 Thrifty when the owner erected a cottage or manor house, then after (and maybe during) a desire to build bath. It happened to me. First of all analysed the options for baths, which I had to bathe or just to see them. Remembered what I liked and what not. And read all the available literature on the subject. Whatever you say, and the main “bath” is a furnace, so the “dance” started for her — decided on its design and location in the bath. With the wall material of the questions was not clearly wood: a log or lumber, and of such thickness that could make bathing even in winter when they are particularly pleasant and helpful.
And just had a chance and I bought cheap is not new, but a good frame of thick logs.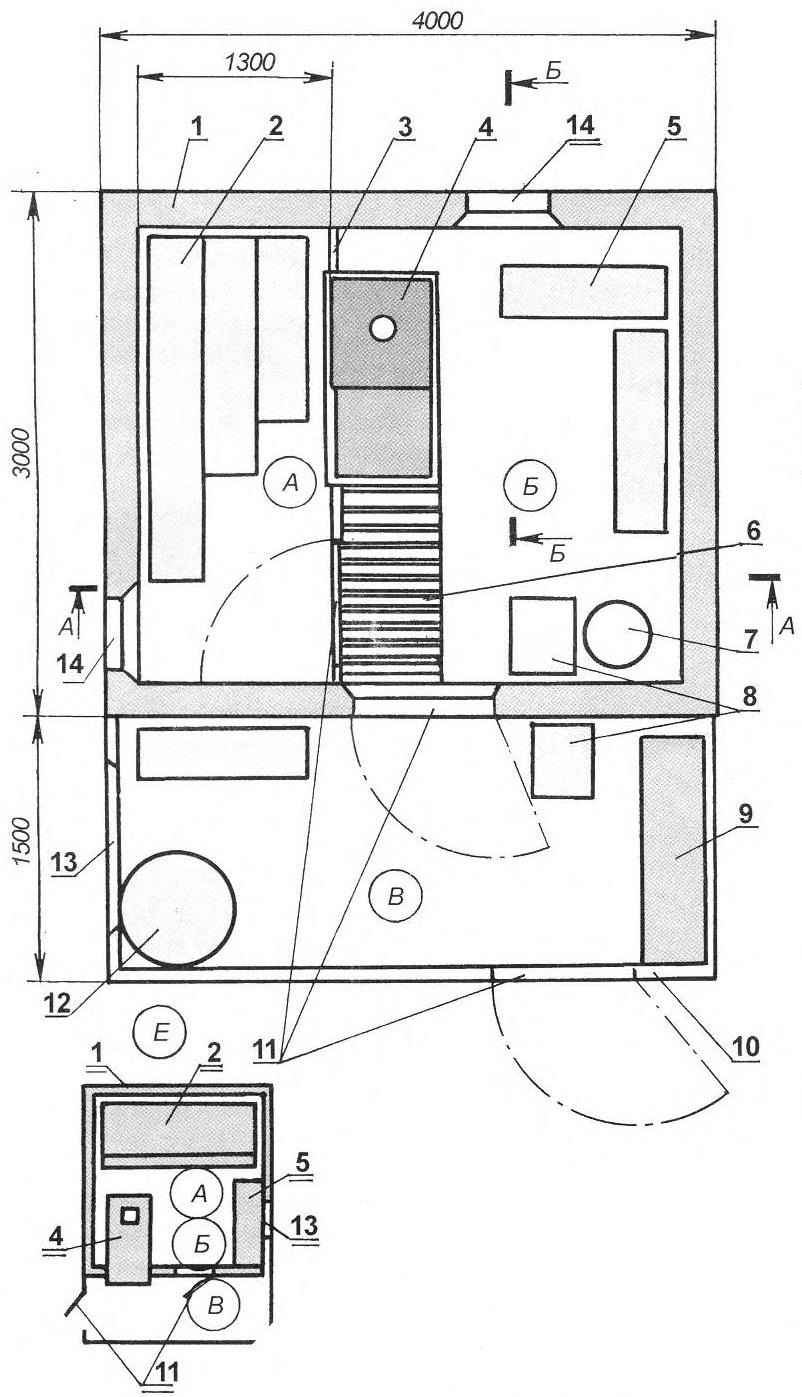
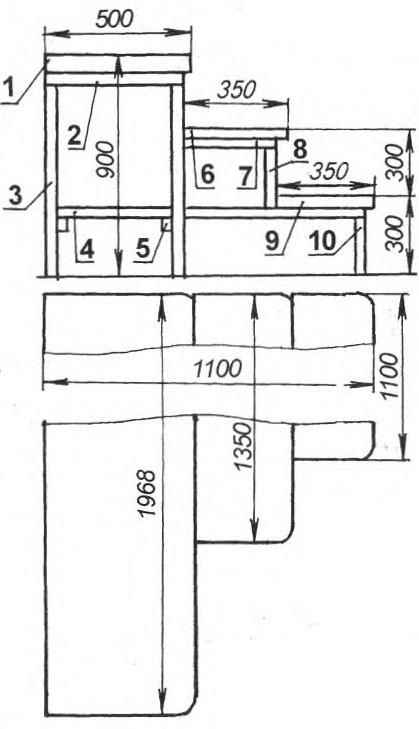
Then draw a plan of the baths: the mutual arrangement of the three functional areas (steam room, washing and changing rooms) relative to the furnace and with each other. Decided on the height of the rooms is about 2 m (height of the son as the tallest person in the family, plus another 200 mm), design underground, floor, roof and figured the estimated cost of the bath. It turned out that the funds that we could allocate from the family budget for the construction of the object, not as great as required, and the project had to be revised. So, we had to abandon the construction of attached dressing room (decided to do it later) and move the locker room of his log walls, replace industrial thermal insulation and other building materials local natural. But combining facilities (steam room, bathroom or secnow with dressing room) did not — each of them will be let and small, but separate! Although the combined option also has the right to life, and a plan of one of them, leading to dressing room furnace, I am also here to lead.
Since bath is the property still in the design stage, its construction 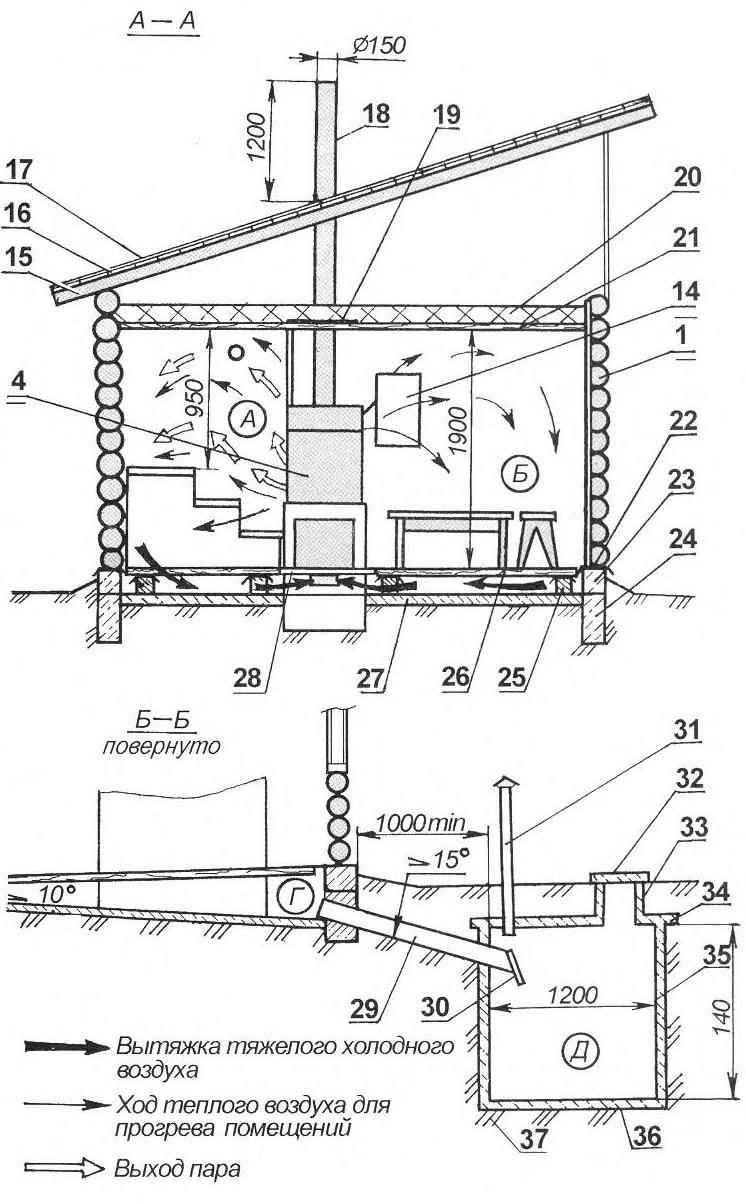 must be agreed with the local architecture. In addition, given the fire hazard of buildings, necessary to provide and comply with fire safety and to coordinate them in legally.
Construction of the baths began with the Foundation, but rather with the excavation of the trench under it to a depth of about 500 mm and is rectangular in plan with the sides on the walls of the future frame. At the bottom of the trench distributed layer of sand with a thickness of about 150 mm, watered it with water and stamped. Then the trench was filled with concrete mix with backfill up to ground level. In the Foundation wall from the future of the sump (with a bias towards her) laid plastic pipe with a diameter of 150 mm.
The walls of the baths were supposed to be wooden, in order to lift them above the ground for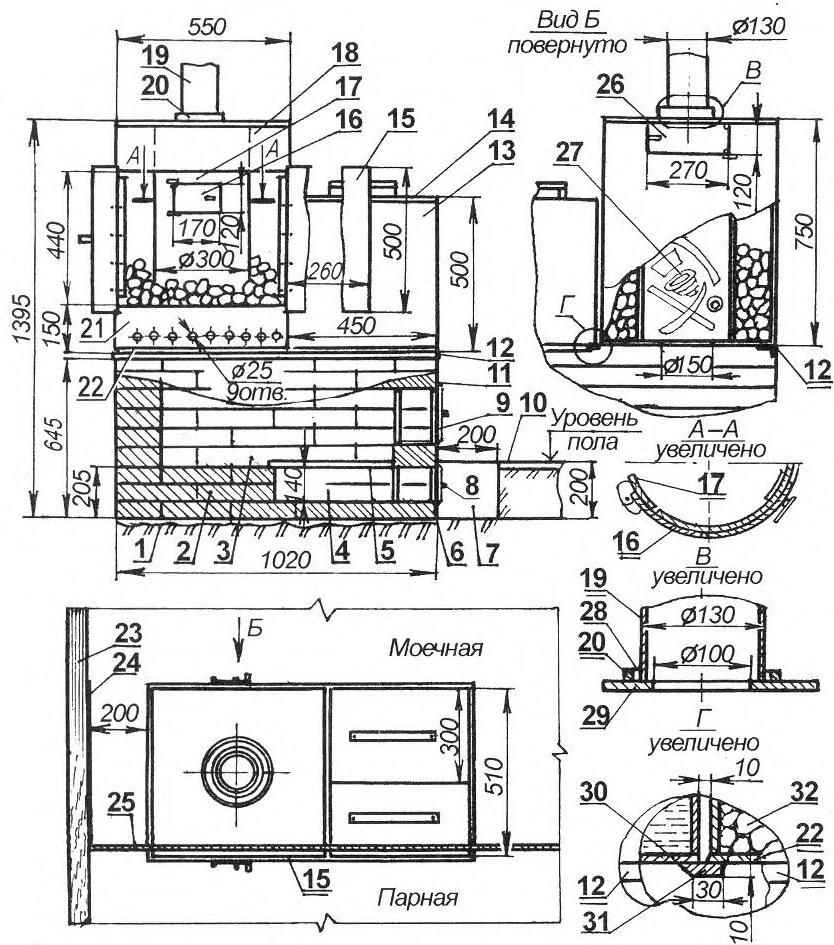 eliminate exposure to ground moisture, rain and spring water on the Foundation, laid the plinth height of about 200 mm from the (red) solid brick. Top of the plinth gave the cement screed and covered with a layer of roofing material.
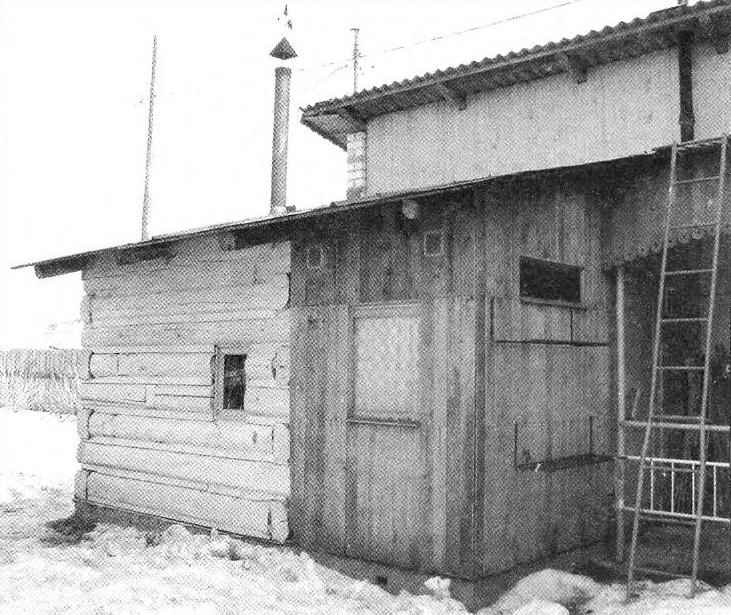
By the way, for walls used the so-called chopping block or plate — a split or sawn lengthwise halves of thick logs. This gave considerable savings of material. But the logs though, and was thick, but not so long to cut the frame “in a Cup.” Well, to complete the pairing boards “in a paw”, it required a lot of experience, which I nedo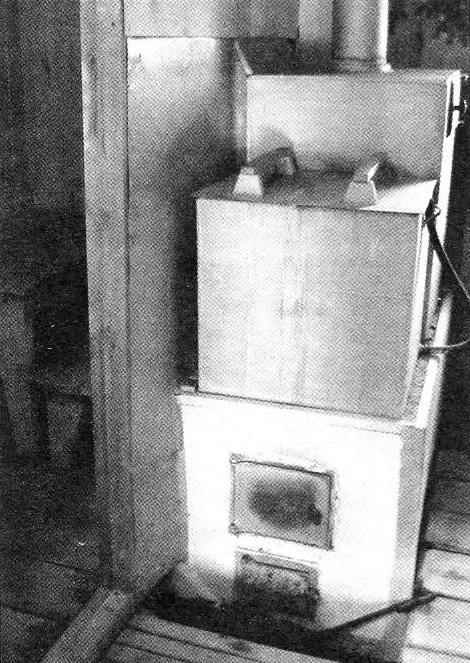 stavan, and very time consuming this way. Therefore, the scaffold was just shostakovian at right angles and held together with steel clamps. Here I note that the joints, like the joints between the rims, the inside has prokonopatit, and the outside was sealed with clay-straw mortar. And in addition all seams throughout their length covered customized rails with cross section in the form of a trapezoid with rounded bumps of the logs side-to-side. The window in the steam room and in the bathroom there is double glazing. Both glass fitted in a single frame (on opposite sides), as in the glass.
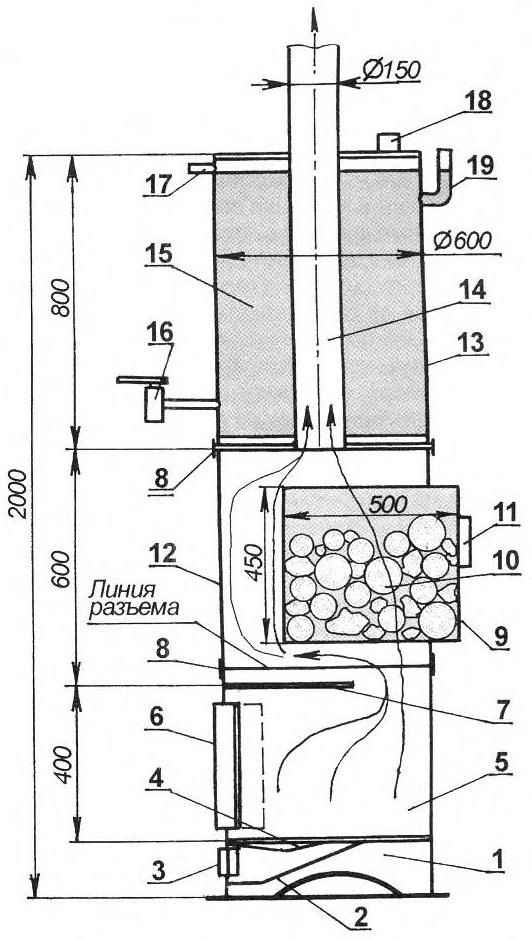
The ceiling of the bath with a crate of edging 30 mm boards on log joists with internal lining 5 mm birch plywood. Ceiling insulation double — layer: first poured his creamy clay-sand-straw mortar with a thickness of about 50 mm, and after drying, the top is covered with fireproof insulation is 100-mm layer of slag (but can be expanded clay, and even the ground).
The roof structure is extremely simple — shed, purlin log beams edged and soft asphalt roof. Yes unless it has some value for bath procedures? Because the roof protects the structure from rain and nothing more. Well, can still to decorate the structure.
 But what do the “red” bath — so it’s stove. And not the external view and functional capabilities: the ability to consume as fuel not only the wood of any breeds of a tree, but the leaves, branches, and even combustible debris, while not clogging up the chimney; quickly heating the bath for a long time to cool down (to keep thermal inertia); simultaneously heating to a high temperature a large enough amount of water and stones; give a lot of steam. In General, to have high efficiency. And another very important point — carbon monoxide should not fall from the furnace into the premises of the baths and to leave through the chimney into the atmosphere. Of course, to satisfy these sometimes conflicting demands is not so easy, but, in my opinion, the stove-the heater in our bath to a considerable extent they correspond.
Will lead a drawing and brief explanation of the operation of the stove-heater.
The intensity of fuel burning in the furnace (and therefore the heating rate of the bath) is governed by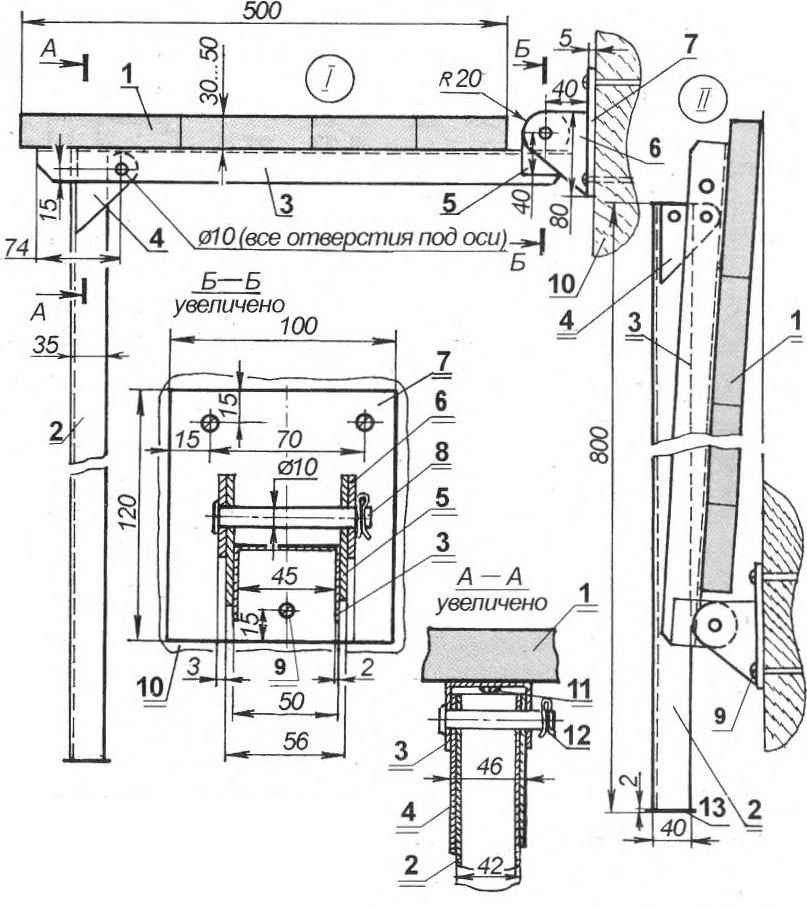 opening the ash-pit doors. You can use four options of heating the premises of the baths:
— the wide-open doors the doors of the heater in the steam room and opened the door of the heater in the washing compartment is made equal heating of both of the premises;
— fold door of the heater in the steam room closed and the door to the washing compartment is open — there is priority heating of the washing compartment;
— fold door of the heater in the steam room open and the door to the washing compartment is closed — by a rapid heating steam;
— all doors are closed, there is an accumulation of heat in the heater (this option is the use covered by a door blower).
 Yet I note that since the firebox of the furnace is located in the washing compartment, before it has fulfilled the pit, which closed with a grille mounted flush with the floor. This not only eliminates litter during firing, but also increases the fire safety.
For the readers I want to offer another version of the very compact all-metal stoves tower. The furnace is cylindrical. Her body parts are made of welded steel thick-walled (s8 mm) pipe diameter of 600 mm.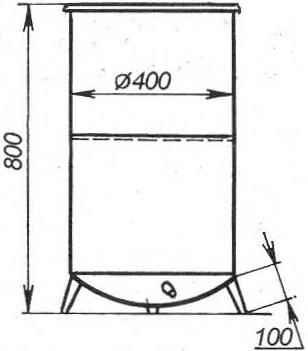
After a laying of the furnace arranged Underfloor space. First, the planned soil slope from wall to drain pipe. And secondly, distributed on the ground not thick layer of concrete, and after it hardened, its surface is “salesny”: sprinkled with cement, moistened and smoothed with a trowel.
Then set about construction of floors. For them, is also of reinforced concrete, wooden formwork, cast the joists, leaving, where necessary, openings for the passage of water. On top of lag laid waterproofing of roofing sheets and laid down planks-“the forty.” Thus between walls and floors around the perimeter left about 30-mm gaps.
In conclusion, and in the washing compartment, and in the steam sheathed ceiling of 5-mm birch plywood, and the walls are wooden paneling, and boards placed vertically. And before that he probely and the floor and ceiling of lime-copper sulphate aqueous solution.
 Near the baths dug a drainage ditch about the size of 1200×1200 mm and a depth of 1700 mm. Bottom laid the flake (flat) stone-“savage” with gaps between them, the walls lined with mortar and laid the walls of ceramic bricks with incomplete filling of seams and gaps that water could seep and go into the ground. The pit was blocked with a piece of road plate. For inspection of the pit, and if necessary, pumping of water in the ceiling gave the hatch and closed it with a massive cover.
At the end of the pipe in the hole made the valve from a sheet of 5-mm rubber. In normal times, it tightly covers the pipe hole and allows you to enter in the bath undesirable odors. With the same purpose and installed vent pipe. The floor slab was covered with earth and sown with grass.
