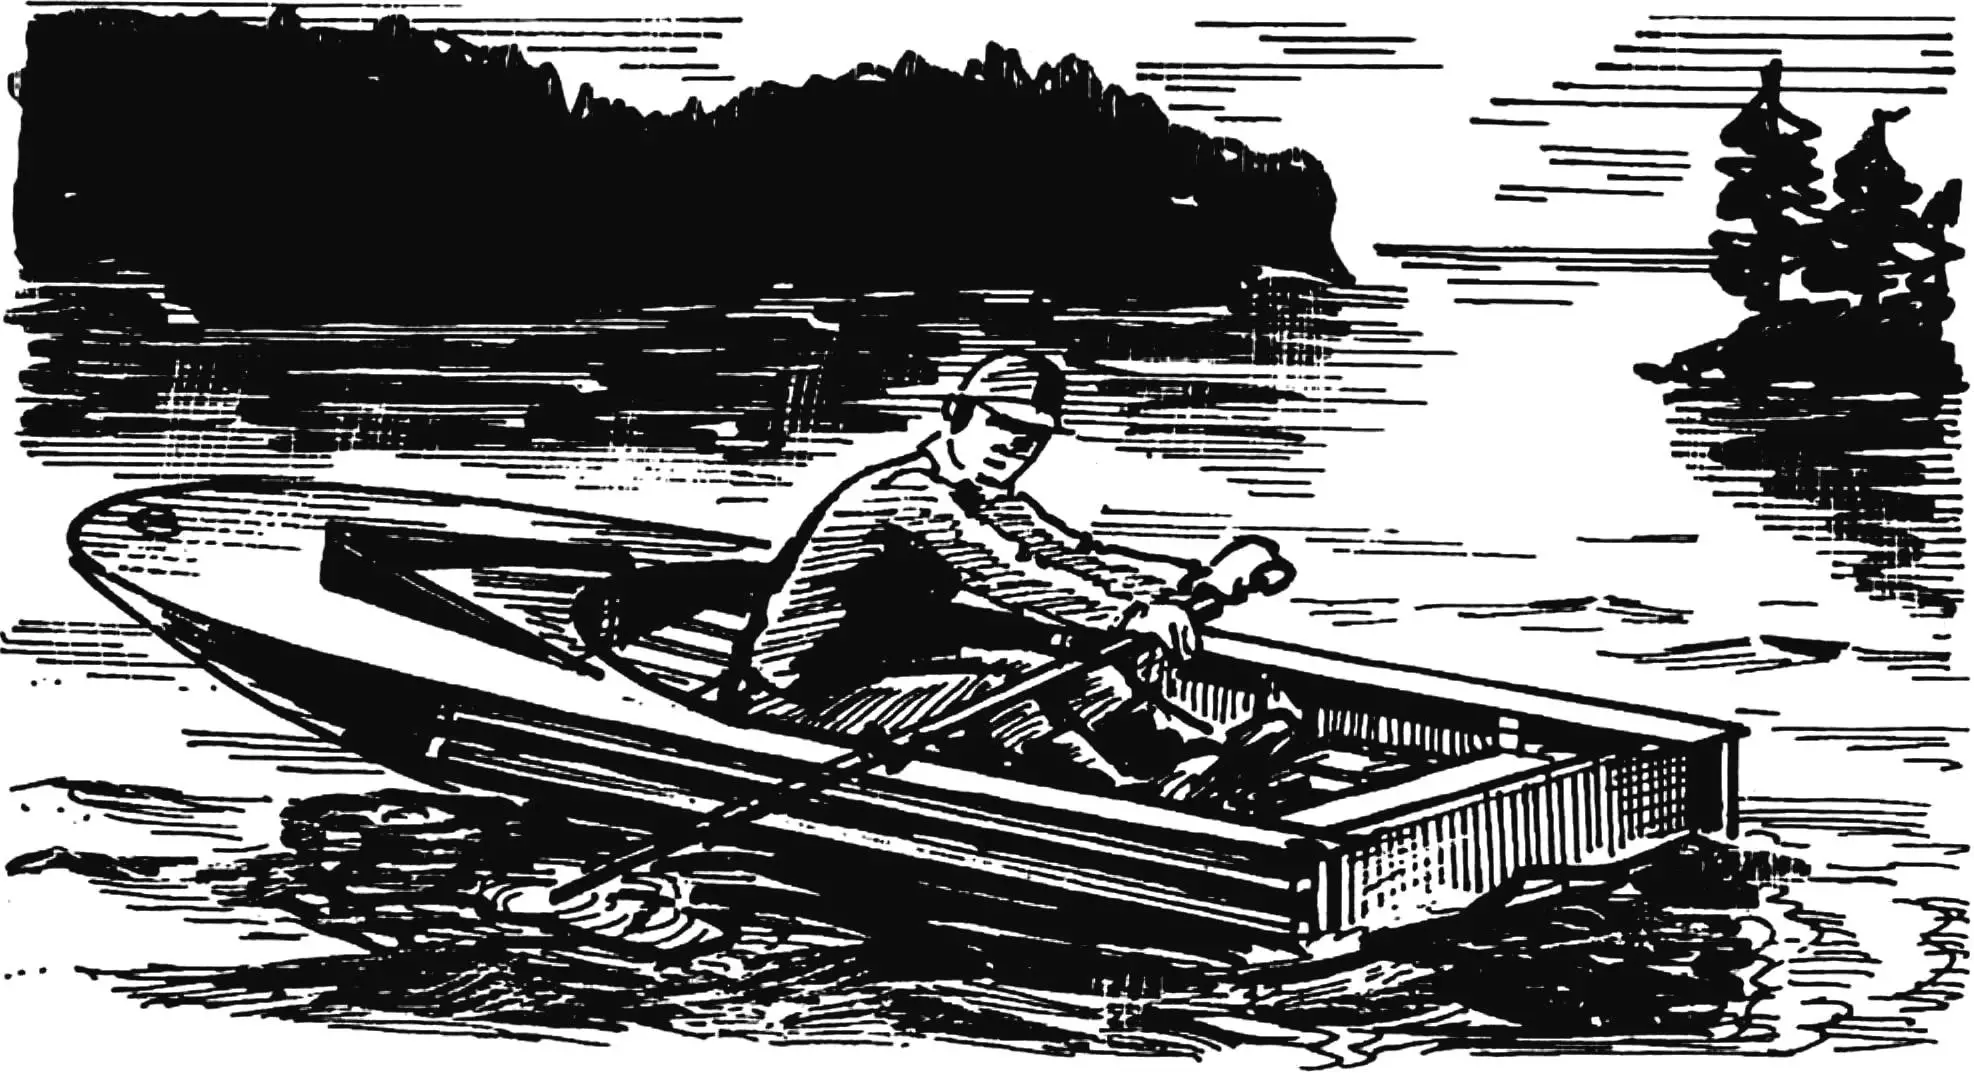
There are many rivers and lakes that can bring joy and pleasure to those who enjoy recreation on the water. But most bodies of water where you can boat are located far from populated areas. Leaving a boat in such places is unsafe. Therefore, today we invite DIY enthusiasts to get acquainted with a compact, easy-to-build flat-bottomed boat, the description of which was published in the Romanian magazine “Tehnium”. Based on domestic experience, its design and manufacturing technology were somewhat modified and supplemented. Such a boat is easy to deliver to the site by car, motorcycle, or bicycle with a small trailer, since its mass is no more than 67 kg. This craft can be modified without much difficulty for installing a sail or a small motor.
Before starting to build the boat, you should prepare the necessary materials and parts, and draw the loft and cross-sections on a sheet of graph paper or plain paper. If you cannot find the recommended materials, they can be replaced. For example, spruce with pine, oak with beech, and St3 with any other steel you have on hand.
The outlines of the transverse framing are transferred from the loft to the blanks of the transverse and vertical frame parts. They are cut out, finished, and carefully fitted to one another, then fastened together with copper or brass nails and epoxy adhesive.
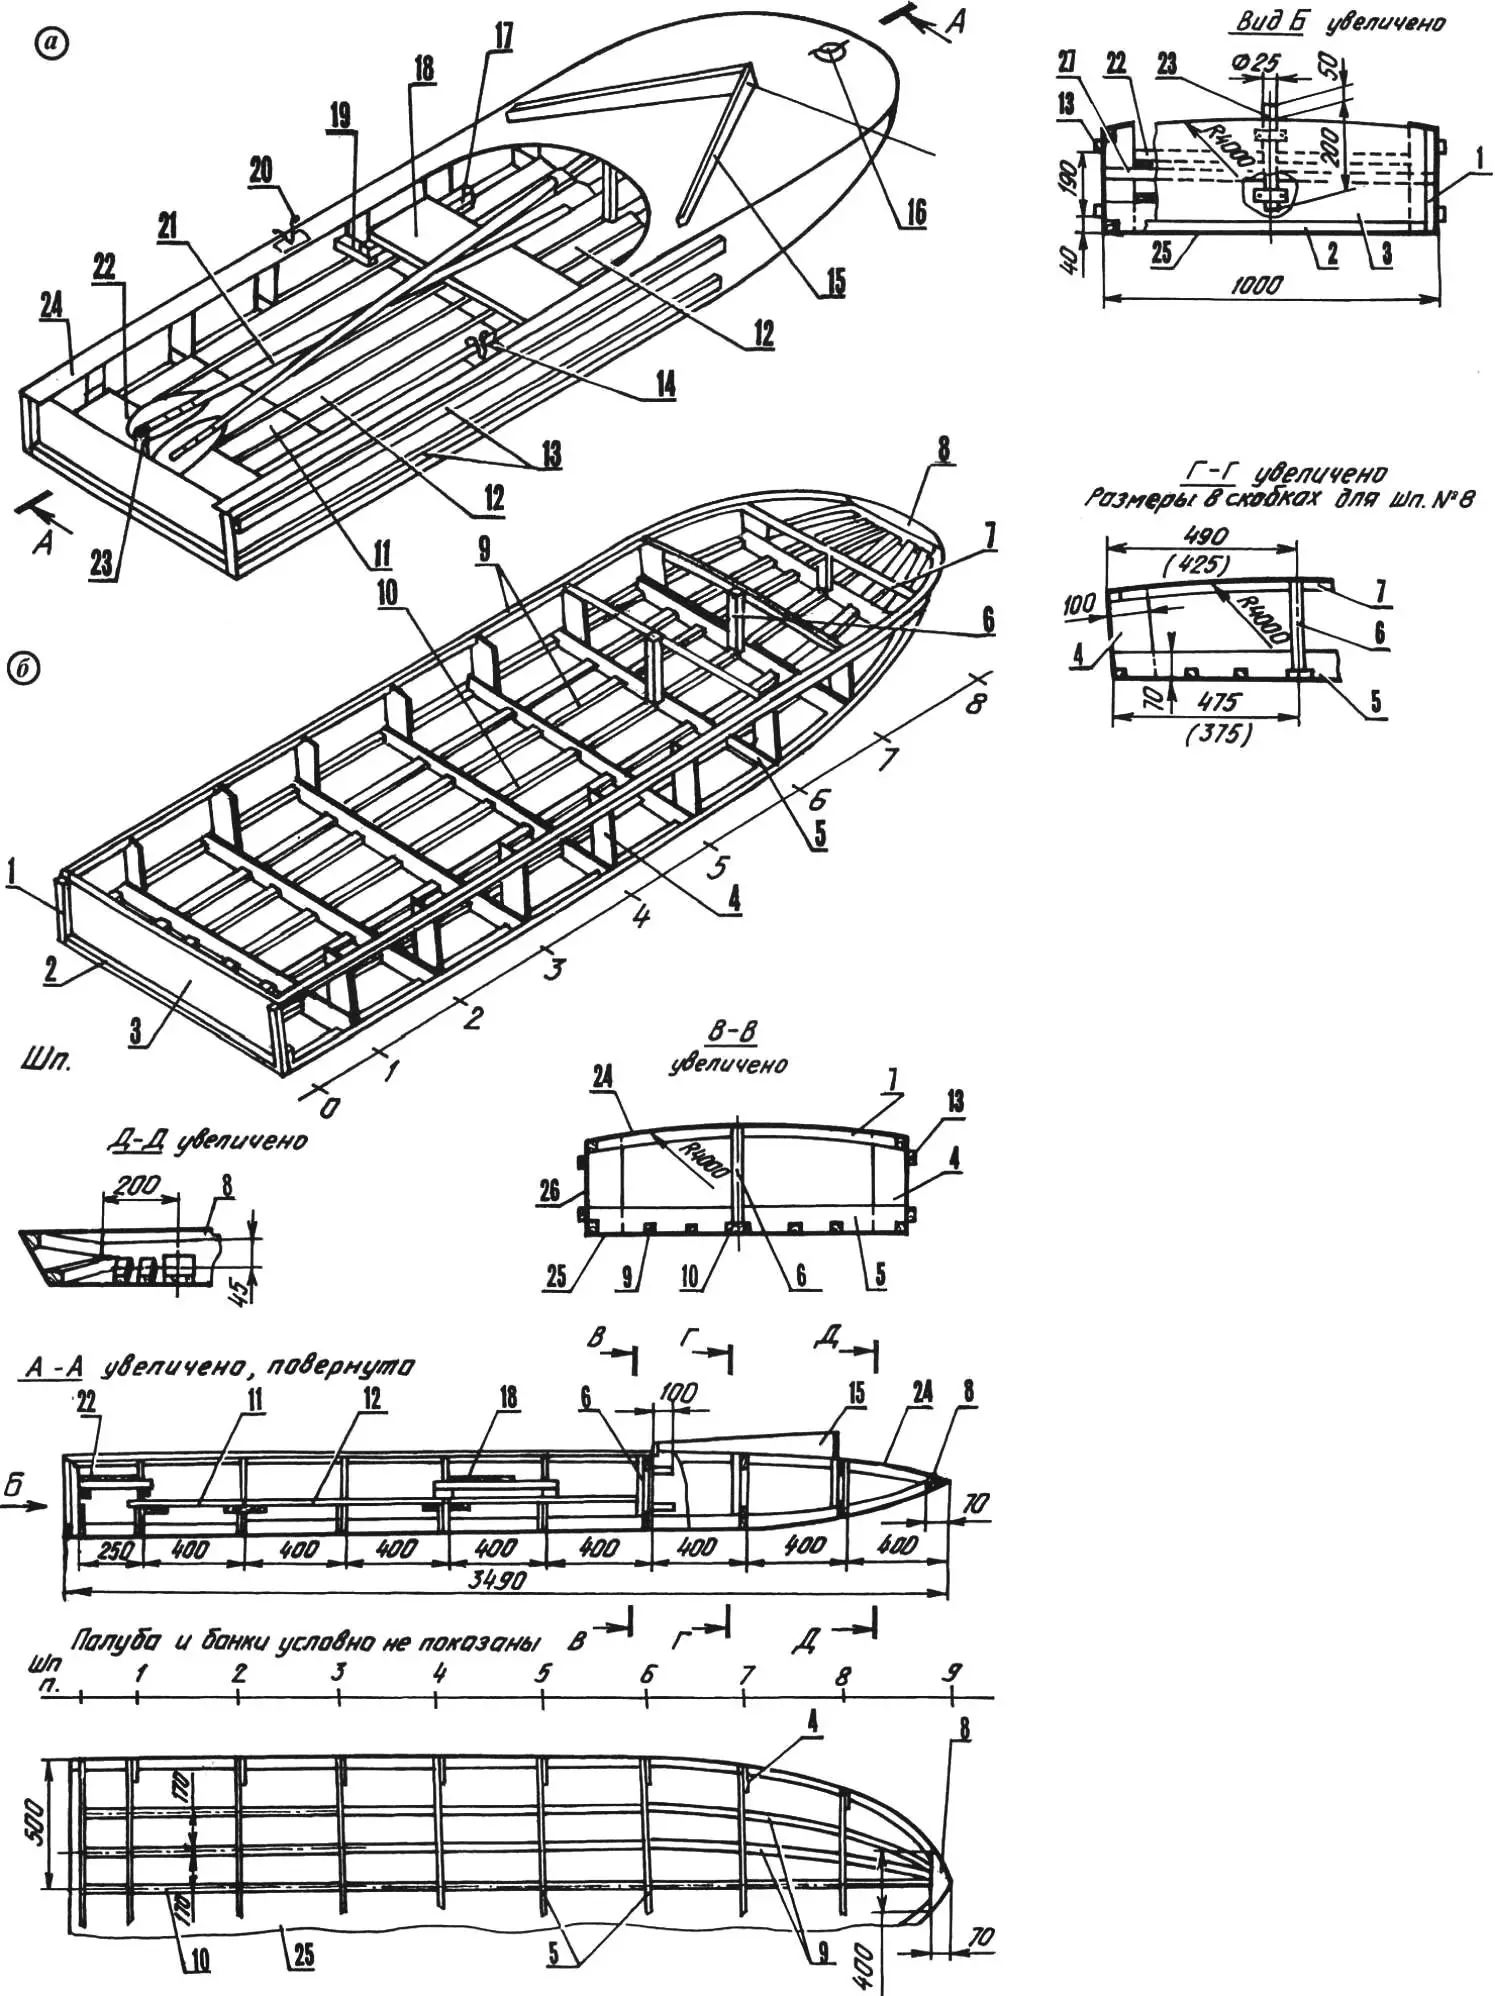
1 — side trim of the transom (spruce, batten 25×25, L280); 2 — lower trim of the transom (spruce, batten 25×25, L1000); 3 — transom board (spruce, board 280×15, L1000); 4 — frame upright; 5 — lower frame member; 6 — deck support; 7 — upper frame member; 8 — stem (oak, timber 80×50, L400); 9 — stringer (spruce, batten 25×25, L4000); 10 — keel timber (oak, batten 45×25, L4000); 11 — smaller floorboard; 12 — floorboards; 13 — gunwales (spruce, timber 30×25, L2500, 4 pcs.); 14 — oarlock socket; 15 — splash rail (spruce, board 100×10, L1000, 2 pcs.); 16 — cleat; 17 — beam (spruce, batten 25×25, L450, 4 pcs.); 18 — forward thwart (spruce, board 270×20, L1000); 19 — support (spruce, batten 25×25, L125, 6 pcs.); 20 — oarlock; 21 — oar; 22 — aft thwart (spruce, board 250×20, L1000); 23 — rudder stock (St3, tube 30×2.5, L250, strip 30×2, L70); 24 — deck planking (plywood, s4, 3750×1020); 25 — bottom planking (plywood, s5, 3700×1060); 26 — side planking (plywood, s5, 3750×300); 27 — support batten of the aft thwart (spruce, batten 25×25, L1000)
To assemble the boat frame, you need to prepare a building jig (strongback). As the latter, you can use the wooden floor of your workshop or make a panel 3500×1000 mm from boards 40–50 mm thick.
On the jig, install and secure with wooden packing pieces the previously prepared keel timber according to the drawing, and mark on it the planes where the frames will be located.
At the first stage of building the boat frame, frames Nos. 0–6 are temporarily secured on the keel timber with battens and nails. Moreover, the “zero” frame, consisting only of the lower member and the transom board, is set at an angle of 10 degrees to the vertical plane. Before fastening the frames, they must be aligned with a plumb line and a level.
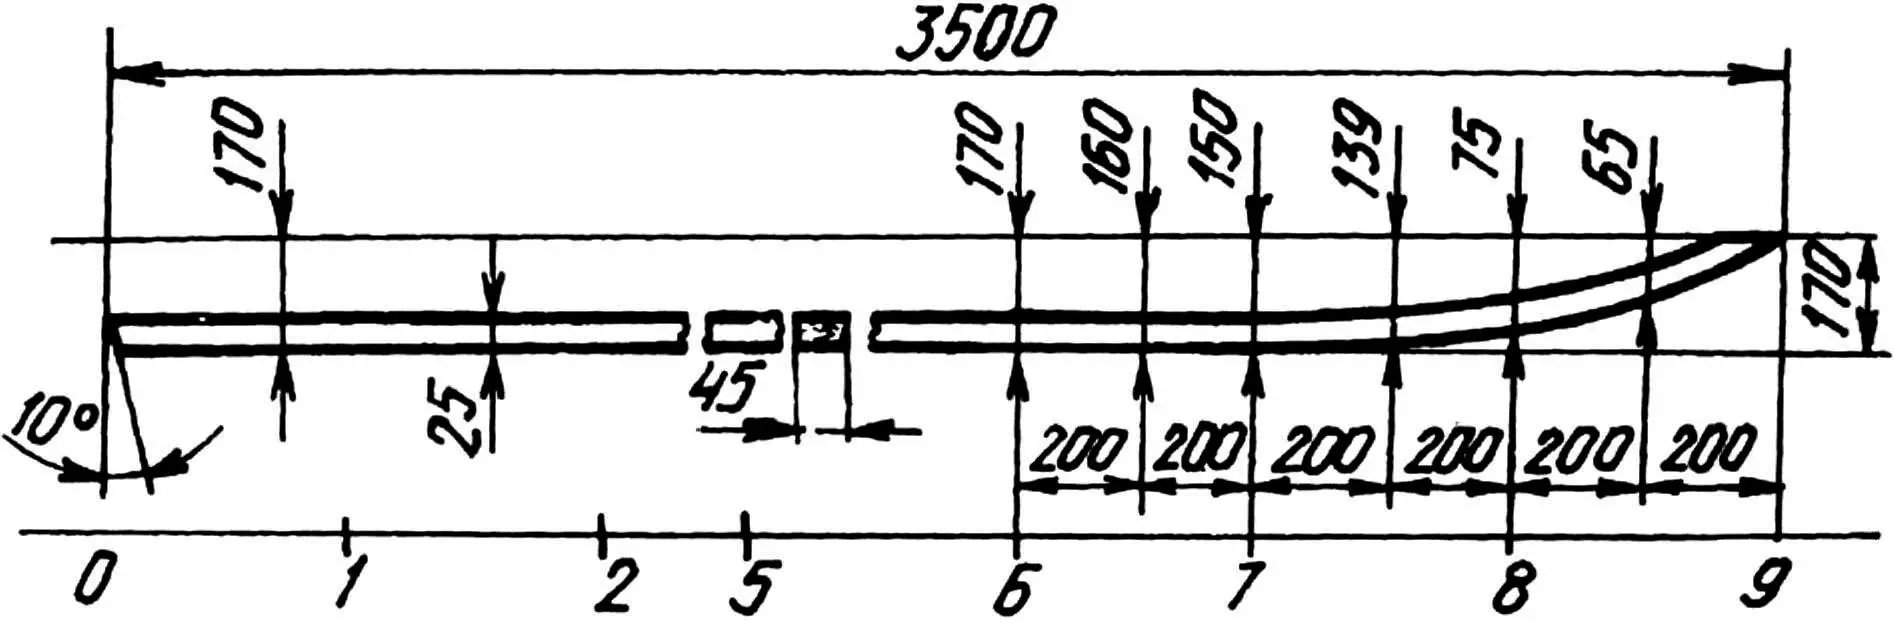
Now you can proceed to install the bottom stringers. Each of them is successively fitted to the frames and fastened with nails and epoxy adhesive. Finally, the keel timber is permanently installed by the same method.
The second stage of frame assembly is started after the epoxy has fully cured. To fit the stringers to frames Nos. 7 and 8 and to the stem, they will have to be bent. Therefore, if they are not elastic enough, the forward ends of the stringers should first be soaked or steamed. Installation of the frames and the stem is done similarly to the previous ones. Fitting the stringers to the frames and fixing them is best done in pairs, starting with the pair of inner ones symmetrical about the boat’s longitudinal axis.
If the stringers were soaked or steamed, they are fixed to the frames with soft-wire twists, then allowed to dry for several days, and only after that set on adhesive and nails.
The last and most difficult operation is joining the stringers to the stem. Every craftsman will likely use their own assembly method for this joint; as a recommendation, we offer the following:
1. Mark and saw a groove in the stem blank for the keel timber.
2. Fit these parts and join them with epoxy adhesive.
3. Allow the adhesive to cure fully.
4. Mark and saw grooves in the stem blank for the upper stringers.
5. Fit these parts and glue them.
6. Allow the adhesive to cure fully.
7. Repeat the operations in steps 1–6 to join the stem to the remaining stringers.
Now the boat frame is roughly ready. It must be prepared for planking. Using a flexible batten, check the fairness of the lines and, if necessary, fair the frames and stringers with a plane, rasp, and coarse sandpaper.
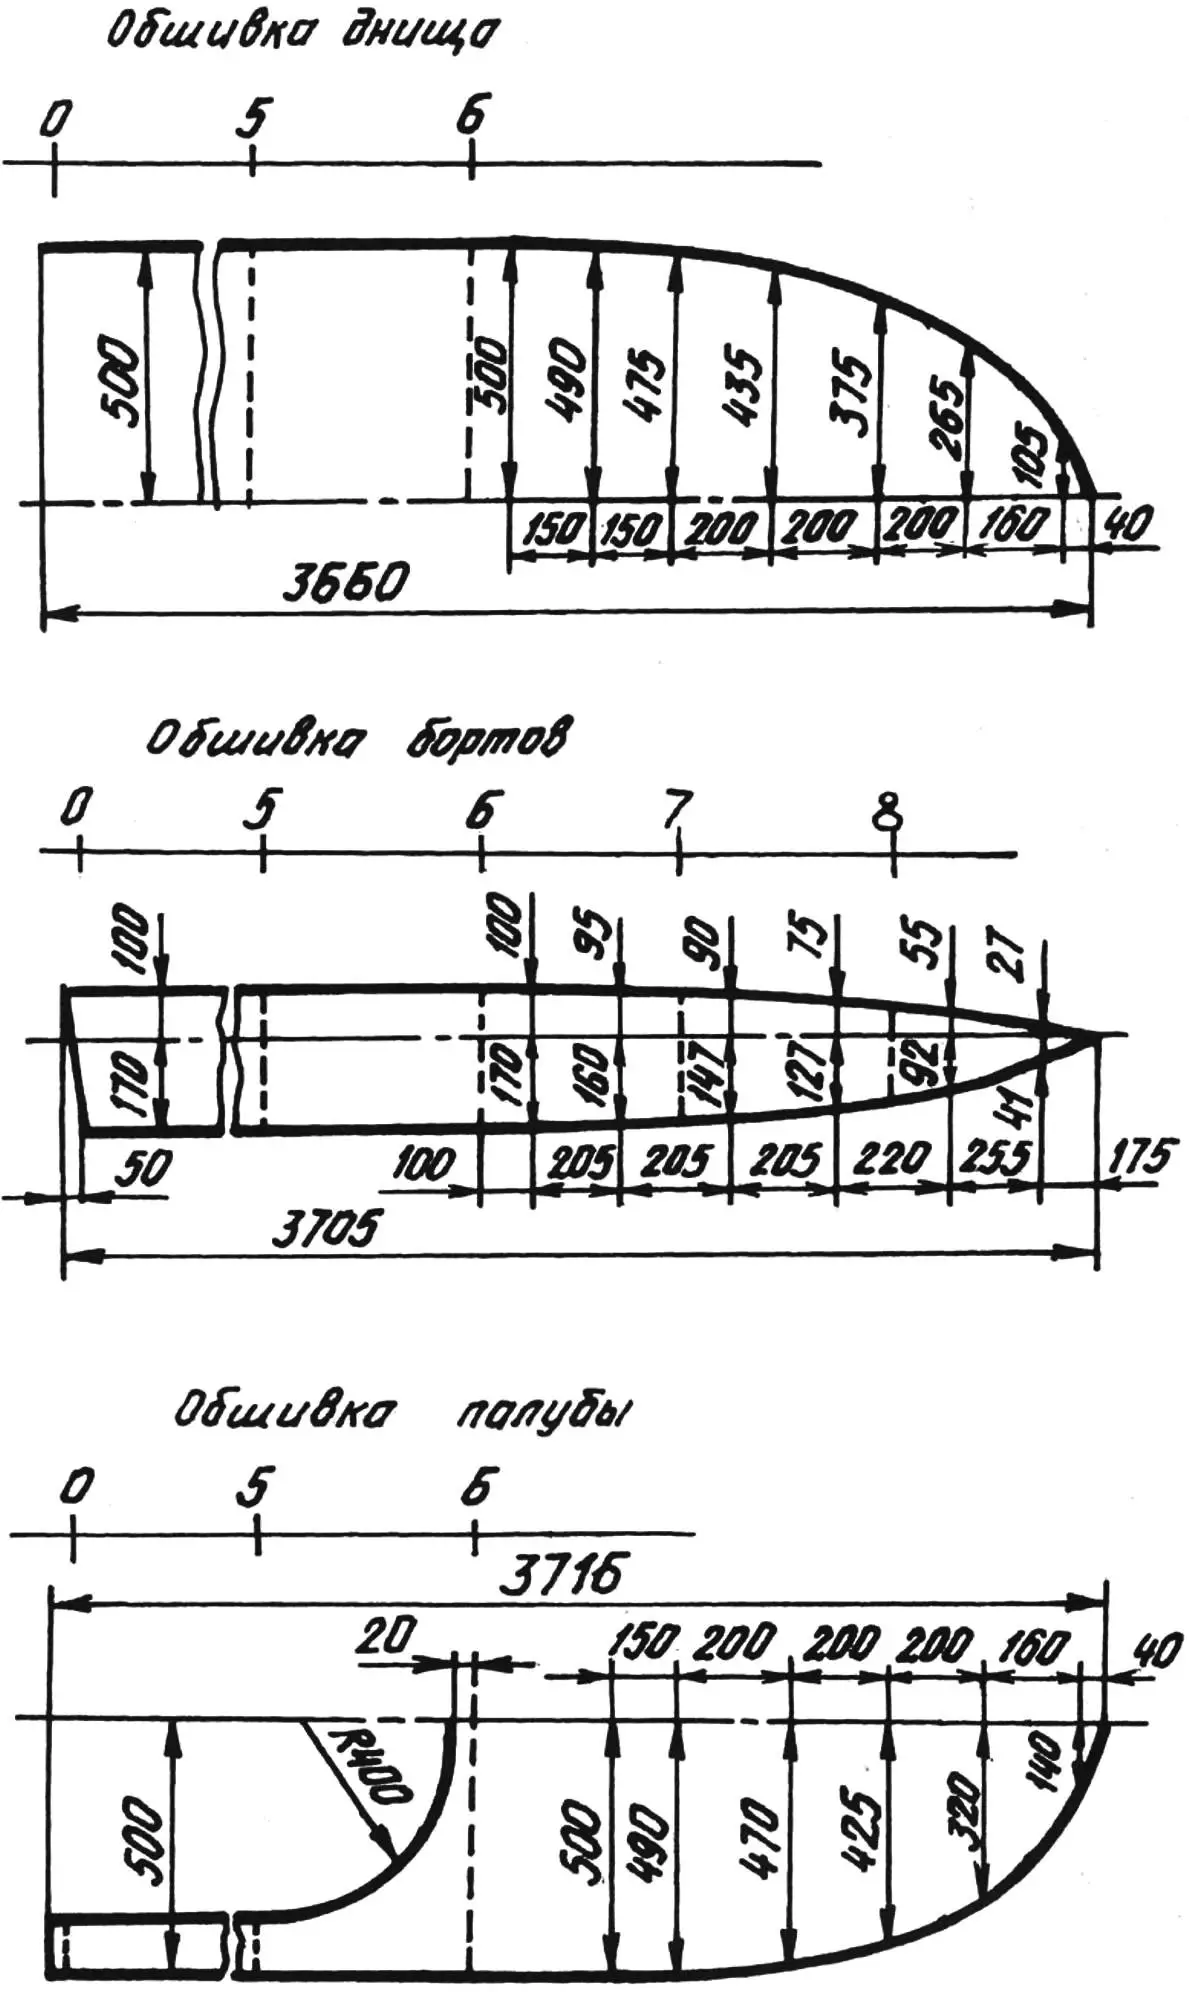
The boat planking consists of three blanks cut according to the drawings shown in the figure. If sheets of plywood of the required sizes are not available, the blanks can be made from several pieces, butt-joined, and after fastening the planking to the frame, reinforced at the joint with a patch on the inside and a strip of fiberglass cloth on epoxy on the outside.
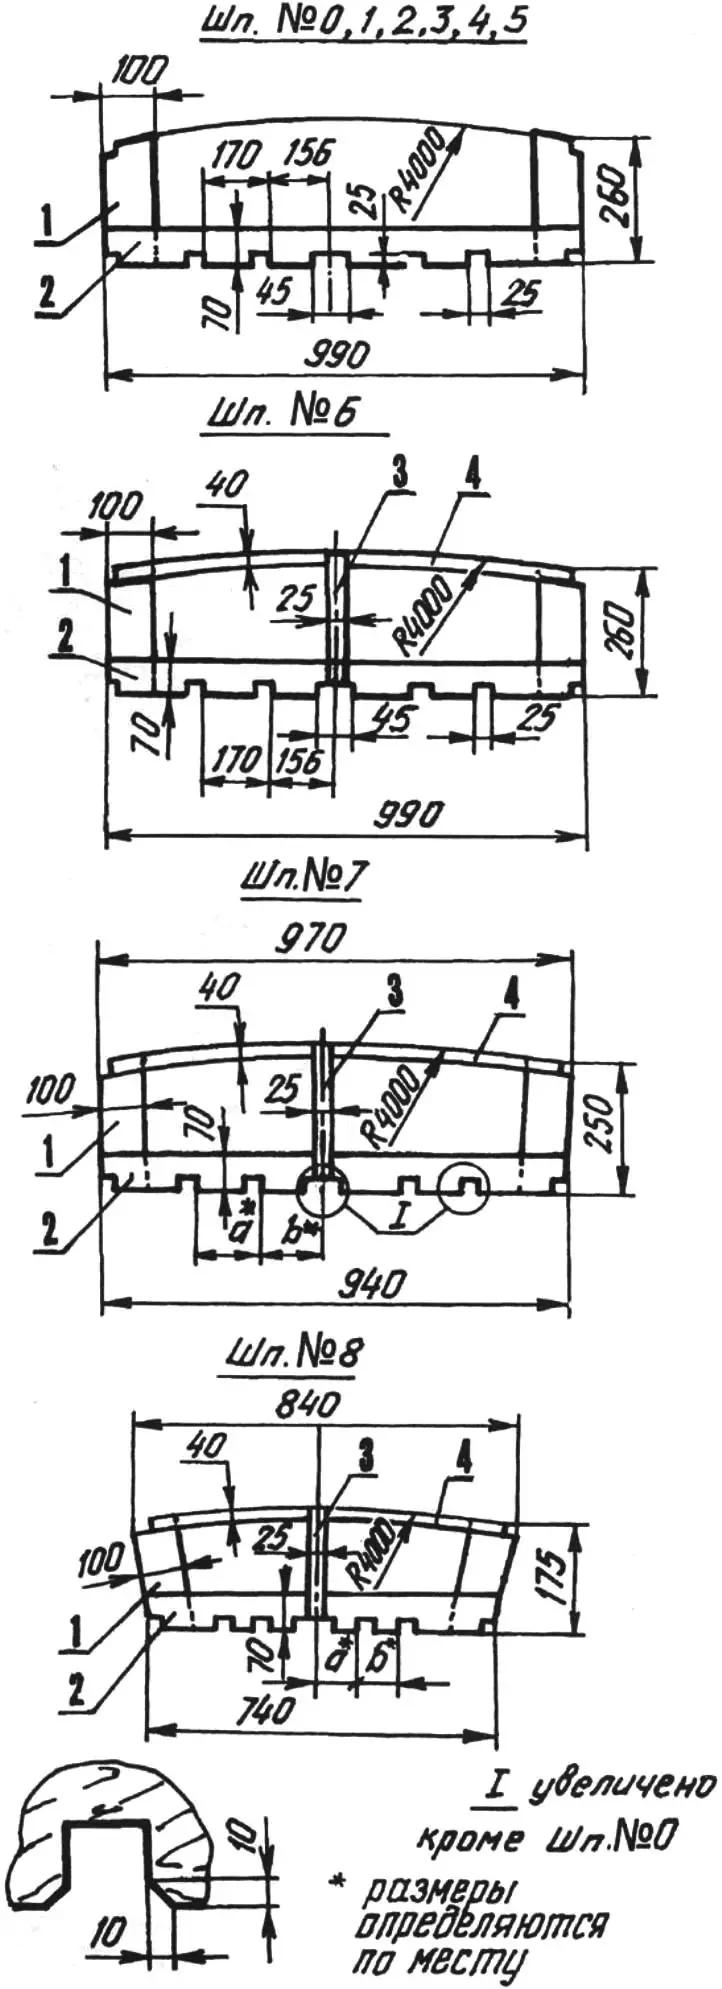
1 — frame upright (spruce, board 100×10, L280, 16 pcs.); 2 — lower frame member (spruce, board 70×10, L1000, 9 pcs.); 3 — deck support (spruce, batten 25×25); 4 — upper frame member (spruce, board 25×10)
The sheet blanks are fastened to the frame with galvanized nails and epoxy adhesive into which wood flour is additionally mixed (it can be replaced with baby powder or talc) to reduce the adhesive’s flow and ensure continuity of the glue line.
The planking is fastened to the frame in the following order: bottom, sides, then deck. Before decking, to improve water resistance, coat the inner surfaces of the sides, bottom, and the deck blanks with several layers of hot boiled linseed oil or parquet varnish.
After the gunwales have been fastened to the planking and the adhesive has fully cured, sand the boat hull, smoothly round all sharp edges, and fill the joints with epoxy adhesive mixed with the same additives.
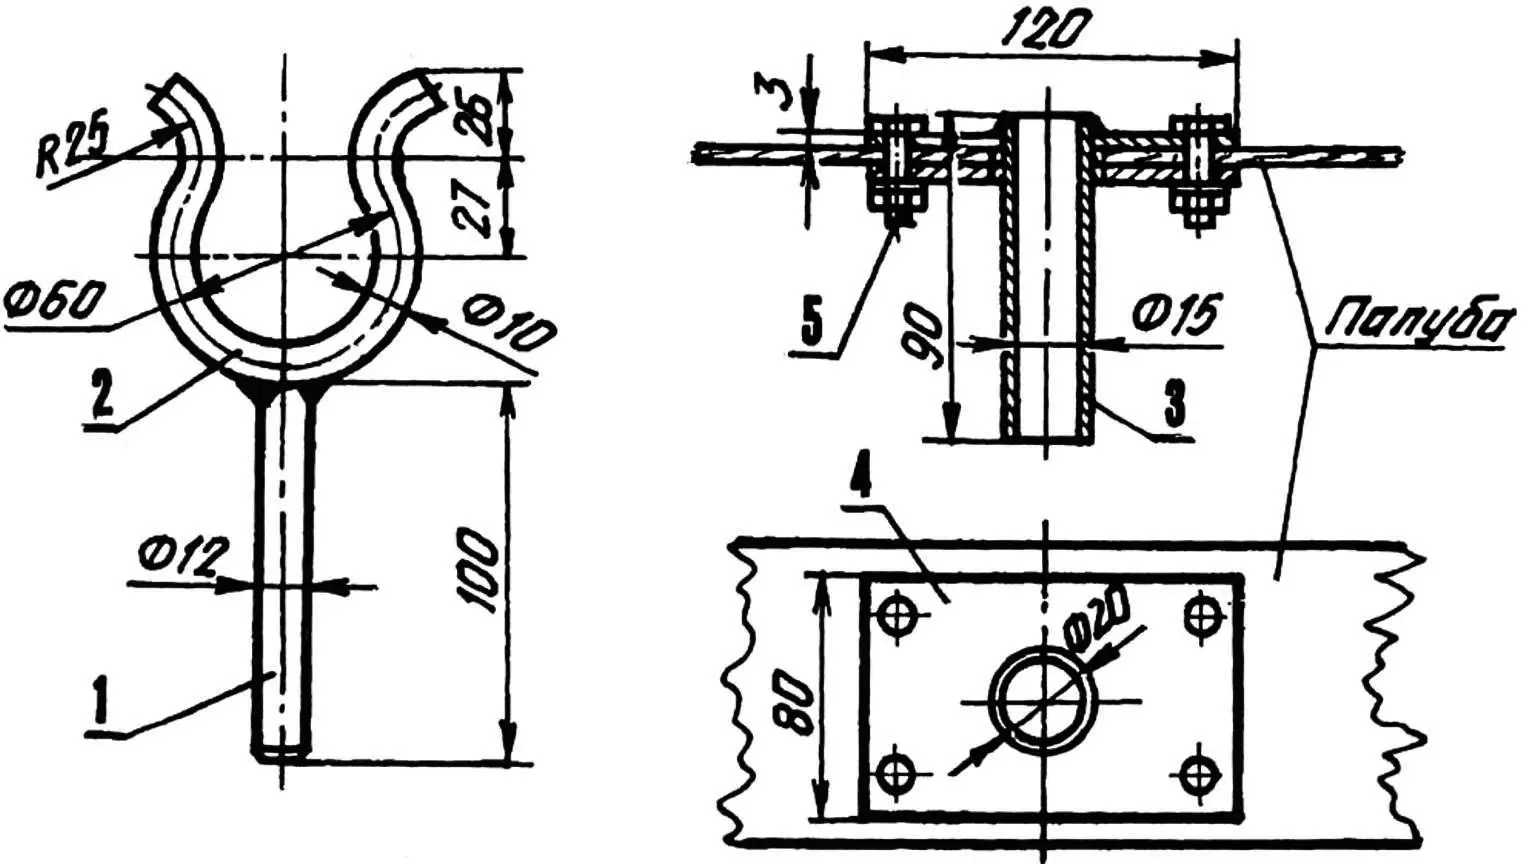
1 — oarlock pin (St.3, rod Ø12, L100, 2 pcs.); 2 — oarlock (St.3, rod Ø10, 2 pcs.); 3 — bushing (St.3, tube 20×2.5, 2 pcs.); 4 — plate (St.3, sheet s3, 4 pcs.); 5 — washer, nut, bolt M8x20, 8 pcs.)
To improve the boat’s course-keeping and protect the bottom from damage, you can lay 2–3 wooden battens with a cross-section of at least 25×25 mm along it from below. We also recommend installing a splash rail on the forward part of the deck to keep water out of the boat. This is because the forward deck slopes slightly downward and forward and will be washed even by a small wave.
When installing the boat’s fittings, remember that all holes in the hull, after drilling, must be treated with hot boiled linseed oil or varnish.
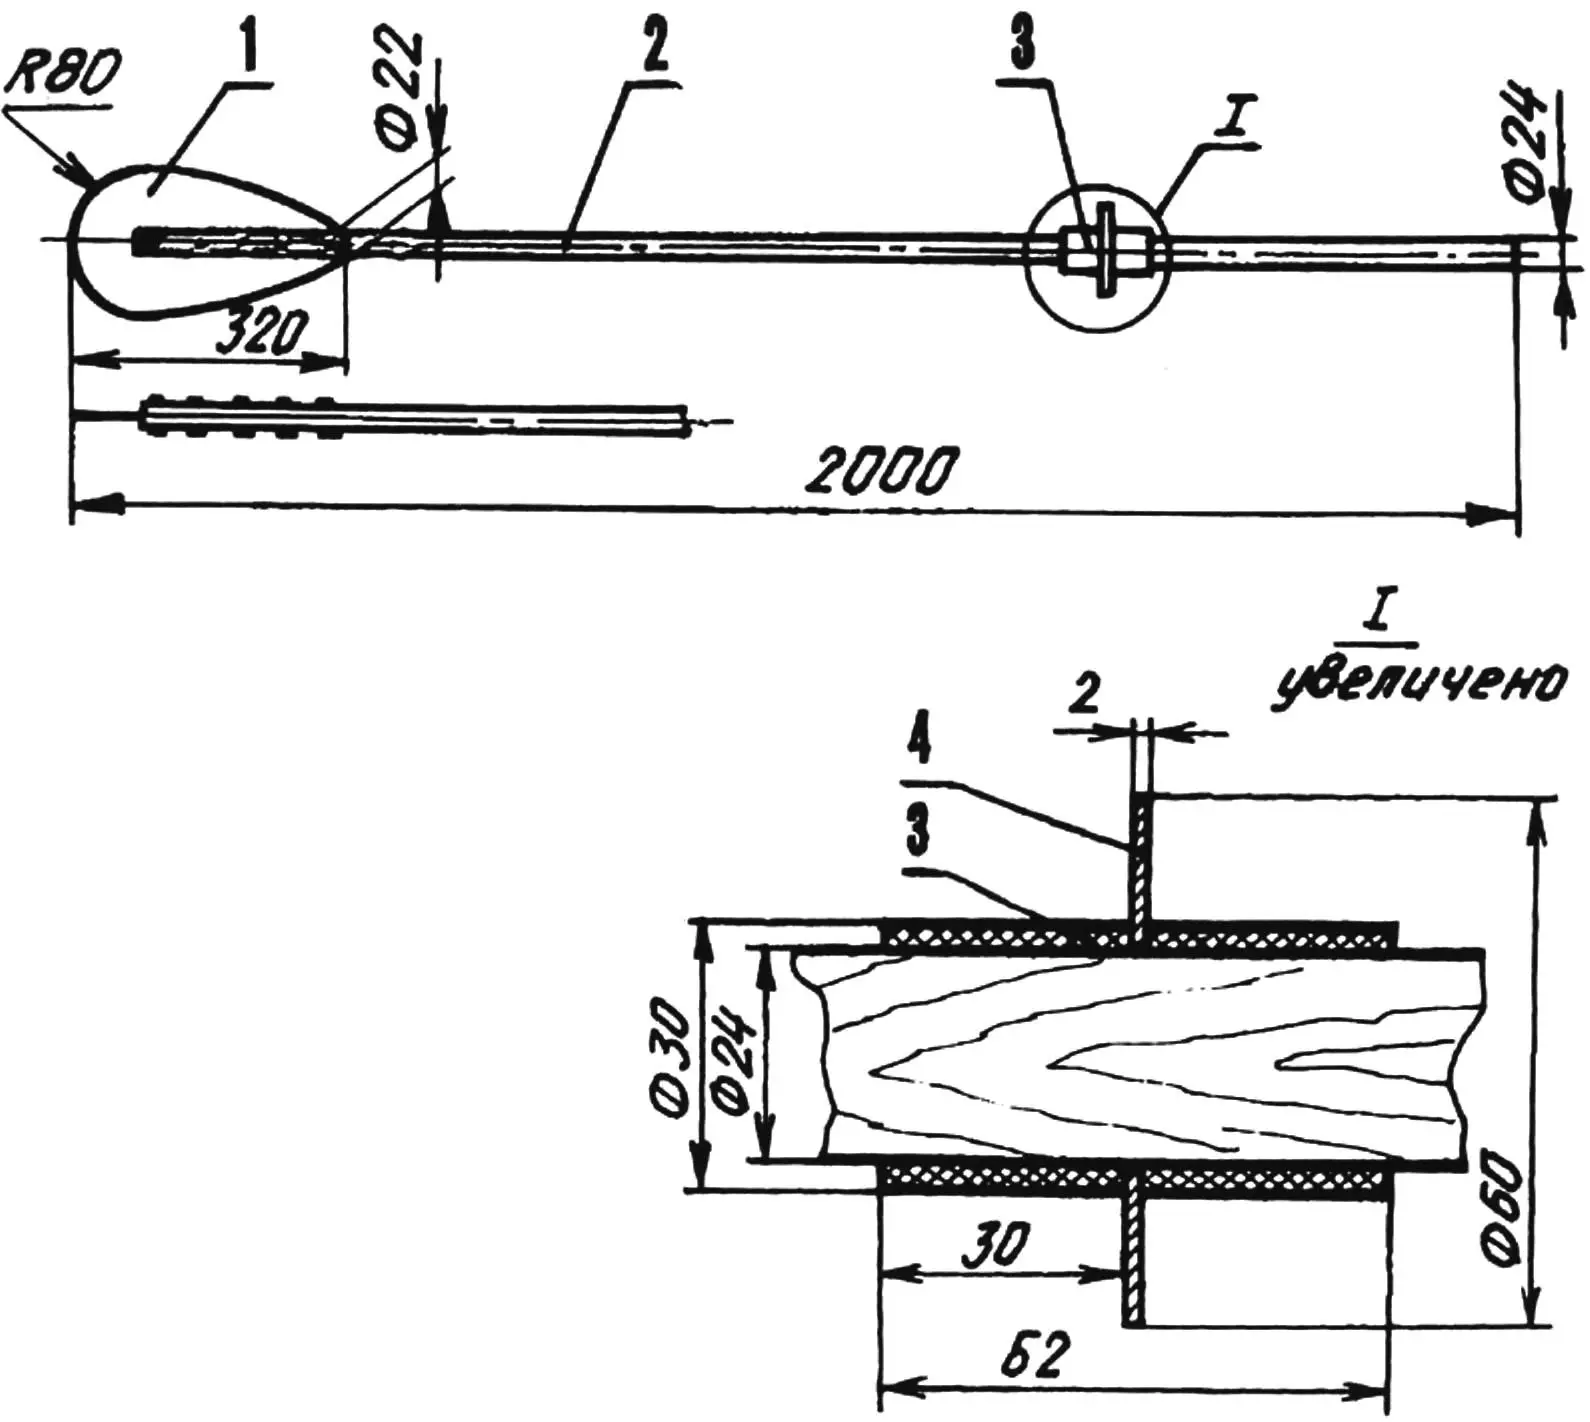
1 — blade (plywood, s5, 2 pcs.); 2 — shaft (oak, round 25, L2000, 2 pcs); 3 — stop bushing (rubber, 4 pcs); 4 — ring (duralumin, s2, 2 pcs.)
The oarlock socket is made from two steel plates with four holes for M8 bolts and one central hole 20 mm in diameter, into which (only for the upper plate) a 90-mm tube of 20×2.5 is welded. Matching holes are drilled in the deck side members, the socket is inserted with a backing plate underneath, and everything is tightened with bolts.
The oar consists of an oak shaft, a blade, and a stop. The stop is made from two pieces of rubber hose and a duralumin ring 2 mm thick. The blade is inserted into a saw cut in the shaft. They are drilled together in several places for 2–3 mm rivets and riveted. Under the rivet heads and on the opposite side it is better to place washers of large outer diameter.
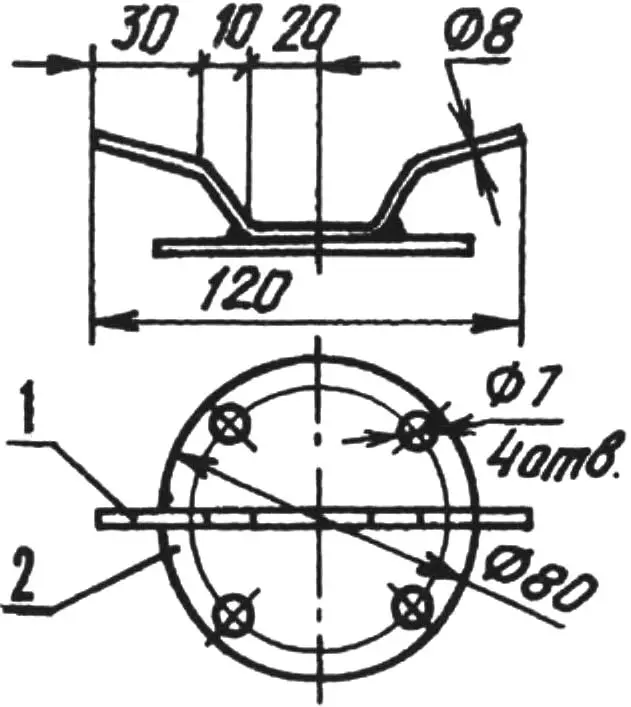
1 — cleat (St.3, rod Ø8); 2 — base (St.3, sheet s3, 2 pcs.)
The cleat is made from a rod welded to a round base with four holes for M6 bolts. When making the base, keep in mind that a similarly shaped backing piece will also be needed.
To fit the boat with a rudder, a rudder stock must be installed on the transom board. It can be made from a tube and two brackets welded to it.
The thwarts are installed on beams and supports fastened to the frames.
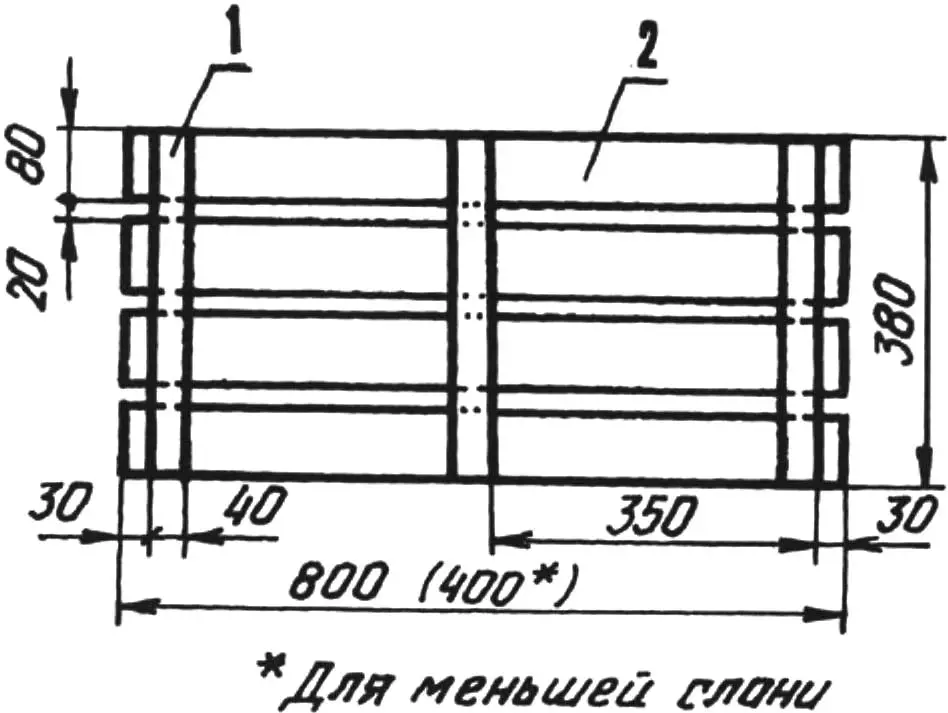
1 — cross batten (spruce, batten 40×25, L380); 2 — board (spruce)
Now the entire boat hull is coated several times with hot boiled linseed oil and prepared for painting according to the instructions supplied with the paint you choose; it is best to paint it with a bright enamel.
The boat is ready and glistens in the sun. You are about to enjoy time on a river or lake. But do not forget that after each use the boat must be thoroughly dried — then it will serve you for many years.
Even if you swim well, you should get a life jacket.
Main specifications:
Length, mm 3490
Beam, mm 1000
Freeboard height, mm 270
Payload, kg 150 (two persons)
Mass, kg 67
“Modelist-Konstruktor” No. 7’2004, V. KUDRIN
Recommend to read
 THE WINDMILL WITH WINDMILL
Free energy wind always encouraged and designers-professionals and enthusiasts-homebrew to many attempts of its use. However, it was not so easy because of the "swampy" nature of the... Cash for coins
Keep small tools, fasteners, and other small radio very comfortable in hand with drawers. The framework of such cash can be collected from the children's "Builder", and serve as boxes...
