
 The need for such airplane appeared when our young conovici already know the basics of management “phanerogam”, and for them it is time to explore the simplest aerobatics. “Tit” (so was called the original model) designed and built in the time of winter school holidays. The club had already had the experience of starting and adjustment of the motor MK-17, so the plane was designed exactly for this engine.
The model design was invented “on the fly” using a common “scrap” materials. At the head of the project idea the principle of maximum reducing the labor intensity of construction and simplify the manufacture of each part (certainly not to the detriment of durability and reliability of the model). Additionally, the improved processability does not have to affect the flight properties. Just note that all nodes now does not require the intervention of the head of the circle and forgives the flaws that are inevitable in the construction of models by students.
Circled the first machines required the introduction of minimum “cosmetic” amendments to the original draft. What you see in the drawings, – the final, already tested, reliable and well flying model. By the way, the “Bird” built by the club in seven instances. Despite the different wing design (both its design is shown in the drawings) and different workmanship, all models fly the same firmly and steadily, allowing the boys to learn initial flying without problems and with maximum pleasure.
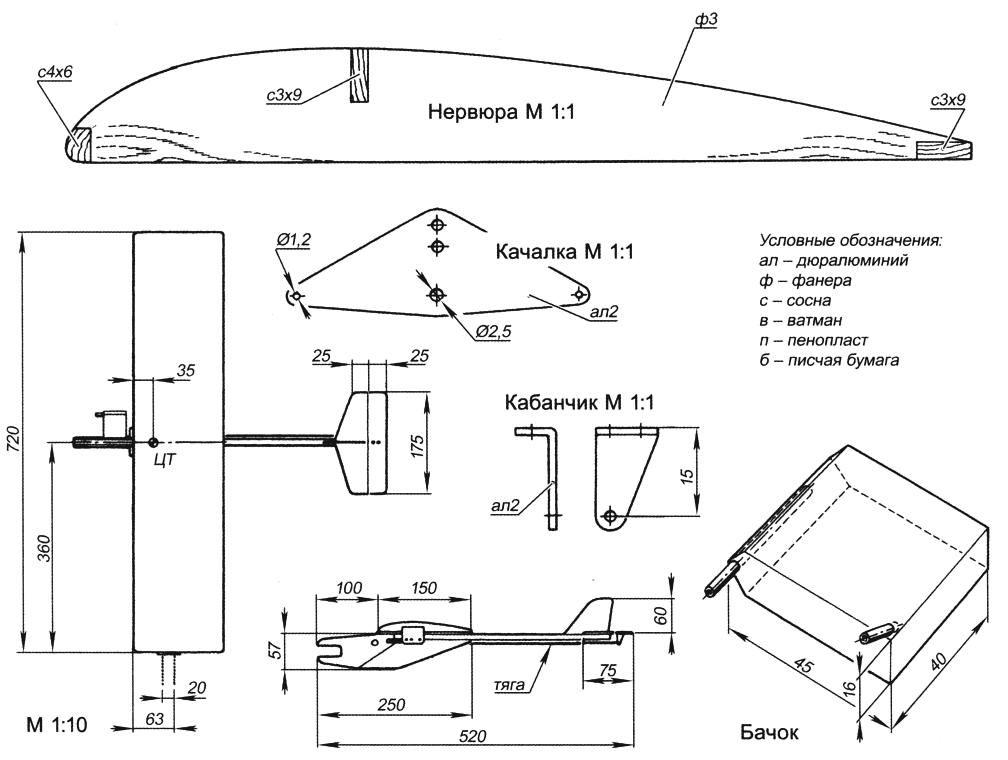
The profile is selected so that the Assembly of any of the wing could be held on a flat bench. The most successful and enduring was patterned wings classical style and carved from construction foam.
Stacked wing. The design of this wing consists of 10 ribs, cut from lightweight plywood with a thickness of 3 mm (the source of this, just the perfect material are widely-used boxes from fruit), as well as of edges and longitudinal (Reiki we initially took from the remnants of old sets. and later began to cut the simplest machine). Assembly fitted to each other parts of the wing is conducted on the PVA glue. As it is now on sale there are many variants of this adhesive, we recommend you to opt for a tougher and more durable varieties. If you wish to absolutely indestructible design can be used to build and plasticized epoxy resin. Just check for yourself that these tips for choosing the glue are not only wing, but also to build the entire model.
The Central part of the assembled frame of the wing is filled from the top and bottom of thick cardboard from Shoe boxes. This trim is glued only on the epoxy resin, which should be applied on the entire inner surface of the cardboard. The resin is partially absorbed into the material of plating, and after its solidification, the Board is not only hardened, but becomes completely resistant to water and fuel. The finished wing if necessary vyshkurivaetsya and then is covered in the “Moment” of conventional Mylar film thickness of 25 microns. Then on the lower part of the center section it is useful to stick two or three strips of abrasive paper with granularity of 200 – 230. This will reduce the possibility of wing shift at startup and flight RC models. To the fuselage the wing is attached to three – five-rings model of the rubber belt.
The foam wing. This option also proved to be very convenient for fabrication and application on the model. Profiled halves-cut into the console we termolabil of bars construction or packing foam on the metal templates. The resulting billet should viscoret to remove lint formed during the melting of the foam.
The plate side rail height corresponds to the full thickness of the profile. For installation of foam blank cut THERMOTRONIC (in extreme cases, a razor blade) into two parts. The spar is better to paste to the epoxy resin, as the experience with the use of PVA showed that the water contained in the glue is absorbed into the wood and warps the spar. This leads to bending and twisting the entire wing, which is unacceptable.
Pine then glued the trailing edge and end ribs out of plywood with a thickness of 3 mm. the Center section top and bottom is sheathed on PVA a strip of thick drawing paper or writing paper. The same material with a width of about 60 mm, with a bend at the leading edge, glued and forehead of the wing. Similarly increases and the trailing edge. Only here the total width of the fold through the edge of the strip should be 40 mm.
Waiting for the complete drying of moisture from the glue, proceed to the wrapping of the wing Mylar film. Glue “Moment” is applied only to the paper enhance the edges and end ribs. The film is “welded” at the edges of the pad, having a temperature of 100 – 120°. Then Mylar trim needs to be pulled. It is better to use a Hairdryer when working with a straightening iron too big of a risk melting the foam. It is worth Recalling that covered the wing should be free of twists and bends.
On one of the foam wings we tried to apply the lining paper instead of Mylar. Fine writing paper was put on the entire wing on PVA, on top of all reinforcement pads. The result was excellent – the wing has got high rigidity and durability. However, the need for a thorough varnishing nullified all the advantages of this plating. Yes and repair it much more difficult and demanding compared to the film covering.
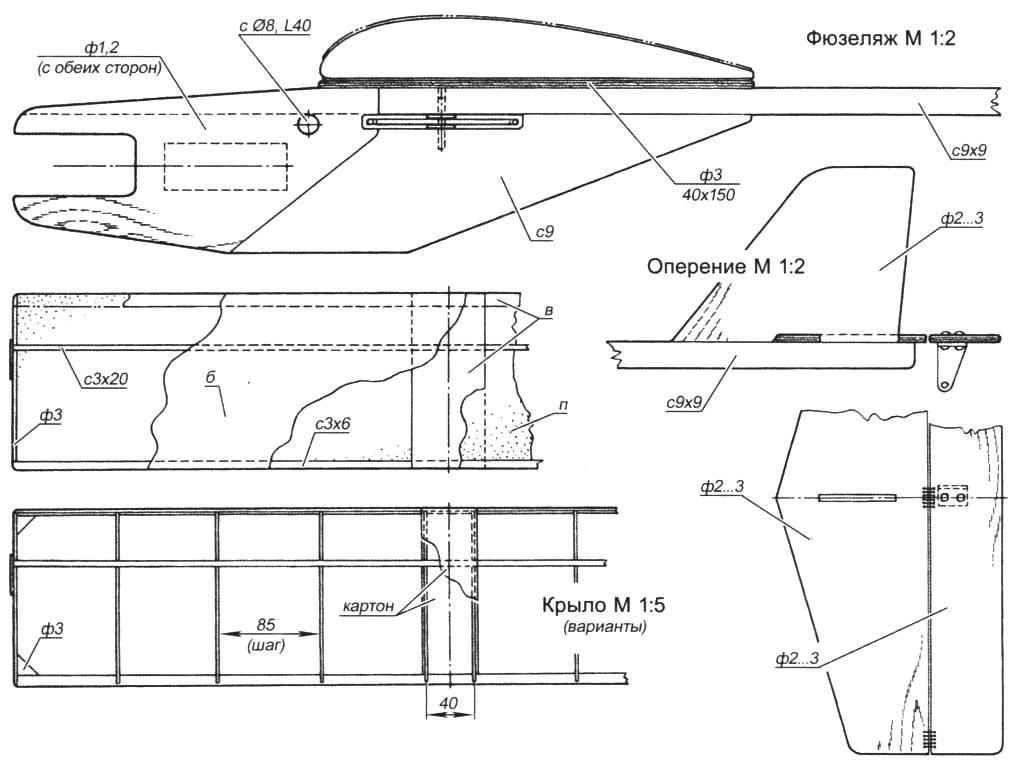
The fuselage. Billet bow is cut from lime or aspen Board thickness 9 mm. the part is pre-processed and vyshkurivaetsya. The upper end is aligned for mounting of the tail boom, and it selects the slot for rocking. It is important to remember that at this stage the cutout for the engine to do it! To the bow on the epoxy glued tail boom rail from quality pine with a cross section of 9×9 mm. Then the bow of both parties is enhanced by overlays of plywood 1.2 mm. Here, as in a highly loaded area, it is better to use epoxy resin. Now it’s time to cut and mount to doubtabout the obtained contours of the fuselage. For mounting the engine, drill by marking the appropriate holes. Try the engine to Motorama and make sure that problems with its installation and mount no. Then marked and drilled the holes for the axis of rocking and in the pin fixing rubber rings. From a piece of birch plywood of 3 mm thickness cut plate size 150×40 mm. Respecting the symmetry, it is glued on the top side of the fuselage (so it will cradle the wing). Now you can paste the pin for wing mounting rubber bands.
The next step is to primer the fuselage nitro lacquer in three or four layers.
You can then mount the host rocking. Distance plates under a rocking chair cut from a suitable sheet plastic or cardboard. Make sure that the rocking chair goes easily without Sakyamuni and excessive backlash.
Feathers cut from 3mm light ply from under fruit boxes or basswood (aspen) with a thickness of 2 mm. stabilizer and fin are joined with each other “in a thorn” . Hinges hinge rudder is nylon or Mylar threads, twisted “eight” through the appropriate hole. The tail Assembly is going into a single node and as such is glued on the aft fuselage. The Elevator is attached to the pylon (the most enduring was the horn, made of thin soft aluminum). It is mounted on the wheel by any usual method. Pre-finish plumage completely similar to the fuselage.
Fuel tank. Billet (or billet if you are used to fabricate the tank-the”house” of the two parts) is cut from a tin sheet, bent on a layout and soldered with the use of a good flux. Copper or brass supply and fuel drain tubes have an external diameter of 3 mm. For fastening the tank to it soldered lugs are made from tin or paper clip. Before installation, the tank should be thoroughly washed to remove residual flux and to check its tightness.
Control system. The rocking chair is made of 2 mm thick duralumin. the Leashes are made of spring wire with a diameter of 1.2 mm. the Axis of rocking is cut from a straight steel rod with a diameter of 2.5 mm with a length of 20 mm. the rod connecting the rocker with the steering wheel height, made only after complete Assembly of the fuselage with a tail – then it will be known the exact length. The desire may be made from a single piece of steel or aluminum spokes or composite, made of pieces of wire and wooden slats with a diameter of about 5 mm. For fixing the rod ends in the holes of the swing and the hog are used pieces cambrica, which tightly onto the protruding shanks. For more reliable fixation is possible on these shanks are cut threads – then the sleeve will not slide with them under any circumstances.
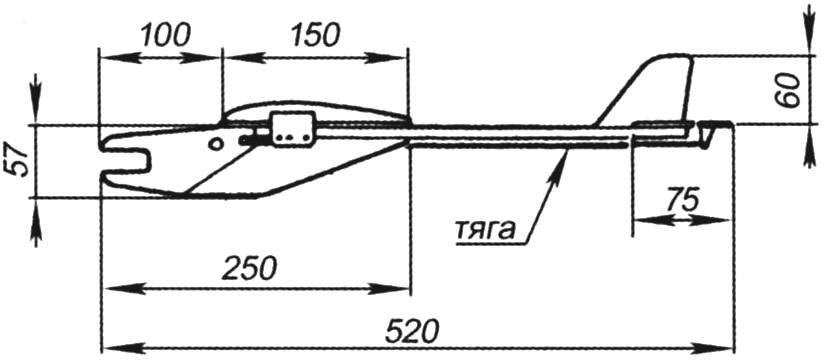
To ending inner wing glued strip of plywood of 3 mm, which serves to output cord. Keep in mind that the selection of the location of the withdrawal cord depends very much. Assuming that the model will be equipped with a good running engine MK-17, the rear cord should pass perpendicular to the fuselage. That is, the distance from the front edge of the wing to the rear holes in bracket must be equal distance from the forehead of the wing to the rear eyelet of the swing control in the area of the fuselage. Then it is easy to mark the hole in the strap and cord under the front – it is located in front of the rear at a distance of 20 – 25 mm. This size is recommended to withstand the following limits. Otherwise, when it is increased (when the operation mode) of the motor model start a little scour in a horizontal plane. This will lead to a very unpleasant phenomenon – in such oscillations the model will “walk” in height.
Balancing. At the tip of the outer wing is assigned a weight of 15 grams. It will provide a balance in the longitudinal plane. For proper longitudinal balance on the completed and fully assembled models of the center of gravity should be located 35 mm from the leading edge of the wing.
For flights used a cord with a diameter of 0,3 mm with a length of 12-13 meters.
V. VICTORY, head of the society
Recommend to read
 INTERTUBES
If you have under the sink plumbing fittings is not covered — to hide all this ugly picture will be easy and simple if you use a thin plastic sheet, from which it is easy to twist the...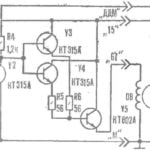 ELECTRONIC VOLTAGE REGULATOR
Many motorists available means, to improve the performance of various components of your machine. Considerable help in providing them electronics. To take at least a variety of...
