 THE TECHNOLOGY OF MAKING WOODEN PROPELLERS. Snowmobile, aerolizer, all kinds of machines hovercraft, wig, microplane and microstoria, various fan installations and other machines can’t operate without air screw (propeller). Therefore every enthusiast of technical creativity, wanted to build one of these machines must learn to produce good propellers.
And as in Amateur conditions it is easiest to do in wood, we will focus only on wooden propellers.
Note, however, that wood (if it will be successful) can produce quite similar screws made from fibreglass (using the method of forming in a matrix) or metal (casting). The most widespread due to their availability received two-bladed propellers from a single piece of wood (Fig. 1).
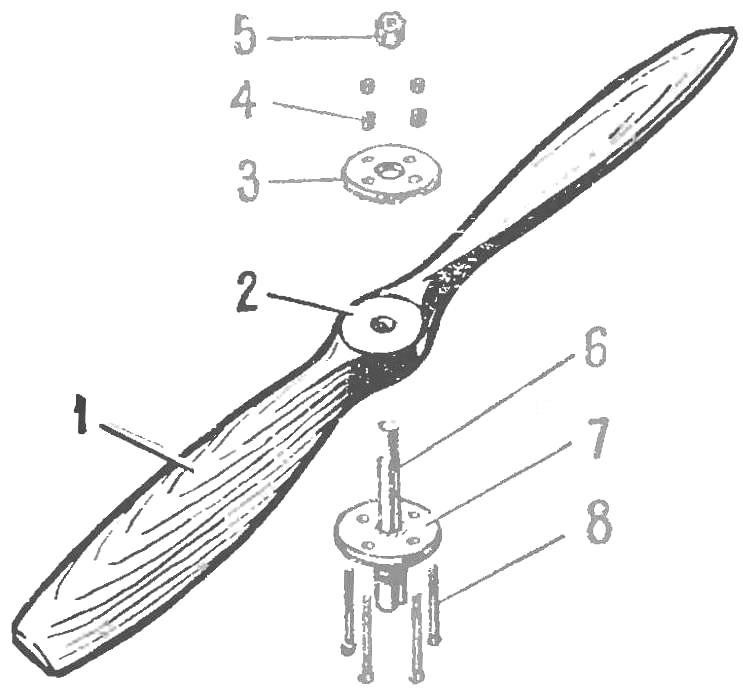
Fig. 1. Two-bladed wooden propellers from a single piece of wood:
1 — blade, 2 — hub, 3 — flange, front, 4 — bolts hub, 5 — castellated nut sock shaft, 6 — shaft 7 — rear flange, 8 — pin.
Three – and chetyrehkantnye propellers harder to manufacture.
THE CHOICE OF MATERIAL
What kind of wood is best to make a screw? A question often asked by readers. Answer: the choice of wood depends primarily on the purpose and size of the screw.
Screws designed for larger capacity engines (15-30 HP), also can be made of solid bars of solid rock, but the requirements to the quality of the wood in this case increase. When you select a billet, you should pay attention to the location of annual rings in the thickness of the bar (it is easily visible on the end face, Fig. 2-A), giving preference to bars with horizontal or inclined arrangement of the layers is sawn from the part of the trunk, which is closer to the bark. Naturally, the blank should not have knots, crevola and other vices.
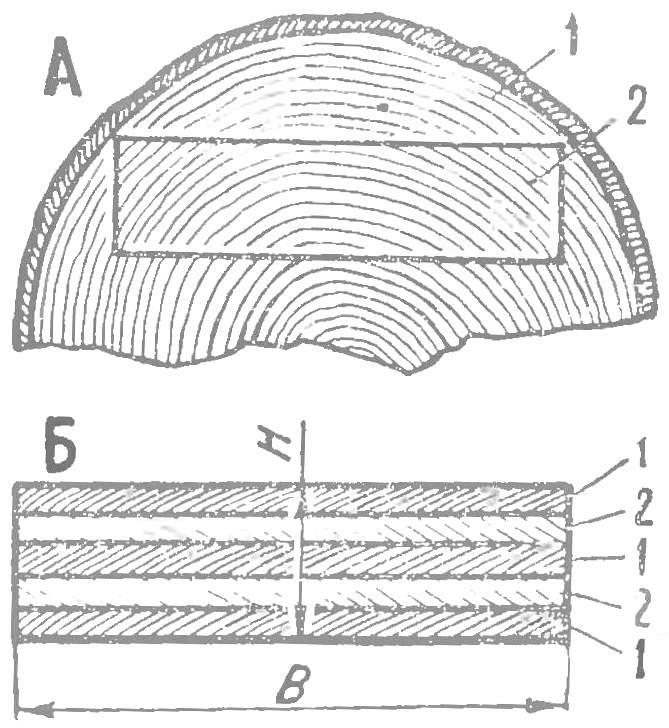
Fig. 2. Billet air screw:
And — from a piece of wood: 1 — sapwood part of the trunk, 2 — the location of the workpiece;
B — billet, glued from several boards in rectangular packages: 1 — mahogany or red beech; 2 — birch or maple.
If appropriate as a monolithic block could not be found will have to glue the blank out of several more thin plates with a thickness of 12-15 mm each. This method of manufacture of screws has been widely circulated in the early days of aviation, and it can be called “classic”. For reasons of strength it is recommended to use boards of wood of different species (e.g., birch and mahogany, birch and red beech, birch and ash) having mutually intersecting layers (Fig. 2-B). Screws made of laminated workpieces after finishing treatment have a very beautiful appearance.
Some experienced professionals glue blanks from .multilayer aviatory brand BS-1, thickness of 10-12 mm, collecting from it a package the right size. However, to recommend this method to a wide range of fans we can not: the layers of veneer across the screw, the processing can form intractable unevenness and degrade the quality of the product. The ends of the blades of propellers, made of plywood, very fragile. In addition, high-speed screw at the root of the blades there is a very large centrifugal force, reaching in some cases up to a ton or more, and in the transverse veneer layers in the gap are not working. Therefore, plywood can be used only after calculating the square root section of the blade (1 cm2 plywood stands on the gap of about 100 kg, and 1 cm2 pine — 320 lbs.) the Screws have to thicken, and it degrades performance as well.
In some cases, the edge of attack of the propeller is closed by a strip of thin brass, so-called fittings. It is attached to the edge of the small screws, the heads of which, after Stripping opasayutsya tin to prevent samoorganizowaniu.
THE SEQUENCE OF MANUFACTURING
In the drawing the propeller is first necessary to produce metal or plywood templates, one template of the top view (Fig. 3-A), a template of the side view and the twelve templates of the profile of the blade that will be needed to check the screw on the stocks.
Billet screw (bar) must be carefully otfugovat, observing size on all four sides. Then put the centerline of the contours of the template of the side view (Fig. 3-B), and remove the extra wood, at first small with an ax, then a plane and a rasp. The next step is processing the contour of the top view. Imposing the template of the blade on the workpiece (Fig. 3) and fixing it temporarily with a nail at the center of the sleeve, tracing the pattern with a pencil. Then turn the template is strictly 180° and encircle the second blade. The excess wood is removed on the bandsaw, if it is not — vygruznoy fine teeth hand saw. This work needs to be done very precisely, so you shouldn’t rush.
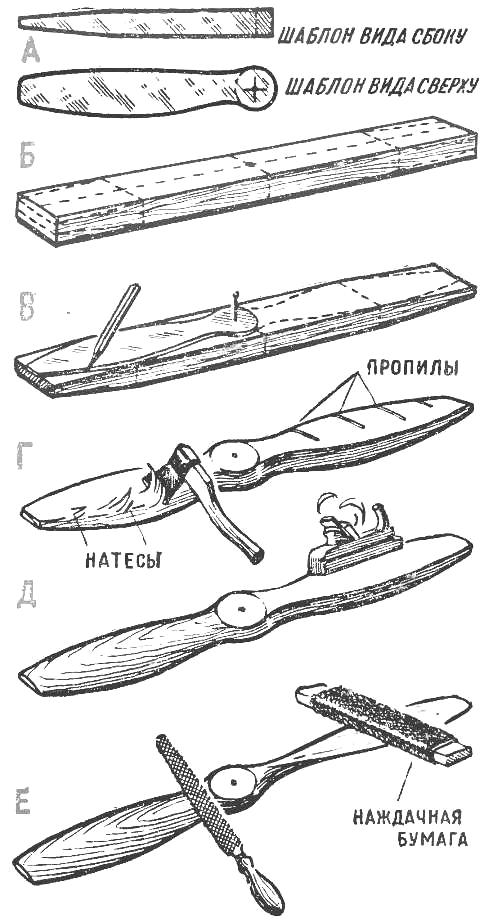
Fig. 3. The sequence of manufacturing a screw:
And — templates (top view and side view); B — the layout of the bars-blanks on the template side view; — marking of the workpiece template of the top view; G — processing after processing of the templates; D — machining of the blades on the profile (bottom, flat part); E — processing of the upper, convex part of the blade.
The product assumed the outline of screw (Fig. 3-G). Now begins the most critical part of the work — giving the blades the desired aerodynamic profile. It should be remembered that one side of the blade flat, the other convex.
The main tool to give the blades the desired profile — sharpened, well-sworn of the axe. This does not mean that the work is “clumsy”: axe can do wonders. Suffice it to recall the famous Kizhi!
Wood removed sequentially and slowly, at first making small short natesa in order to avoid cleavage by layer (Fig. 3-G). It is useful to also have a small dwukrotnie struzak. The figure shows how you can speed up and facilitate the cutting profile of the blade, making a few cuts with a hacksaw, fine teeth. By performing this operation, you have to be very careful not to saw through deeper than required.
After rough machining of the blades of the screw is brought to the condition of the planes and rasps with a check in the stocks (Fig. 4-A).
For the manufacture of the pile (Fig. 4) it is necessary to find a Board equal in length to the screw and fat enough that it was possible to make transverse cuts with a depth of 20 mm for mounting templates. The Central core of the bench is made of solid wood, its diameter must match the diameter of the hole in the propeller hub. The rod is glued perpendicular to the surface of the bench. Putting him on a propeller, determine the amount of wood to be removed to match the blades to the profile templates. Doing this work for the first time, you need to be very patient and careful. Skill is not acquired immediately.
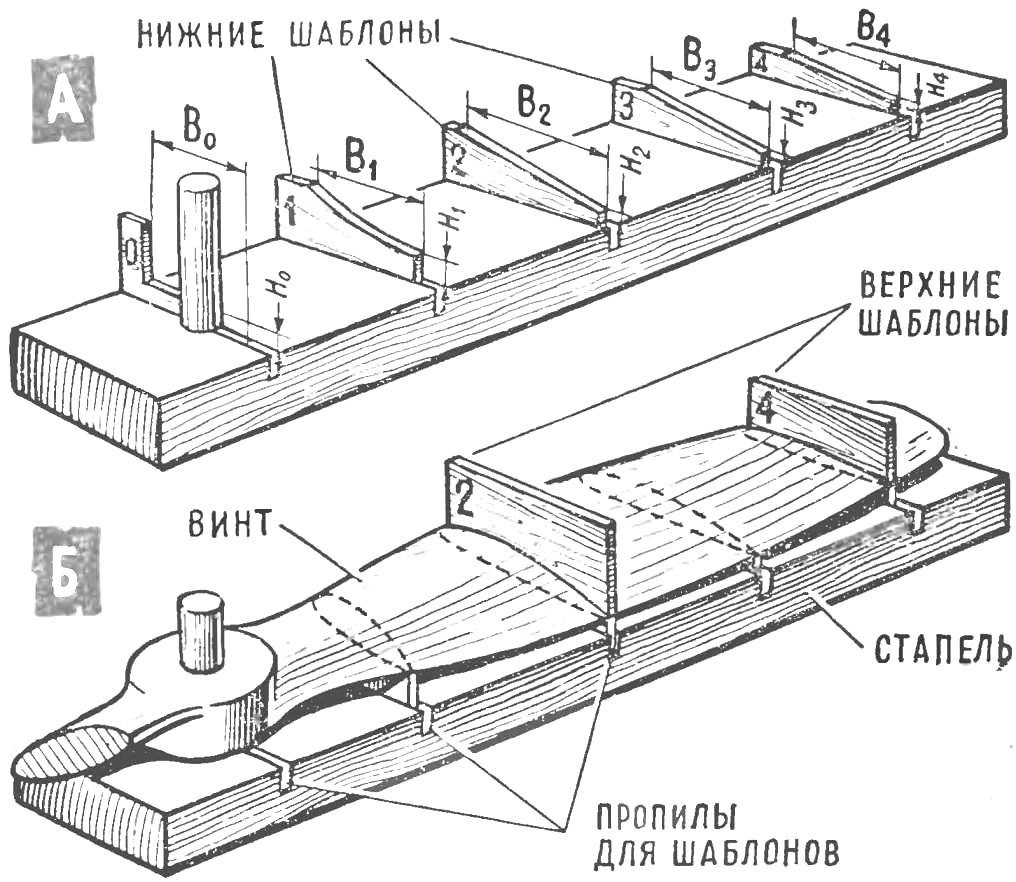
Fig. 4. Stapel and templates profiles of the blade:
A — install the templates in the berth; B — checking machined blade templates and contrabanda.
After the bottom (flat) surface of the blade will be finally brought success, and begins lapping the upper (convex) surface. The test is conducted with the help of contraband, as shown in figure 4-B. thoroughness of this operation depends on the quality of the screw. If suddenly it turns out that one blade was a bit thinner than the other and this often happens with inexperienced masters — will have to correspondingly reduce the thickness of the opposite blade, otherwise, and the weight and aerodynamic balance of the propeller will be broken. Small flaws can be corrected with a sticker of the fiberglass pieces (“patches”) or small sawdust bedding, zameshannye epoxy resin (mastic colloquially referred to as bread).
When cleaning the surface of wood screw should take into account the direction of the wood grain; planing, scraping and sanding can be carried out only “by layer” in order to avoid scuffing and the formation of rough areas. In some cases, in addition to the scrappers, good help in the decoration of the screw can have glass shrapnel.
Experienced joiners after sanding RUB the surface smooth, highly polished metal object, pressing firmly into him. They compacted surface layer and “wipe out” the remaining it tiny scratches.
BALANCING
Made the screw should be carefully balanced, that is given in this state, when the weight of the blades exactly the same. Otherwise, when the rotation of the screw there is no vibration, which can lead to the destruction of the vital nodes of the whole machine.
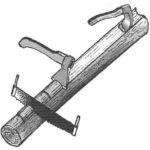
Figure 5 depicts a simple device for balancing screws. It allows you to perform balancing accurate to 1 gram — that’s almost enough in Amateur conditions.
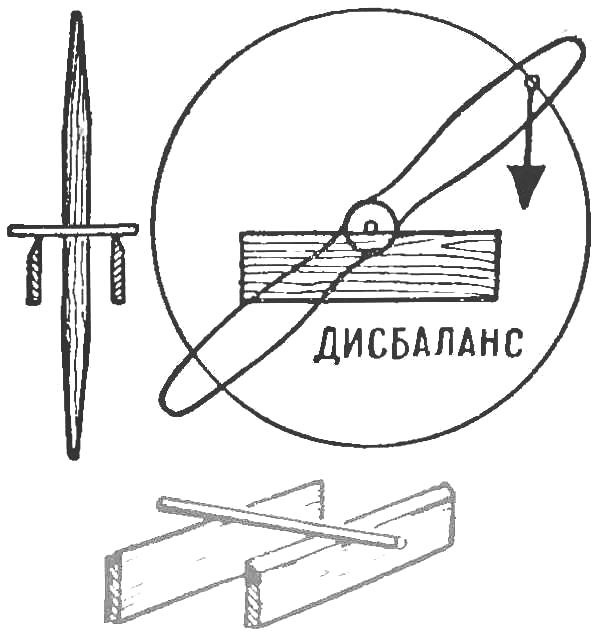
Fig. 5. A simple device to check the balancing screws — using two carefully aligned boards and the axial insert.
Practice has shown that even with very careful manufacturing of screw weight of the blades is obtained varies. This happens for different reasons: sometimes
due to the different specific weight of the butt and the top parts of the bar, which is made of screw, or different density layers, the local uzlovatom, etc.
How to be in this case? To adjust the blade weight sostragivaja with heavier some amount of wood, it is impossible. Should be heavier the lighter blade, vkladyvat it pieces of lead (Fig. 6). Balancing can be considered complete when the screw will remain stationary in any position of the blades relative to the balancing device.
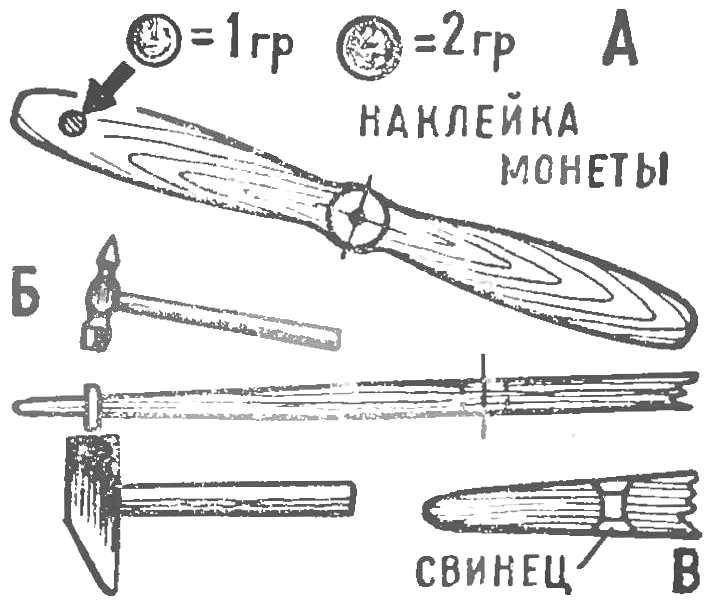
Fig. 6. Balancing screw by claymania pieces of lead in a lighter blade:
A — definition of imbalance by means of coins; — the incorporation of a piece of lead of equal weight to equal the shoulder (hole a little razzenkovku both sides); In — view of a lead terminal after raskladki.
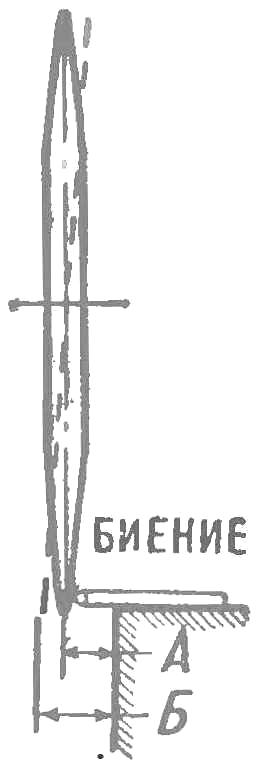
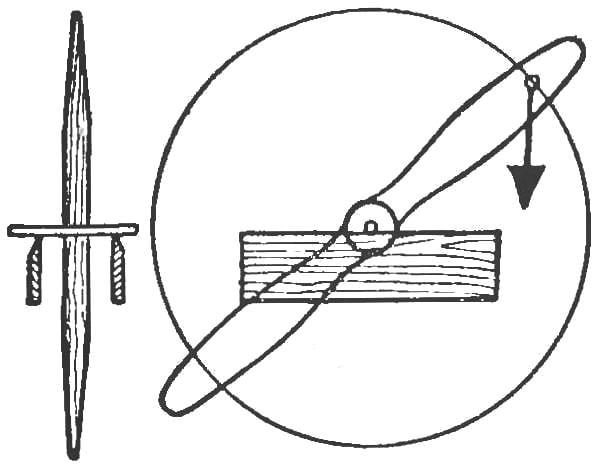
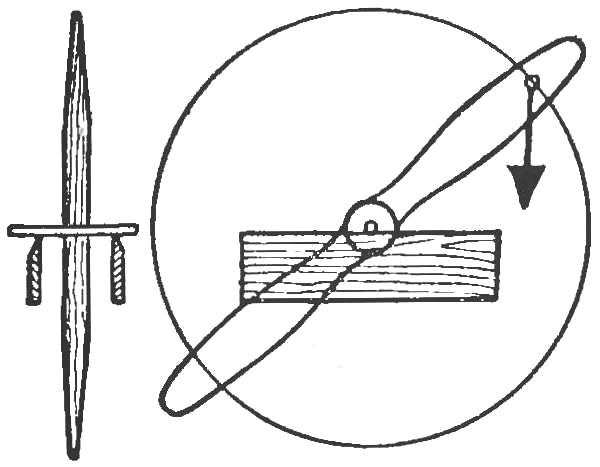
Fig. 7. The scheme of check of the screw in the runout.
Equally dangerous is the runout of the screw. Scheme checking of propeller on the runout shown in figure 7. While rotating on the axis of each blade should be held at the same distance from the reference plane or angle.
TRIM AND COLORED SCREWS
Ready and carefully ambulancewoman screw needs to be painted or lacquered to protect it from atmospheric influences, and also to protect from fuel and lubricants.
For paint or varnish is best to use a spray gun powered by a compressor at a minimum pressure of 3 — 4 ATM. This will give the opportunity to obtain a smooth and dense coating, unattainable for carpal painting.
Best paint — epoxy. You can also apply glyptal, nitro – and nitroglycerine or recent alkyd coating. They are applied to pre-primed, otshpatlevyvayut and carefully sanded the surface. Mandatory magdolina drying, suitable some paint.
The best varnish is so-called “hipotetically” parquet varnish. It is well kept and clean wood, and on the painted surface, giving it a elegant look and high mechanical strength.
V. MALINOWSKI, winner of the NTTM-72, L TURBINES
Recommend to read
 THE TRENCH — AXE
In the preparation of parts of the framework for a wooden house is the most difficult operation — the manufacturing of the bed for a snug fit of the upper and lower logs. You want to...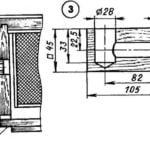 BEES WATERED AND FED THE MACHINE
When rented with option to purchase three of the apiary, I realized how difficult it is to handle a large number of bee colonies. Part of the problem was solved with the help of the...
