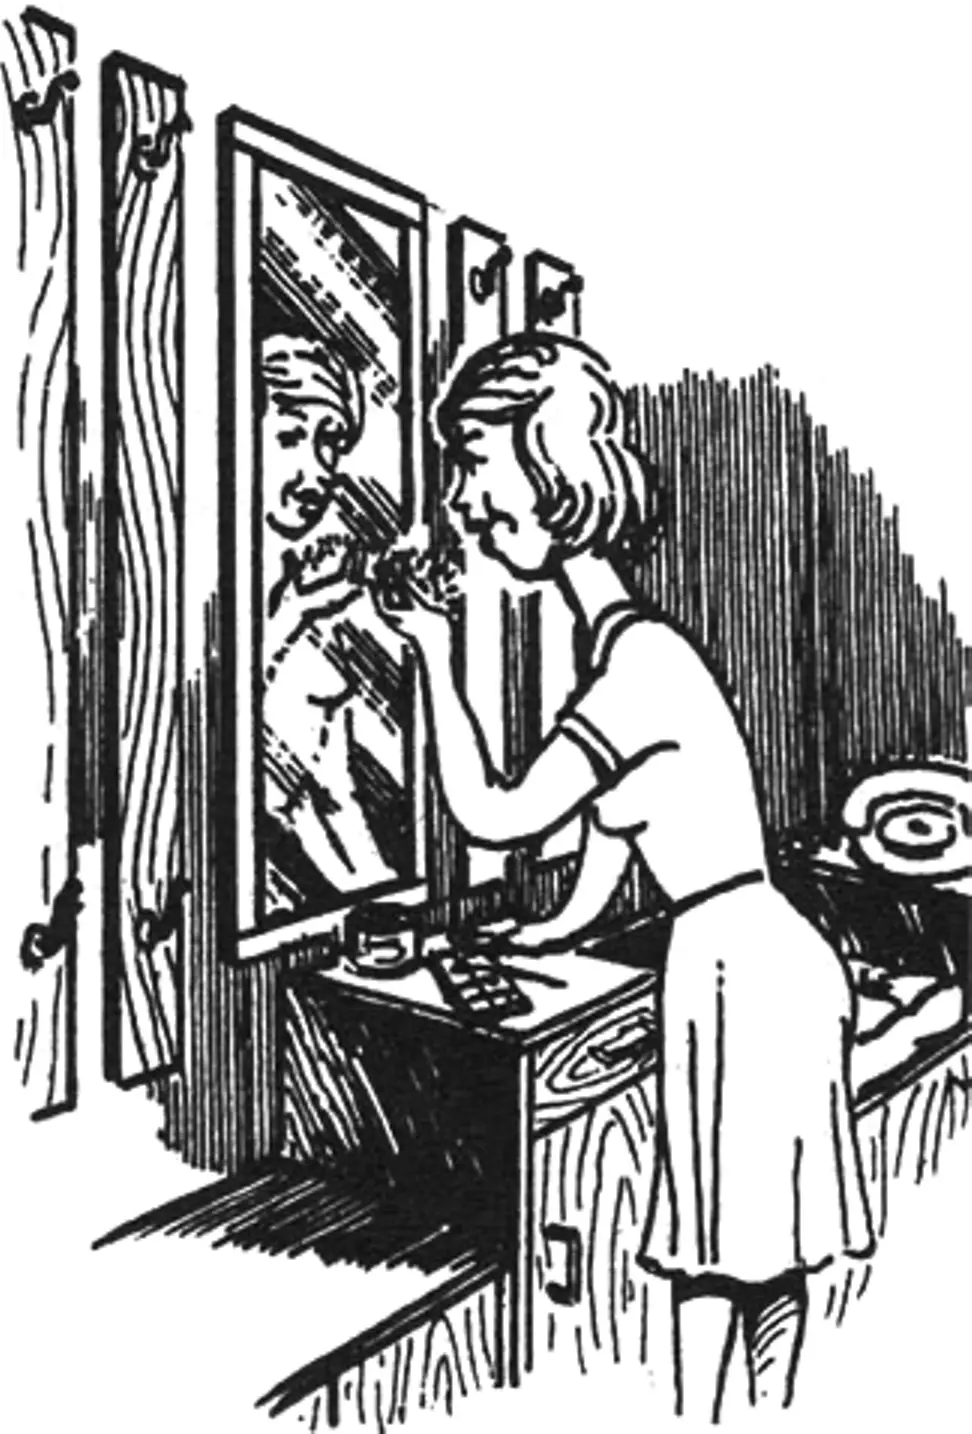
Not every home has an entryway that can accommodate the hallway wardrobe units sold in stores: as a rule, they are designed for a spacious hallway. At the same time, even in a small corridor you can rationally organize a corner with a mirror and hangers, similar to the homemade furniture set for a small hallway suggested by the Hungarian magazine “Ezermester”.
It consists of a convenient bench with a telephone; a cabinet in which you can place, for example, a vacuum cleaner, and in the drawer — the necessary small items; and finally a shoe cabinet, behind whose doors there is a rack for shoes. On the wall above these pieces, board hangers and a mirror are mounted, completing a simple but attractive suite.
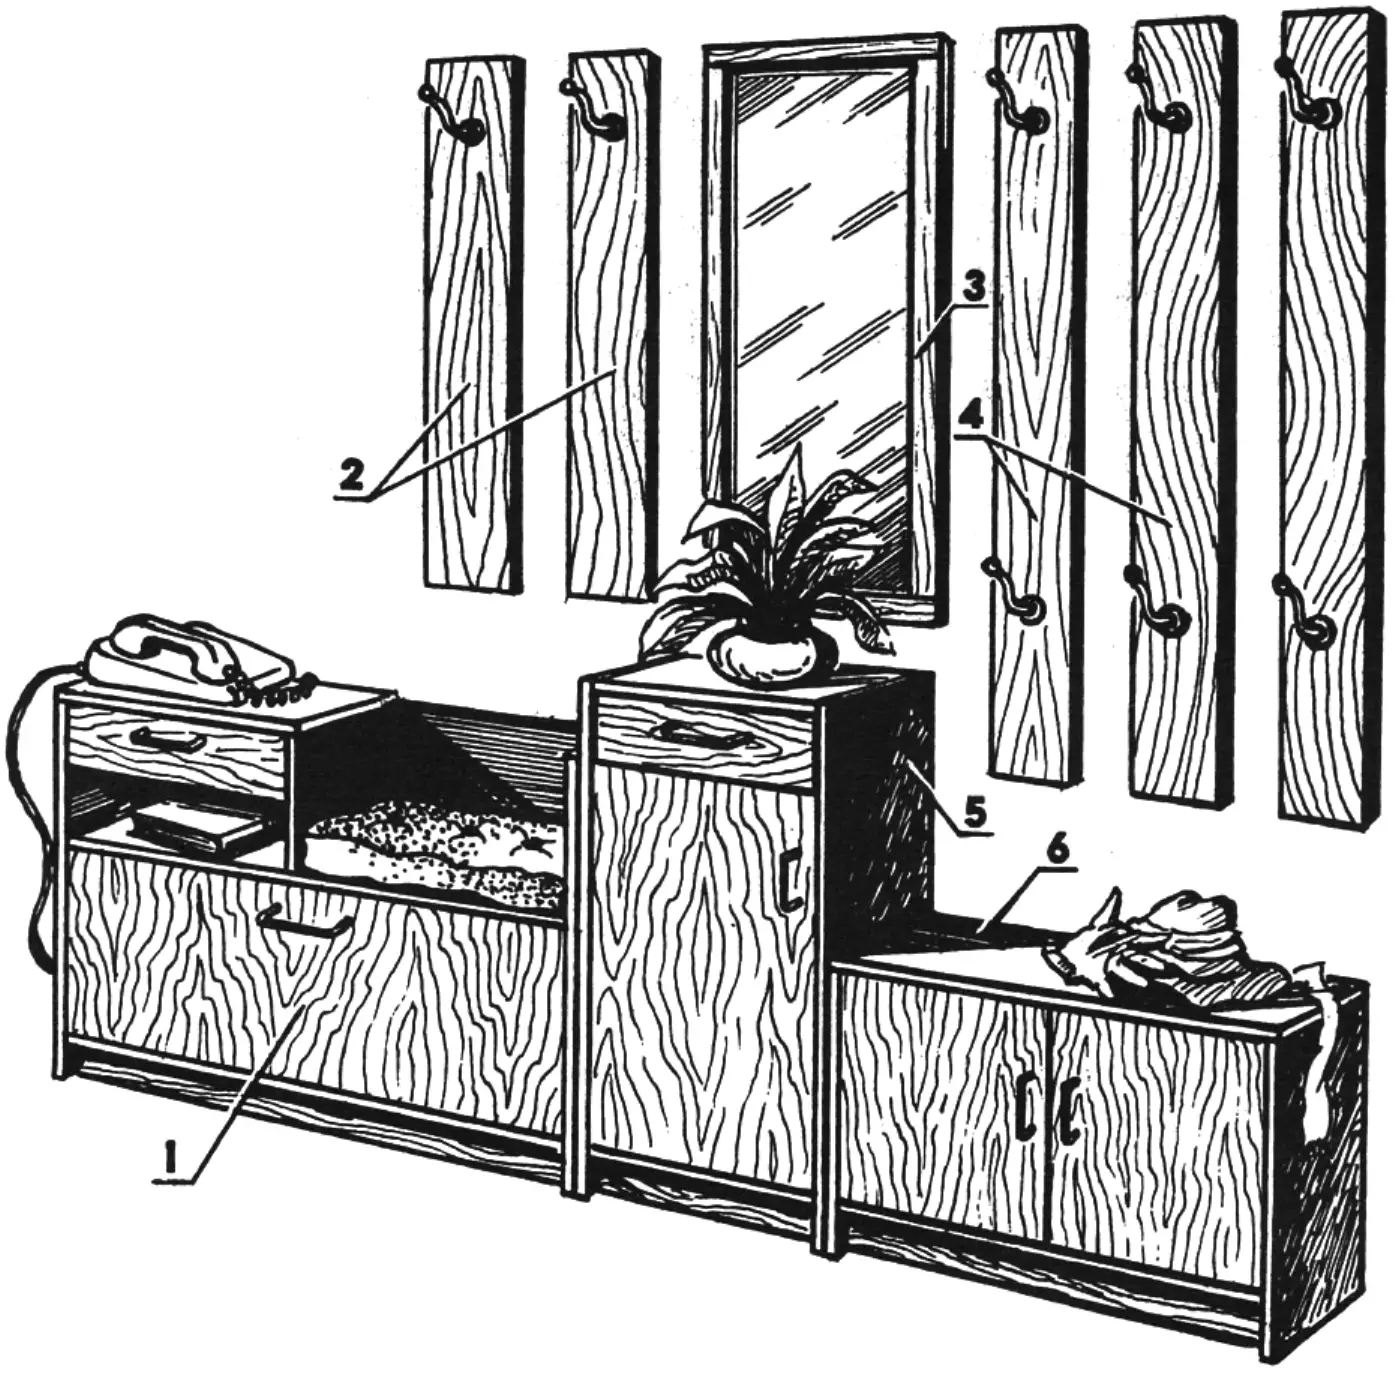
1 — bench; 2 — small hangers; 3 — mirror; 4 — large hangers; 5 — cabinet; 6 — shoe cabinet
Making it yourself is within anyone’s reach, since all the constructions are simple and do not require any scarce materials — particle board (or furniture board), boards, bars and battens with slats are used, plus ordinary furniture hardware: hinges, handles, hooks.
And now specifically about each item in this set.
Bench
Its design (Fig. 2) is thought out so that it is convenient to use the telephone and put on shoes for elderly people or children: there is a soft seat.
The body is based on two horizontal panels and vertical side panels that support the entire structure. They are made of particle board and joined with inserted round dowel pins. The lower horizontal panel has a support strip — a particle-board batten — and the upper one also rests on a partition (also of particle board). On the latter and on both side panels, support bars for a slatted rack (if shoes are to be stored here) or a shelf are fastened. On one of the side panels, in addition, a vertical rod of a damper is installed — a device for holding the hinged door. The door is also of particle board; its hinges are fastened to the lower panel. At the rear the bench has a wall of hardboard or thin plywood.
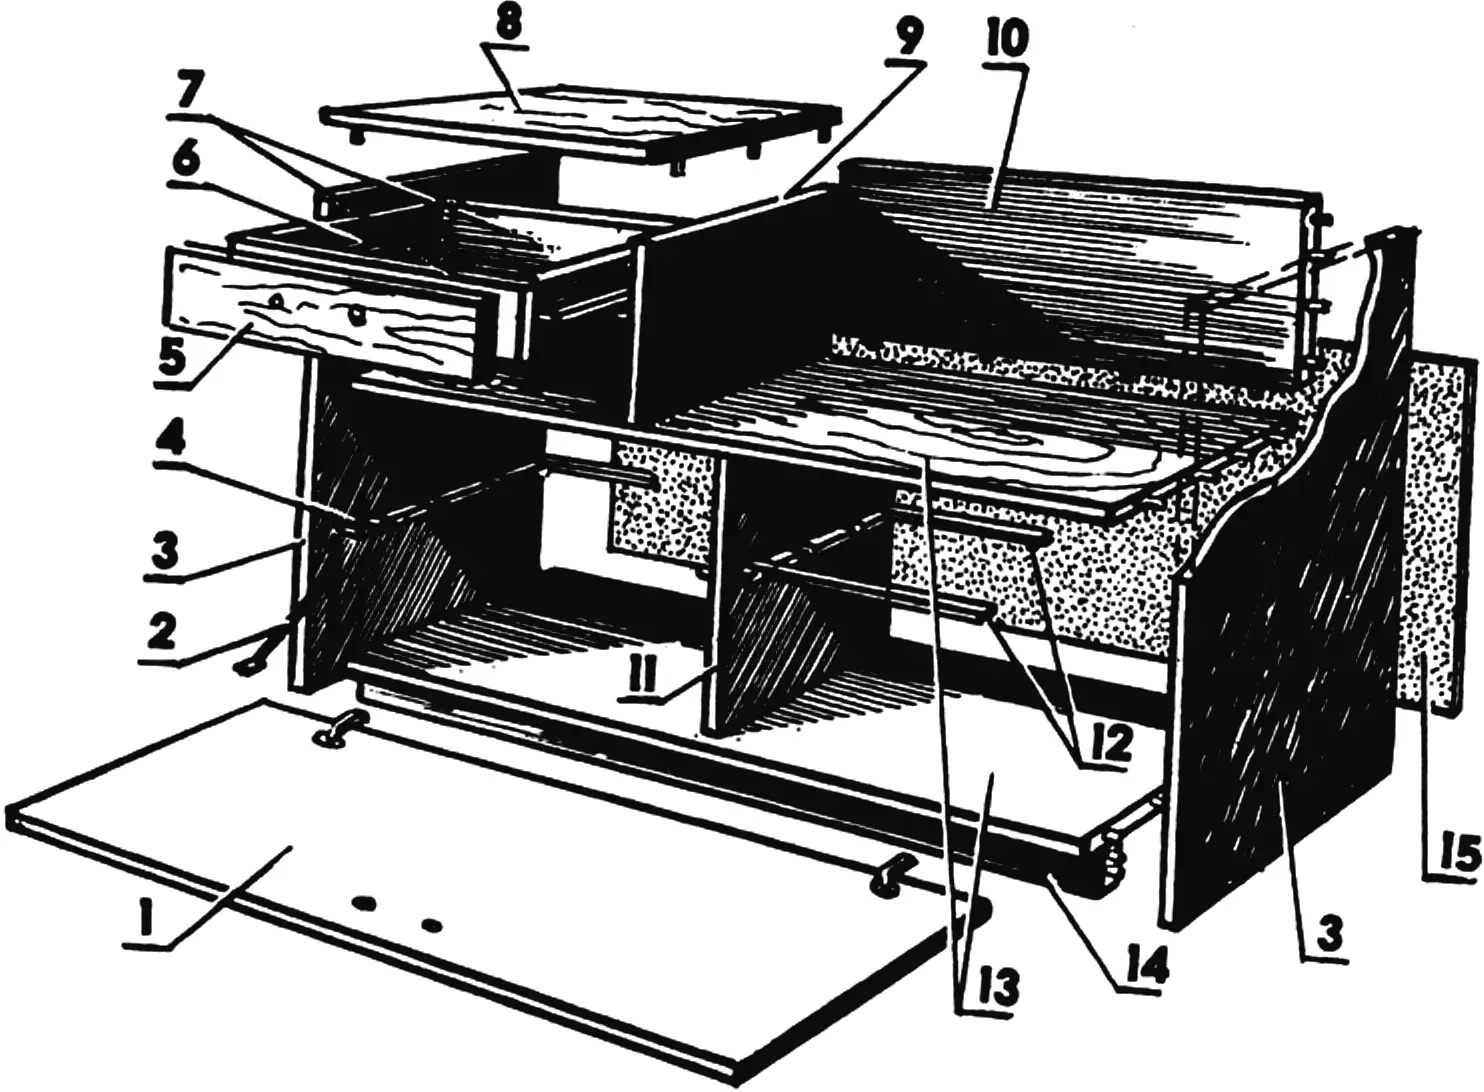
1 — door (particle board 962x392x19); 2 — damper; 3 — body side panels (particle board 750x400x19); 4 — rack supports (bars, 380x30x10); 5 — drawer face panel (particle board 323x150x19); 6 — drawer side (board 343x150x10); 7 — drawer rear and front walls (board 302x150x10); 8 — top panel (particle board 400x362x19); 9 — seat side panel (particle board 400x250x19); 10 — seat back (particle board 619x250x19); 11 — partition (particle board 381x392x19); 12 — rack (bars 470x20x20); 13 — body horizontal panels (particle board 962x400x19); 14 — support strip (962x70x19); 15 — body rear wall (hardboard, plywood 999x430x3)
The bench side panels rise above the upper horizontal panel, forming: on the left — a drawer compartment, and on the right — a seat. In the middle an auxiliary vertical panel is installed, which serves at the same time as a side wall for both the drawer compartment and the seat. To add rigidity to the upper part of the bench and to finish the seat, its back (particle board) is fastened, and above the drawer section — a lid: an upper particle-board panel that serves as a telephone stand.
The drawer is nailed together (or assembled with tenons) from thin boards or plywood. At the front it has a decorative face — a wider board covering the drawer guides on its sides and on the vertical panels of the compartment (bars measuring 361x10x10 mm). Under the drawer a small niche remains, where it is convenient to store, for example, a telephone book so that it is always at hand.
It remains only to place a cotton or foam mattress in the seat compartment — and the bench is ready.
Cabinet
It also has a drawer, similar in design to the one described above. The rest of the cabinet (Fig. 3) is extremely simple: it is a box formed of vertical and horizontal particle-board panels, also joined with dowels. Extra rigidity is provided by a crosspiece (a batten installed below the drawer) and a rear wall of hardboard or thin plywood, nailed with small nails around the entire perimeter.
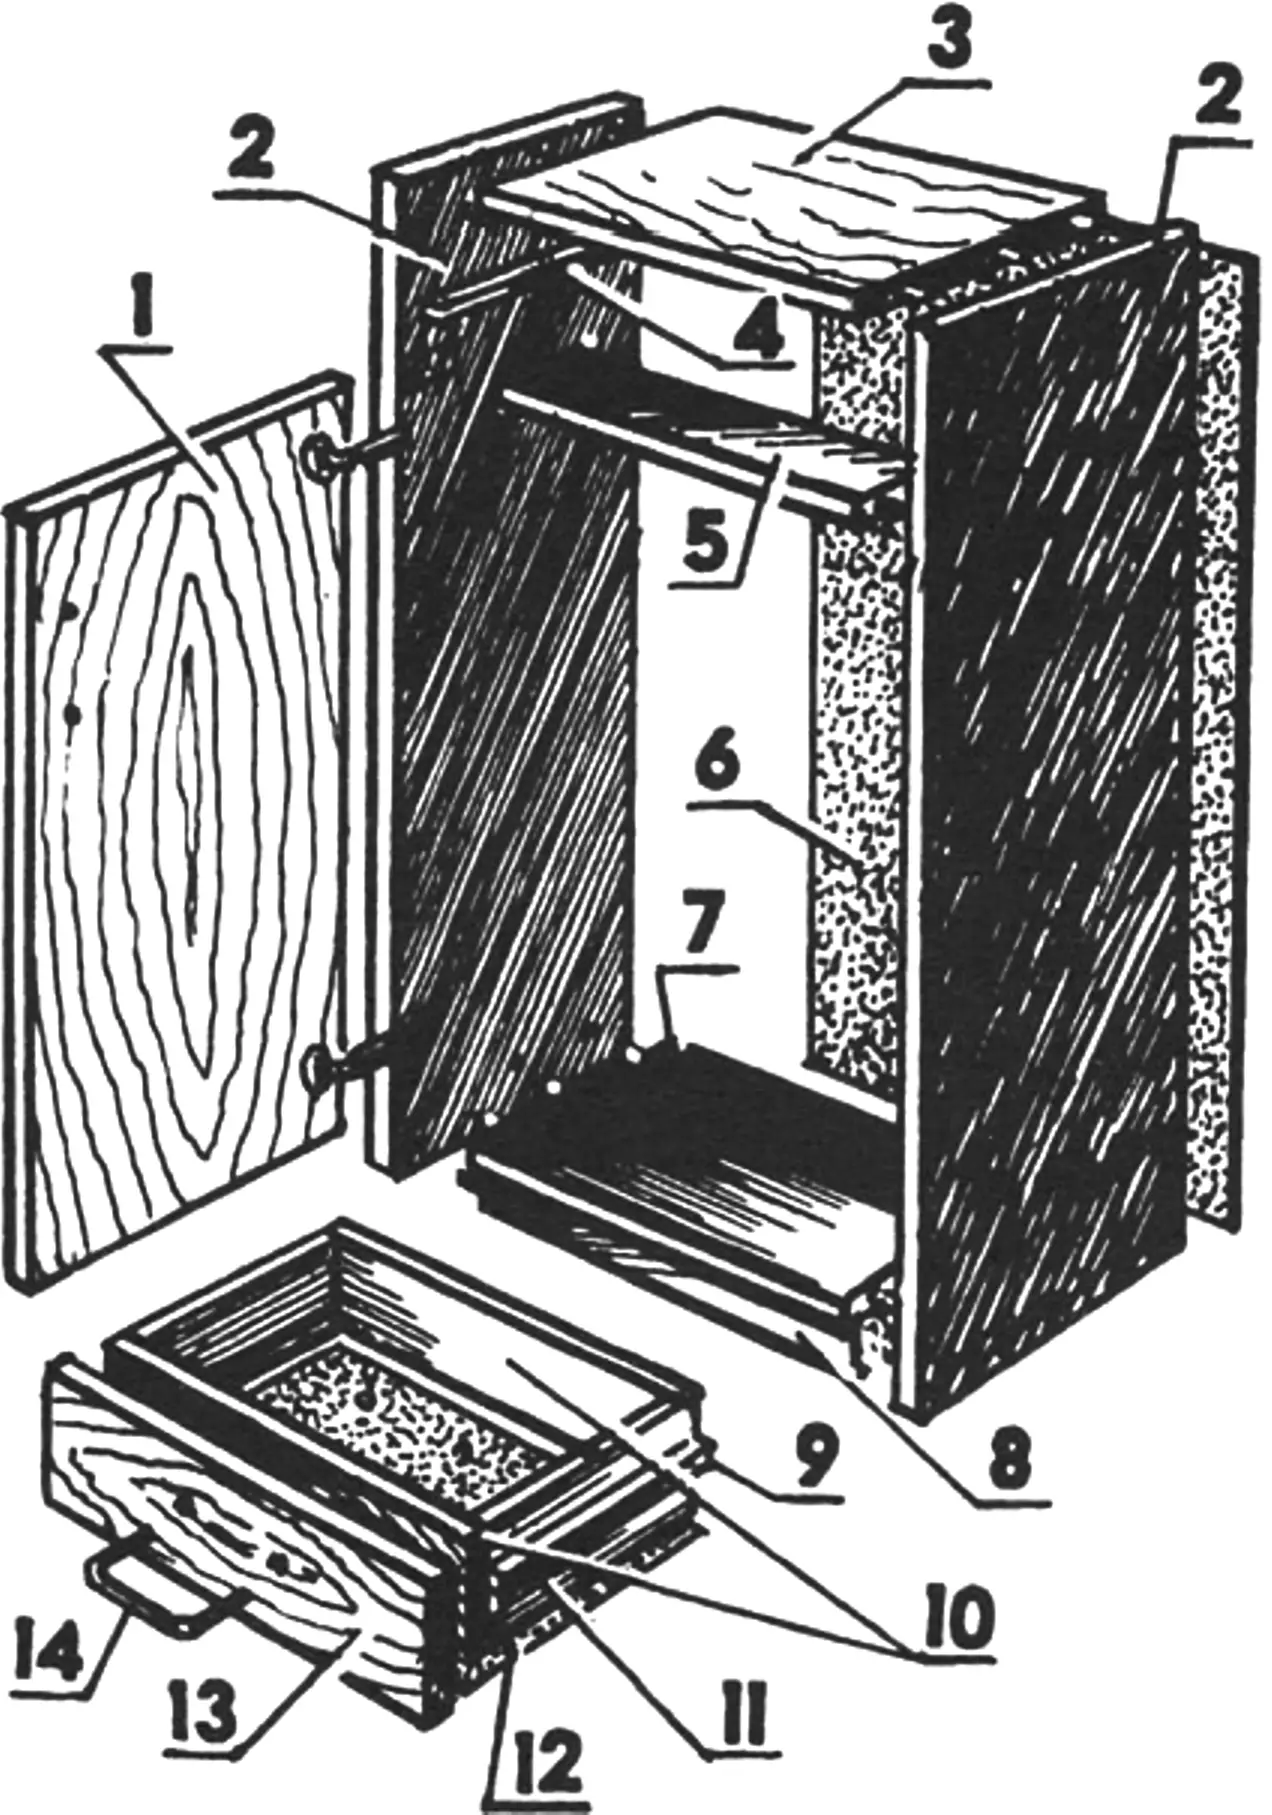
1 — door (particle board 661x462x19); 2 — body side panels (particle board 909x400x19); 3 — body top (particle board 462x400x19); 4 — drawer guide (bar 380x10x10); 5 — crosspiece (particle board 462x100x19); 6 — body rear wall (plywood, hardboard 909x498x3); 7 — body bottom (particle board 462x400x19); 8 — support strip (particle board 462x70x19); 9 — drawer guide (bar 362x10x10); 10 — drawer front and rear walls (board 442x140x10); 11 — drawer side (board 343x140x11); 12 — bottom (plywood 441x380x3); 13 — drawer face (particle board 461x150x19); 14 — handle
Under the lower panel of the box there is a support strip — a particle-board batten set slightly back from the front edge of the panel. Note that, as with the bench, the cabinet side panels are load-bearing and act as a kind of legs. A door is hung on one of them (any hinges may be used).
Shoe cabinet
In design it is also a box (Fig. 4), only low and long. Compared with assembling the cabinet, its installation differs only in how the top panel is fastened: it is not set between the side panels but rests on them — for greater strength (if someone decides to sit on it). For the same purpose a pair of uprights (of particle board) is built in inside. There are two doors, also hung on the side panels (with any hinges).
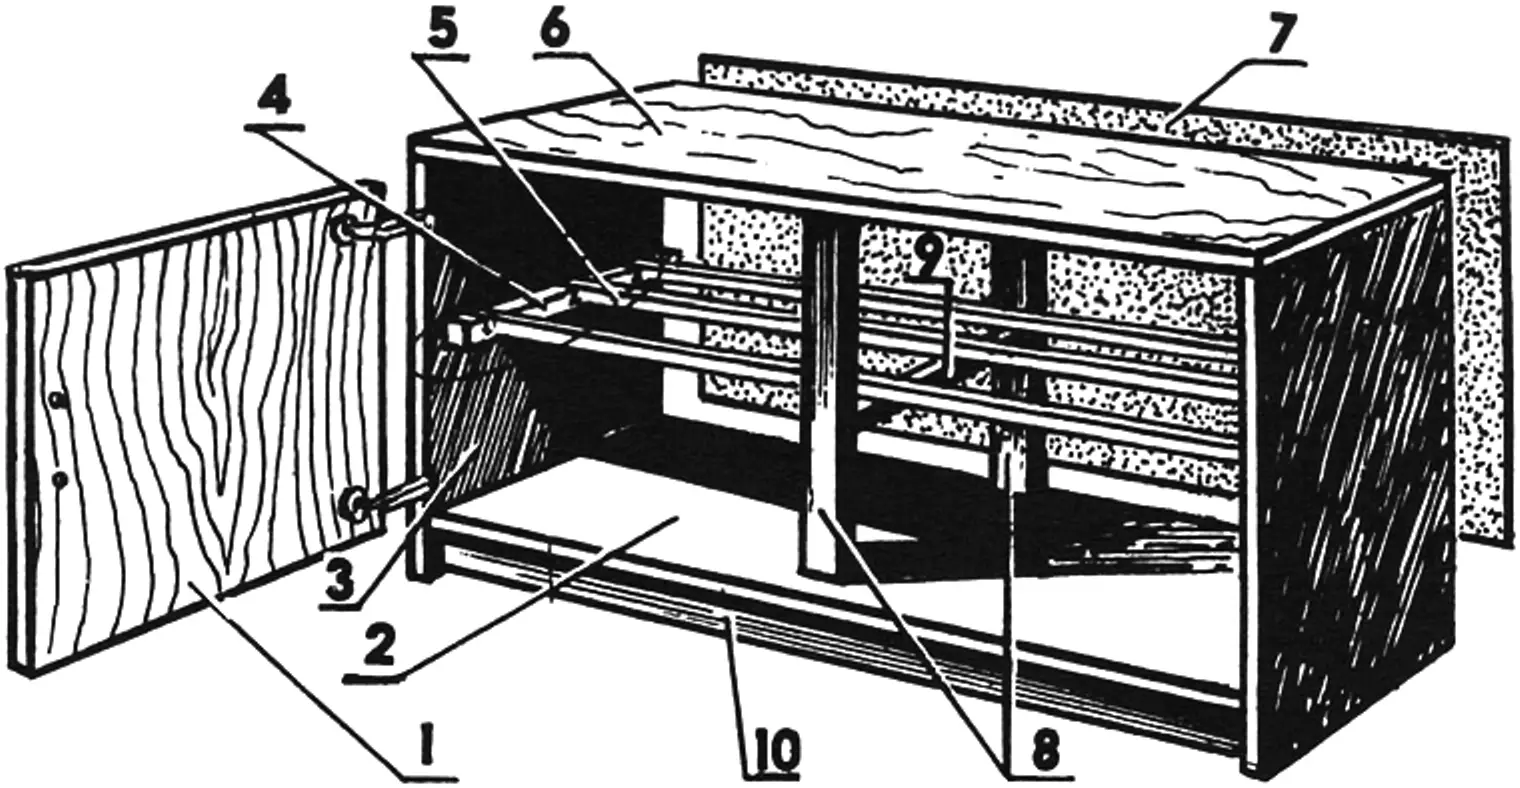
1 — door (particle board 480x392x19); 2 — bottom (particle board 962x400x19); 3 — body side panel (particle board 481x400x19); 4 — rack support (bar 380x30x20); 5 — rack (bars 962x20x20); 6 — body top panel (particle board 1000x400x19); 7 — body rear wall (hardboard 999x480x3); 8 — uprights (particle board 392x50x19); 9 — rack support (bar 342x20x20); 10 — support strip (particle board 962x70x19)
As with the cabinet and the bench, under the lower panel there is a support strip — a particle-board batten. The box side panels are also load-bearing. Bars for the rack on which the shoes will rest are fastened to them on the inside. A third (supporting) bar is installed between the uprights. The rack is laid from slats of 20×20 mm cross-section.
Hangers
They are made from smoothly planed wide, not very thick boards (Fig. 5). On the smaller, shorter ones placed above the bench, one hook is installed in the upper part, and on the larger ones above the shoe cabinet — two hooks: top and bottom (for example, for children’s clothes).
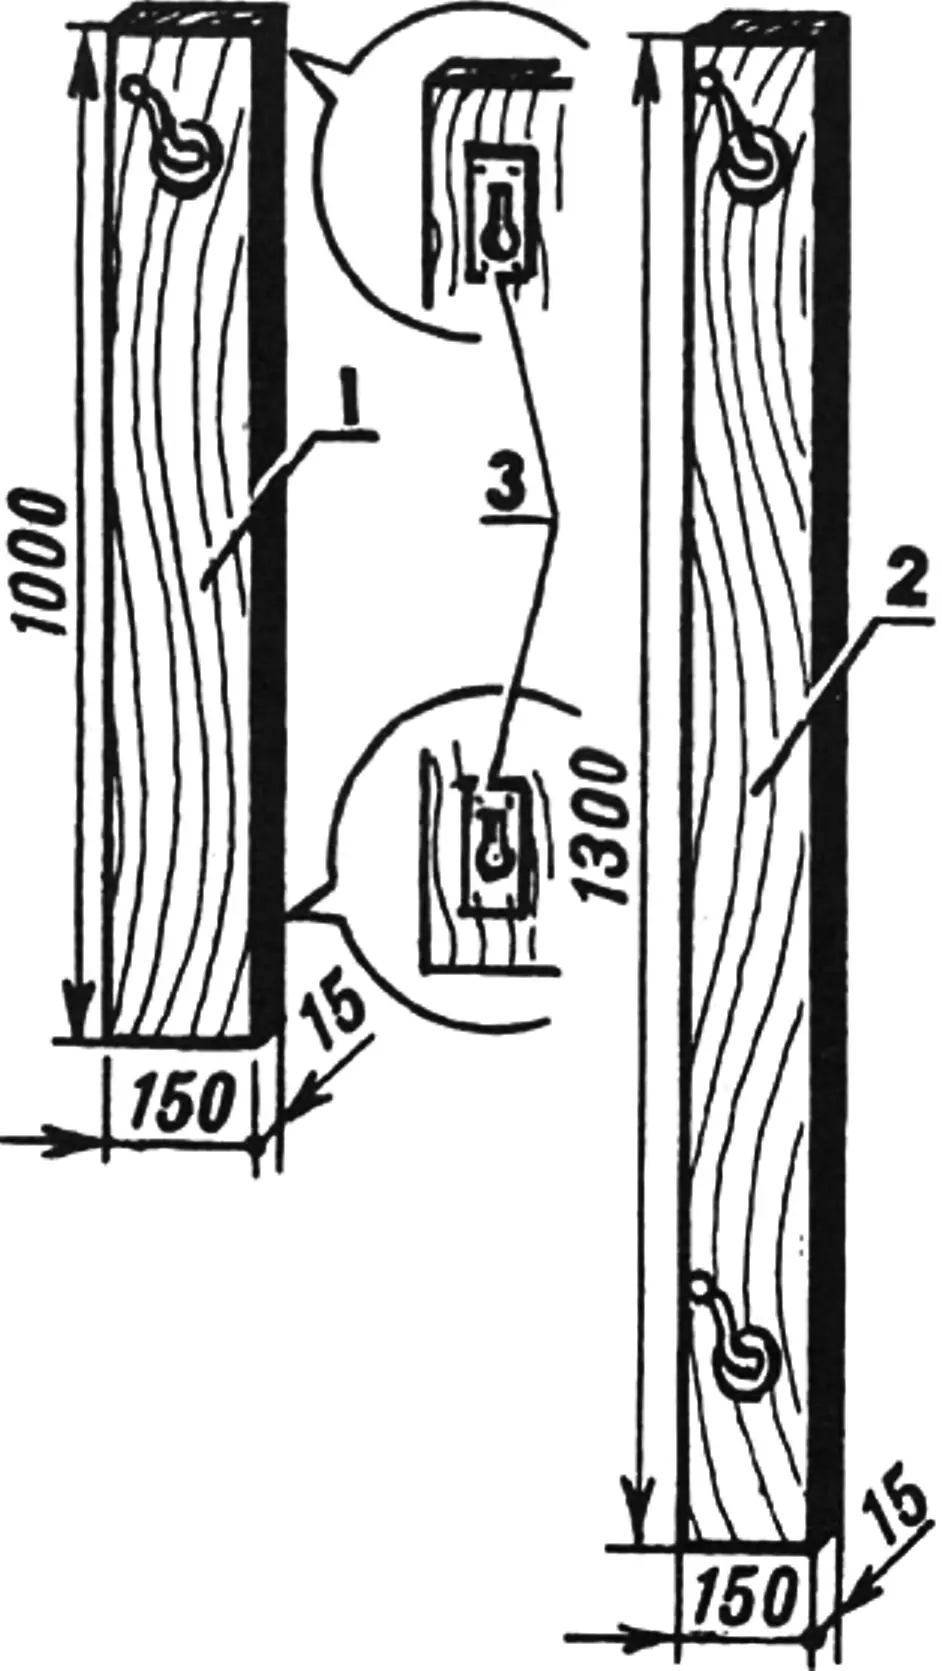
1 — small; 2 — large; 3 — metal hanging brackets
Any hooks may be used. On the reverse side of each board, both small and large, standard metal eyes (for example, for kitchen shelves) are fastened with screws at the top and bottom, by means of which the hangers will be hung on the wall.
Mirror
Its frame should also be extremely simple (Fig. 6). It is easy to make from wooden battens of 40×20 mm cross-section, with a straight half-lap joint or with wire staples (using a furniture stapler).
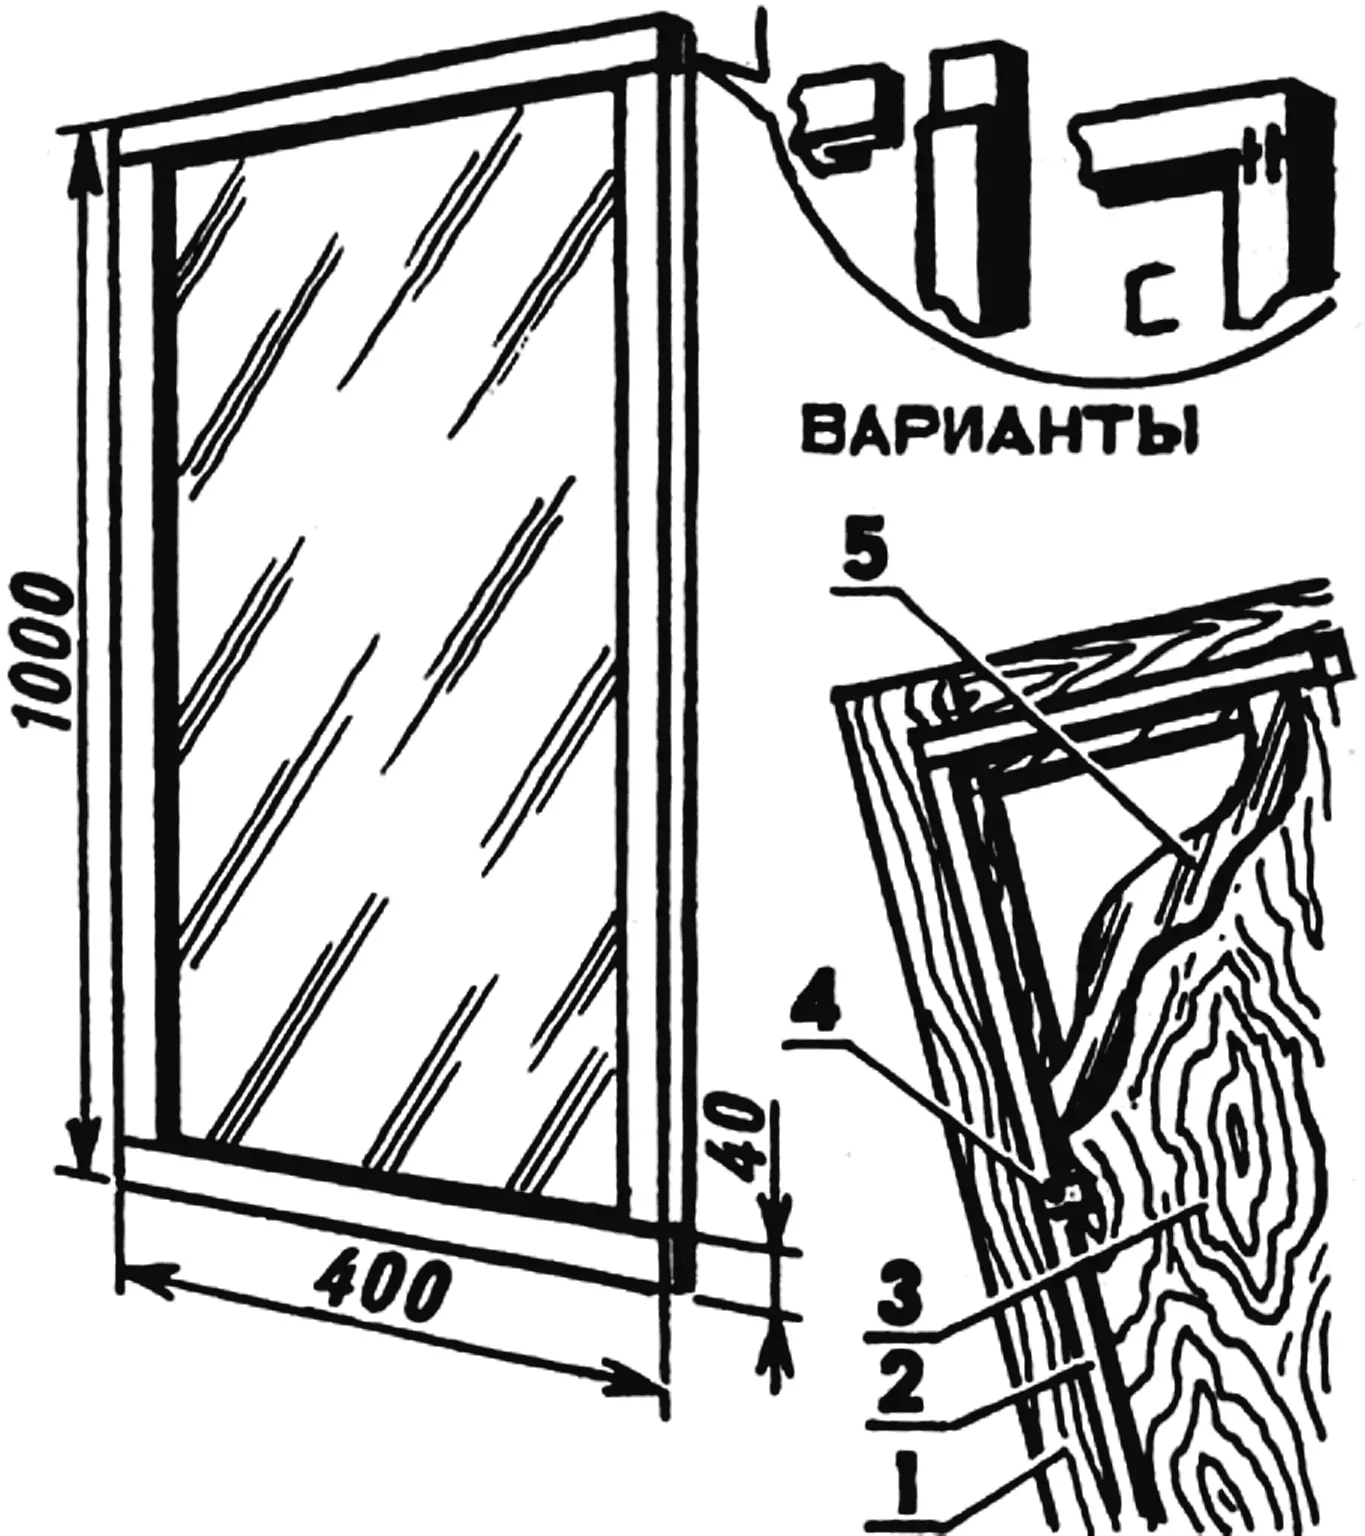
1 — frame (battens 40×20); 2 — subframe (slats 10×5); 3 — mirror backing (plywood s3); 4 — retainer (metal plate); 5 — mirror
To fasten the mirror glass, a subframe of thin slats of 10×5 mm cross-section is nailed to the reverse side of the frame, and the glass is laid into it. On top it is covered with a hardboard or thin plywood panel and pressed by flat retainers made of metal plates.
Finish
All particle-board panels should be painted, not only for aesthetic but also for environmental reasons. They may also be covered with wood-look film.
Before covering or painting, all surfaces must be sanded with sandpaper, and the joints previously filled. For finishing the bench, cabinet and shoe cabinet, nitrocellulose, oil or enamel paints may be used, in several coats, with intermediate drying and sanding with fine-grit sandpaper.
The color is chosen to match the surroundings; a combination of two colors is possible: one for the bodies of the pieces, the other for drawers and doors (always lighter than the first).
After careful sanding, the board hangers and the mirror frame are best treated with stain and coated with furniture varnish, also in several coats. However, they may be painted the same as the other pieces — this will create the impression of a unified suite.
“Modelist-Konstruktor” No. 10’2001
Recommend to read
 VELOSEZON
The proposed design is the winner of one of the contests of velomobiles in the Lithuanian city of šiauliai. My first recumbent I built in the 1980's, a few times it was altered... Building a cottage
Dacha plots... Just [~600 m²]. How can you fit a house, a separate kitchen-dining room, a utility block, a bathroom, and a garage on this tiny patch? And you still want to plant...
