Markings (see picture). start with the application of solid pencil lines bounding a geometric pattern. Moreover, the line parallel to the longitudinal edges of the workpiece, is applied by hand motion to himself, holding a pencil with thumb and forefinger, and middle finger resting on the edge of the workpiece. Perpendicular to the same line is applied with a carpenter’s try square, and those that need to go at different angles to the longitudinal edges, – using erunok or Malka.
Internal space to house ornament, divided into elements of geometric design. First, as a rule, into squares or rectangles and then into triangles. A breakdown of major part of the ornament carried out with a ruler or a compass divider, while the minor elements are performed “by eye”.
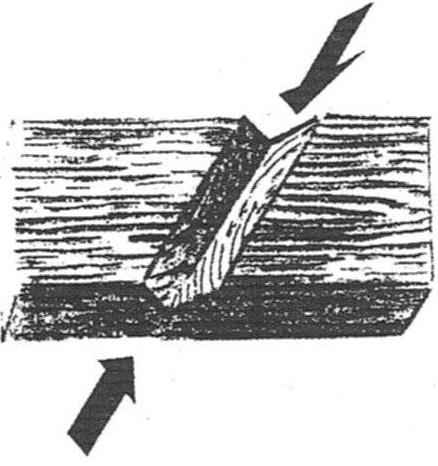
Finished the notch, cut at an angle to the fibers
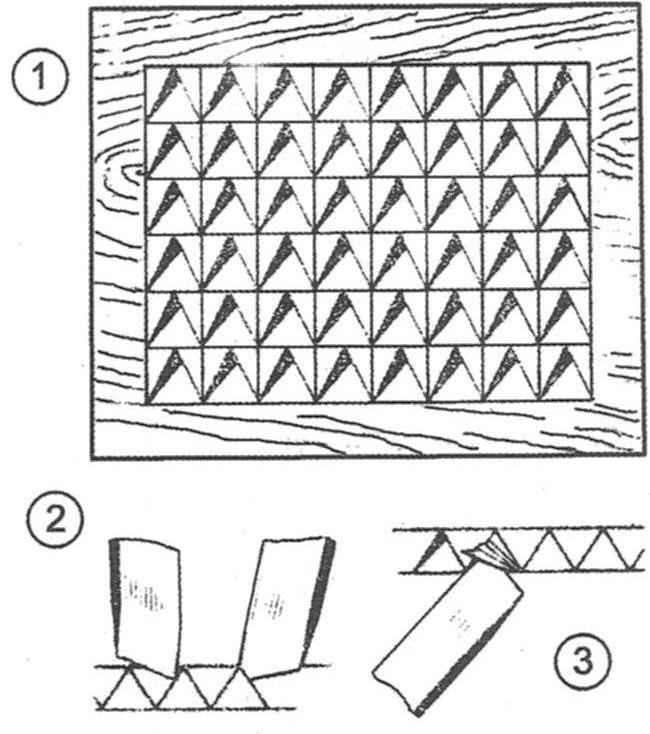
The thread pattern of the corners:
1 – the layout of the pattern; 2 – execution of cuts; 3 – sample chip
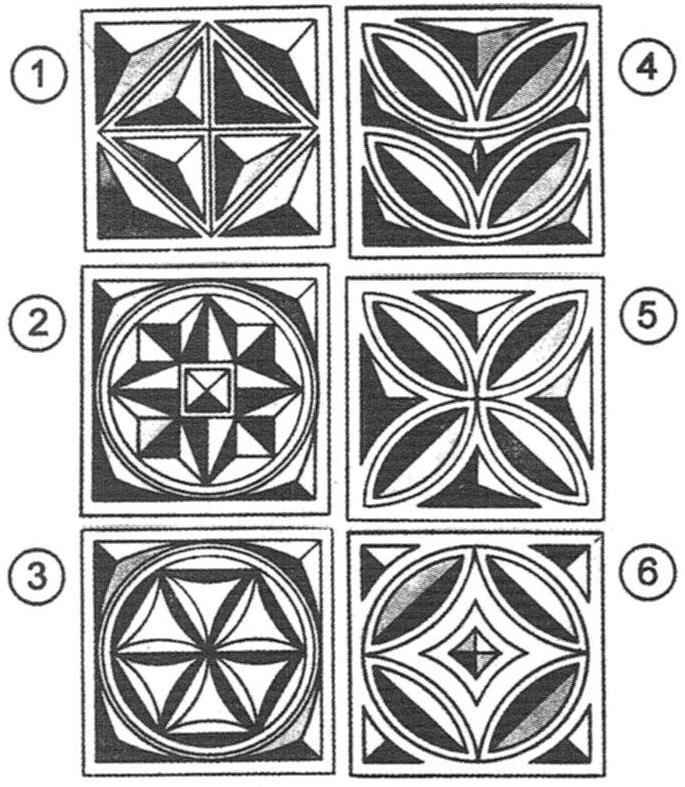
The triangle as an element of a geometrical carving in ornamental compositions:
1 – in combination with grooves; 2 – a diamond in the center; 3 – 5 – with skobchataja prirezkami; 6 – with diamond framed skobchataja prorok
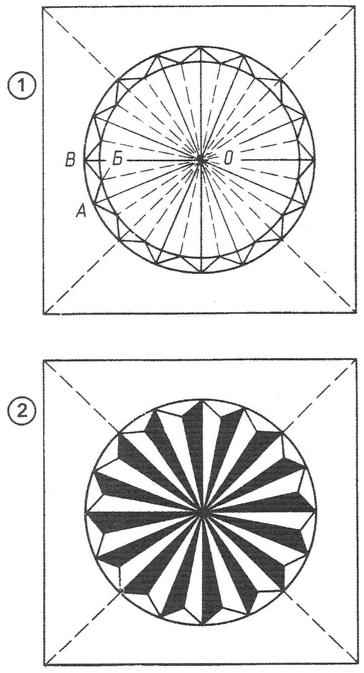
Socket with glow:
1 – marking of the workpiece; 2 – ready socket
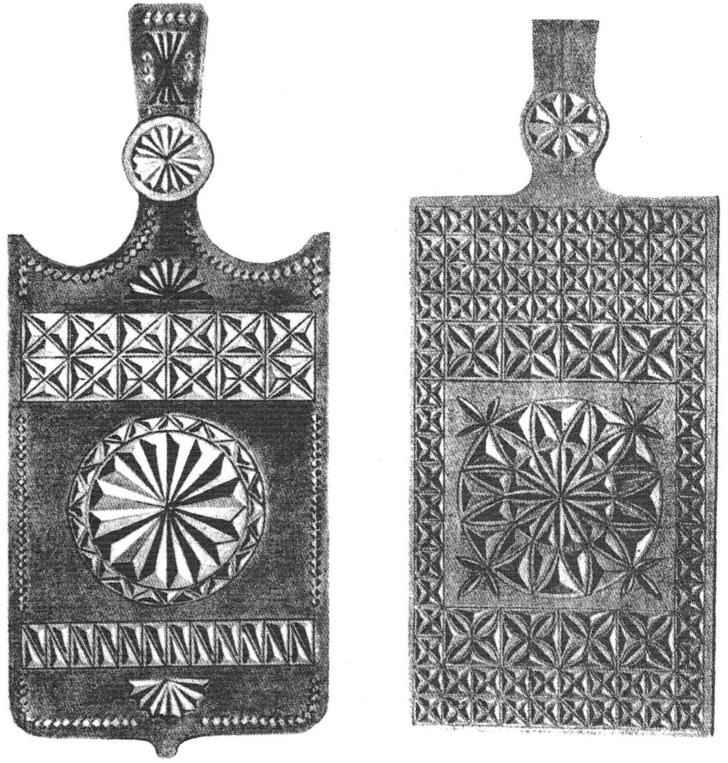
The geometrical carving on the cutting boards
Thread direct dihedral recesses are in several stages, the workpiece coated with her grid of squares with sides of 10 mm. the Exercise is performed sitting, with the help of weed. First cut notches across the grain of the wood. The joint held in the right hand with the clenched fist, fingers tightly gripped the handle: a little finger – at the bottom edge, and the thumb – with an emphasis in the arm. Start with cutting the middle line of the recesses. When performing the inclined faces of the joint is held at an angle to the right or left (within 30 – 40° to the plane of the workpiece).
First of all cut the right face, placing the toe joint at the beginning of the recess with the deviation from the middle line to 1-1,5 mm. by Tilting the cutter, cut it into the wood and slowly lead themselves, trying hard motion to do a completely straight groove of uniform depth. When the end faces will remain 5-10 mm, handle joint gradually withdrawn from himself, continuing at the same time, the movement of the toe of the cutter on the end faces.
Thread the left facets with the inclination of the joint to the left, movement to itself, somewhat harder than the right, because the cutter tends to move to the middle line. Lead should be correct. Slowly, with constant pressure.
At the end of the exercise cut end faces of the recesses. For this purpose the plate is rotated 90°. Tilting the pot to the right at 30 – 40°, bisected by a line bounding the figure, respecting all the above rules. Then, turn the plate 180°, also undercut end faces of the recesses on the other side. Chips in the form of a triangular straw needs to separate themselves or from the blast of the cutter. If not, repeat all the operations first, and in the same order, but in any case not to pull out the shavings with your fingers or to bash her with a knife.
Of cut along the wood fibres require less effort when cutting, but more care, as the joint tends to go by the layer-linear. His movement need to constantly adjust. And the verge turned pryamimi and clean recesses cut in two. The first time a joint is injected into the wood deep, but true. Second time doing the excavation at the required depth. If the cutter did not go according to fiber (non-linear), when re-cutting to change the direction it is moving in the opposite direction. When you are done making faces, cut the tips of the chips.
Dredging under an angle to the grain of the wood make, achieving a smooth cut faces, adjusting depending on the specific of each case in the cutting direction (excluding the movement of the tip to wedge against the layer, the impending appearance stabbing and scratches).
Due skills to reliably perform the trihedral recesses should be to gain, practicing the appropriate exercises. And to start with the simplest of them – the thread of the pattern from the corners, after inflicting on the workpiece horizontal and vertical lines at a distance of 10 mm from one another, by the resulting squares slanted (in both directions) lines into triangles (see figure).
Keeping the Bong upright, cut side triangles from top to bottom. Depth of cut at the top should be the maximum, and at the base is nullified. Then the pot is tilted, deepening the triangle toe cutter, cut chips.
Thread triangular grooves with a hollow in the centre is carried out after the appropriate markup. Starting the exercise, put the toe joint in the center of the triangle so that the heel of the cutter were directed to one of the corners (the center determined by eye). Holding the tool vertically, push the handle and make the cut (3 in each triangle) from the center to the corner. Then, holding a pot in series to each corner, cut faces (the inclination angle about 60°) the same techniques, they carried out cutting corners. Intersections should not be chipping and tears fibers. The line bounding the surface of the workpiece, is clear and direct.
In the manufacture of sockets, lights, performance skobchataja of proraso (holes) can be guided by almost the same tips that were outlined above, adjusted for the instruments used. In particular, the use of semicircular chisels to the proper profile. Same remark for thread nails, which, being located in a staggered manner, creating a unique beauty of its scaly pattern.
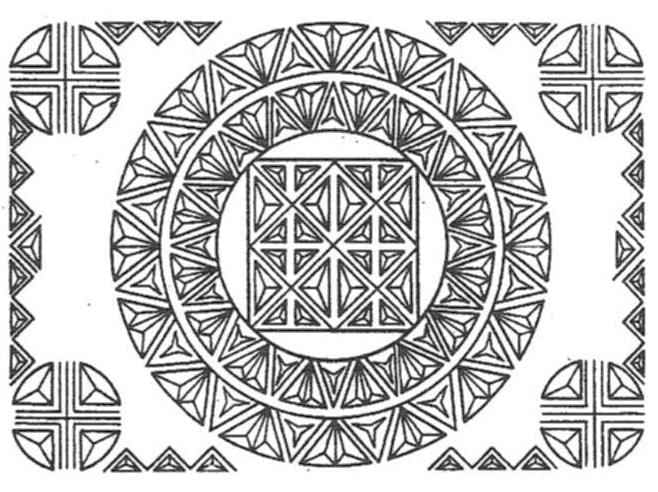
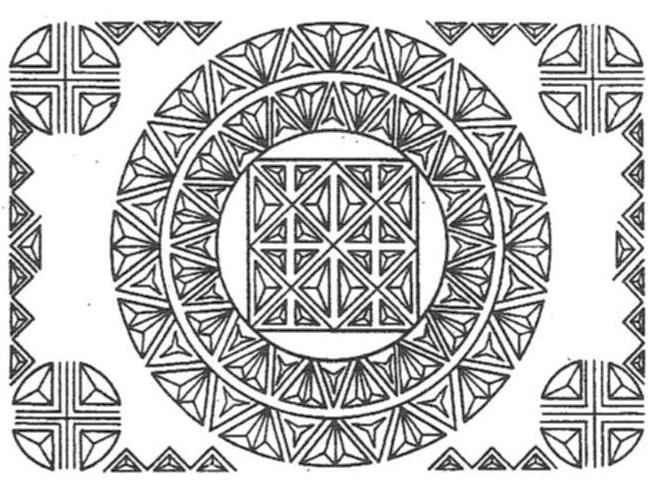
Combining the basic elements of a geometrical carving, you can create an interesting ornamental compositions. Some of these compositions is depicted in the illustrations (see figure).
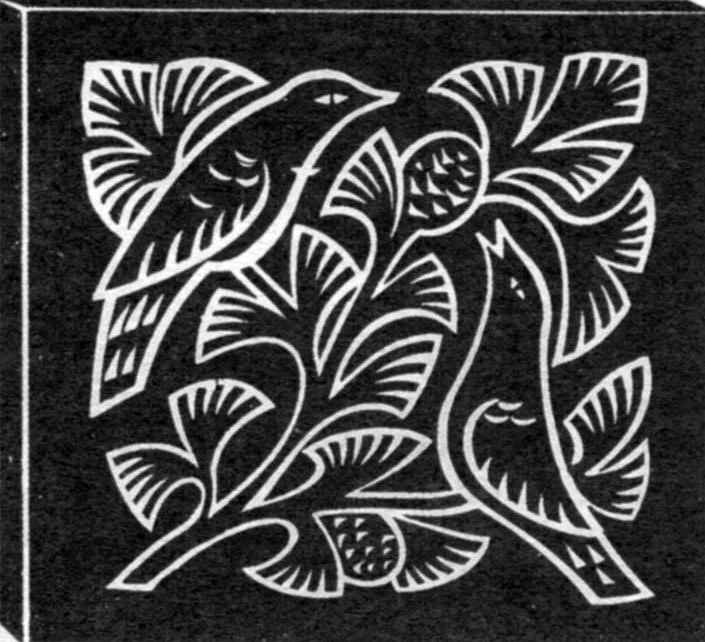
The planimetric carving (ornament)
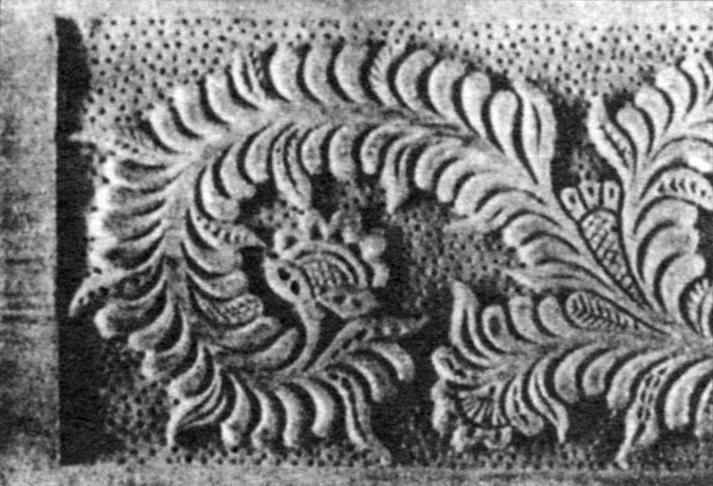
The relief carving with the chosen background pricechannel
With all the variety of decorations wooden surface, characteristic of geometric carving, to fully reveal the natural beauty of the wood, to the greatest extent to convey the inherent fertile material warmth she can not. Yes, and it is only a kind of ploskovice thread. And it is characterized by that the background is a flat surface decorated products or blank pattern to form recesses of various shapes – donations.
But here is part of a contour thread. No disturbing the composition of the product, it is in contrast to geometric uses mainly visual motifs. Leaves, flowers, figures of animals, birds, etc. – all like the engraved picture. Lines are clear, simple hard. The play of light and shade is almost there. And this is precisely its appeal.
Learn the technique of contour threads, requires perseverance, and increased attentiveness, and, of course, hard work, consistent developing exercises for increasing complexity; from basic sockets with a smooth curve the petals to the intricate compositions with floral ornaments, various panels, etc. And the quality of the material it is recommended to first work on wood of a Linden. Then, as you gain fundamental skills to use a birch with a subsequent transition to other, more valuable species.
Selected for thread contour image is applied to the workpiece with a pencil or transferred from the original (tracing paper) through the carbon paper. And to protect the line from premature abrasion, cover them with a thin layer of varnish. It is – if the wood surface is not subjected to pretreatment.
Usually the workpiece prior to application of the image appropriately treated: cleaned, then painted a dark color with the subsequent drying, small grinding and coating of nitrocellulose lacquer or wax composition. Moreover, to obtain the desired color often use 2 – 3%-s ‘ solutions of water-soluble dyes for wood. For example, dark brown # 15, walnut № 2 and№ 3.
The tracing of the pattern is fixed on the surface of the workpiece and a sharp object is forced all the lines on the wood. The resulting contour encircles colored pencil, visible on a dark background, or scratch awl.
The blank is fixed on the workbench still. 180° only in extreme cases. The threads perform standing. Working with two hands: and the hands are more protected from injury break on first tool. Moreover, the right hand holding a chisel or the joint for the handle, and the fingers of the left hand hold the instrument below the handle near the blade.
Bong – Prime tool. Lines across the fibers, cut the toe of the blade movement to his subsequent undercut faces at a certain angle and to the desired depth. Lines, along the fibers, working carefully on the layer with the inclination of the joint to and from oneself. Curves cut smoothly, not looking up, first the outer and then the inner side of the contour. By increasing the curvature of the line of the heel joint lifted above the material.
As needed use, of course, the corners, the gentle, medium and steep semicircular chisels. The expressiveness of the thread increases, varying the depth and width of cut lines:
for large shapes they are more sharp, succinct. Typically, the first are so-called “upper” line, so that their faces were continuous, and then”lower”. If the line goes through the background, it cut deeper. And when it goes to another form of picture – less.
Modern art jewelry technique contour threads a few changes: cut the contour on the inner side make cool, and trim external is a hollow. It makes the picture more expressive. Sometimes the inner face of the loop slightly soften. For greater expressiveness contour thread sometimes paint, such as watercolor paints. For this purpose, the blank outline outline, elements of his paint in the appropriate colours, and then perform a thread. Line drawing complementary recesses in the form of circles, ovals, petals, which also enhances the artistic expression of the contour of the thread.
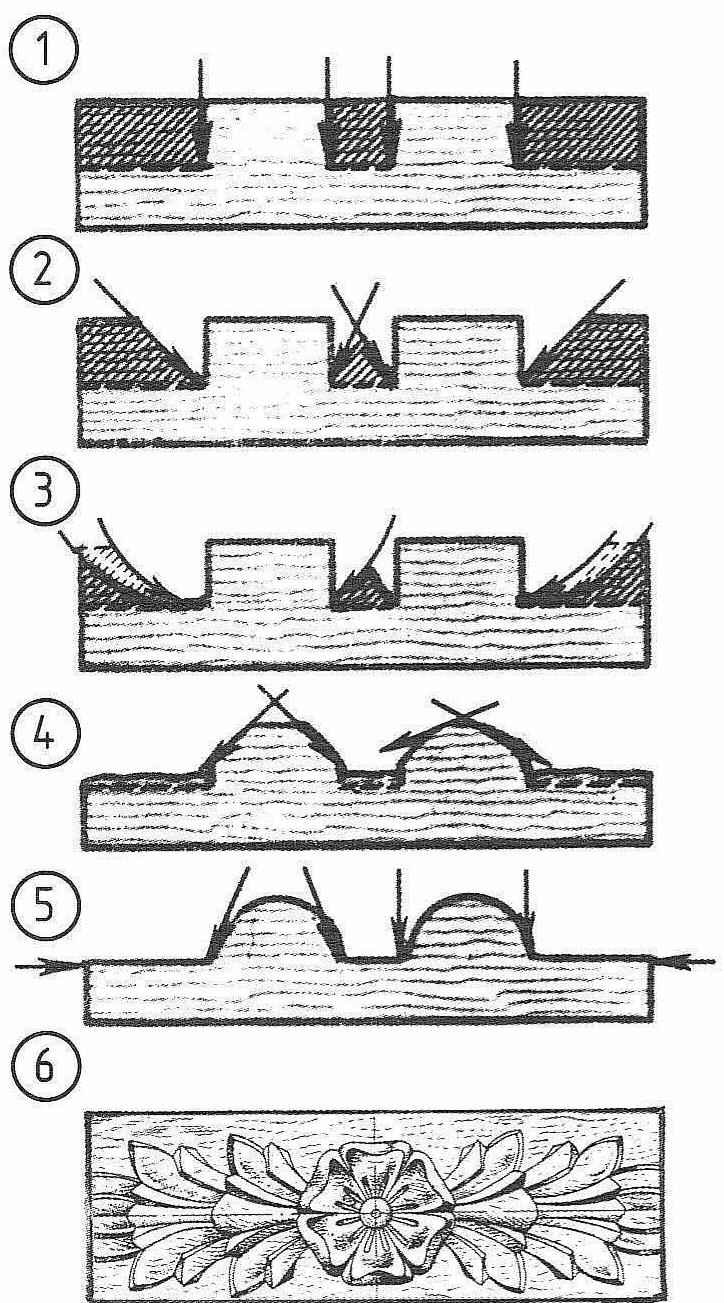
Stages of relief carving:
1 – cut along the contour; 2 – trimming to the base; 3 — sample of a background completely; 4 – rounded pea; 5 – a sweep background and ornament; 6 – part of the floral ornament
Relief carving, in which an important role was played by the skill and talent of the carvers Abramtsevo-Kudrino school, established in the late nineteenth century in the suburbs, has several varieties. Zaovaleny thread, as well as the contour is executed in the form of dihedral recesses on the circuit pattern, but the notches are cut deeper, and their faces are rounded (zaovalivajut). And the forms of the ornament and cut the notches zaovalivajut cooler, and from the background – more gentle. There is a common thread of symptom relief: a conditional low relief, located in the same plane at the level of the decorate surface.
The incision is made exactly along the contour with a slight tilt of the tool in the direction of the figure. If the line is straight, then use a Bong, if the curved – a chisel of the appropriate profile. Trimming of the contour, make a Bong, or the gentle, medium and steep chisels. Recent work poke, i.e., holding the tool at an angle of approximately 45° to the surface and pushing the end of the handle with his palm. And zavarivanje perform with the help of Bong, or sloping of a chisel.
In some cases, the background zaovalivajut so that it never remains flat. This background is called pillow, and thread zaovaleny with the pillow background. According to the technique of execution, the purpose (and appearance) here is a little different from the usual zaovaleny thread.
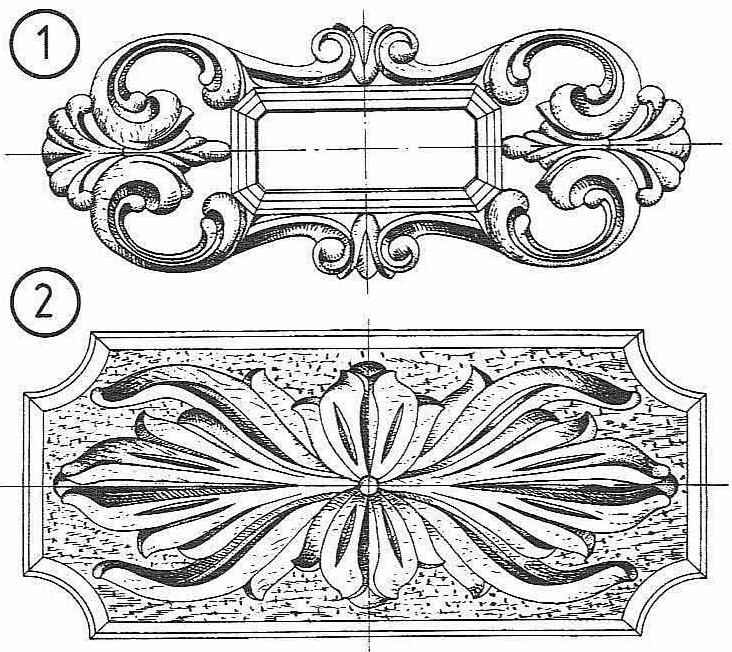
Decorating the furniture with relief carving:
1 – insert braided (fishnet) thread; 2 – a blank insert with furniture pricechannel background
The relief carving with the chosen background is the same as conventional zaovaleny. The shape of the ornament remain flat with rounded edges. Due to the fact that the background is selected to a small depth, the pattern seems to be lying on a smooth plane.
Sweep start with the large areas of background direct chisels, holding them nearly horizontal. In the corners of the ornament working parts of the blades, using as a tool sometimes kljukarzy, narrow chisel and then the joint. The edge of the background strip movement to the center of the workpiece.
The background of the coin sometimes. The play of light and shadow here is somewhat richer than in zaovaleny thread, but also small. Therefore, the relief carvings are mainly small things and finish polishing.
The relief carving is like the transition from the contour to a relief carving, which has almost no flat surfaces, and the forms of ornament are revealed by the topography of different heights.
Relief carving carry out standing. The workpiece is fixed on the workbench still and turn only in extreme cases. Master the techniques appropriate for this plastic material, as wood of a Linden. Then you go to rocks of middle and high hardness -birch, walnut, beech, oak.
![Eaves (woodcarving)]()
Eaves (woodcarving):
1 – the simplest versions, made in the technique of Welt (propyl) thread; 2 – complicated openwork compositions; 3 – variant with deaf relief carving
The main stages of relief carving are: drawing, incision and trimming of the contour of the ornament, the selection of the background roughly, revealing the forms of relief ornament, trimming the background, detecting small relief ornament, chasing background. Part of this list is present in the other bands thread. Many of the steps have already been highlighted (especially when it was about relief carving). And because we focus only on the most characteristic and distinctive aspects of the technology relief carving.
The incision is performed in the vertical position of the cutter strictly on the contour, translated through the carbon paper on the blank and covered for protection from abrasion during operation, a thin layer of clear lacquer (brush lines). Not to get undercut ornament in high relief, the tool is slightly tilted to the side of the picture.
If in the pattern some elements to find the others, then cut and trim starting with the top lines and make them less deeply; and for a large – incision and trimming of the elements lying in the background.
When the material is solid, and the depth of the background is quite significant, a one time cut and trim not to work. In such cases, these operations are repeated. The first incision is made with light pressure on the chisel, making sure that it took place exactly on the lines of the drawing. Trim doing deeper scoring. Thus the chips can not be separated. Hence, it is necessary to repeat the incision for its removal.
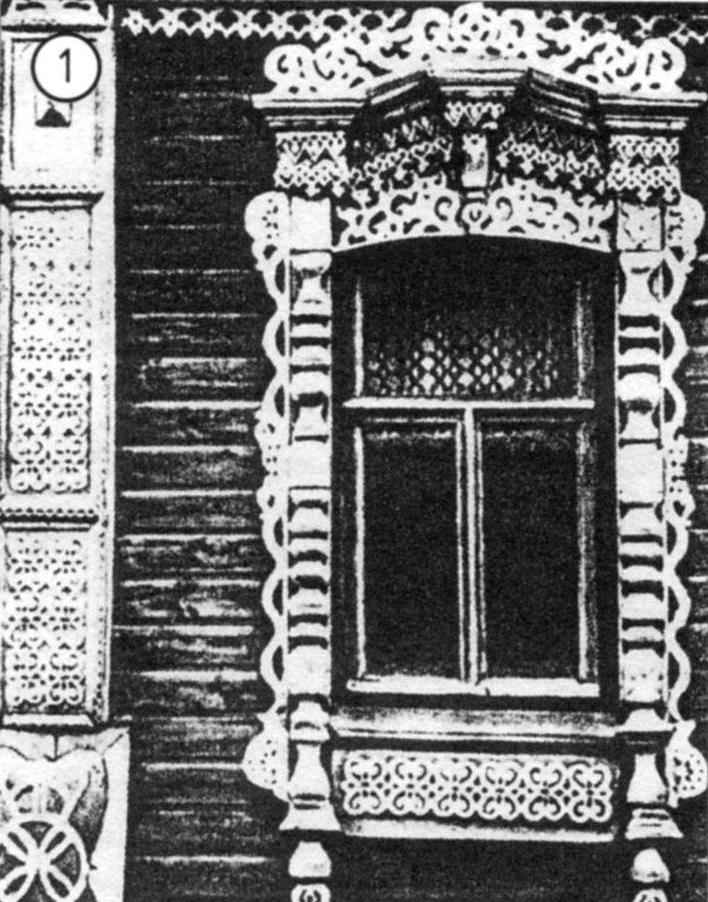
Decoration of window frames:
1 – version, made in the technique of Welt (propyl) thread; 2 – variant with deaf relief carving
When performing such a variety of carving as high relief, having in bas-relief contrast to the higher elevation, rich chiaroscuro, and the large ornament, contour chop with the help of mallets. To do this, pick up the chisel of the desired profile, put the blade on a line with a slight slope in the direction of drawing and striking with a mallet on the handle of a chisel, cut off the circuit. Stump perform with an allowance of 2 – 3 mm above the design depth of the relief and with a small allowance on the contour for further processing and Stripping of ornament and relief.
Cutting the contour portion of the ornament, the same chisel to cut the outline at an angle of 45° in places where space allows background. In tight spots on the stump and make the undercut in several steps. The main thing in this work to accurately calculate the force of impact to evenly cut layers of wood to the required depth.
The selection of background rough start with the biggest “spots” sloping wide chisels. Cut lead in different directions depending on the area of the background and direction of fibres of wood. A chisel with two hands, tilting her to the plane of the background. For large thread background cut with mallets. In any case, the depth of the background after fetching should be the same everywhere.
One of the most common operations in identifying forms of relief carving is zavarivanje or rounding of convex elements. The steps of this operation are easy to understand on example of curvature of a pea.
After incision and trimming of the contour of a pea, background fetch roughly removed with a weed root chamfer at an angle of 45°, then the upper chamfer. And finally, the bottom with the pot, or the sloping of a chisel. The latter conceive the contour of a pea.
Zavarivanje other forms of ornament is similar.
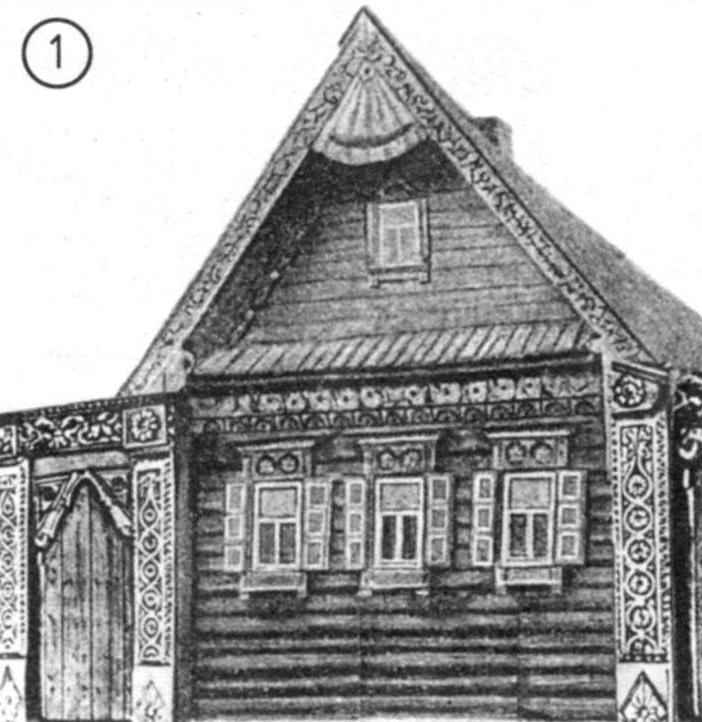
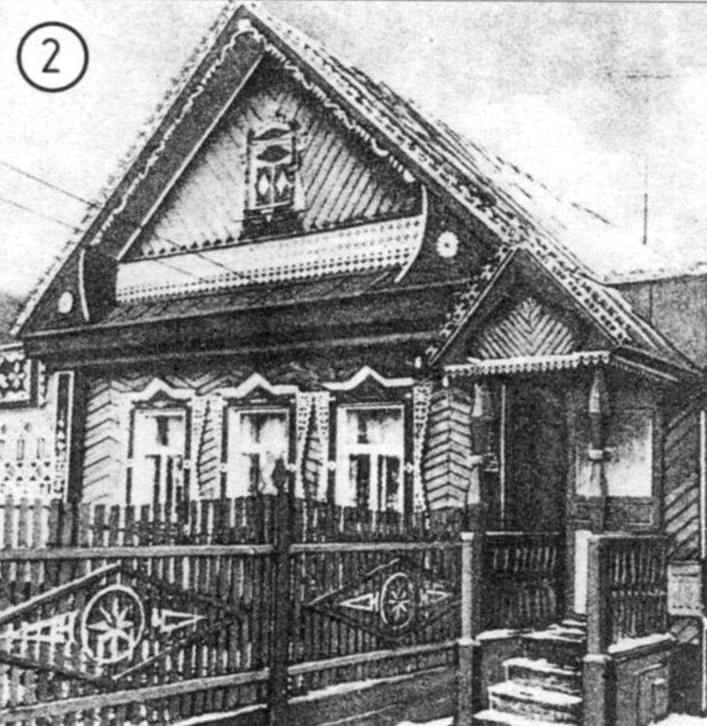
Carving that transforms the “typical” house:
1 – variant with deaf relief carving; 2 – variant with extensive use of modular outlets and patch
The development of topography often produce sample legkoobratimy indentations with medium and sharp chisels. Left hand grasping the tool below the cutting, guiding the movement of the chisel and the palm of the right push the handle. The blade first cuts into the wood. Then, gradually lowering the handle and as if werriwa blade on the bevel, slowly bring him up. The movement resembles the recovery of a spoon. At the same time slightly rotate the chisel from left to right and right to left, thus reducing the cutting force and to obtain a cleaner cut.
A common operation is the cutting of the inclined plane to the background (flower petals, leaves, buds, etc.). This operation is performed with sloping or straight chisels in two steps. First cut off the desired layer, and then forming the profile strip and plane. The direction of slices must match the direction of the forms of the ornament.
The identification of small relief ornament is to apply a thin and insignificant, seemingly, but so important for expressive carving of notches. Running techniques contour thread using the Bong or cerasina.
Embossing background is made using a punch (mint), which uniformly hit with a hammer. In relief carving this operation is rarely used. Implementation of its easy.
Welt – this is the thread in which the background is deleted. It can be performed in the technique of relief carvings (flat ornament), and in the technique of relief carving. The background here and remove the chisel or a jig saw (with a saw). In the latter case, the thread is called propyl.
A special significance has the Welt thread with a relief ornament. It requires exceptionally high skill. For the unprecedented lightness and complexity of this thread called fishnet. Sometimes the threads are glued to a wooden base. Hence the appropriate name: invoice or pasted thread. As openwork, it is often used for furniture decoration. And perform the so-called “pillow” – well prostrelennoe the Board, which is attached with wood glue or casein thin paper. On top of paper glued blank for thread: circumcised on the size of the picture and carefully processed. As the material used solid wood: walnut, mahogany, birch. The surface of the workpiece is transferred to the drawing and proceed directly to the thread. First, perform a pruning of the contour. Then zaovalivajut edges and carefully study the terrain. Finished the thread with a thin knife carefully removed from the pillow clean from paper and glued to the product.
A thousand years of history, rich in the tradition of sculpture, or three-dimensional thread. This species is characterized by the fact that the relief image is here already partially or completely separated from the background, turning into a sculpture. It has been widely used for interior decoration, furniture, household items. Often carvers portrayed in his compositions, the figures of animals and birds, fantastic animals. With the advent of Christianity appeared sculptures of saints, which are often brightly painted and served as a decoration of many temples.
Love humor, joke, and sometimes sharp satire is embodied in a wooden toy. Special fame toy Zagorsk (now Sergiev Posad) and the village of Bogorodskoe.
Woodcarving is characterized by its large scale. Runs mainly on softwood using axes, saws and chisels. And use this thread for decoration of wooden buildings. Also call it the ship, because it is believed that she came with carved decorations of wooden ships. The nature and techniques woodcarving to be long (for example – “okhlupen” – shaped image of the head and upper torso of a horse, deer, large birds on the crest of the roof over the front), embossed, slit (openwork). Sometimes the whole pattern is made of individual parts that are planed, cut, cut out separately and then bonded together, for example, nails (national outlet).
Deaf relief carving with napoletani (deaf) background and a high relief pattern is a time for decorating the Gables of the houses, window frames, etc. Among the leaves and flowers can often be found here images of mermaids-of guardians, lions and Phoenix.
Finish the carvings is not only to give a more attractive appearance, new color and gloss, but also to create a protective coating that protects the wood from dirt and moisture. And if you use a transparent varnish and polyester resins and to better identify the texture, underlining the natural beauty of wood.
The main stages are: preparation for finishing, dyeing, coating and processing finishes.

Protection carved details coating
Finish products by hand is, of course, a lot of work. After grinding with fine sandpaper from the thread grooves is removed by using a stiff brush dust. Then the surface is moistened with 3 to 5% solution of joiner’s glue or PVA dispersion, rubbing her wet swab along the grain. Then dried for 2 – 3 hours with subsequent removal of the pile with the spent grain sandpaper lightly along the grain. This operation is performed twice. After the removal of the cloth the surface is clean from dust.
Dyeing can be recommended to use water soluble dyes for wood №№ 1-16. The solution concentration of 1,5 – 2% is applied to the surface of the thread with the excess that the wood was free to absorb the dye. Moreover, in 1 min after application, do not soak the dye is removed pressed tampon.
After drying, the painted surface is rubbed hard with fabric such as burlap or waste fine sandpaper along the grain. The goal is to gently smooth raise the NAP and remove any excess dye that veils the wood texture.
When applying finishing coatings using various materials depending on the purpose of the product, species of wood and type of thread. In particular, the widely used nitrocellulose lacquer NC-218 and metropolitenu NC-314. Moreover, after drying the first coat of varnish lightly sanded waste fine sandpaper and applied a second coating. Stand product within 24 – 48 hours, again lightly sanded, clean the surface from dust and start polishing.
The first operation is fulfilled with a mixture of nitrocellulose lacquer with varnish in a 1:1 ratio. To swab at the Polish did not stick, on a surface put a few drops of paraffin oil. After exposure of the product during the day, cover lightly sanded and produce a second polishing NTS-314 to produce a high Shine. Followed by another excerpt, but for the past three days. The third, final polishing is carried out with a varnish diluted with alcohol up to 8 – 10% concentration. The surface becomes a mirror Shine.
Mechanized decoration of carved products is usually performed by a well-established technology (see table). But, as practice shows, the varnish ML-2111 are characterized by high decorative properties than the nitro-cellulose coating. It should also be noted that the dyes Nos. 3, 8, 17 under the action of the lacquer change color.
T. MATVEEV, Moscow
Recommend to read
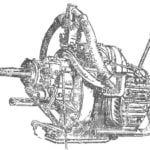 GEAR FOR SNOWMOBILE
Designers snowmobiles know that linking directly to the crankshaft of the engine and the propeller is unprofitable: too high engine speed do not allow to use aredigital optimally. To... NOT THROWN AWAY BUT USED!
The so-called "mouse" is an integral part of a modern computer. With the advent of new, old, still working, but outdated morally, as a rule, thrown away or gathering dust idle in the...
 In our country, has long been famous for its forest resources, one of the more beloved Supreme materials has always been and remains a tree. From generation to generation the secrets of working with him. And develop products, affecting the world through the grace and plasticity of form, beauty, textures and splendor of the carved pattern.