An incubator for breeding chickens at home can quickly to make, having a thermostat with indicator light on and the cord with plug (eg, burnt-out iron), a couple of 300 Ohm tubular wirewound resistors type PEV-100, two tanks under the humidifier, a metal grid with cells 5×5 mm Yes pine boards. And to control the incubation process it is advisable to have any (even homemade) psychrometer, dryer and candling.
It is advisable to start with the casing of the incubator, then move on to wiring and debugging of the whole structure.
Case — the box from boards in width 110 and a thickness of 15 mm. Internal dimensions mm. 300x300x200 Cover is removable, 330×330 mm. To prevent lateral displacement applied Reiki 20×20 mm, nailed to the lid is indented from the edges to the thickness of the shell.
All wiring is done directly on the cover. Stavatti resistor heaters are mounted on brackets from the metal bracket dimensions 30×30 mm parallel to each other (they are separated by approximately 200 mm) and symmetrically to the thermostat and connect them according to the circuit diagram of the incubator. The installation is solid copper wire with a diameter of 1-1. 5 mm in the heat resistant insulation.
The thermostat (from iron) is fastened with screws or bolts passed through a heat insulating gasket, in the middle of the lid. It has a fairly wide temperature control range. But if there is a possibility of choice, a preferable instance, clearly triggered even the slightest pressure on the strip: this will be more responsive to the change of the thermal regime in the incubator, including or switching off the heaters.
The incubator is equipped with swecoin-the icon (light bulb НL1 with a cartridge, and a resistor RZ in the form of Ni-chrome coils, which are located in a porcelain tube) from the iron. Indicator glow — a sure sign of passing an electric current through resisto-ry-heaters and R2.
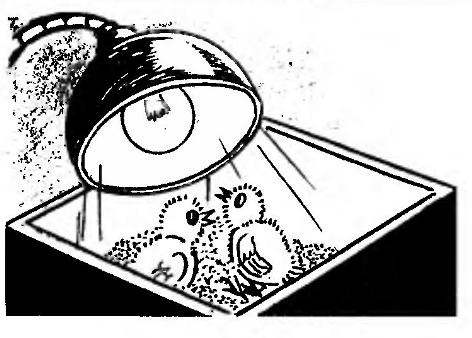
Homemade incubator and its circuit diagram:
1 — housing; 2 — lag wood (3). 3 — air humidifier (water container, 2 PCs.); 4 — mesh; 5 — cover; 6 — rail-fasteners; 7 — resistor heater (PEV-100, 300 Ohm, 2); 8 — operation indicator lamp (iron); 9 — temperature controller; 10 — bracket (10-mm cut the metal bracket 30×30 4 PCs); 11 — bolt M4 (4 PCs); 12 — wire installation in heat-resistant insulation; 13 — a screw 5×12 (4 PCs).
Simple and reliable: candling (a), dryer hatched Chicks (b) psychrometer (C):
1 thermometer dry; 2 — wet thermometer; 3 – band hair; 4 — humidifier (muslin or gauze in a single layer); 5 — bottle of water; 6 — clamp of the bottle; 7 — basis.
НL1 is powered by a divider formed by resistances + R2 (payload) and RZ. But in the iron as a load was made by the heating element, whose power (and, hence, the current flowing through the divider, and the voltage of the bulb, made with spiral) is much greater than those values that correspond to the circuit diagram of the incubator. That is, the system indicator will light up in the home-made very poorly. To increase the brightness of the spiral of the porcelain tube is removed and in its place is established a different, more acceptable parameters.
Quite suitable for such replacement is 40-turn segment of the helix from 400-watt electric open type. The voltage drop across this resistor wire is sufficient for a bright glow indicator lamp НL1 inserted into a hole 12 mm in diameter in the lid of the incubator. Porcelain tube protects updated wirewound resistor RZ, and the remaining parts are fixed in place.
A homemade incubator is equipped with simple equipment. On the bottom of the three stacked logs — Reiki 300x20x20 mm. Between them in the middle there are two water tanks to maintain the required humidity. As the tanks will fit the plastic cover and housing from the school pencil cases, gotovilis, paints, as long as their side does not exceed 20 mm. is Installed and the metal grid of size 300×300 mm with cells 5×5 mm. And, of course, a thermometer. It is placed horizontally on the grid, at a convenient observation spot
Almost ready incubator with the lid open include in the grid for inspection and presetting. Listen as the thermostat responds to this is the inclusion of a clear positive with a very characteristic sound — click. Then close the lid and after two or three actuations of the thermostat (the benchmark is already light) measure how fast the incubator out on the given thermal conditions. If necessary, the screw of the thermostat turn in the right direction.
As practice shows, the required thermal mode is set after warming up the incubator for two to three hours. Optimal is considered to be such condition in which the temperature inside the case is 37-38 °C (± 0.3 °C).
Before laying eggs for the incubator include warm-up and reaching the desired thermal conditions. After establishing the desired temperature lay eggs.
During incubation must periodically, for 6-10 times a day, flip the eggs, not forgetting to pour the water in the tank and keep an eye on the thermometer. In the case of slight overheating, it is sufficient to slightly open the lid for a short time.
Approximately from 19 th to 21-th day from the laying of eggs will begin appearing chickens. Hatched Chicks are transferred into a suitable cardboard box and dried out there using light bulbs with a capacity of 60-100 watts at a temperature of about 30 °C. the Number of hatched Chicks is 40-70 percent of the tab. The result largely depends on the quality of eggs. To check the embryos and monitoring their development it is desirable to have the ovoscope, even homemade.
Yu. KARIMOV, p. Khurba, Khabarovsk Krai
Recommend to read THE SNOWMOBILE RIDE YOURSELF! When winter comes and the snow is "fluffy blanket" covers the ground in many areas, the only vehicle able to overcome it "fluffy blanket", it becomes tracked all-terrain vehicle or, more... NO GASOLINE NEEDED Most of the vehicles I built were based on mass-produced noisy and "fuel-guzzling" motorcycle or bicycle internal combustion engines. This was convenient on one hand, but very troublesome...