SPORTS DINGHY ON THE HOME SHIPYARD

SPORT DINGHY AT THE HOME OF THE SHIPYARD“Moth” is the name of this sports Dinghy. Thousands of boats ply the waters of the lakes and reservoirs in many countries of the world. Especially popular vessels of this class in Czechoslovakia and the GDR. Sailboats these are not monotypes, that is, do not have strictly defined form. The rules allow while maintaining the basic dimensions of the vessel as modification of its contours and the use of different materials for the housings. One of the constructive options, “the Moth,” we offer our readers. Dimensions sailboat the following: maximum length — 3.35 m, maximum width — 1.6 m, sail area — 8 m2.
Given the drawings and the technology built boat designed for use pressed cardboard (hardboard). Moreover, the entire housing is formed from a single sheet of a thickness of 3 mm.
 
Fig. 1. Hull sport Dinghy
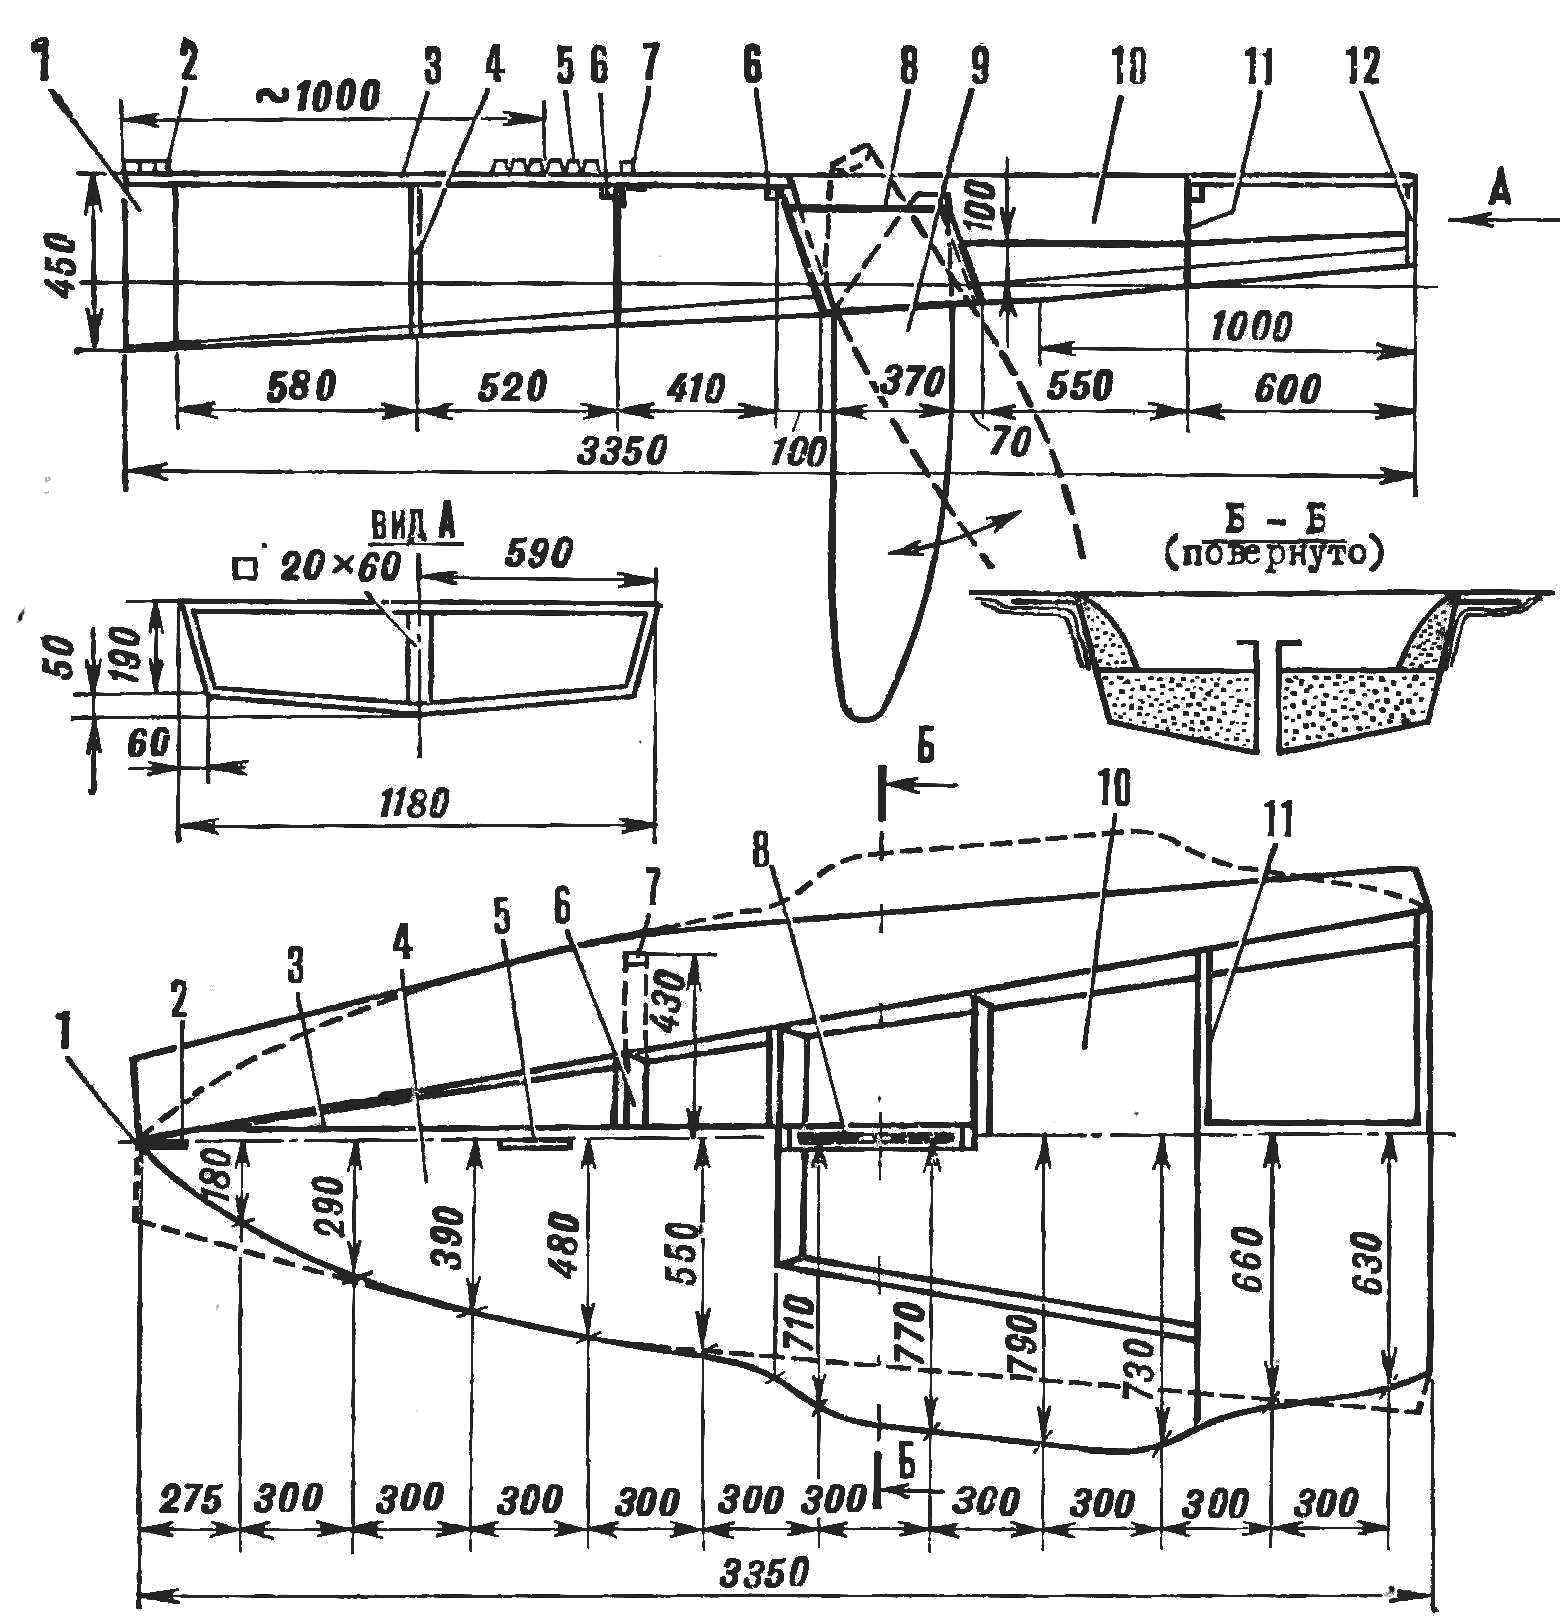
Fig. 1. Hull sport Dinghy “the Moth”:
I — stem, 2 — shtag-potens, 3 — deck, 4 — bulkhead, 5 — steps, 6 — BIMS, 7 — vant-Putins in — svartby well, 9 — centerboard, 10 — cockpit 11 — bulkhead of the cockpit, a 12 — transom.

 
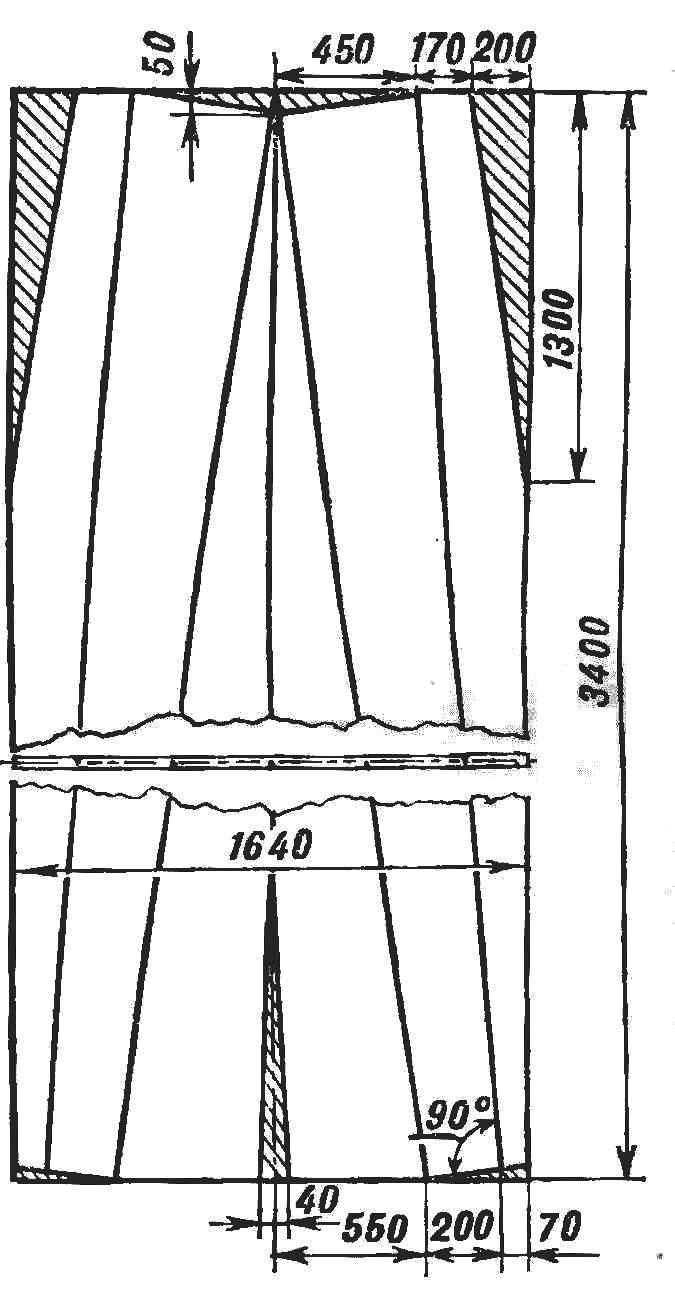
This would require a sheet size 1640X3400 mm. It is marked on both sides. The location of the lines on the face and back sides of a sheet shown in figure 2. Perpendicular to the line DP should be held straight; subsequently, it will have the bulkhead. Their location is shown in figure 1.
 
Fig. 2. Layout template and instructions for use of cuts.
 

After marking, the excess material is removed. Then the cardboard incision at the bend lines approximately half its thickness. Incisions are made only from the side lines. This operation should be performed very carefully so as not to penetrate through the cardboard.
 
Fig. 3. Van patens
Fig. 3. Van patens
 
Further, of the five millimeter hardboard is cut out the transom. In its diametral plane (on the axis of symmetry) is glued with waterproof glue any wooden rail on which is mounted the steering device.
 
Now you can start assembling the hull. Marked and notched hardboard sheet is bent as shown in the drawings, and to the resulting billet clamps is attached to the transom; in the same way connect the sheets and in front of the body, forming the stem. Don’t forget that it needs reinforced by an insert of hard wood — oak or ash.
 
Fig. 4. Steps and shtag-potens
Fig. 4. Steps and shtag-Putins
 
Finally, the transom is fixed to the hull with strips of fiberglass (2-3 layers) impregnated with epoxy. Similarly, the inside and outside are glued and the excesses of the housing.
 
After curing of the resin in the hull is glued to the bulkheads of hardboard with a thickness of 5 mm or plywood with a thickness of 3-4 mm.
 
Fig. 5. Steering gear
Fig. 5. Steering gear:
1 extender,2 — adaptor (rubber tube),3 — tiller.4 — rudder
 
Device svetovogo the well is shown on figure 1. He is going on glue and screws made of plywood 5 mm thick pine slats. Before bonding it in the bottom of the cut slit. The size of the gap, and the width of verdolaga, is determined by the thickness of the centerboard. Mount the well to the bottom — epoxy glue and screws with the subsequent gluing the joints with strips of fiberglass.

 
Fig. 6. The centerboard
 
“Moth” has a self-draining cockpit, which greatly facilitates the installation of the Dinghy on an even keel after the roll over and eliminates the pouring of the cockpit. And unsinkable sailboat provides the filling with foam of the space between the third bulkhead and the transom (see figure 1). To drain water from the cockpit in the fourth bulkhead and the transom at the level of the bottom of the cockpit cut holes (scuppers). Inside the cockpit is glued with fiberglass or cotton cloth on epoxy glue. To the feet of the boater does not slip on the bottom, just before curing of the resin it is coated with sawdust or dry sand and rolled with a roller.
 
Before installing the deck to the second bulkhead needs bolts to attach vant-potency (Fig. 3) made of dural or steel profile “area” with a flange thickness of 2 mm for steel or 4-5 mm for aluminum.
 
Fig. 7. Mast
Fig. 7. Mast:
1 — mast,2 — geek 3 — block of the mainsail is the halyard. 4,5,7 – nosing mast and boom, 6 — brace, 8 — duck 9 — lik-groove.
 

The deck is also cut from the pressed cardboard. Mount it to the frame with strips of fiberglass and Epoxy resin. After that you should clean up all the rough edges and drips and to paste over the body with fiberglass on epoxy or polyester resins. At least fiberglass can be replaced by cotton cloth, and resin — any water-resistant varnish or paint
 
On the deck is set of steps the mast and the forestay, potens (Fig. 4) — segments of the steel section t-section.
 
R and p. 8. The sequence of formation of the corps
 
Rudder and centerboard (Fig. 5, 6) are cut out of three-millimeter steel sheet or made of aluminum with a thickness of 6 mm. not bad it turns out the centerboard out of plywood with a thickness of about 20 mm, when to give it aerodynamically shaped biconvex profile.
Tiller with extension of the oak or ash strips.
 
Mast “Moth” vyklevyvajut from pine slats with a cross-section 25X75 mm (for mast) and 20X40 mm (gik). Inside of both parts is doing a figure of the slot — lik-grooves. They fixed the sail. To cut the face of the groove before gluing the slats in the package. At the top of the mast is cut to install the pulley under the main halyard.
 
Fig. 9. Nosing
Fig. 9. Nosing:
1 — upper end of the mast 2, the lower end of the mast, a 3 — weight gnca.
 
After finishing the mast and boom they are impregnated with hot linseed oil and varnish.
 
Nosing mast (Fig. 9) are cut from sheet stainless steel or normal steel with the subsequent galvanizing.
 
The cutting and sewing sails should be given the utmost attention because of the thoroughness of its manufacture depend on the running of the vessel. Sew the sail from Dacron, canvas or tent fabric. Suitable as a pillow tick or Bologna. All it will take about 13 m and a width of 1 m. the Size of individual panels is given in figure 10. When smachivanie of blanks necessary to give the seam approximately 50 mm. Sew the cloth on the sewing machine, be sure the seam of the “zigzag” type.
 
Fig. 10. Open your sails
Fig. 10. Open your sails:
1 — seam. 2 — laderman, 3 — halowy angle, 4 — palova Board . 5 — sheet corner with grommets, 6 — alcovy corner grommets.

 
From the rear of the luff in the sail sewn laderman under armour — narrow planks that give the sail shape. All the angles are amplified by botami — triangular pieces of cloth. To valvomo corner is attached also palova plate — triangular duralumin plate with a hole in the top for interfacing with rotaflam.
 
To the front and bottom katarinam sails sewn synthetic or plant-lik-wire 0 8 mm. Rear
leech is sheathed with a strip of cloth cut from the same material as the sail.
 
Standing rigging of the Dinghy (a forestay and a couple guys) runs of steel cable d 3-4 mm. cable Ends are sealed at the thimble or in the copper tube. For cables tension the forestay and serve a spiral lanyards.
 
The construction of sports sailboat can be considered complete. Set sail and embark on its maiden voyage!
 
According to the magazine “Practices” of the GDR

Recommend to read

  • WAR MACHINE “BLUE BERETS”WAR MACHINE “BLUE BERETS”
    Military paratroopers wearing the blue beret. If combat vehicles and airborne troops also "gave" blue berets, they first would have to own a BMD (airborne combat vehicle). The revision...
  • TILE — LOCKTILE — LOCK
    Ceramic tile is often mounted on the wall gustotertoj an oil paint. Method, of course, simple but unreliable: over time, the tile starts to move away. Easy to remove the tile to update...