
 The production model better to start with the most labor-intensive details — wing. Here it is rectangular and consists of 14 ribs, two spars, the front and rear edges and two endings. Take the time to manufacture for the first training model two or three wings, because during training it is possible a failed emergency landing.
The ribs are made of plywood with thickness of 1 mm. 14 the First folding plates and securing them between the templates in the vise, handle the package file. Then, clenched grip, saw through with a hacksaw the slots for the spars. After that, each rib lighten.
The spars cross-section 4X8 mm vistagate of pine slats. The front edge of the rails with a cross section of 5×5 mm and rear — from lime plate.
Before assembling the wing to the spars and the leading edge of the mark on the drawing the location of the ribs and in the back saw grooves to a depth of 5 mm. First, install all the ribs on one spar, then tie the second. The threads attach to the rib front edge, and then back.
Making sure there are no distortions over all the joints with glue. Letting it dry, remove the thread and stick the ending from lime plate thickness of 4-5 mm. Panel a thin fake veneer of the Central part of the wing to the threads of the rubber, attracting it to the fuselage, not pushed tight. To the outside ending to balance the mass of cords attach the cargo of 20-25 g And stick to the inner strap for outlet cords. Treating the wing with sandpaper, start the cording macalintal paper. The finished wing cover five or six layers of Amalita.
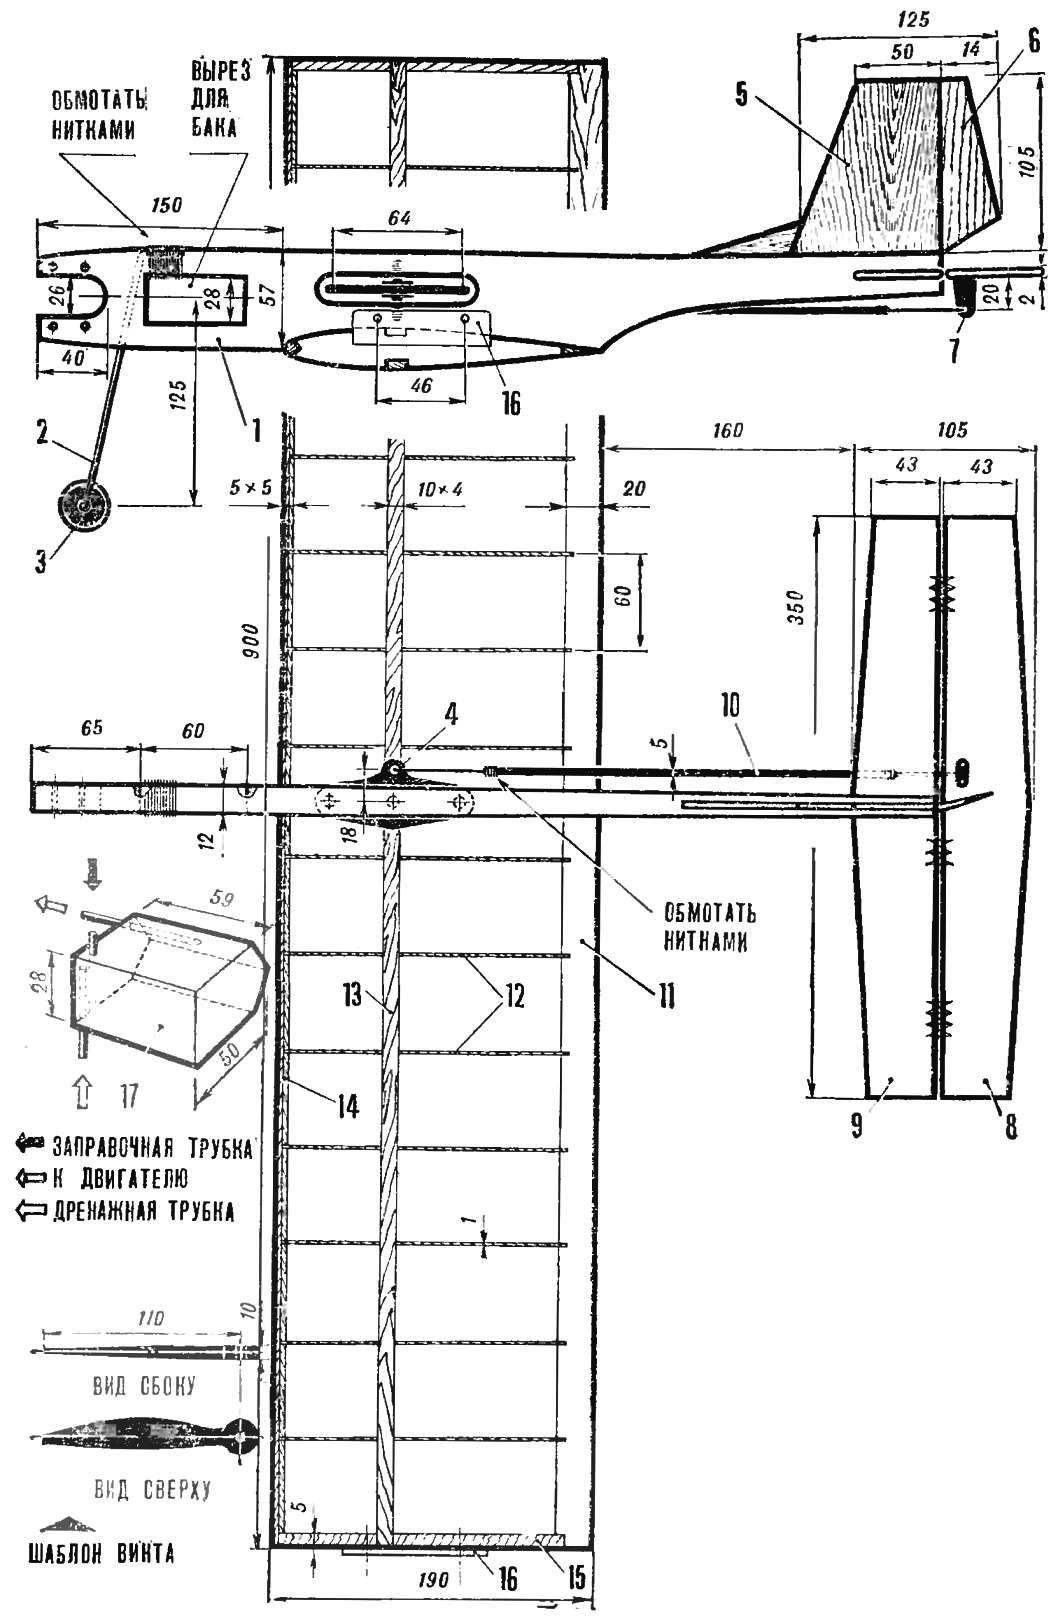
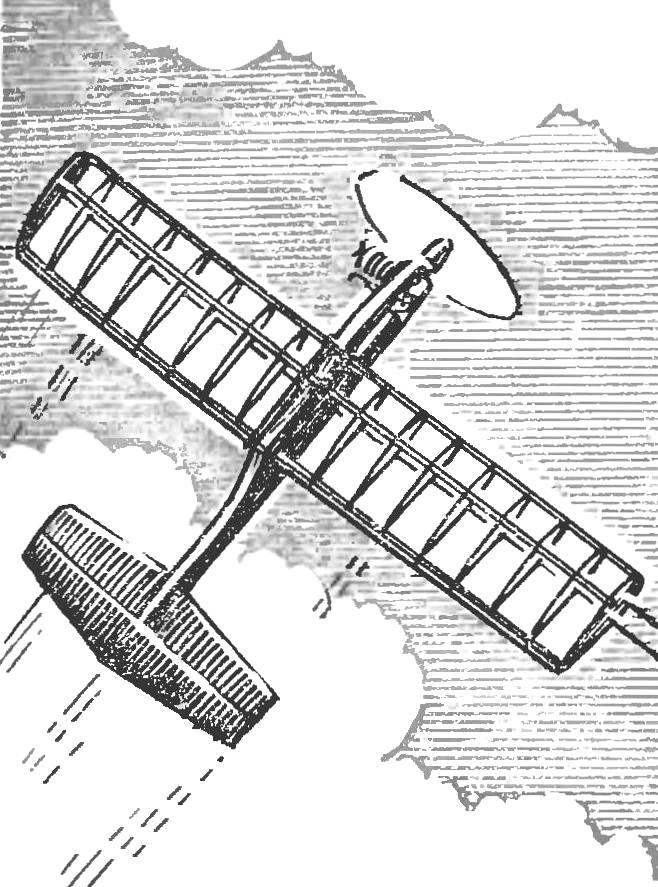
Cord training model airplane:
1 — fuselage 2 — front chassis 3 — wheel, 4 — chair, 5 — keel 6 — rudder, 7 — Elevator bracket, 8 — Elevator 9 — regulator 10 — rod, 11 — rear flange, 12 — rib, 13 — spar, 14— front edge, 15 — ending, 16 — bar output cord, 17 — fuel tank.
The fuselage is manufactured from lime plate thickness of 12 mm. Treat it along the contour and make cutouts for the tank and rocking. The nose of the fuselage should be strengthened with plates of plywood, the tail is to narrow down to a thickness of 6-7 mm. Propyl to make saw blade stabilizer blade. Treat the fuselage with sandpaper and glue the stabilizer from lime plate thickness of 2.5 mm in the middle and 2 mm in the terminal part.
The Elevator — also from lime plate — hang it to the stabilizer on loops of fishing wire Ø 0,3 mm. Bracket rudder out of tin put in the two rivets.
The keel, sawed out of plywood, insert two spikes in the tail part of the fuselage. The rudder is a little decline in the external direction of flight direction.
Rocking control from duralumin with a thickness of 1,5 mm. shaft — steel wire Ø 2.5 mm. Rod, connecting bracket rudder bellcrank and control, made of pine rails of circular cross section Ø 6 mm. as the thrust axes use steel wire Ø 1,5 mm. Attach them to a wooden rod threads with glue.
Chassis — single wire Ø 2,5 mm. the Wheel of the PCB with a thickness of 5 mm.
The tank for fuel solder, tin plate, thickness of 0.2 mm. screw it into the cutout of the fuselage. When you install the intake-hook position in the same plane with the jet engine.
The wing attach to the fuselage with rubber thread.
During the control weighing of the mass of the model should be 540
The control knob cut from plywood 10 mm thick Plexiglas or textolite.
As cords you can use steel wire Ø 0,3— 0,35 mm or build a special cable from wire Ø 0.1 mm. For attaching cords to the control stick and the chair at their ends it is necessary to consolidate the carbines, which can be made of steel wire Ø 0,6—0,8 mm. to Store cords on the spool with cheeks Ø 200-250 mm, preventing the formation of knots and kinks. They are usually glued together from plywood. Cords should be kept dry and clean. Before the flight they should be wiped with a clean cloth.
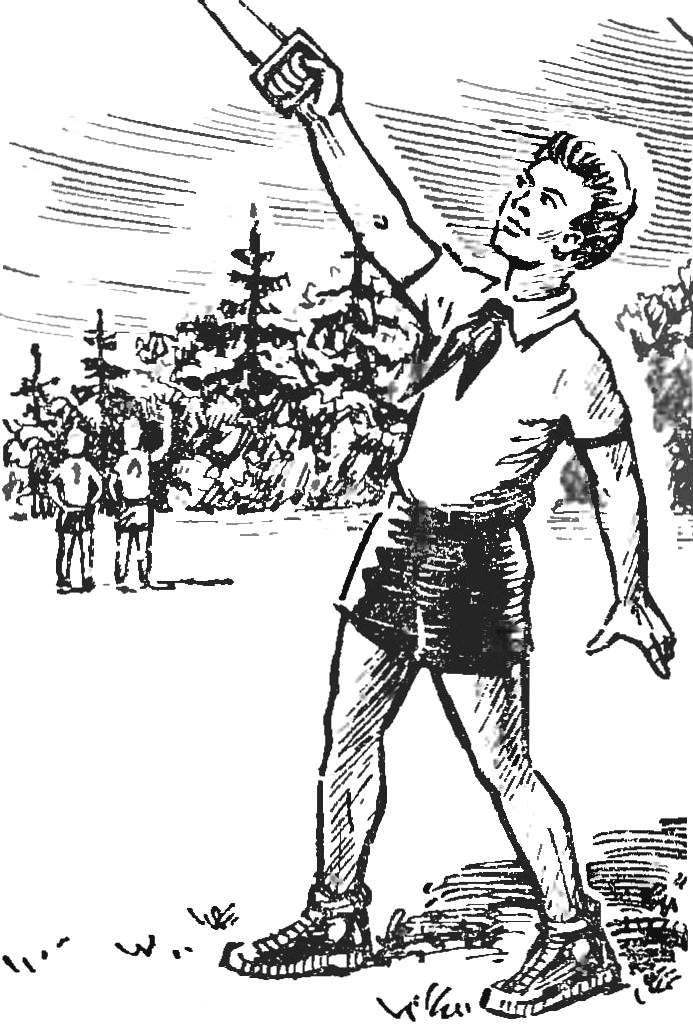
Before you run the model, find her center of gravity. Considered normal when it is at a distance of 15-20% from the leading edge of the wing. The first flight must be completed for the head or the athlete, having experience in piloting. Flying preferably in calm weather, when the wind speed is 1-2 m/s on a rope with a length of 12-15 m. once the model will be tested by experienced sportsman, you can begin to learn.
The first flights must carry full insurance. The instructor lifts the model into the air, and the athlete gently gives him the control knob, and your hand lays on the arm of the trainee. These operations should be carried out at the time when the model is flying at a height of 6-8 m. during the flight all the time necessary to insure the trainee’s actions and, if necessary, adjust the position of the control knob. Arm and hand “UCITA” should be relaxed, and the attention should be directed at how the model responds to the deviation of the control stick. Hand the pilot should be extended and be with Konami a straight line.
The instructor gradually weakens the control over the hand of the student and from time to time gives him self to fly. If the model is stable is flying parallel to the horizon, so the first skills acquired. After a few such flights, you can take on and take off from the ground.
Thus it is necessary to slightly deflect the Elevator up and leave it in this position throughout the takeoff. It is advisable to control the model (not to work the wheel) the smaller the pilot intervenes, the better it turns off.
During landing the pilot should behave in the same way as during takeoff. After stopping the engine should not interfere in management: model gradually lowers and touches the ground. If the engine stopped during climb, then you need to deflect the Elevator down to gain the necessary speed for planning.
Such flights it is advisable to make several times. Moreover, practicing takeoff and landing, fueling not a full tank to horizontal flight did not take a lot of time.
Once you have mastered these techniques, you can begin to implement small slides, turns on the hill, the loop. Of course, good piloting can only be achieved by self-training. From flight to flight will increase the experience and confidence: the elements of flight once seemed difficult will become a regular.
V. ROZHKOV, master of sports of the USSR
Recommend to read
 THE BRITISH BOMBER AND THE NUCLEAR BOMB
English bomber CANBERRA is considered one of the most famous warplanes of the world. The period of its serial production lasted from 1949 to 1963, and during this time the plants... DECORATIVE CANDLES
These elegant candles will easily fit into any modern interior. Their Golden lights create a home atmosphere of coziness and warmth, give a special charm to Christmas night. About the...
