
Oleg Starikov, an amateur car designer-enthusiast from the village of Ostrovtsy near Moscow, is known to all local technology lovers (and they can safely include the majority of the male population of the village, young and old), who jokingly often call him “Samodelkin” or “Kulibin”.
This name is also familiar to readers of our magazine from the publication in “Model Designer” No. 3 for 1999 – about a jeep-pickup built by Oleg Starikov called “SIMOT”. Today the craftsman presents another home-made machine under the same name, but only with the index “2”. The names of the cars are symbolic. The author compiled it from the first letters of the surname and names of family members (the Starikovs: daughters Irina and Marina, Oleg himself and his wife Tatyana) in gratitude for their understanding and patience – after all, for a long period he devoted the lion’s share of his free time not to them, but to the machines he was creating .
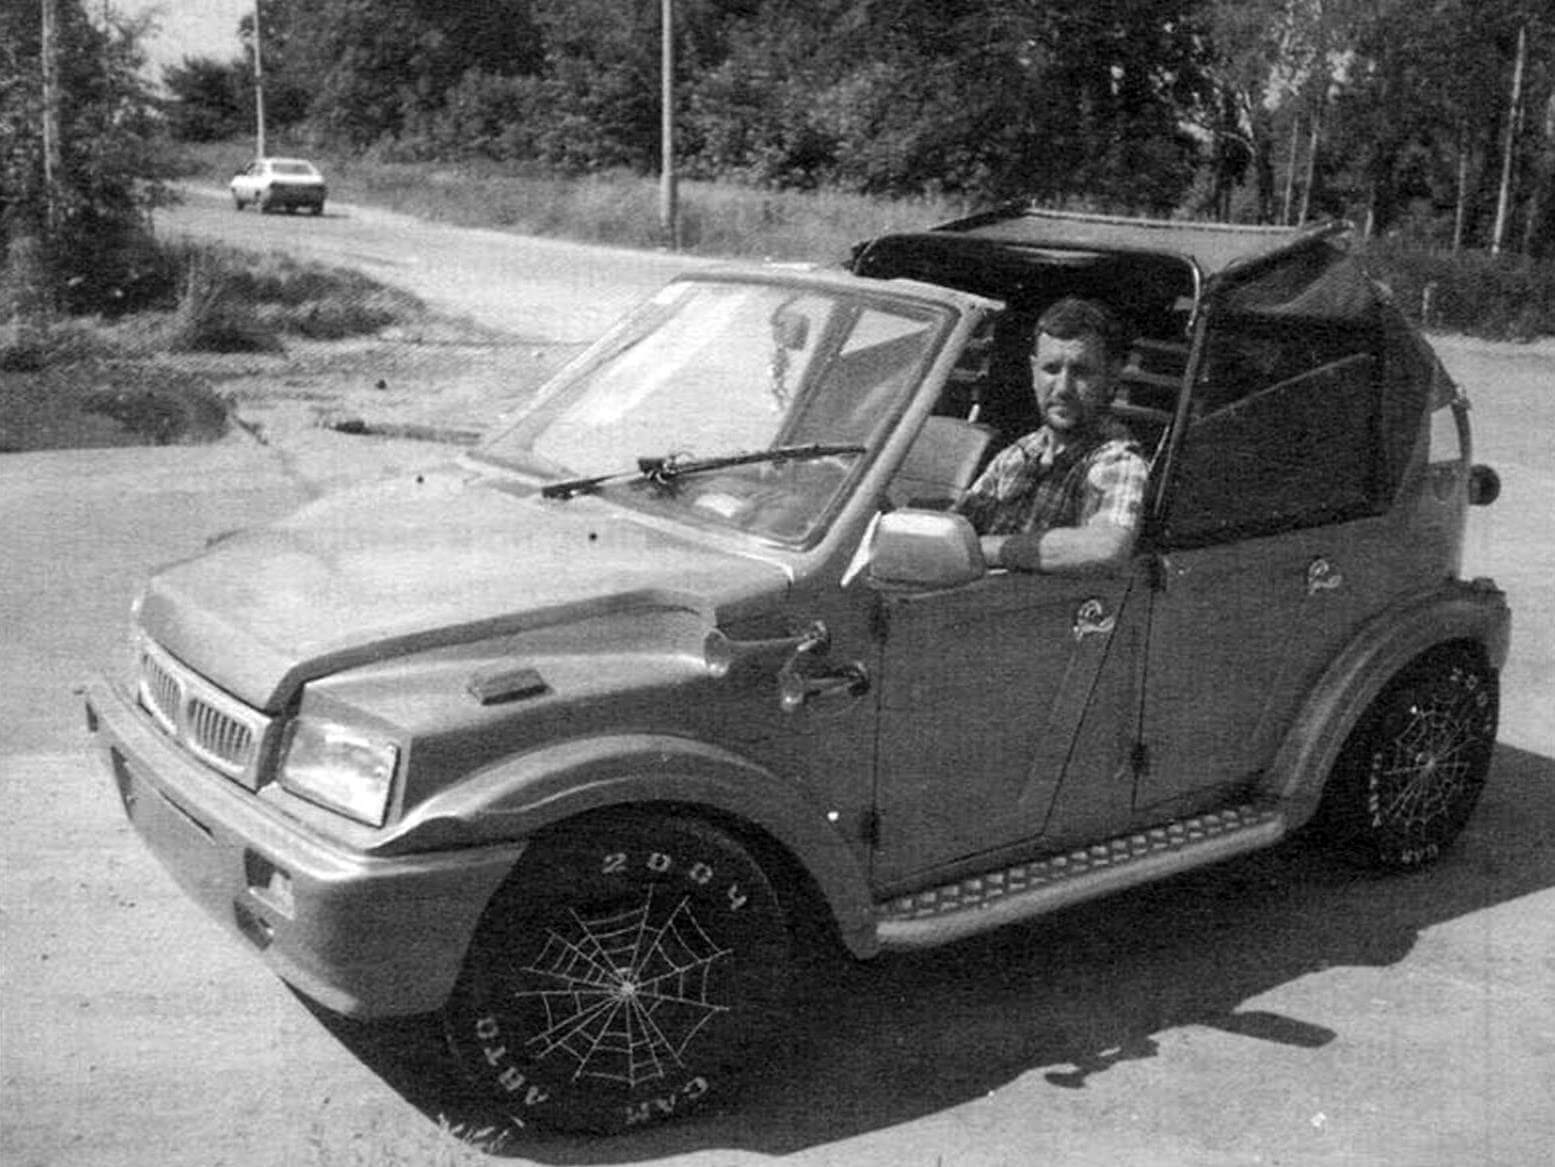
After I built a large and practical jeep, which I used for several years, I wanted to make another car – a small pleasure car with an opening top, and at the same time continue experiments in the field of construction and design. And a little more than a year later, such a car appeared.
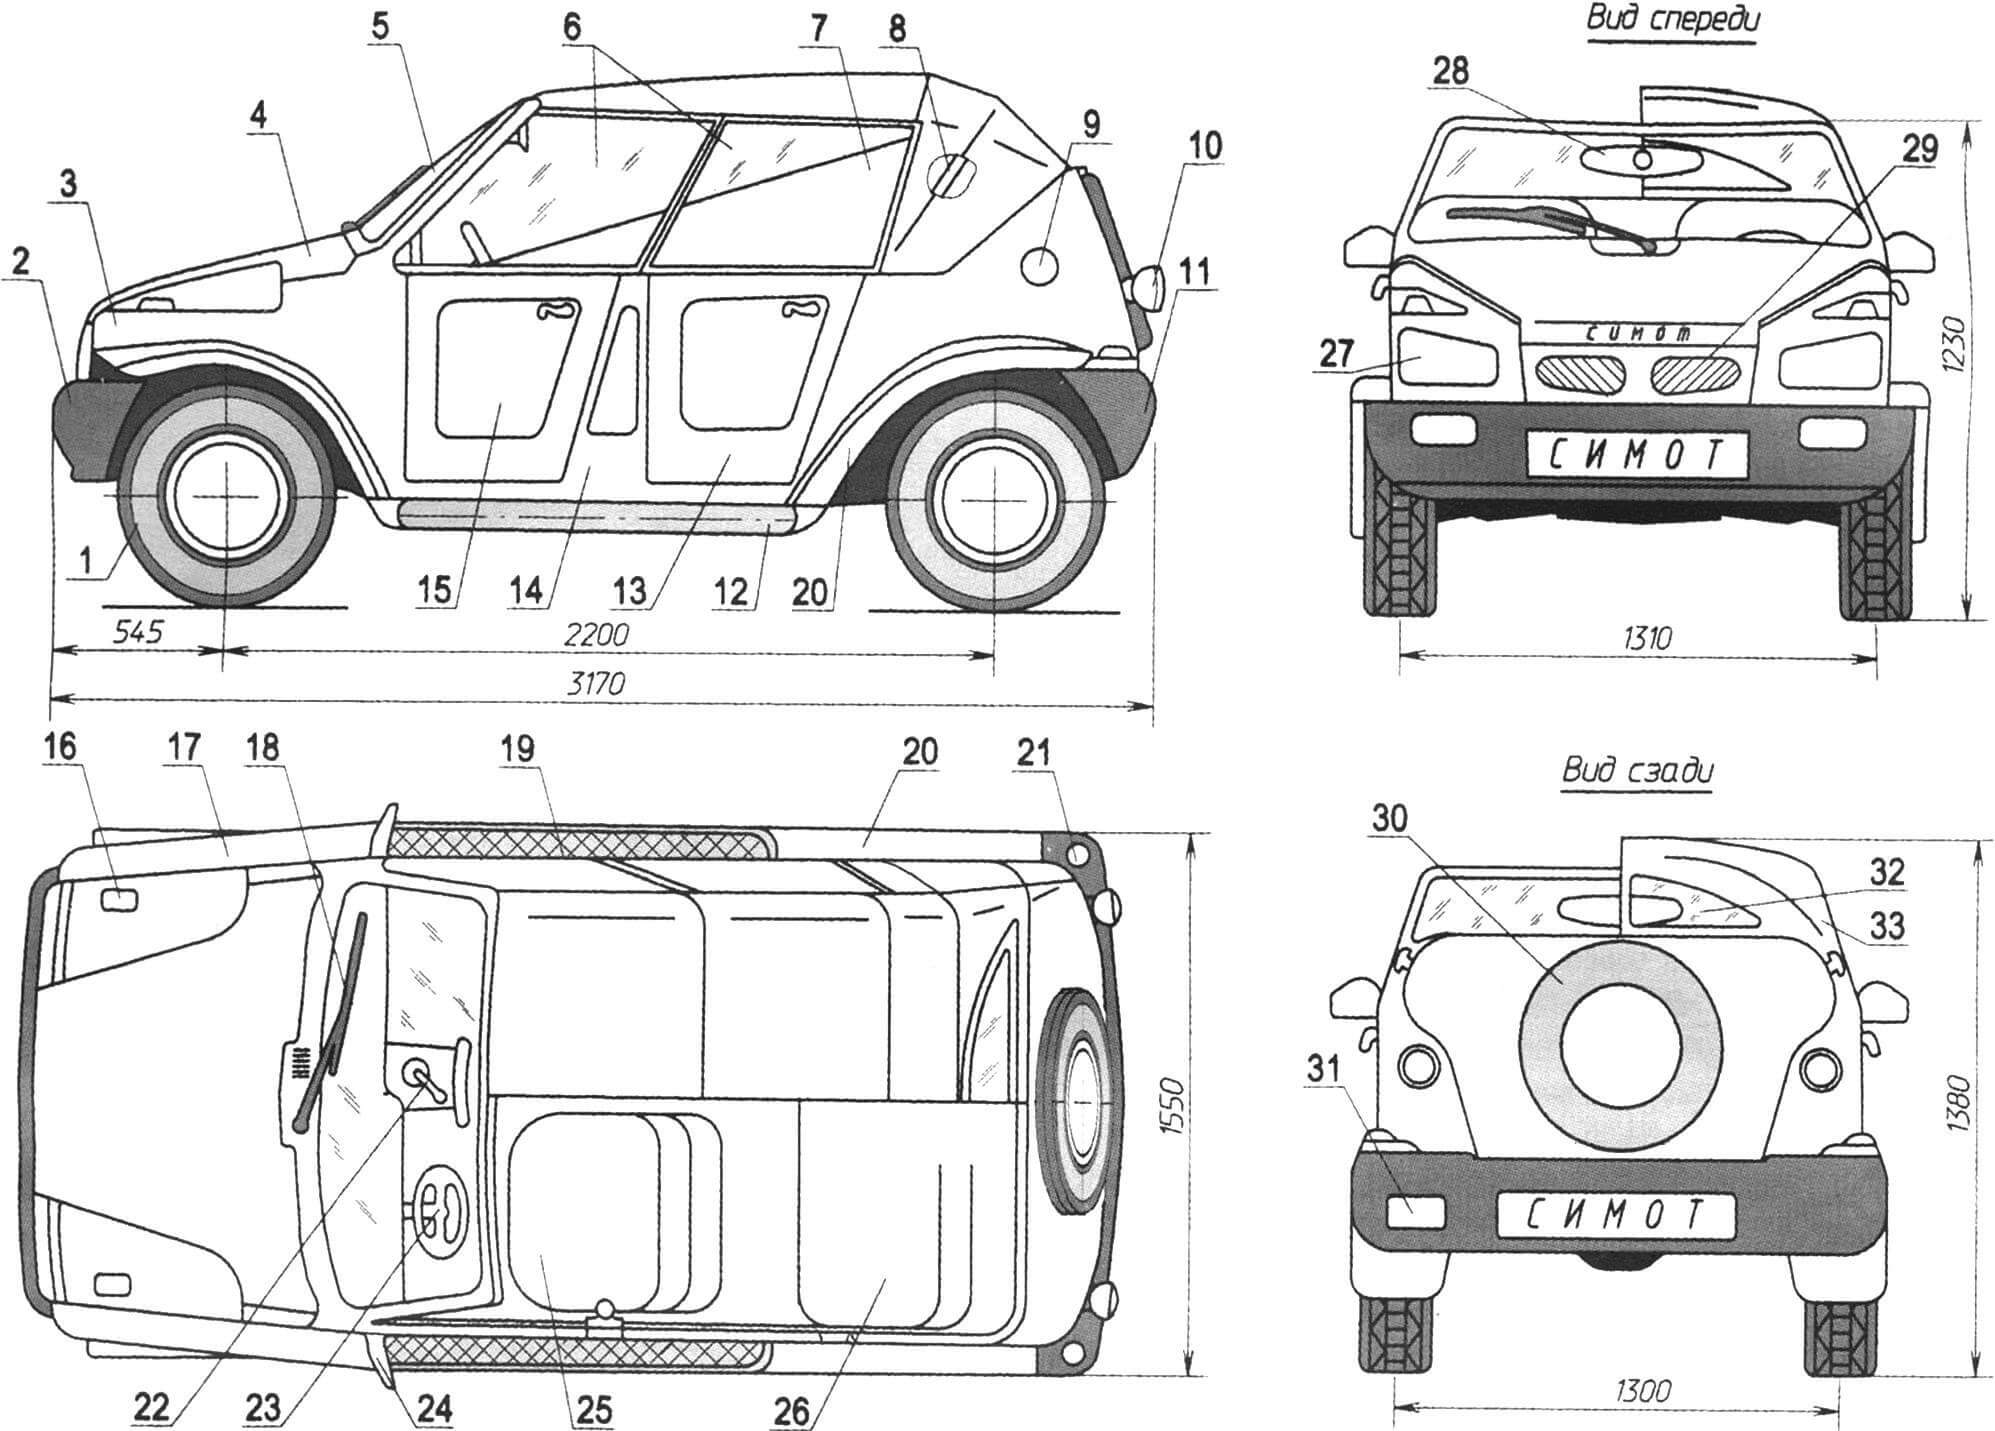
1 — wheel (from a Zhiguli car, 4 pcs.); 2 — front bumper (from the Oka car); 3 — wing (from a GAZ-69 car, converted, 2 pcs.); 4 — hood (homemade); 5 — windshield (from the Oka car); 6 — front and rear side windows with frames (4 pcs.); 7 — glass cover; 8 — awning frame (from a GAZ-69 car, converted); 9 — gas tank neck; 10 — rear signal light (from a GAZ-51 car, 2 pcs.); 11 — rear bumper (from the Oka car); 12 — footrest (steel pipe 050, 2 pcs.); 13 — rear door (from a GAZ-69 car, 2 pcs.); 14 — inter-door pillar (from the GAZ-69 car, 2 pcs.); 15 — front door (from a GAZ-69 car, 2 pcs.); 16 — direction indicator (from a GAZ-69 car, 2 pcs.); 17 — front fender (half a wing from a GAZ-69 car, 2 pcs.); 18 — windshield wiper (from the Oka car); 19 — step step (corrugated steel sheet, s2); 20 — rear fender (half a wing from a GAZ-69 car, 2 pcs.); 21 — rear turn signal (from a GAZ-53 car, 2 pcs.); 22 — gear shift lever (from the Oka car); 23 — steering wheel (from the Oka car); 24 — side rear view mirror (from VAZ-2107, 2 pcs.); 25 — front seat (from the Oka car, 2 pcs.); 26 — rear seat (from the Oka car, 2 pcs.); 27 — headlight (from the Moskvich car. 2 pcs.); 28 — central rear view mirror; 29 — radiator trim (from a VAZ-2109); 30 — spare wheel (from a Zhiguli car); 31 — reversing lamp; 32 — rear window; 33 – awning (from a truck)
The design was chosen so that the car combines features of modernity and the past, or, as they say now, in the “kitsch” style, which translated from English means “shift of styles.”
He took the GAZ-69 and Oka cars as a basis, although in the end little remained of their previous appearance.
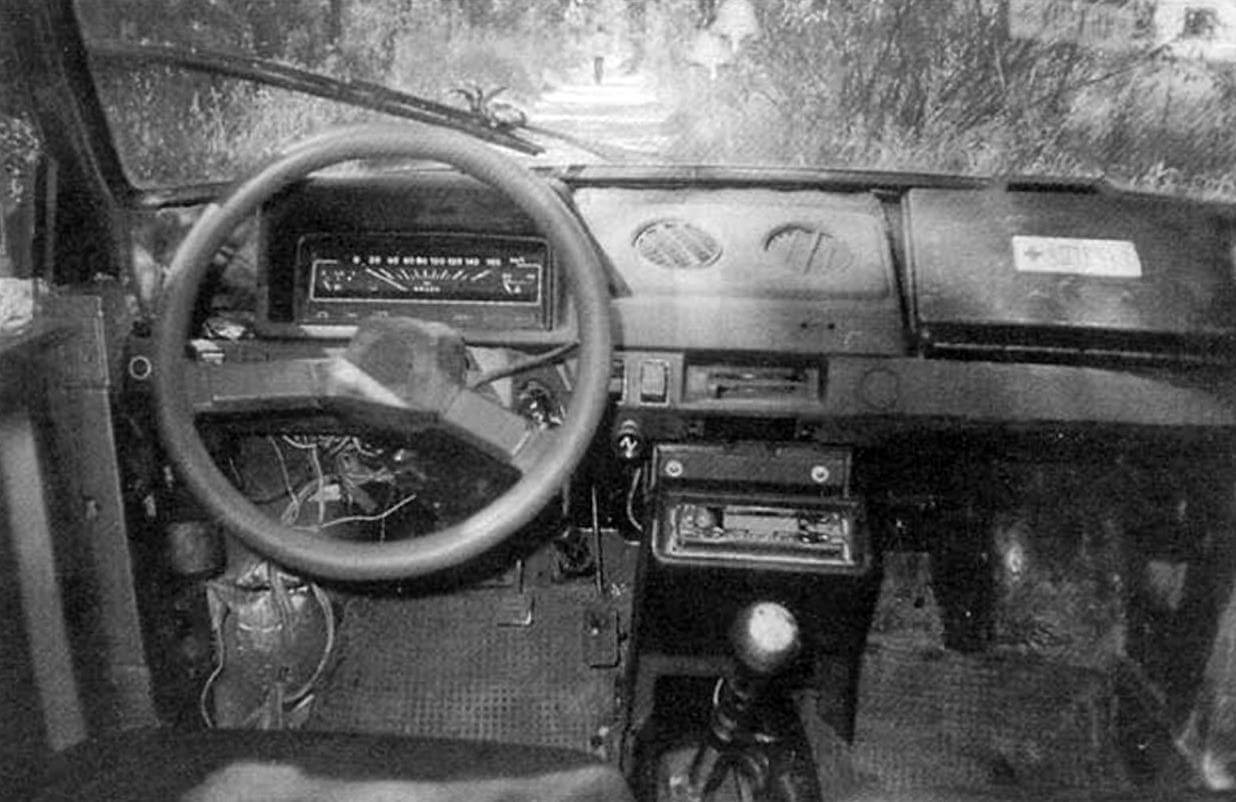
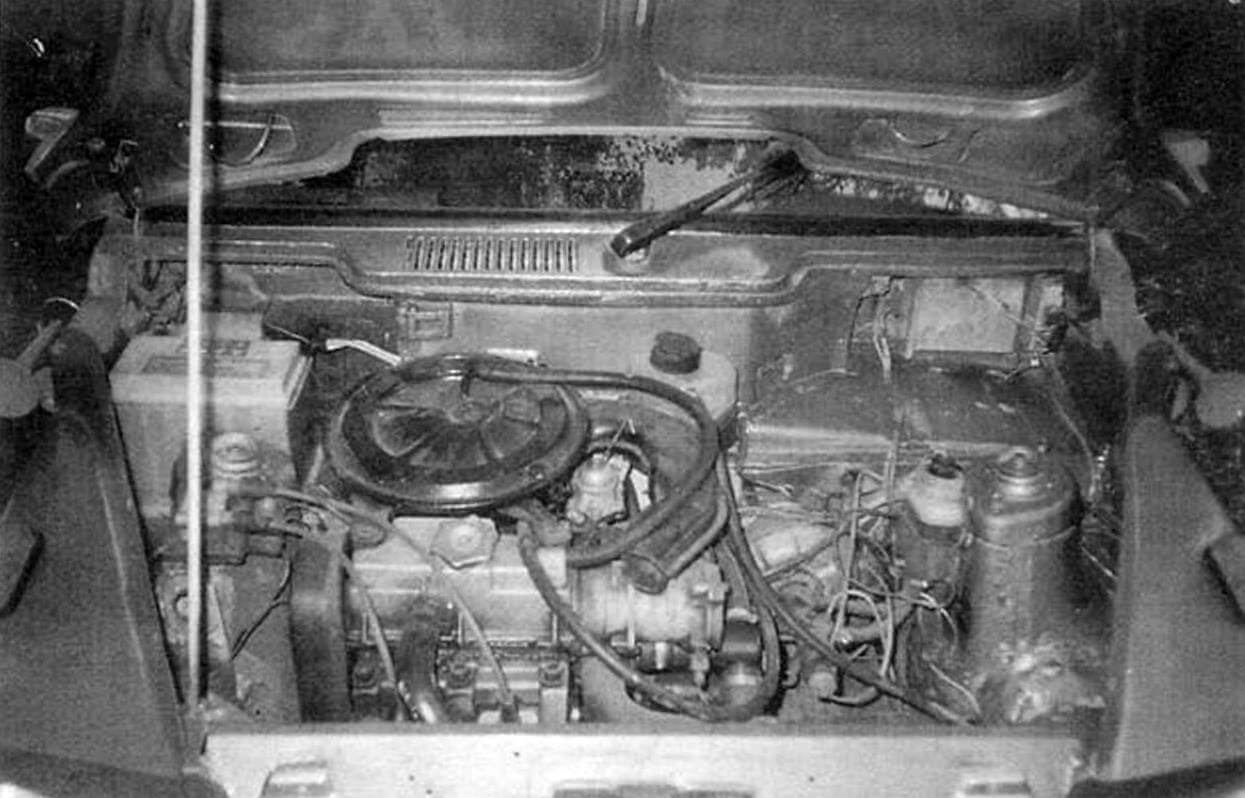
Mechanics were used from Oka: engine, gearbox, transmission, suspension and controls, brake system, clutch, steering mechanism.
But the Oka wheels didn’t suit me: driving off asphalt roads on such small ones is a risky business. Therefore, I decided to replace them with Zhiguli ones – they not only increased the vehicle’s cross-country ability, but also gave it a more impressive appearance. To do this, we had to make some alterations to the chassis: adapters were installed on the front wheel hubs and the rear brake drums (on the Oka, the rear hubs are made as one part along with the brake drums). At the same time, the track of both the front and rear wheels increased slightly, which slightly increased the load on the bearings and axles, but had a positive effect on the stability of the car.
It was clear to me even without calculations that an open body (such as a phaeton or a convertible – whoever likes what you prefer, I myself don’t see a significant difference between them) compared to a body with a roof required an increase in the rigidity of the floor and especially the thresholds. I tried to provide this fully and even, as I assume, in abundance. So, the floor was made of steel sheet 1.5 mm thick. I first welded the door pillars (from GAZ-69) to the sills in the middle. At the bottom they are quite wide, and therefore give additional strength to the sills (and therefore the body as a whole) in the most stressful place. The rack itself was additionally reinforced from the inside of the body with a buttress bracket made of a steel (1.5 mm thick sheet) box profile welded to it, the threshold and the floor. The thresholds in the doorways were also reinforced with extensions (or, in marine terminology, coamings) made of the same 1.5 mm steel sheet bent in half, from which the floor and buttress were made. The height of the extensions is the maximum possible, as long as they do not interfere with the entry of the driver and passengers into the cabin. I welded the coamings to the sills and body pillars on the interior side so that they would not interfere with closing the doors. And in addition to all this, outside along the thresholds I also made running boards, the frame and base of which is a steel pipe with an outer diameter of 50 mm. The steps are made of corrugated steel sheet 2 mm thick and welded along the entire length to the thresholds and pipe.
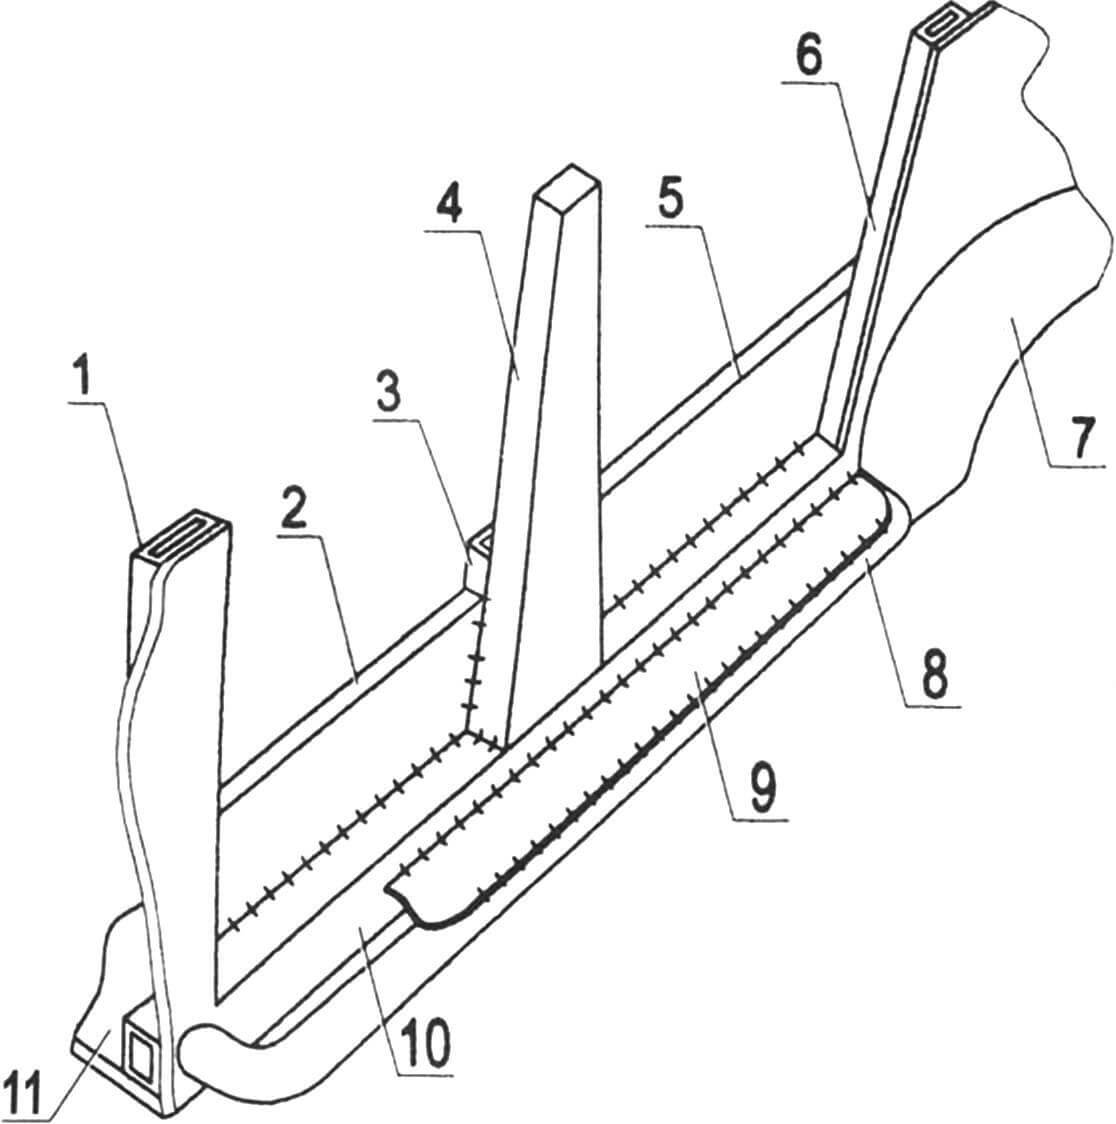
1 — front pillar; 2.5 — front and rear coamings (steel sheet, s1.5, bent in half); 3 — bracket-buttress (steel sheet, s1.5); 4 — middle door pillar (from a GAZ-69 car); 6 — rear pillar; 7 — rear wing; 8 — footrest; 9 – step; 10 – threshold; 11 — floor (steel sheet, s1.5); pos. 1,6,10 – basic parts from the Oka car
In addition to increased rigidity of the lower part, the phaeton-type body required passive safety at the upper level. There were two design solutions in this regard: strengthening the windshield frame and installing a high tubular roll bar behind the back of the rear seat. I’m thinking of installing another safety bar above the door pillars – the car won’t be registered without it.
The windshield frame pillars are homemade and have a triangular cross-section. In addition to their direct purpose, they also serve as drainage channels for water flowing from the front of the roof into the crossbar groove. In their lower part, the racks are extended to the wheel arches in the wings and welded to the walls of the engine compartment. Drainage holes are made in the wings to release water.
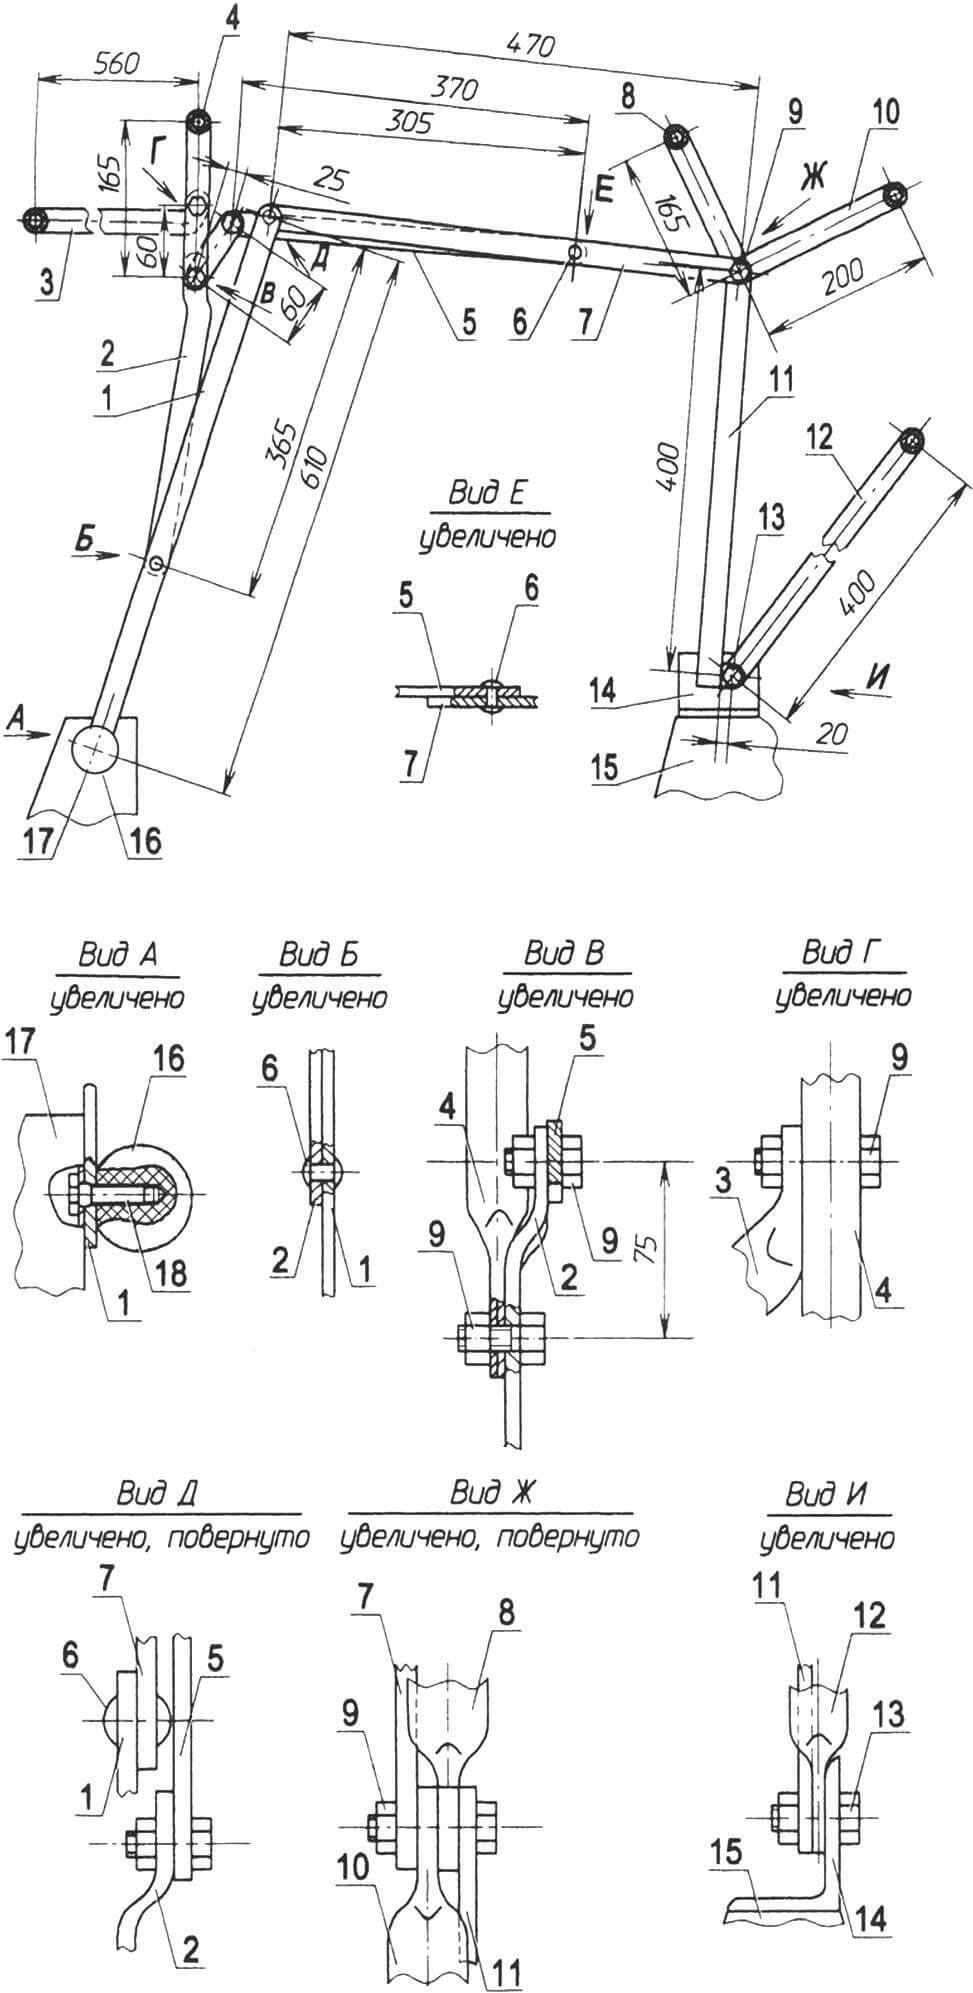
1 — front pillar (2 pcs.); 2 — half-stand (2 pcs.); 3 — front frame; 4 – front arc; 5 — half-thrust (2 pcs.); 6 — non-separable hinges (6 pcs.); 7 — thrust (2 pcs.); 8 – middle arc; 9 — collapsible hinges (M8 bolt, 8 pcs.); 10 – posterior arch; 11 — rear pillar (2 pcs.); 12 — rear frame; 13 — rear threaded connection (2 pcs.); 14 — bracket (angle 50×30, 2 pcs.); 15 — rear pillar (2 pcs.); 16 — ball nut M10 (2 pcs.); 17 — inter-door body pillar; 18 — M10 bolt (2 pcs.)
The upper cross member of the windshield frame is made in the form of a trench, into which the front arc of the awning is placed and fixed here with the help of spring clamps (those that secure the hood on a GAZ-69 car).
It should be noted that the additional slope of the windshield had a positive effect on reducing drag, although this was not that important. Much more gratifying was the fact that the oncoming air flow did not swirl behind the glass in the cockpit, but smoothly flowed around the car.
The doors to the convertible fit perfectly with the GAZ-69 car. I also made frames with plexiglass windows for them. The windows were partially covered with covers made of the same film from which the awning was made. The frames are inserted (and, if necessary, removed) using pins into the holes in the upper edges of the doors. The standard door handles were not preserved, and in their place I installed modern, antique-style ones.
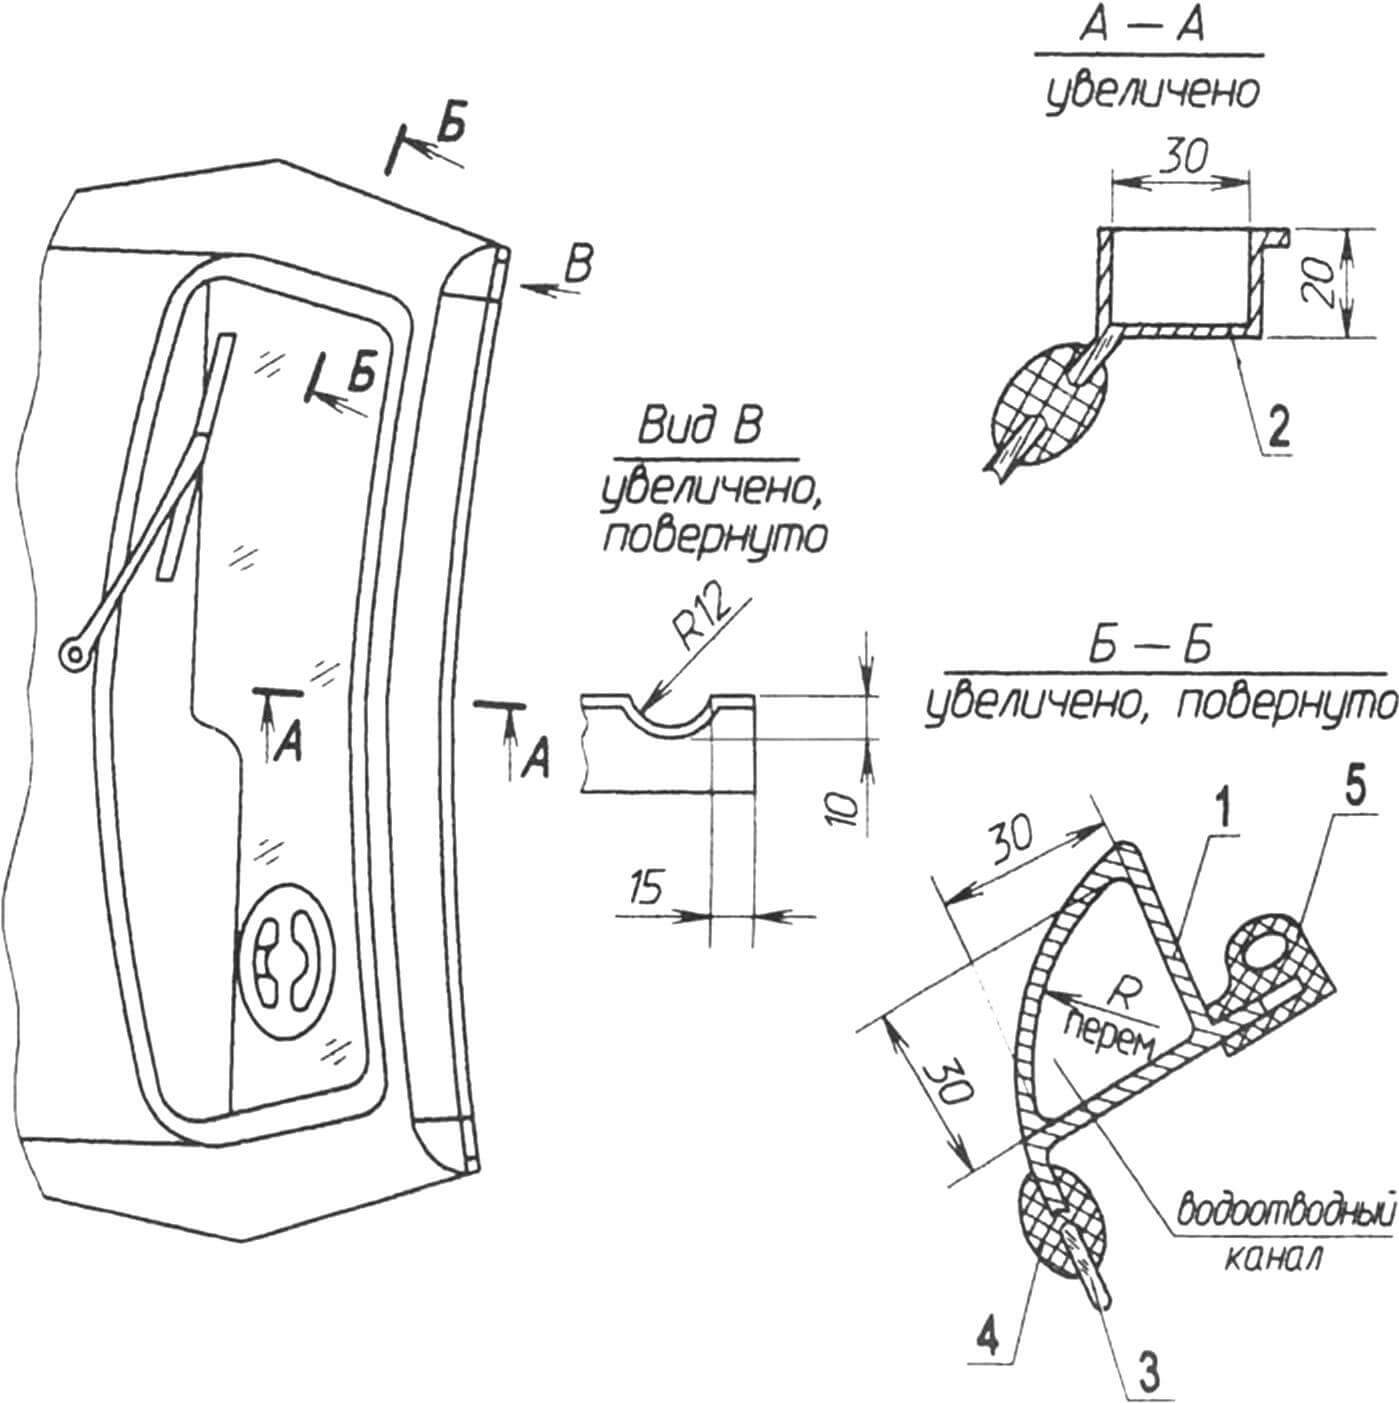
1 – stand with drainage channel; 2 — jumper with a groove for the front frame of the awning frame and water drainage; 3 — windshield; 4 — sealing and mounting rubber of the windshield; 5 — rubber seal of the doorway
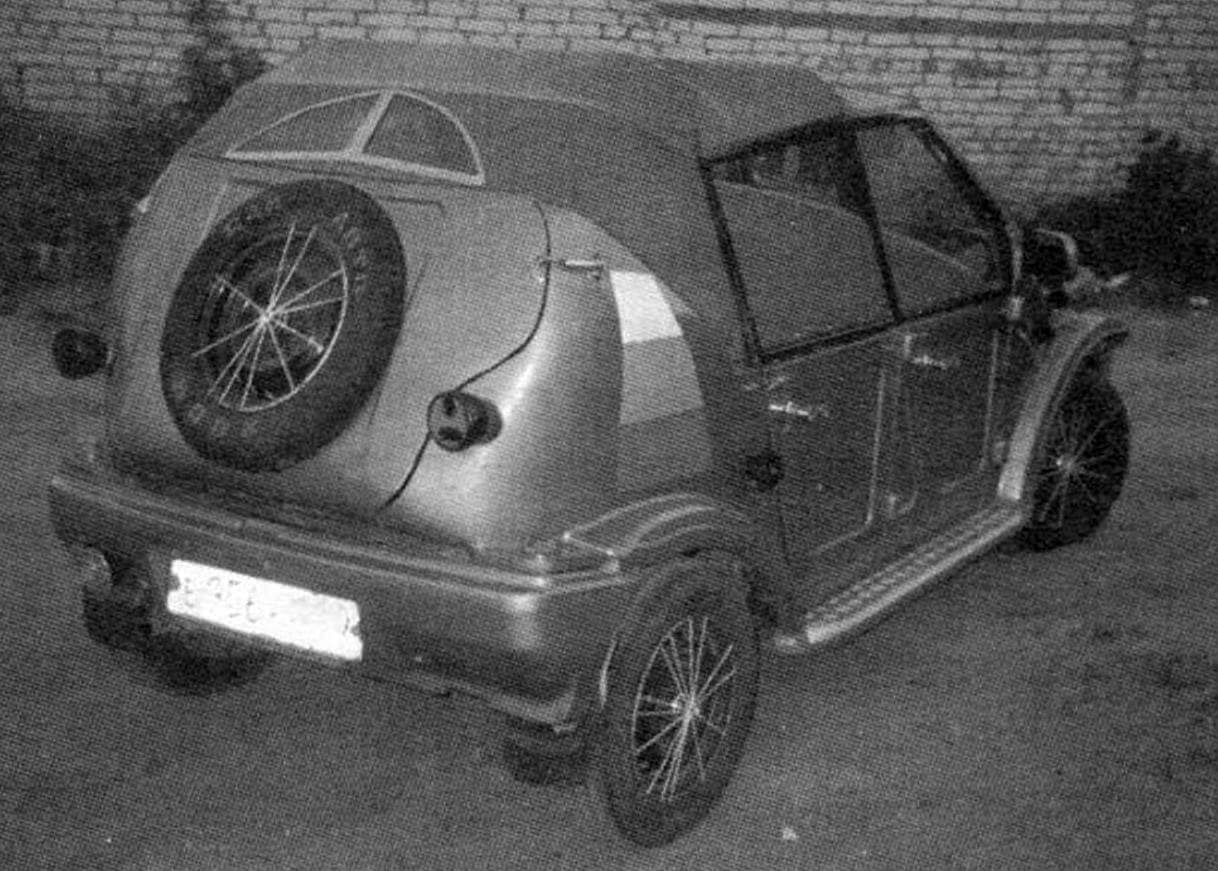
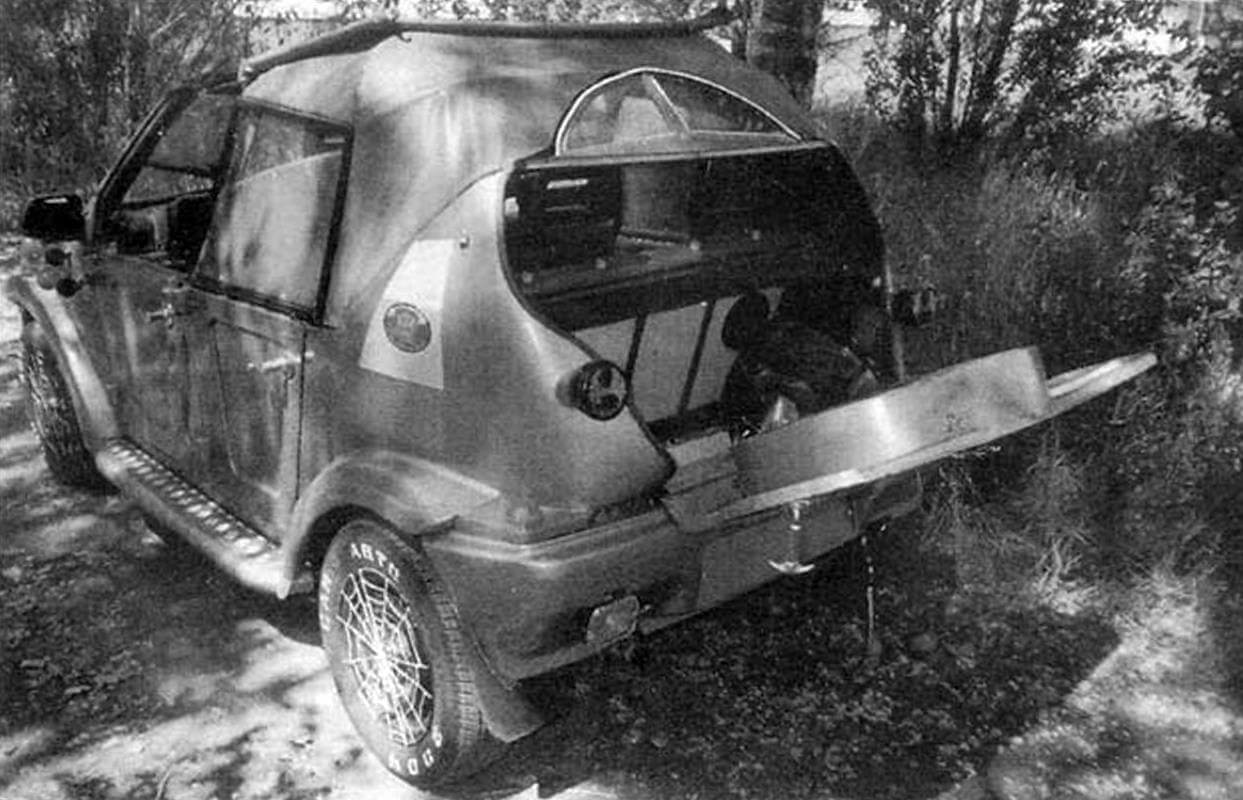
The back door is completely homemade. Through it, access is provided to a small luggage compartment, separated from the passenger compartment (as in station wagons and hatchbacks) by the back of the rear seat. It is made with a cylindrical recess for the spare wheel, which migrated here from the engine compartment. The door is fixed to the rear wall of the body using spring clamps. When the door was made and installed, the idea came to expand its functions and make it into a folding table, which I plan to do soon. To do this, all you need to do is make a small cutout in the rear bumper so that the door opens to a horizontal position, and a stand under the door or a pair of cables holding it in place.
I adapted the wings for my car from a GAZ-69, only not entirely, but by cutting them in half lengthwise, thus getting two wings from one, and then adjusted them in place.
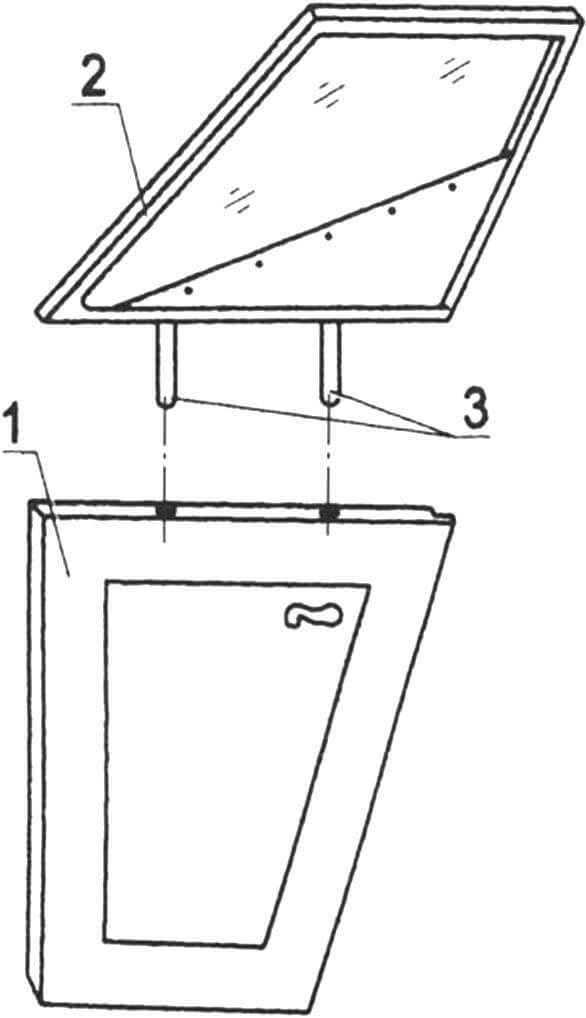
1 – door; 2 — window (frame with glass and cover); 3 — pins Ø10 (2 pcs.)
Despite the fact that the car was built as a pleasure car, that is, it was intended to be used in the warm season and in good weather, it still needs an awning, at least in case of rain. Therefore, the main requirement for the awning was that it fold and unfold quickly and easily, and also stretch well – then water would not accumulate on it and it would not spoil the appearance of the car. These requirements could be met by a suitable articulated frame. I took this mechanism from an old GAZ-69 car and fitted it locally to my car, shortening the struts and rods. The width of the transverse arches turned out to be just right for SIMOT, so there was no need to reduce or increase them. The front part (arc) was made to open independently. In the reclined position, an opening is formed above the head of the driver and front passenger, reminiscent of a large car hatch. To open the awning completely, you just need to unscrew the two nuts securing the front frame pillars to the body pillars. The nuts were made in the shape of a ball with threaded axial holes so that they could be unscrewed and tightened by hand.
The material for the awning was the same one used to cover truck vans. It is durable, waterproof, frost-resistant. By the way, to operate the car in the cold season (or rather, in winter), I’m going to cover the bottom of the awning with a piece of woolen blanket, and I already have a heater – from an Oka car.
External network alarm devices are collected from different machines. The headlights are Moskvich, the rear signal lights are from a GAZ-51 truck, the direction indicators are from a GAZ-53, and the front turn signals are from a Zhiguli.
Klaxons are pneumatic. I purchased two of them (high and low tones) and two small air compressors for them. Sound signals are issued from a standard button on the steering wheel – it turns on the power to the electric motors of the compressors.
The interior equipment of the cabin (front panel, all control devices on it and electrical wiring) is from an Oka car. The control mechanisms also come from it: gas pedals, brakes, clutches, gear shift lever.
Re-equipping the interior is the next stage of design experiments.
O. STARIKOV, Ostrovtsy village, Moscow region.
Recommend to read
 SO AS NOT TO INTERFERE
How in the large or small basins, so they are all occupying the limited space of the bathroom. Three hook driven into the wall above the bath, will solve the problem — they will serve as... PLOW JALALABADI
Readers of "M-K" has long been familiar with the enthusiast a homemade tilling equipment, designer, lover of Nizhny Tagil Grigory Ivanovich ODEGOVA. After all, he managed to develop one...
