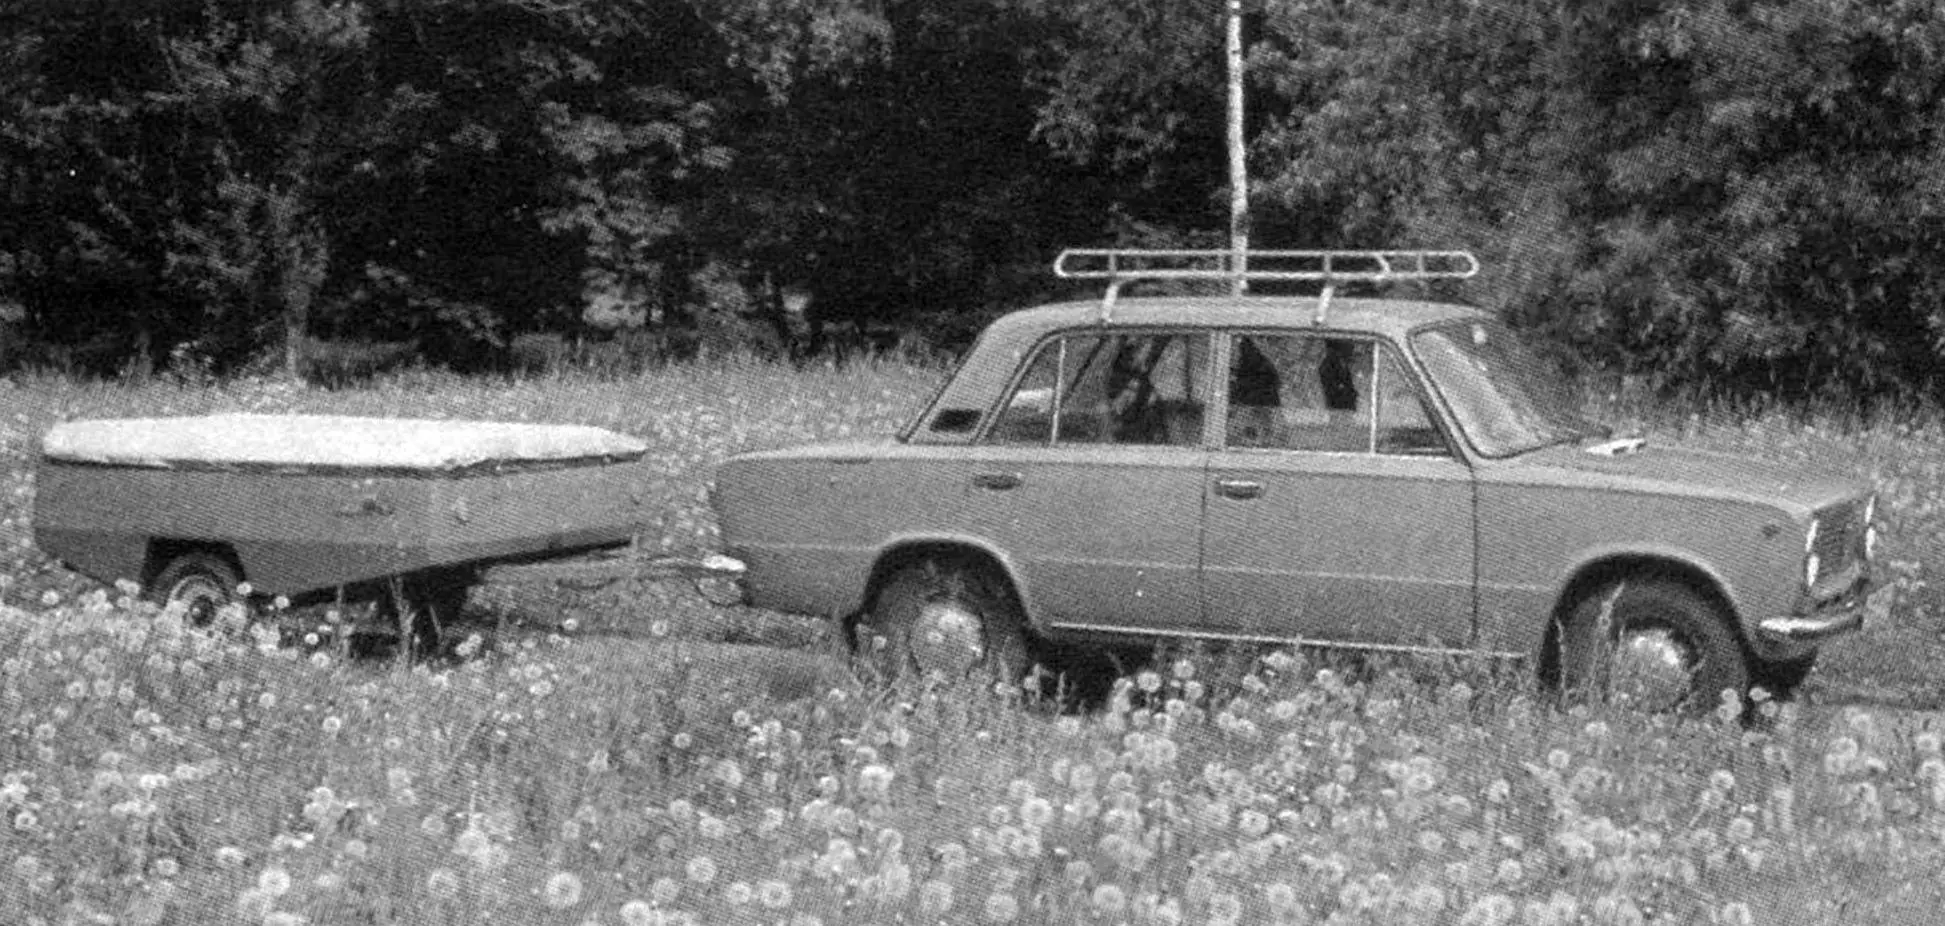
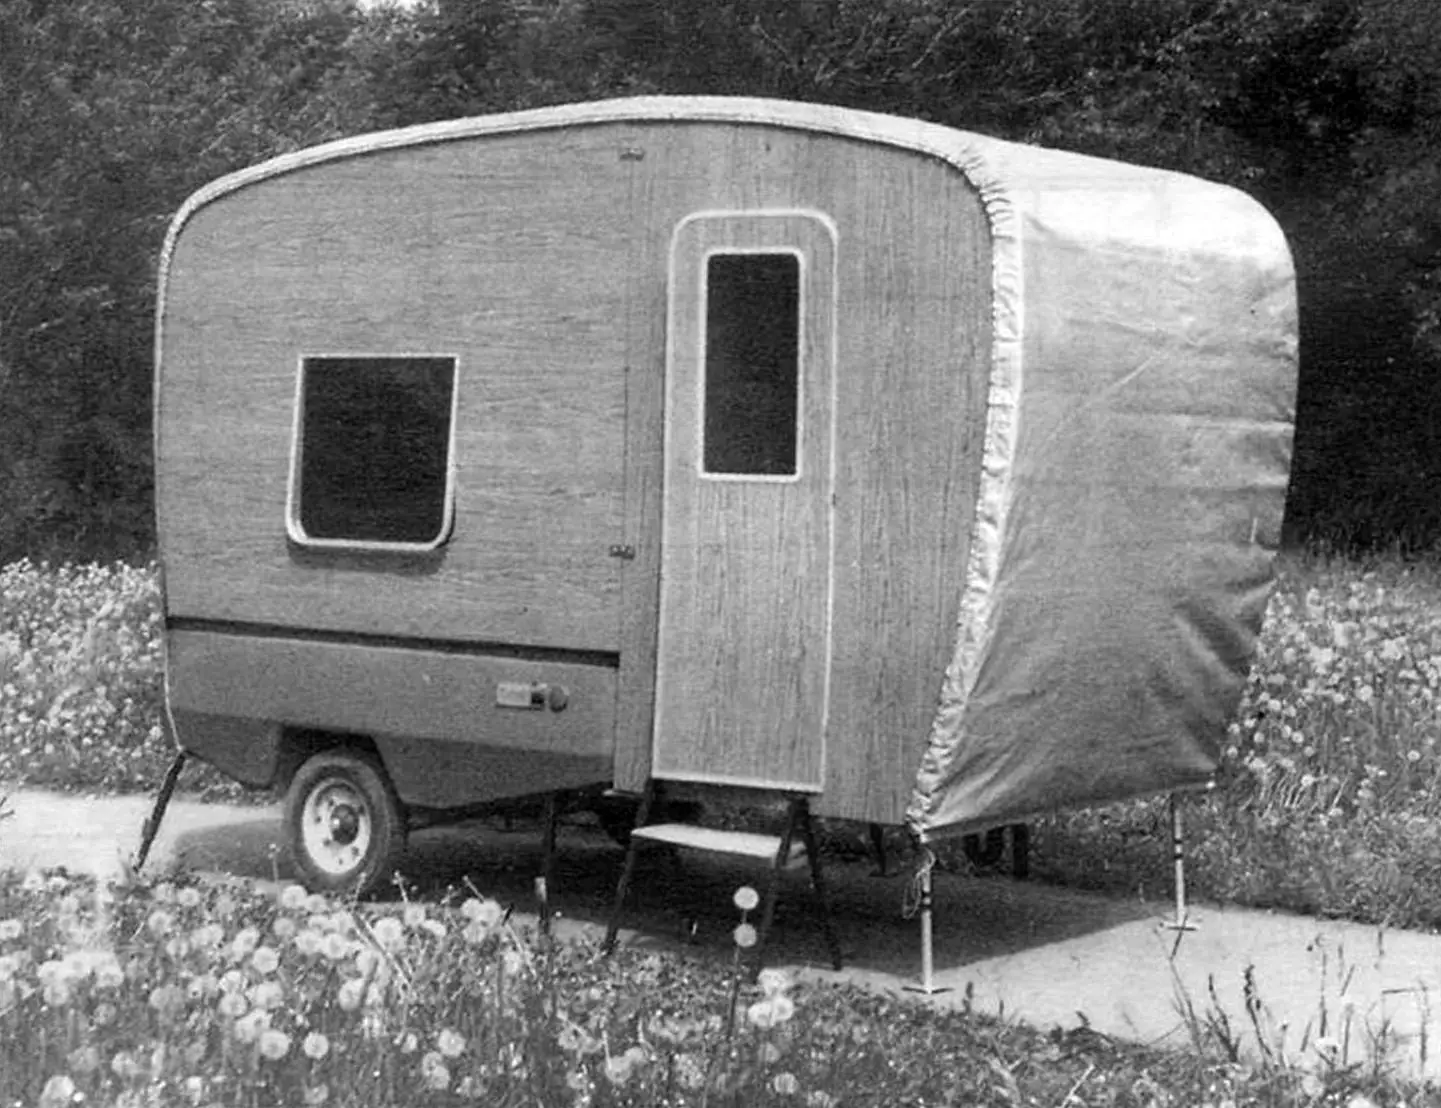
The idea to build a transportable dacha came to me back in the days when road service was just a dream for car travelers. So I decided to provide it for myself. I must say, the dacha I built many years ago is still serving me well. After all, most campsites and motels are located near busy highways. I, on the other hand, set up my bivouac-style housing right at the rest spot, closer to nature, causing virtually no harm to it.
Designing the mobile dacha took quite a bit of brainwork. A simple solution — making it like a van on wheels — was unacceptable to me. Such a dacha would require a lot of storage space, the towing vehicle’s speed would be limited to 40 km/h with increased fuel consumption, not to mention registration issues.
There weren’t many trailer options available for a dacha, so I decided to adapt what I already had — the “Skif-2M” trailer. The word “adapt” isn’t entirely accurate: I barely modified the trailer — just drilled a few holes in the top edges (bends) of the side panels and still use it in its cargo version when needed. But I really did adapt the dacha structure to the trailer. As a result, I can store both the trailer and the folded dacha in a regular garage, placing the trailer on its rear panel. No registration is required. Also, since the trailer body is sealed, it can be transported — dacha included — even across to a different riverbank.
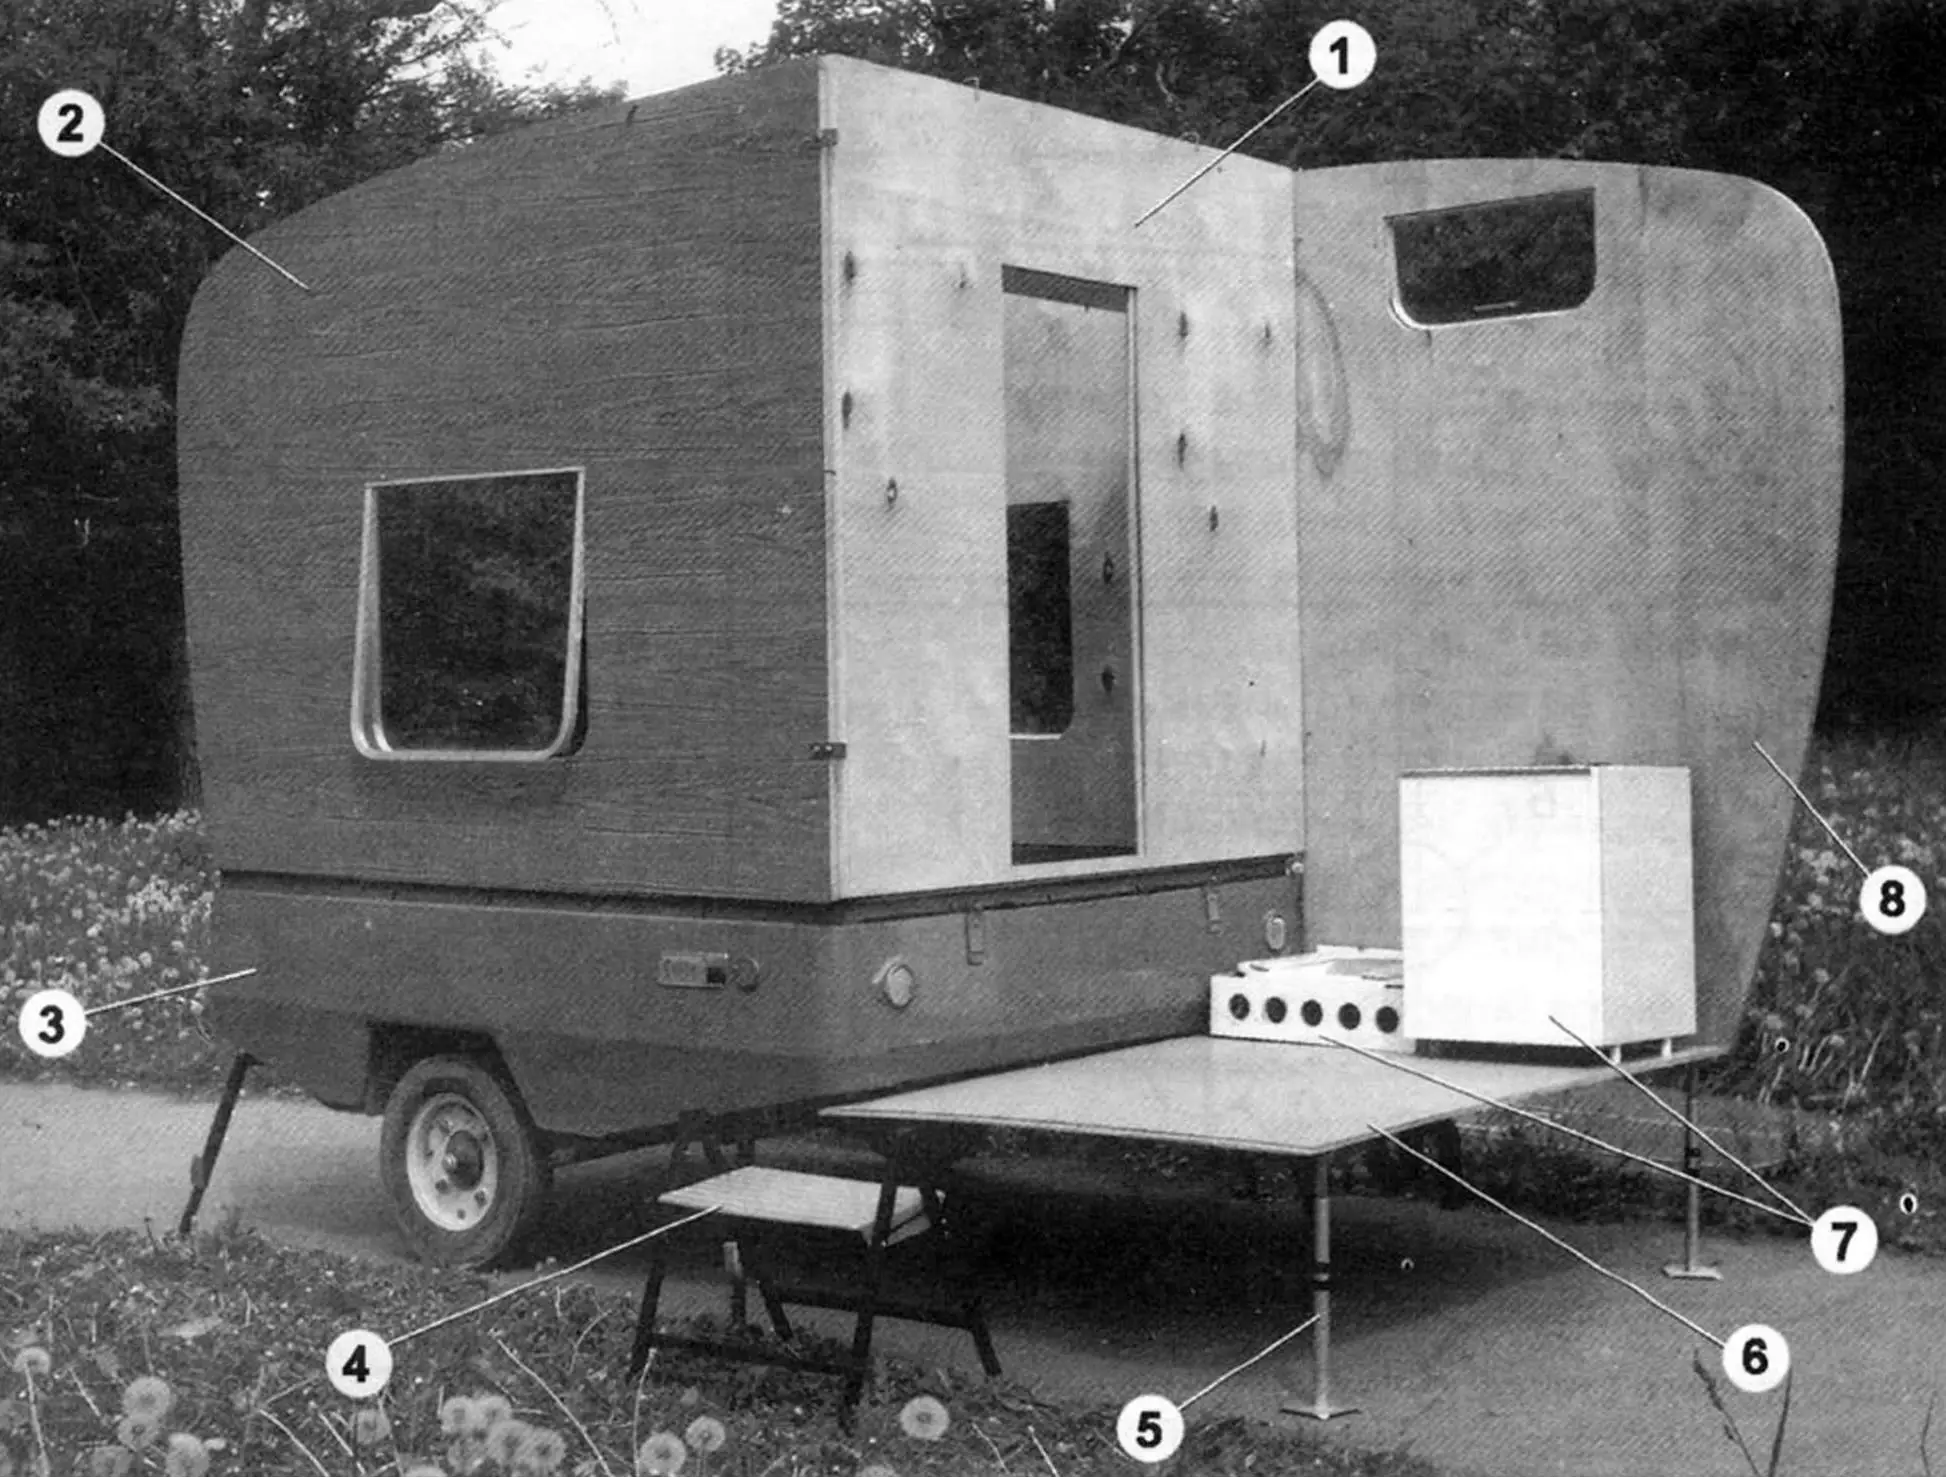
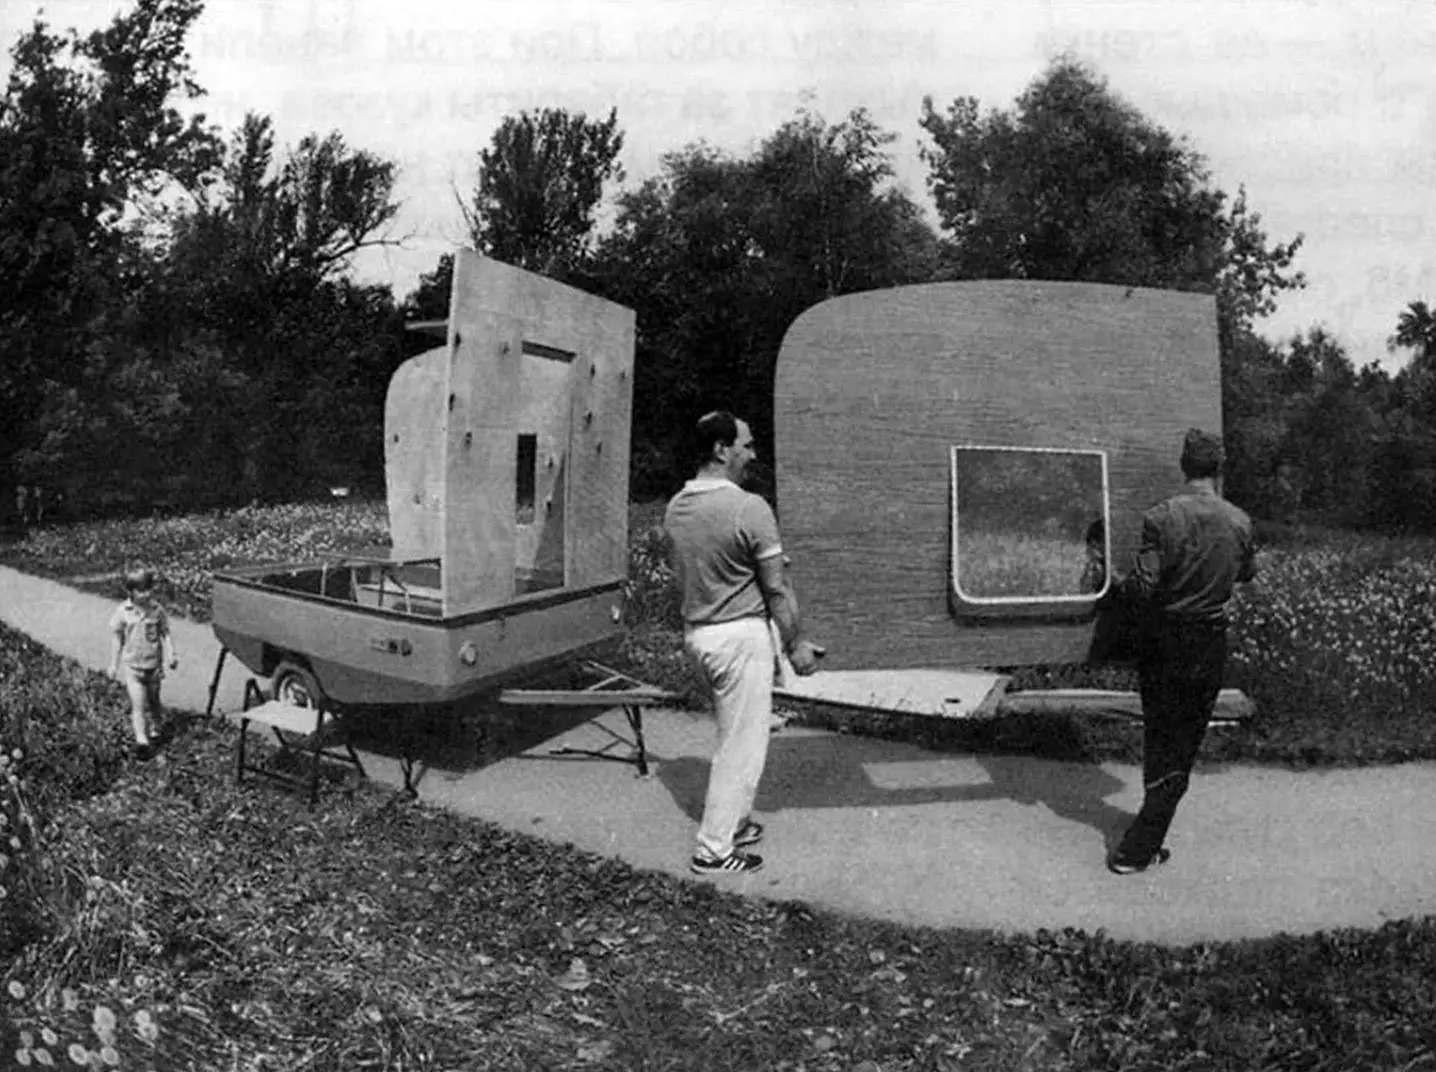
Structural elements of the trailer-dacha (roof not installed):
1 — main cross panel; 2 — room panel (2 pcs, mirror images); 3 — Skif-2M trailer; 4 — porch; 5 — telescopic support (6 pcs); 6 — floor panel of kitchen compartment; 7 — kitchen equipment; 8 — kitchen window panel (door panel not installed)
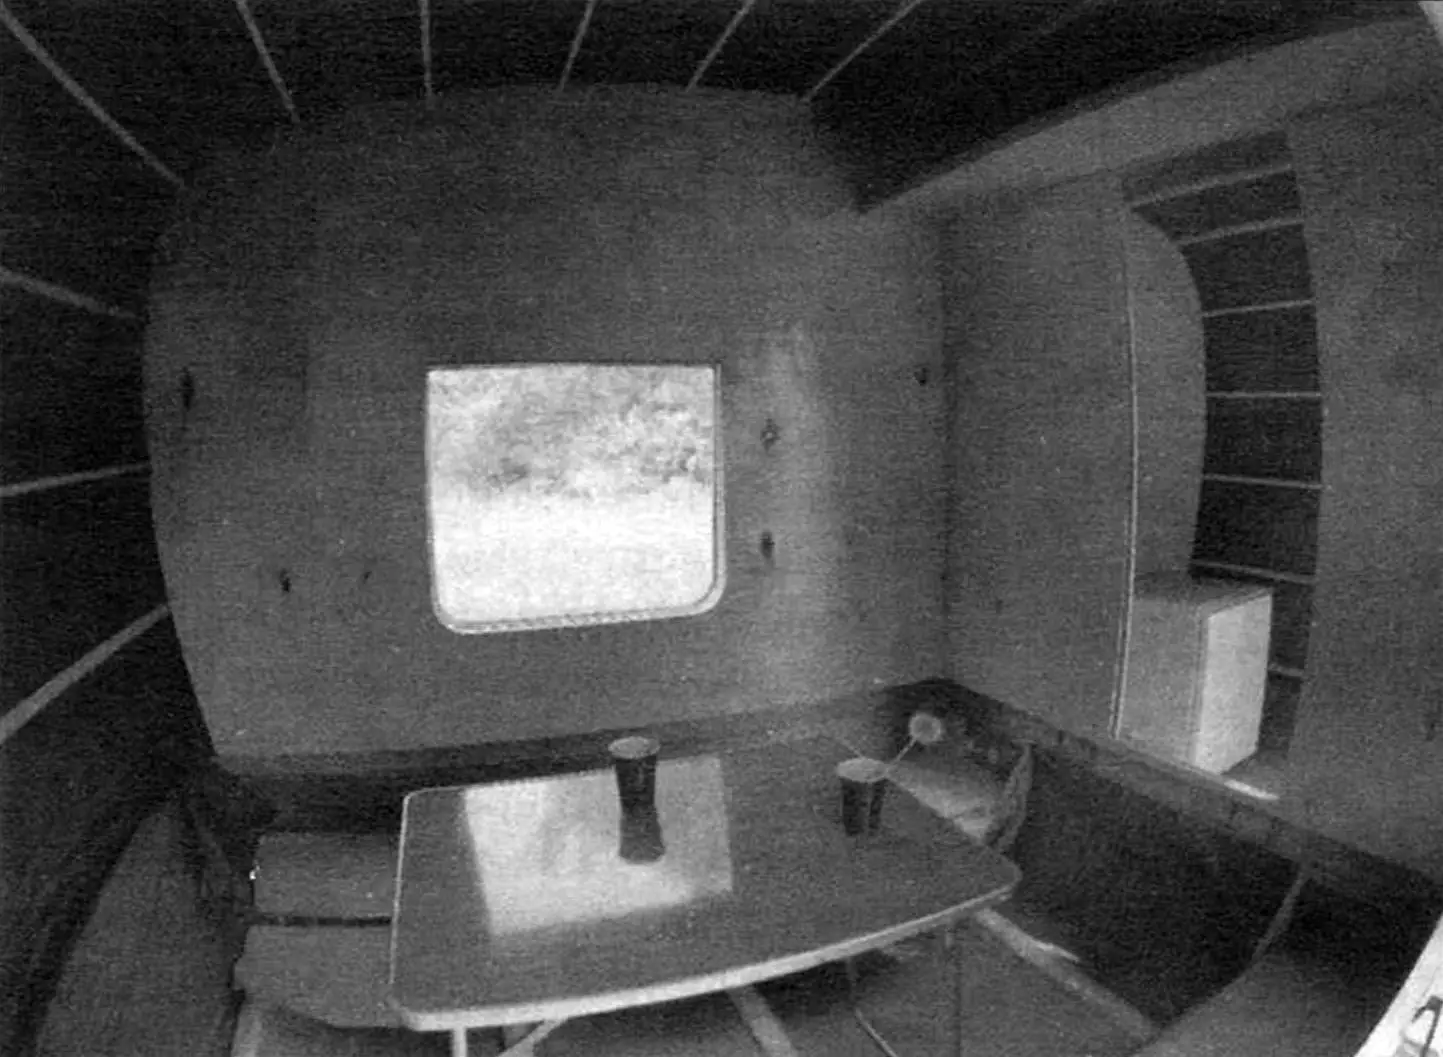
The dacha structure is prefabricated and panel-based. When assembled, it forms a small mobile house with a living (sleeping) room and a small entry-kitchen area.
The length of the main cross panel (which also serves as an interior partition) is slightly less than the trailer’s width — by the thickness of the room panels. It is installed on the front side of the trailer and acts as the connecting element for all other panels. The panel is hollow, assembled with nails and epoxy glue on a frame made of 40×24 mm pine bars, and covered on both sides with 4.5 mm plywood. All frame joints (corner, T-shaped, cross-shaped) are simple and uniform — half-lap. The total thickness of the panel is 30 mm. A door opening is made in the panel. The door is sliding, made of 10 mm plywood, and slides into one side of the panel between the coverings (installed during frame assembly).
To allow other panels to be attached to the main panel (before plywood covering), three steel plates with welded M8 nuts are attached to each vertical post from the inside. For securing the panel to the trailer side, screws are inserted into the bottom framing bar with their heads cut off. Matching holes are drilled and countersunk in the trailer’s upper edge.
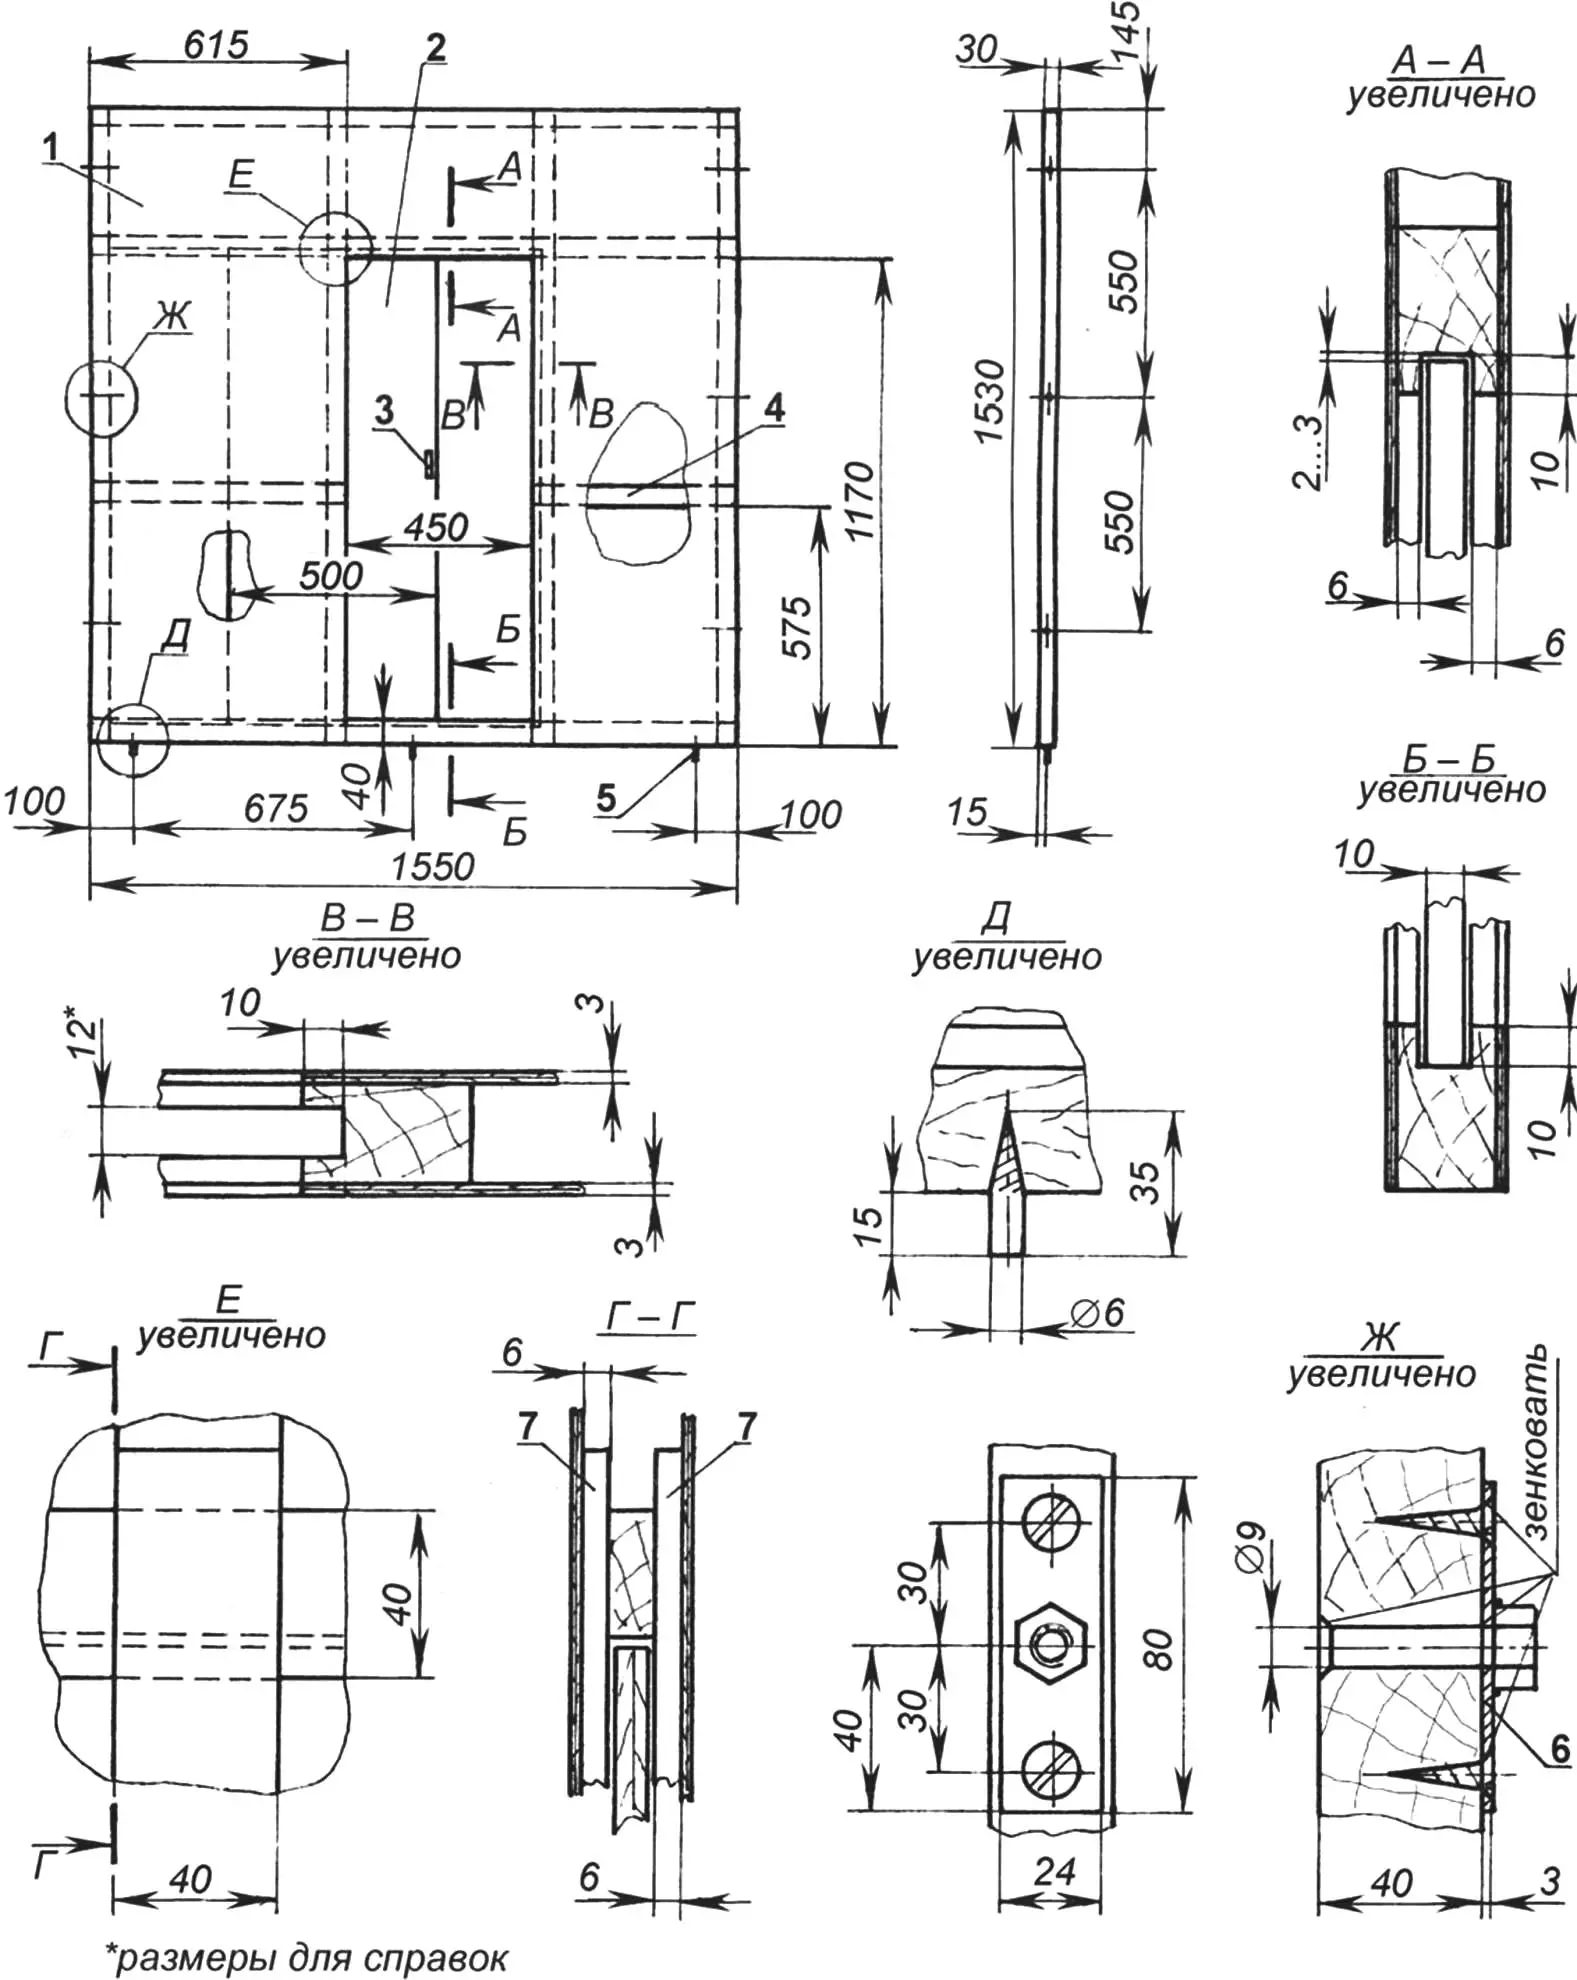
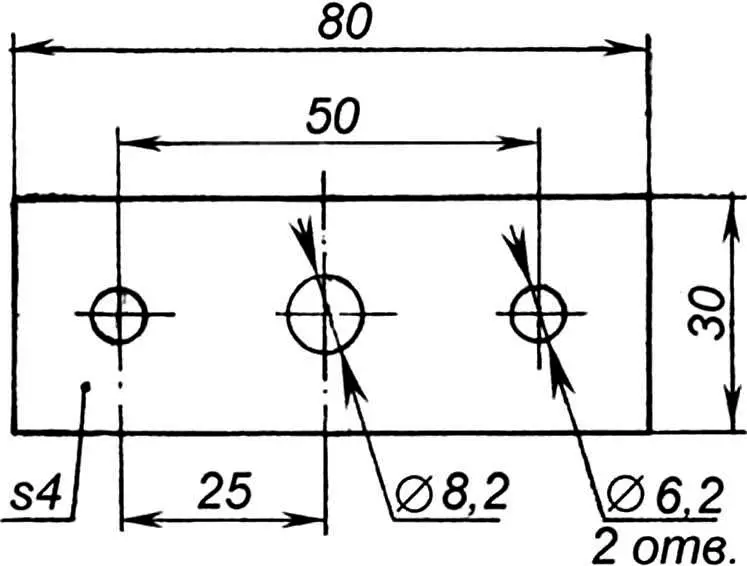
Main partition panel:
1 — facing (plywood s3, 2 pcs); 2 — door (plywood s10); 3 — door handle; 4 — frame (bar 40×24); 5 — pin (Ø6 screw without head, 3 pcs); 6 — plate with M8 nut (6 pcs); 7 — door stops (strip 40×6)
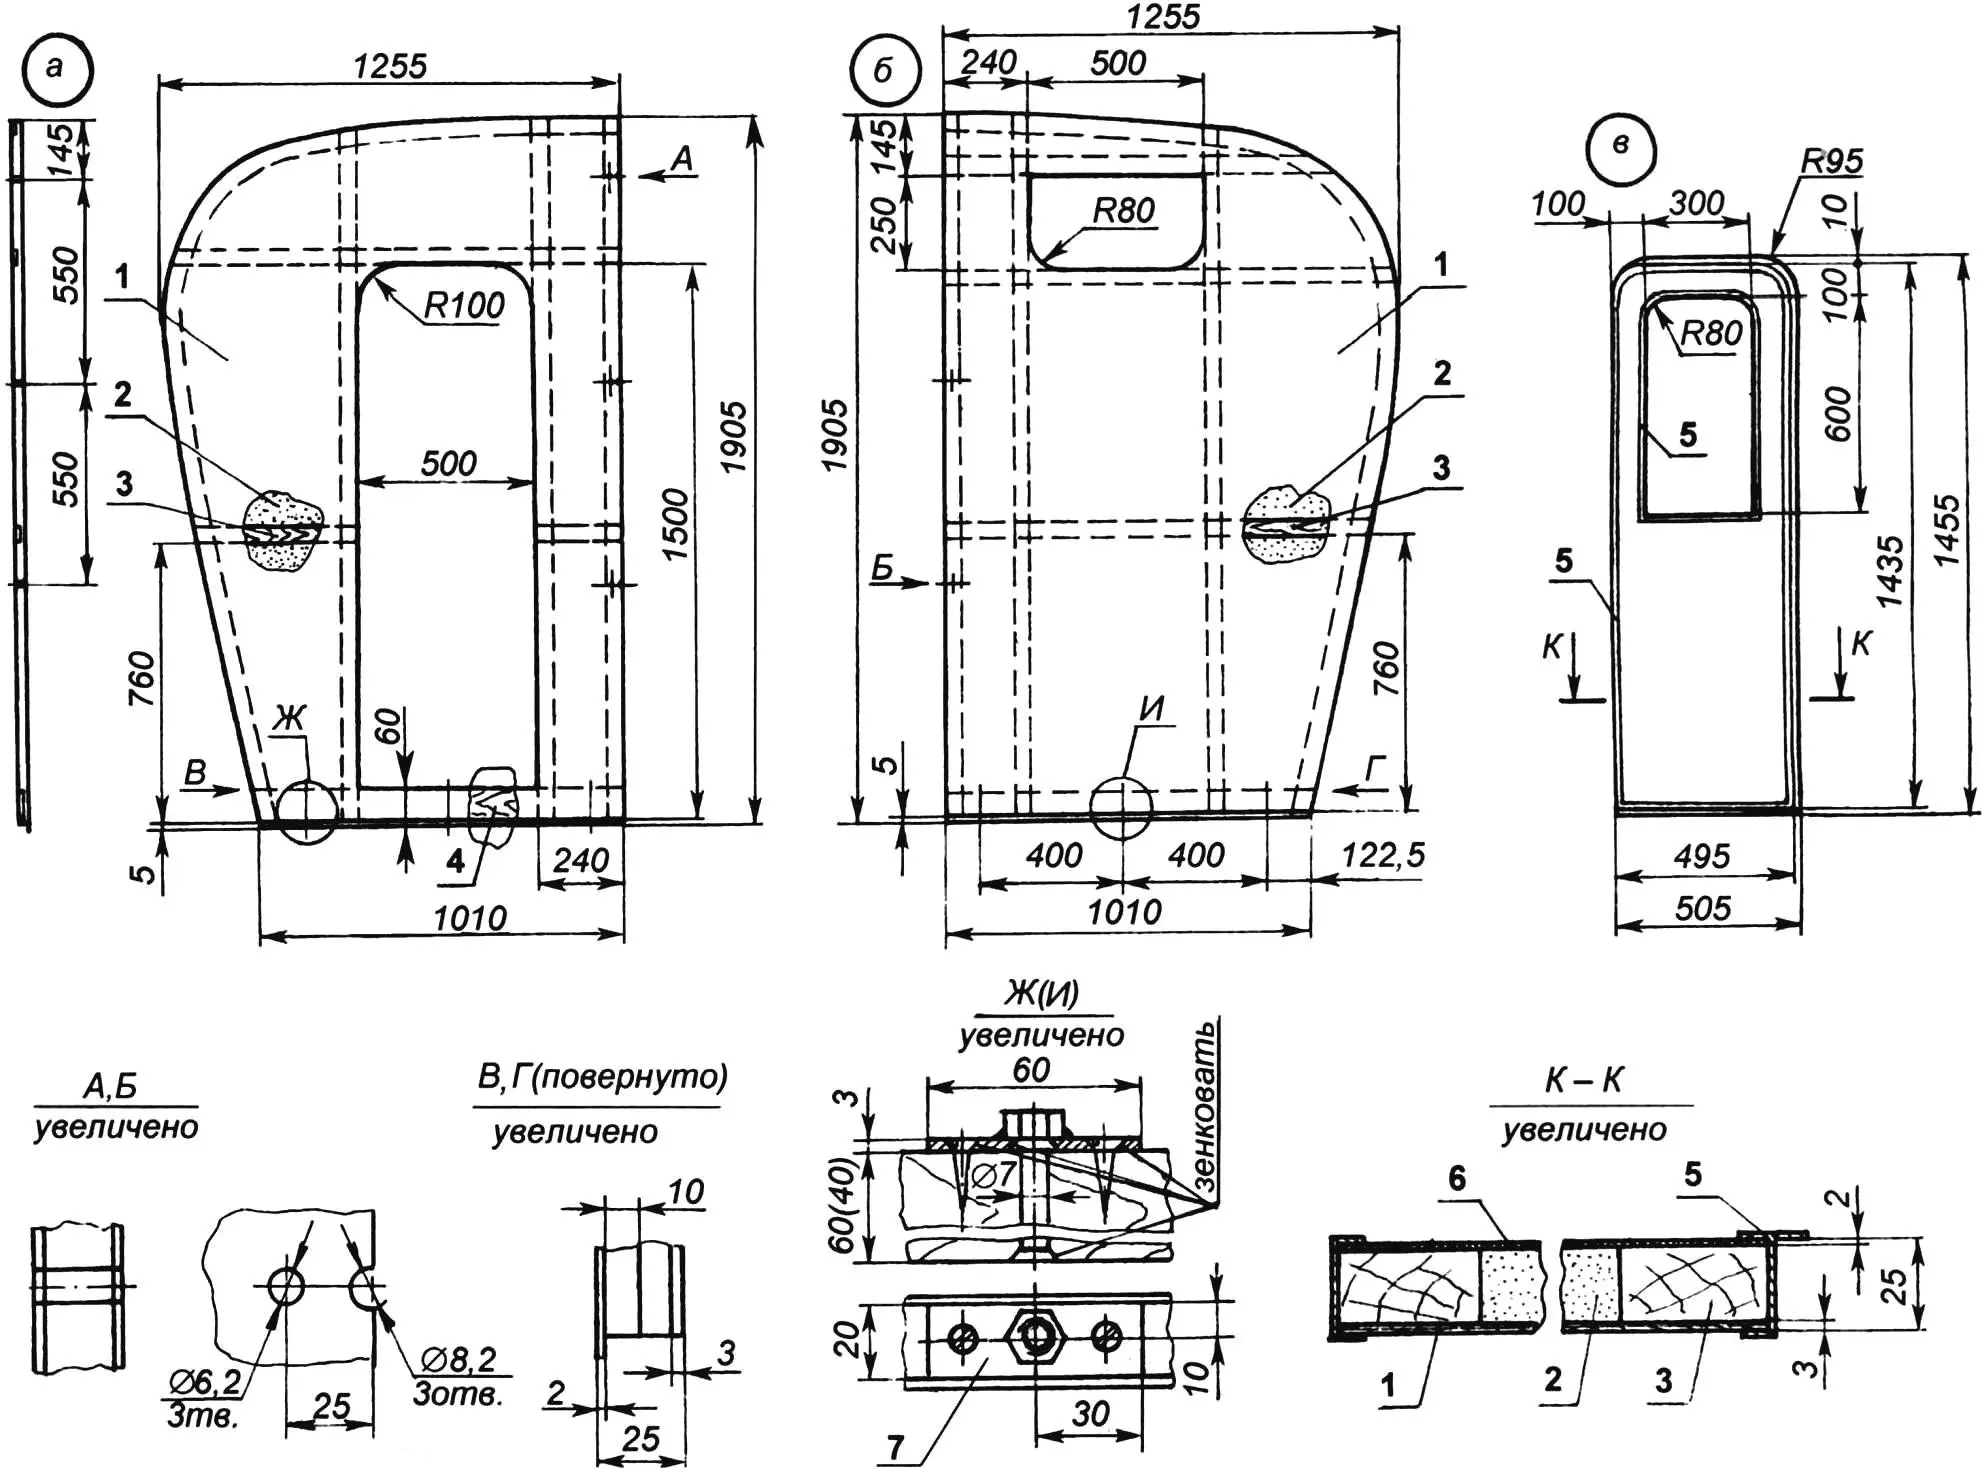
There are two room panels. They are identical in size, but mirror each other. The length of their bottom edges (1836 mm) matches the length of the trailer’s longitudinal side panels.
The phrase “bottom edges” is used because the total panel length (1940 mm) is slightly greater, and the walls extend beyond the trailer’s rear dimensions. The rear and top edges of the panels have a curved (template-based) convex shape. This configuration gives the roof a gradual slope for water runoff and increases the interior volume.
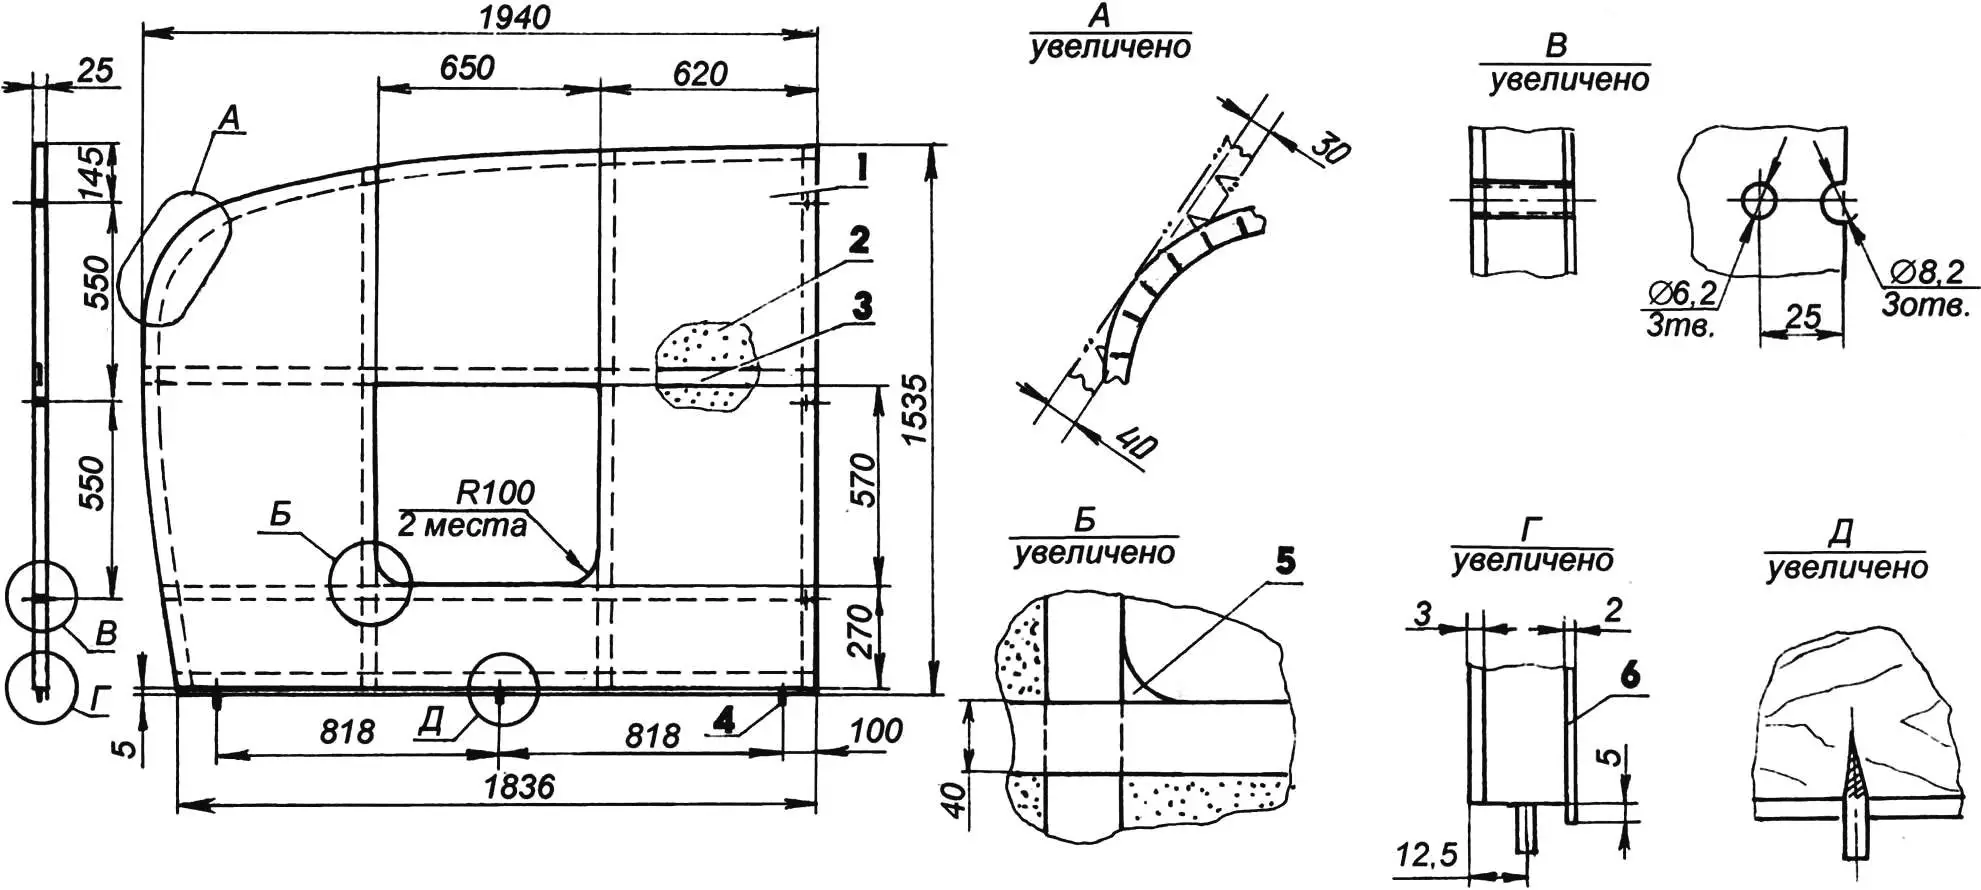
Living compartment panel:
1 — inner facing (plywood s3); 2 — insulation (construction foam, sheet s20); 3 — frame (bar 40×20); 4 — pin (Ø6 screw without head, 3 pcs); 5 — rounded insert (board s20, 2 pcs); 6 — outer facing (textolite s2)
The construction of the room panels is similar to the main panel — also framed. The frame here is made of slightly thinner bars — 40×20 mm. The joints and assembly with nails and epoxy are the same — half-lap. To make the curved (convex) panel frame profile, I used unseasoned spruce bars — they bend well. For small radii, I also made triangular cuts 3/4 the width of the bars. These were bent as needed and dried. The cut ends were glued with epoxy. At window corner curves, triangular inserts with rounded hypotenuses were glued in. The inner facing is also 3-mm plywood. The outer one is 2-mm textolite with a woodgrain texture. Notably, the bottom edge of the outer facing extends 5 mm below the frame’s bottom bar, forming a drip edge that prevents rainwater from seeping inside. I considered lowering it more, but the risk of breaking the thin edge during transport or assembly made me abandon that idea.
The main partition panel is installed first, then the side panels
Before covering the panels with textolite, I placed sheets of construction foam inside the frame cavities. I trimmed them flush with the frame using heated nichrome wire. The facings were glued to the frame bars with epoxy, and spot-glued to the foam and inner grid.
There is no floor panel in the living room — the trailer bed acts as the floor. The wheel wells inside the trailer take up a lot of usable space, so benches were placed over them along the side walls, supported with legs. Each bench consists of two hinged sections: a fixed seat and a folding platform. By lifting the platform and placing inflatable mattresses, sleeping places are arranged. The benches are made from the same 3-mm plywood as the panel interiors and are reinforced with longitudinal and cross wooden bars. The edges of the platforms are cut to match the trailer’s front and rear profiles so they don’t interfere when lowered.
1 — interior cladding (plywood s3); 2 — insulation (construction foam, s20); 3 — frame (wooden bar 40×20); 4 — threshold (board 60×20); 5 — aluminum profile (T-bar 25×20); 6 — exterior cladding (getinax, sheet s2); 7 — M6 nut plate (6 pcs.)
I started designing the kitchen compartment from the floor — or more precisely, by defining the size of its panel. I decided to place the floor on the drawbar, and that determined its length (which turned out to be less than its width). The width was dictated by the trailer’s dimensions. I should note that the floor slightly extends under the trailer body and locks in place there, so it’s a bit longer than the bottom edges of the wall panels that rest on it.
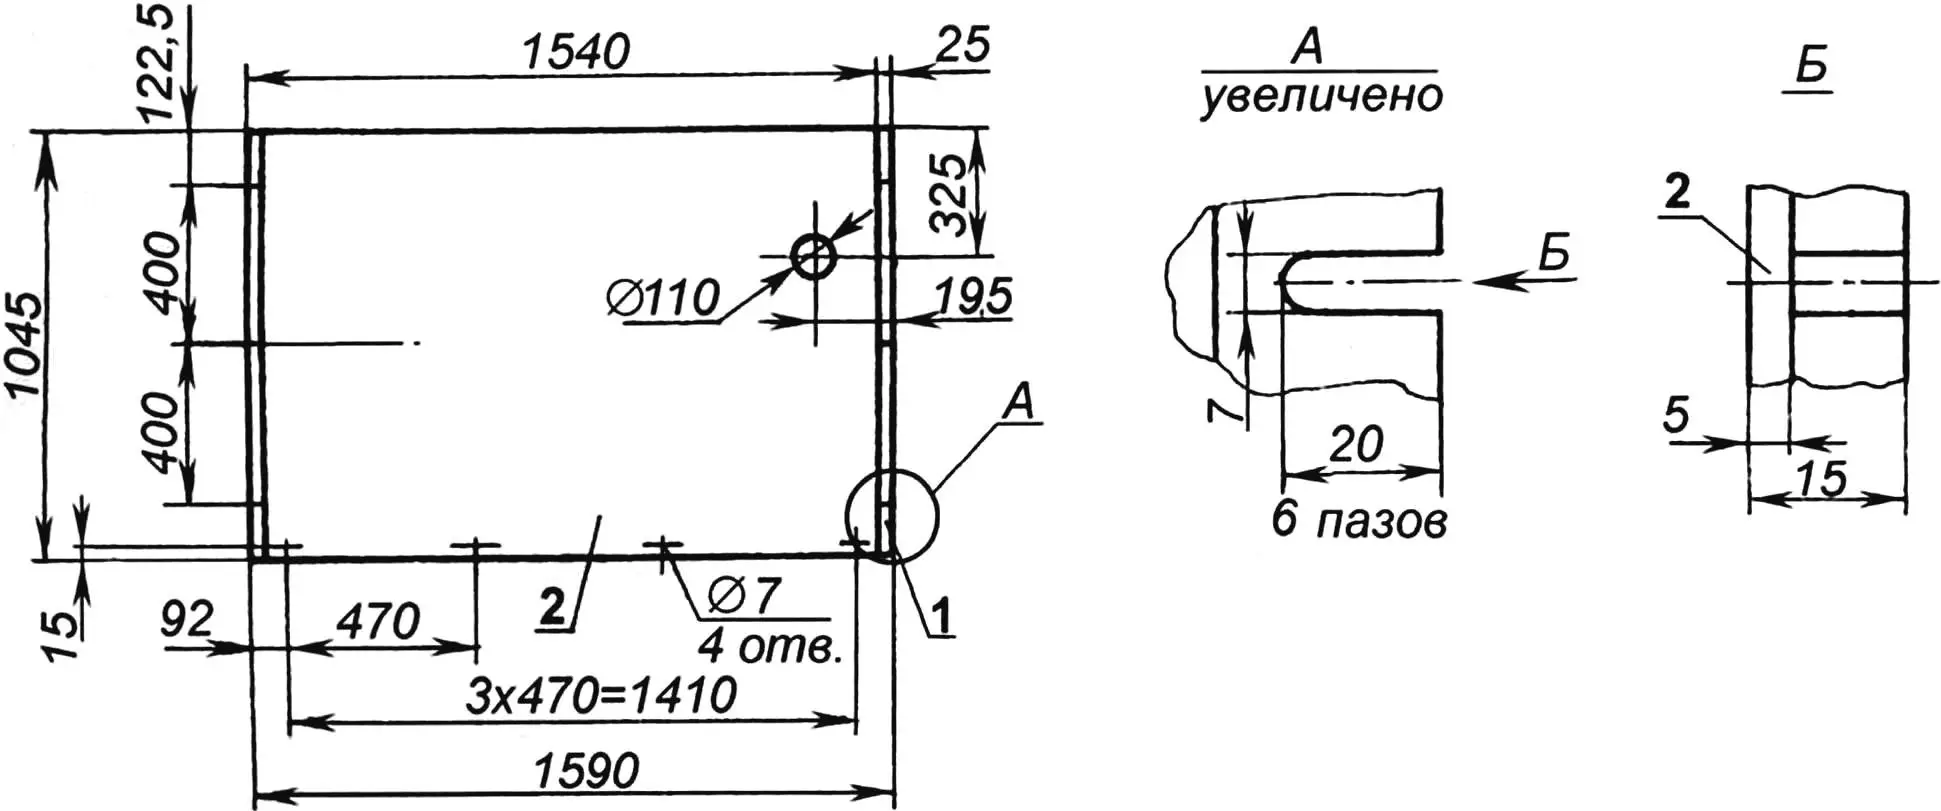
1 — base (plywood, sheet s10); 2 — covering (felt-backed linoleum)
The kitchen floor is made from 10 mm plywood, with felt-backed linoleum glued on top. A large hole is made in the floor panel for a drain trap, several holes for mounting the roof bar, and side through-slots for screws that attach the wall panels. There are also two blind holes on the bottom side that fit the standard bushings on the drawbar’s cross member, serving as locators.
The kitchen compartment walls are modeled after the living compartment walls. One panel has a window opening, the other a door opening. The cut-out part of the latter was used to make the door. The door is a standard swing door with a fixed window. The window, like all the others, is made of plexiglass framed in an aluminum profile. The profile is an I-beam type used for suspended ceilings made of acmigran. Its height (25 mm) defined the thickness of the wall panels, as I had already planned to use it for framing doors and windows during the initial design. While framing, I removed any unnecessary or obstructive flanges. On small radii, I carefully thinned the flanges while bending the profile.
1 — slat (wooden bar 25×15); 2 — hook (stainless steel, sheet s2, 2 pcs.); 3 — screw (4 pcs.)
The roof is soft. Builders usually mean roll materials on mastic when they say this. But mine is made of fabric: the bottom layer is tent cloth, and the top is what I call “silver” fabric — named for its color (possibly percale, but I’m not sure). This “silver” fabric is ideal for a trailer roof — waterproof, soft, lightweight, reflects sunlight well, and doesn’t overheat even in hot weather.
The roof also has a unique feature: its front and rear ends serve as the end walls of the trailer.
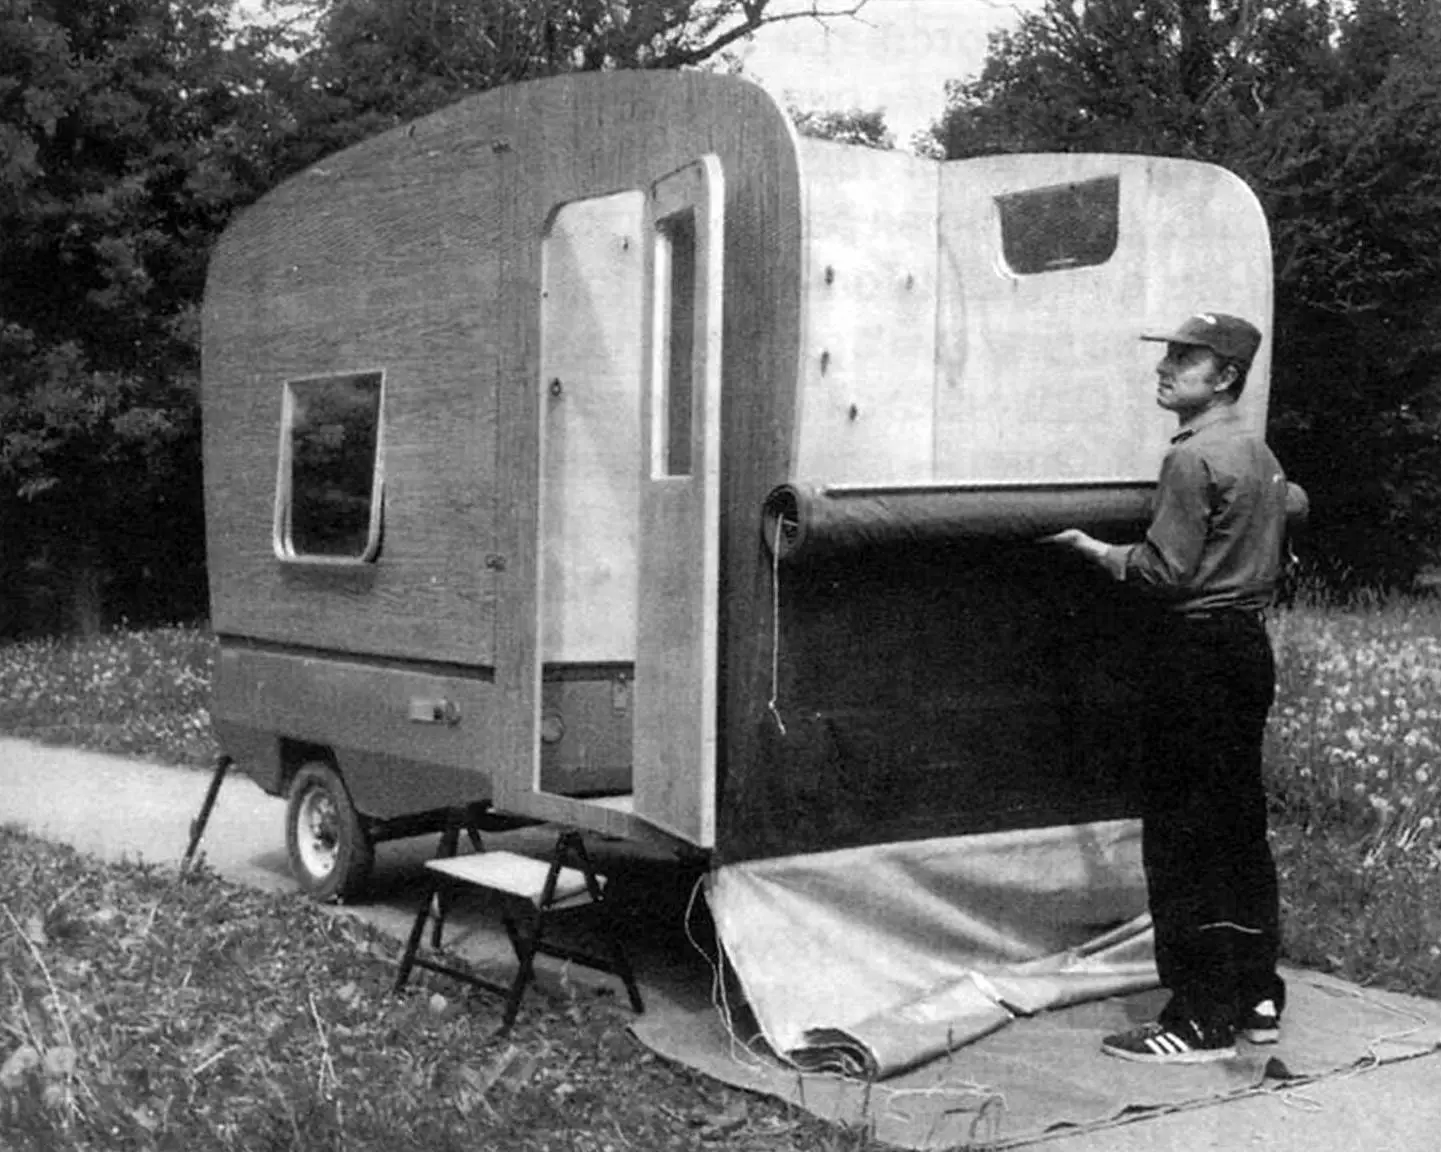
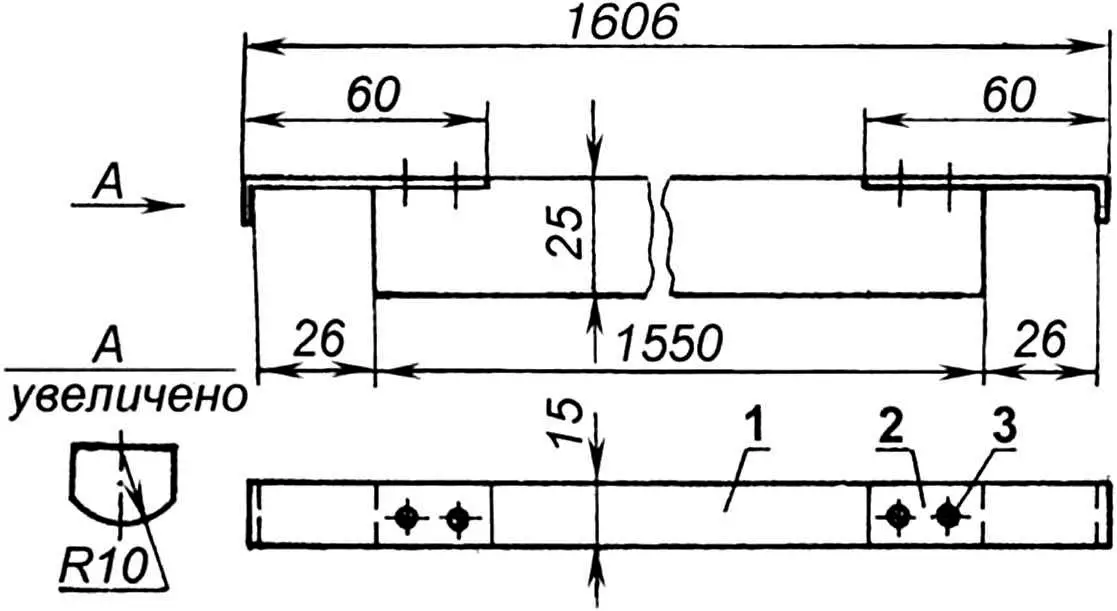
The roof consists of two long fabric sheets, slightly wider than the trailer. The top sheet (“silver”) overlaps the bottom. Along each edge of both sheets are stitched channels (sleeves) that contain strong cords. These cords are used to tighten and secure the sheets to the wall panels. On the inside of the bottom sheet, 30 evenly spaced crossbars made of ash (section 20×15 mm — or 30×20 mm if using pine) are nailed with large-head nails. Each crossbar has hooks on the ends. These bars prevent sagging and keep the wall panels evenly spaced.
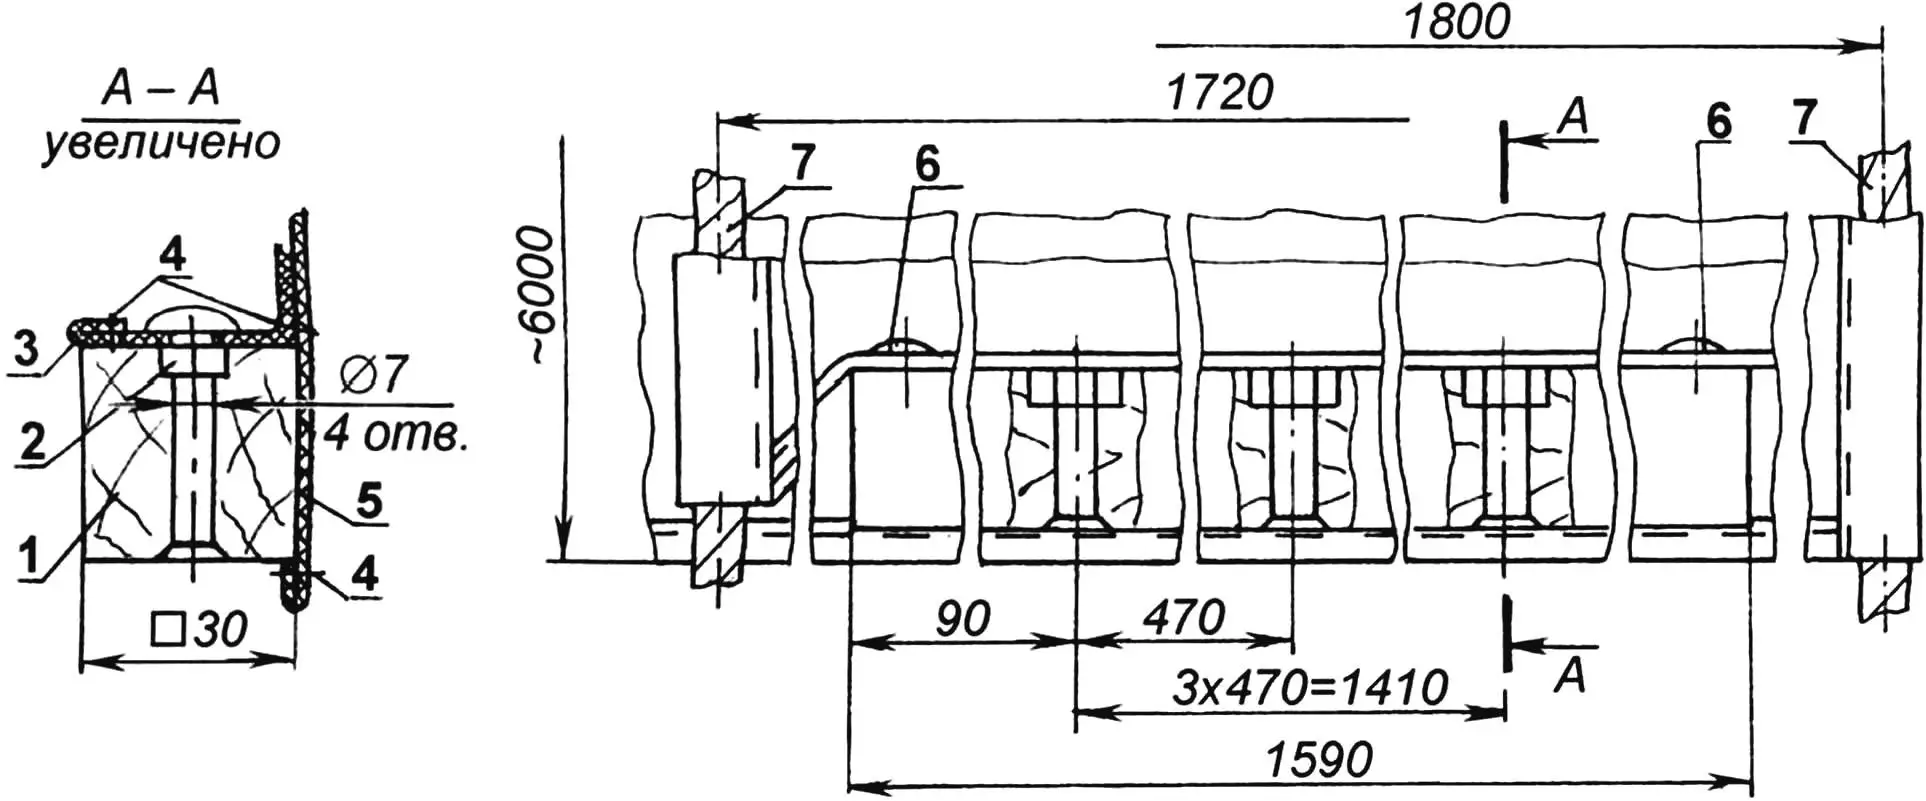
1 — mounting bar (30×30 wooden beam); 2 — M6 nut (4 pcs.); 3 — bottom roof sheet (tent fabric); 4 — seams; 5 — top roof sheet (percale); 6 — nail with large head (8 pcs.); 7 — tightening cord (4 pcs.)
Both fabric sheets are sewn together 80 mm from the edge. The end of the bottom sheet is folded over the mounting bar and nailed from the inside. The end of the top sheet hangs down outside and acts as a drip edge.
The mounting bar has four 7 mm holes. They are countersunk from the top, and M6 nuts are epoxied into them. Using M6 bolts and washers, the bar (and the roof) are attached to the edge of the kitchen floor section.
There are three shelves in the trailer. All have identical construction and size. Their design is the same as the partition: a wooden frame clad in 3 mm plywood. They are thinner, like the wall panels — 25 mm thick. They differ in mounting method. One is for electronics and is installed on pins between the living compartment panels above the rear trailer lip. The second is fixed on pins and hung by hooks on the partition above the door on the room side. The third is secured on pins between the kitchen wall panels inside the “watermelon” (as I call the bulges on the trailer’s end walls).

1 — seat cladding (plywood s4.5); 2 — longitudinal seat bar (2 pcs.); 3 — transverse seat bar (5 pcs.); 4 — seat leg (2 pcs.); 5 — inner longitudinal lounger bar; 6 — outer longitudinal lounger bar; 7 — transverse lounger bar (3 pcs.); 8 — foldable lounger leg (2 pcs.); 9 — lounger cladding; 10 — hinge for folding the lounger (piano hinge).
All parts, except items 1 and 9, are made from 40×20 bars; parts 2, 5, 6 are attached to the cladding by their narrow side, parts 3, 7 — by the wide side
Assembly of the dacha begins with choosing a site and unloading the dacha panels from the trailer, placing them nearby. First, the partition (main panel) is installed and fixed with props on the front side of the trailer, and mounting plates are loosely screwed to it using M8 bolts. Then, wall panels of the living section are installed onto the side walls of the trailer and attached to the partition using M6 screws and plates.
Next, the floor of the kitchen section is mounted on the drawbar, and the walls of the kitchen section are installed on top. These walls are also attached to the partition using M6 screws and plates, then tightly fastened with an M8 bolt, pulling the wall panels snugly to the partition. After this, the roof is fitted and tightened over the dacha. And finally, a porch is added to the entrance — it looks like a small stepladder or a folding stool. But this is standard trailer equipment.
To ensure the entire structure is stable when parked, telescopic, height-adjustable supports are placed under the corners of the trailer and the floor of the kitchen section.
When preparing the dacha for transport, the panels and other parts are first packed starting with the roof. It is rolled up and placed at the bottom of the trailer. Then the partition and the floor of the kitchen section are placed on the inner side flange of the body. Free space inside the trailer can be filled with belongings and utensils, but they must be securely fastened “camp-style” to prevent shifting or collision during transport.
Further loading of panels is done with soft material placed between them to prevent friction. Although the panels may slightly protrude beyond the trailer’s dimensions, they are held securely inside by a cover, which is pulled tight after loading.
The dacha is equipped with appliances that either do not require electricity (gas refrigerator, gas stove) or are powered by the vehicle’s onboard system (radio receiver, TV-video equipment); there is also a water tank and a shower tray. A pit is dug under the dacha for waste collection and used water drainage, which is buried and reclaimed after the campsite is dismantled.
To recharge the battery, a 10-watt wind generator mounted on a mast is used.
V. KOLYASKIN
Recommend to read
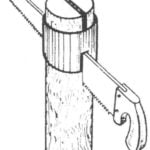 THE SLIDING CONDUCTOR
It is often necessary to cut a wooden rod so that you get two identical halves - for example, for the manufacture of frames for drawings or photos. However, the one who tried to do it...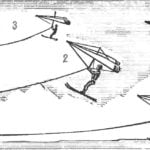 SKIING — IN THE AIR
In the third issue of our journal in 1968 published a description of the design of snake-gibralta for water skiers, created by the pioneer of this sport in the USSR — Alexander Casein....
