
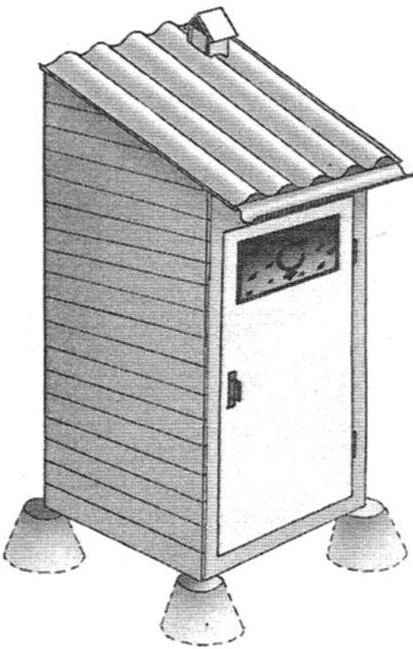
 The development of cottage or garden plot the most prudent and economic to start with the erection of the booth of the toilet. And that, in General, correctly: how to do without it?
Option of such facilities, “where the king walks in” is the so-called play-closet, in which there is only a hole. A more advanced variation — so-called powder-closet, of the simplest design which we want to tell.
Main difference from the play-closet is that, instead pit is used the storage hopper, in which feces prosypayutsya the appropriate powder material, including, of course, the best is peat. We note that many garden plots allocated for drained peatlands, where, as they say, problems with this material there. The use of peat powder ensures complete hygiene. But not only: as a result of its application to the beginning of the next gardening campaign, you will have a certain number of high-quality organic fertilizer. In the absence of peat as the charging material are also used shredded vegetable waste, shredded paper chaff produced on the machines for destruction of documents. Sawdust is unsuitable.
The design of the structure made the shield. The basic requirement is a thick wall that ensures the absence of drafts, so the boards are knocked together from the dry grooved or selected by the quarter boards. Comb grooved boards should be oriented up, to avoid accumulation in the groove of moisture. In the rear part of the building frame is formed from boards in the thickness not less than 25 mm with a width of 75 mm, and the front of the used boards section 50×70 mm. Two side and back shields are made in advance. The front frame beams are constructively included in the frame of the doorway, so pre-assembling the frame (without bonding) is performed before Assembly of the side panels.
The size of the structures in the plan should be approximately 1×1 m. After selecting plot locations for the installation of the toilet in the corners to dig four pits, which are as formwork for pier Foundation buried old bucket without a bottom, cone upwards, so that its cutoff was located on the ground level. Then digs a hole for the hopper drive, which is a box made of metal or wood (in the latter case a good idea to upholster it from the inside sheet steel). You can try to use the bunker for any metal or plastic container of suitable dimensions (for example, the fuel tank from the truck). The bunker dimensions are mm. 400x500x750 This volume, as practice shows, one season is enough, even in the embodiment of powders-rest rooms. However, if you expect families throughout the summer season, the size can be increased. The bunker should rise above the ground to avoid the ingress of precipitation and groundwater.
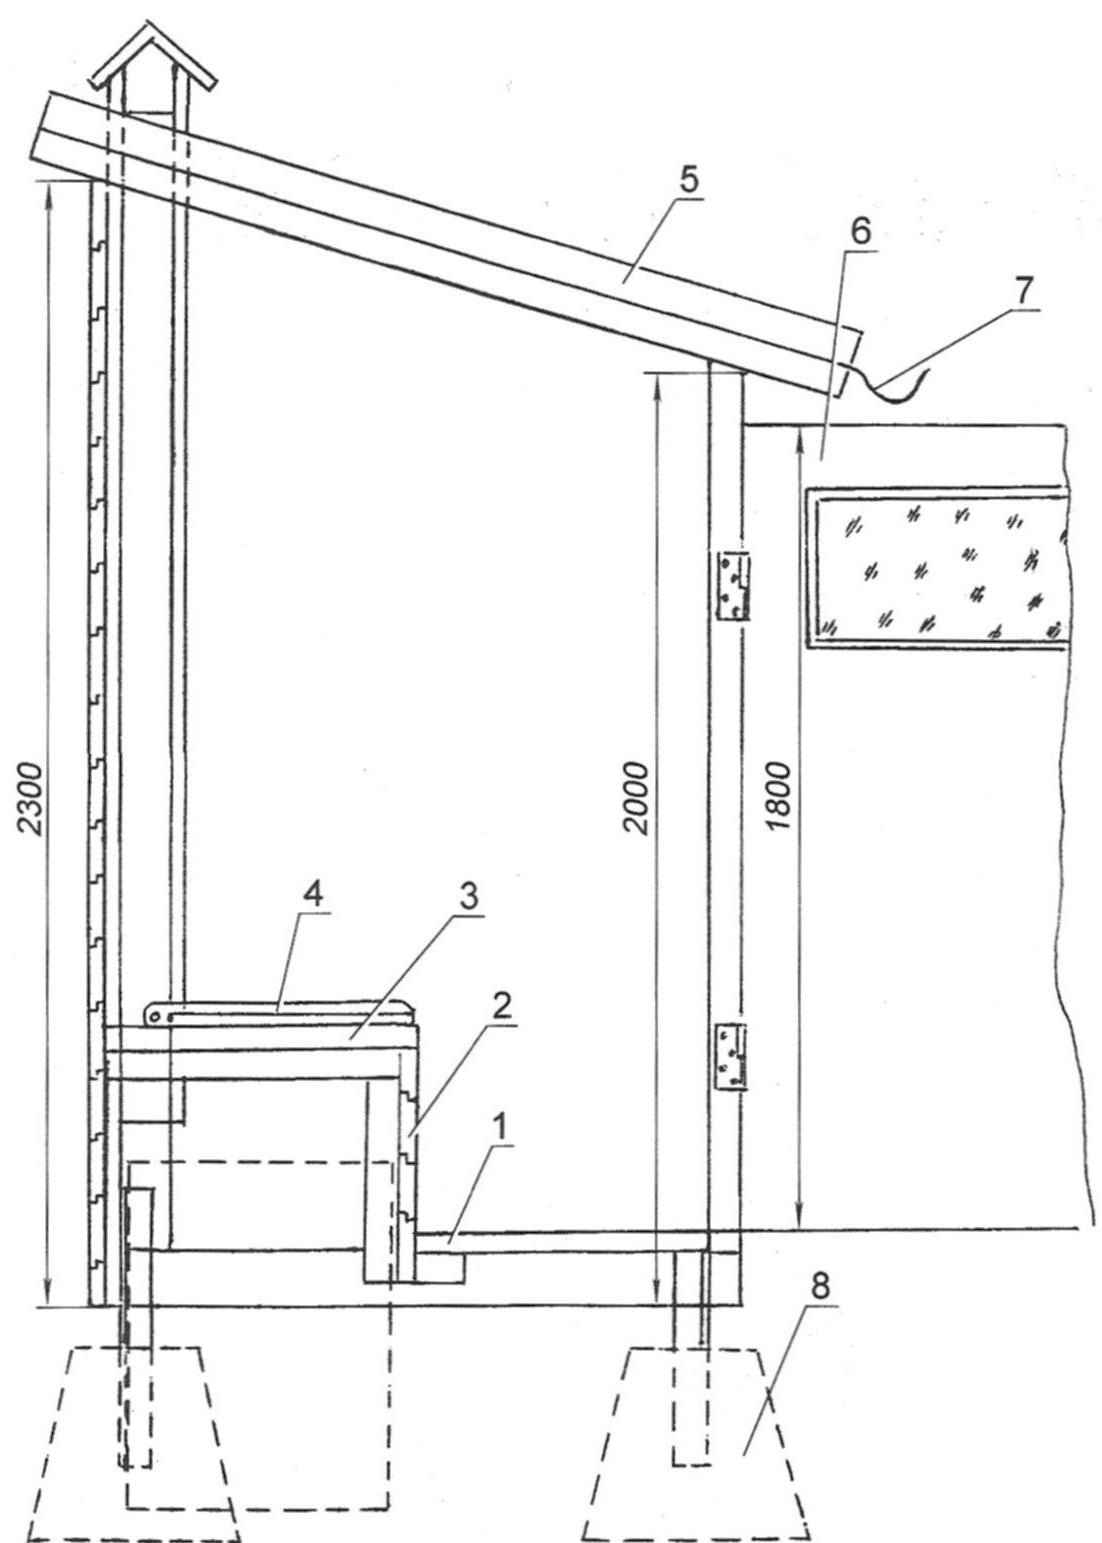
Vertical section of the toilet:
1 — floor;
2 — vertical wall of the seat;
3 — top cover of the toilet seat;
4 — seat;
5 — roofing;
6 — door with window;
7 — trench drain;
8 — the pillars of the Foundation, reinforcement fixing.
The Assembly of the structure of the shields is on the nails. Subsequently can be installed on the corners of the reinforcing metal plates to give greater strength. In the lower part to the frame member with screws from the inside”wood” attached metal squares with cross-section dimensions not less than 40×40 mm, which are subsequently walled up in the Foundation that ensures the stability of the structure against wind loads.
Blank for ventilation ducts strays in the form of a square of planks 20 mm thick and fixed to the wall or frame elements back to back in one of the back corners: formed vertical box. In some of the corners of buildings, right or left — you decide. This is because, as practice shows, the final cleaning of the hopper is much easier to lead from the inside of the toilet compared to using the hatch at the rear. This toilet seat cover is removable. In addition, when the back walls of the toilet virtually eliminates the contact zone of the hopper flies, as well as the spread of odors. Consider how you would prefer to unload, and install box so that it is less interfered with.
After that, collect the glue on the frame of the doorway, to ensure its Squareness, then adjust and hang the door. Using the plumb and level, align the whole structure installing pads under the boards. Concreting columns of the Foundation, to reduce the consumption of cement be sure to use a filler of any type. After curing of the concrete can proceed to the arrangement of the interior of the toilet.
To install the floor to the side edges of the frame and the siding are nailed bars of a cross section of 40×60 mm. To these bars, the frame member and the casing attach the bars of the same section forming the frame of the seat. Then plank the floor, place the vertical trim of the seat. On top and behind the trim at the same level, attach the reinforcing rib section 30×50 mm. the Blank for the upper panel of the toilet seat after the use of planed boards 30 mm thick and the slats. Then adjust the shield at the outer contour of the installation site (pre-can of hardboard to make a template).
The seat it is expedient to equip a standard seat with a cover from the toilet. Therefore, the hole in the shield is done using this seat as a template (easier and better of all, this operation to produce jigsaw). Seal seat, if necessary, is done by means of foam. The edges of the upper panel of the toilet seat is nailed up door handles that serve to remove it before emptying the hopper.
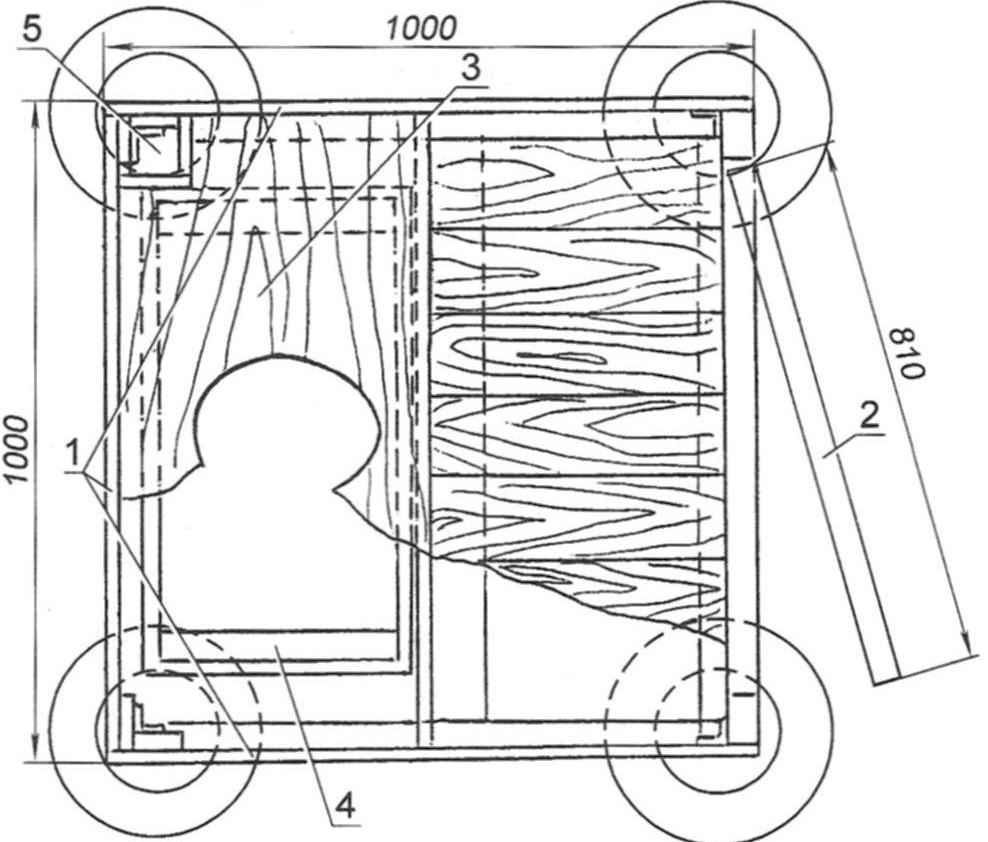
A cross-sectional view of the toilet:
1 — shields;
2 — door;
3 — cover the seat;
4 — hopper;
5 — vent box
The internal cavity under the toilet seat and the hopper it is advisable to impregnate the spent lubricating oil. And outside, if you do not impose specific requirements to the appearance, the toilet it is also possible to handle them (oil, of course it is better to take clean). And the inside walls should be painted with white latex paint or whitewash with lime.
The roof is best done shed with a slope to the front door. In this case, the height space above the seat will be more, and besides, you later without any difficulty will be able to attach shower cabin. The best material for roofs is slate or roofing material. Under the slate, you will need a rare crate; in the case of soft roof it must be more dense. The vent pipe to provide a roof visor.
The door panel any good. You can make the door, sheathing the frame, connected to the spike Board. For natural lighting of the toilet enough the upper part of the doors glazing or wrap.
As a tank for storing the filling material will fit even a cardboard box (of course, if the material is dry). Scoop for filling you can buy or make from a plastic container with a handle. It is also desirable to install an internal lock-bolt, a basket or toilet paper holder, hanger hook, mirror, sink and towel (however, the discharge of water from the sink into the hopper should be deleted). Before operating on the bottom of the hopper it is necessary to pour a layer of dry peat or peat lands.
A. NIZOVTSEV
Recommend to read
 HALLWAY FURNITURE
The proposed set of furniture for the hall although made at home, but meets the requirements of modern furniture design, creating comfort and coziness at home. This consists of three... MOTOR-PLOW ILICHEVA
...The silence of the Sunny spring morning shattered the clatter of the engine. The farmer, perekapyvayut shovel your garden, straightened up and looked over the fence into the...
