
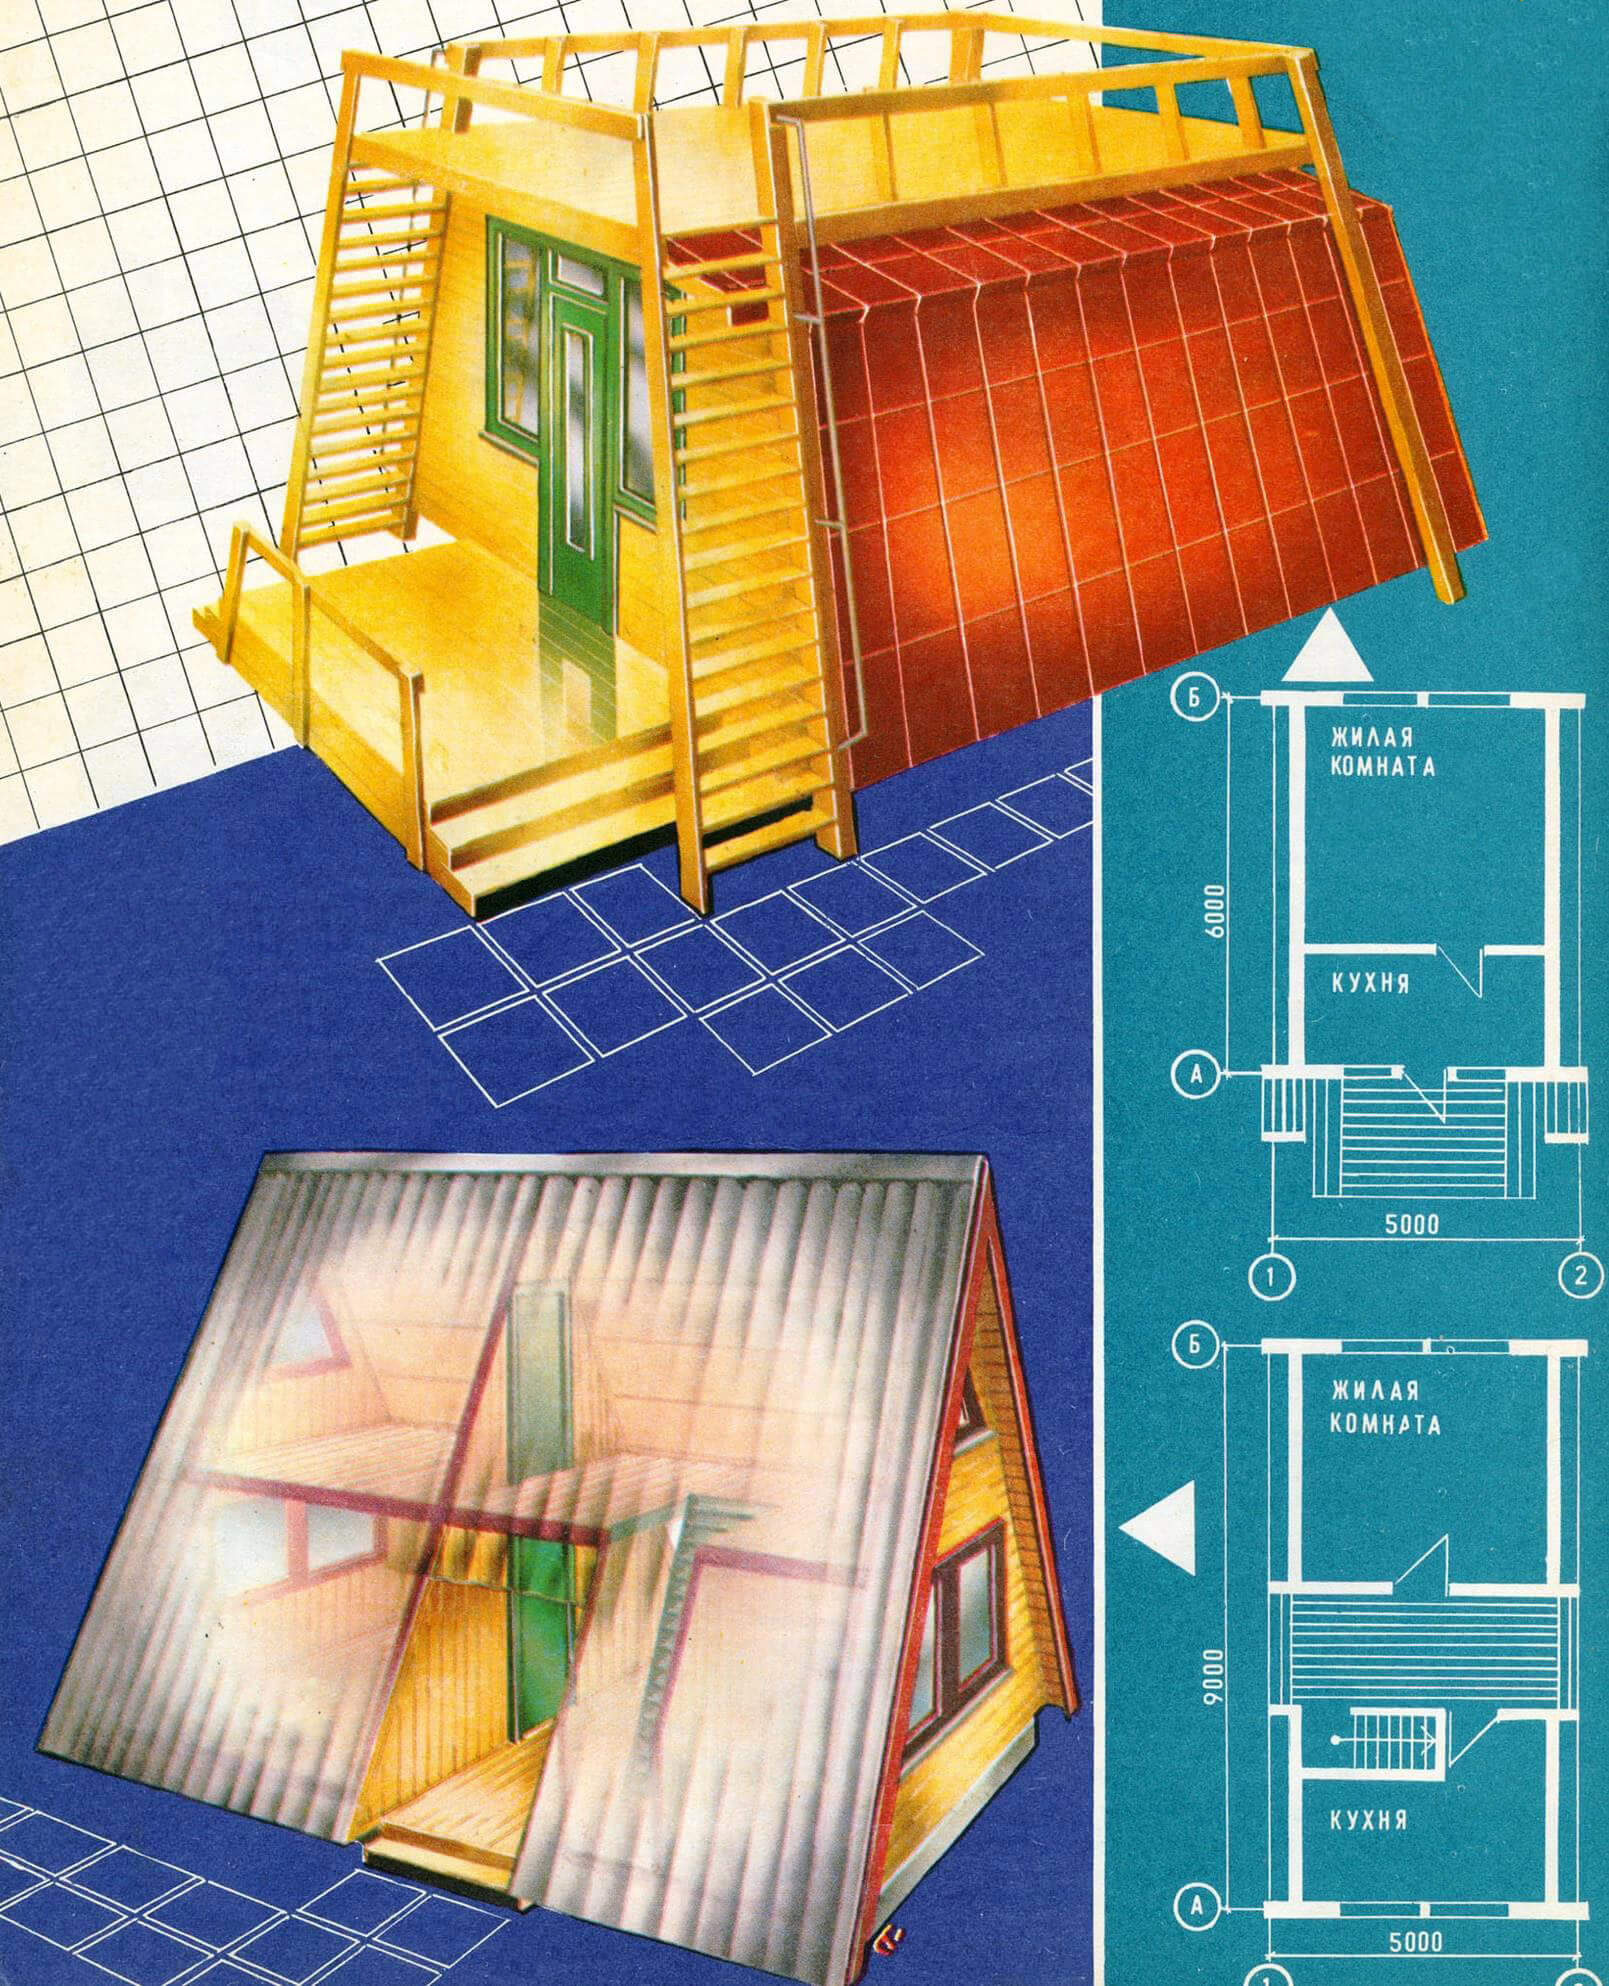
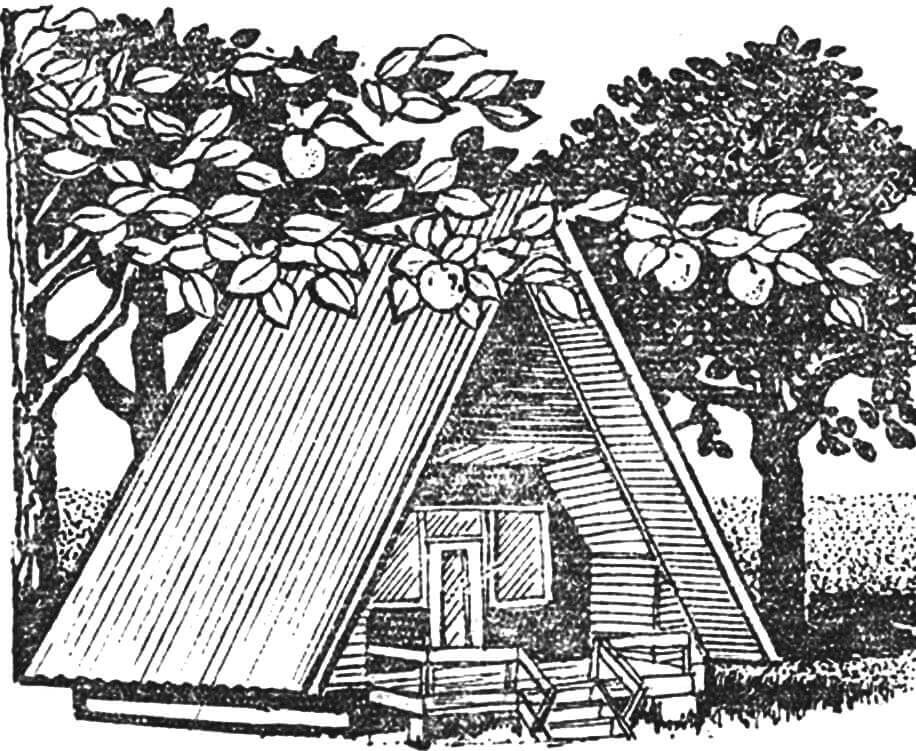
A garden house designed according to the “hut” scheme differs from traditional buildings in that it does not have walls: they are replaced by an enlarged roof, under which all the living quarters are located. Thanks to a simple design solution, such a country house can be quickly built.
Of course, the gable roof, which creates the original appearance of the building, somewhat reduces the internal space, but it combines both roof and walls, which do not require additional external finishing.
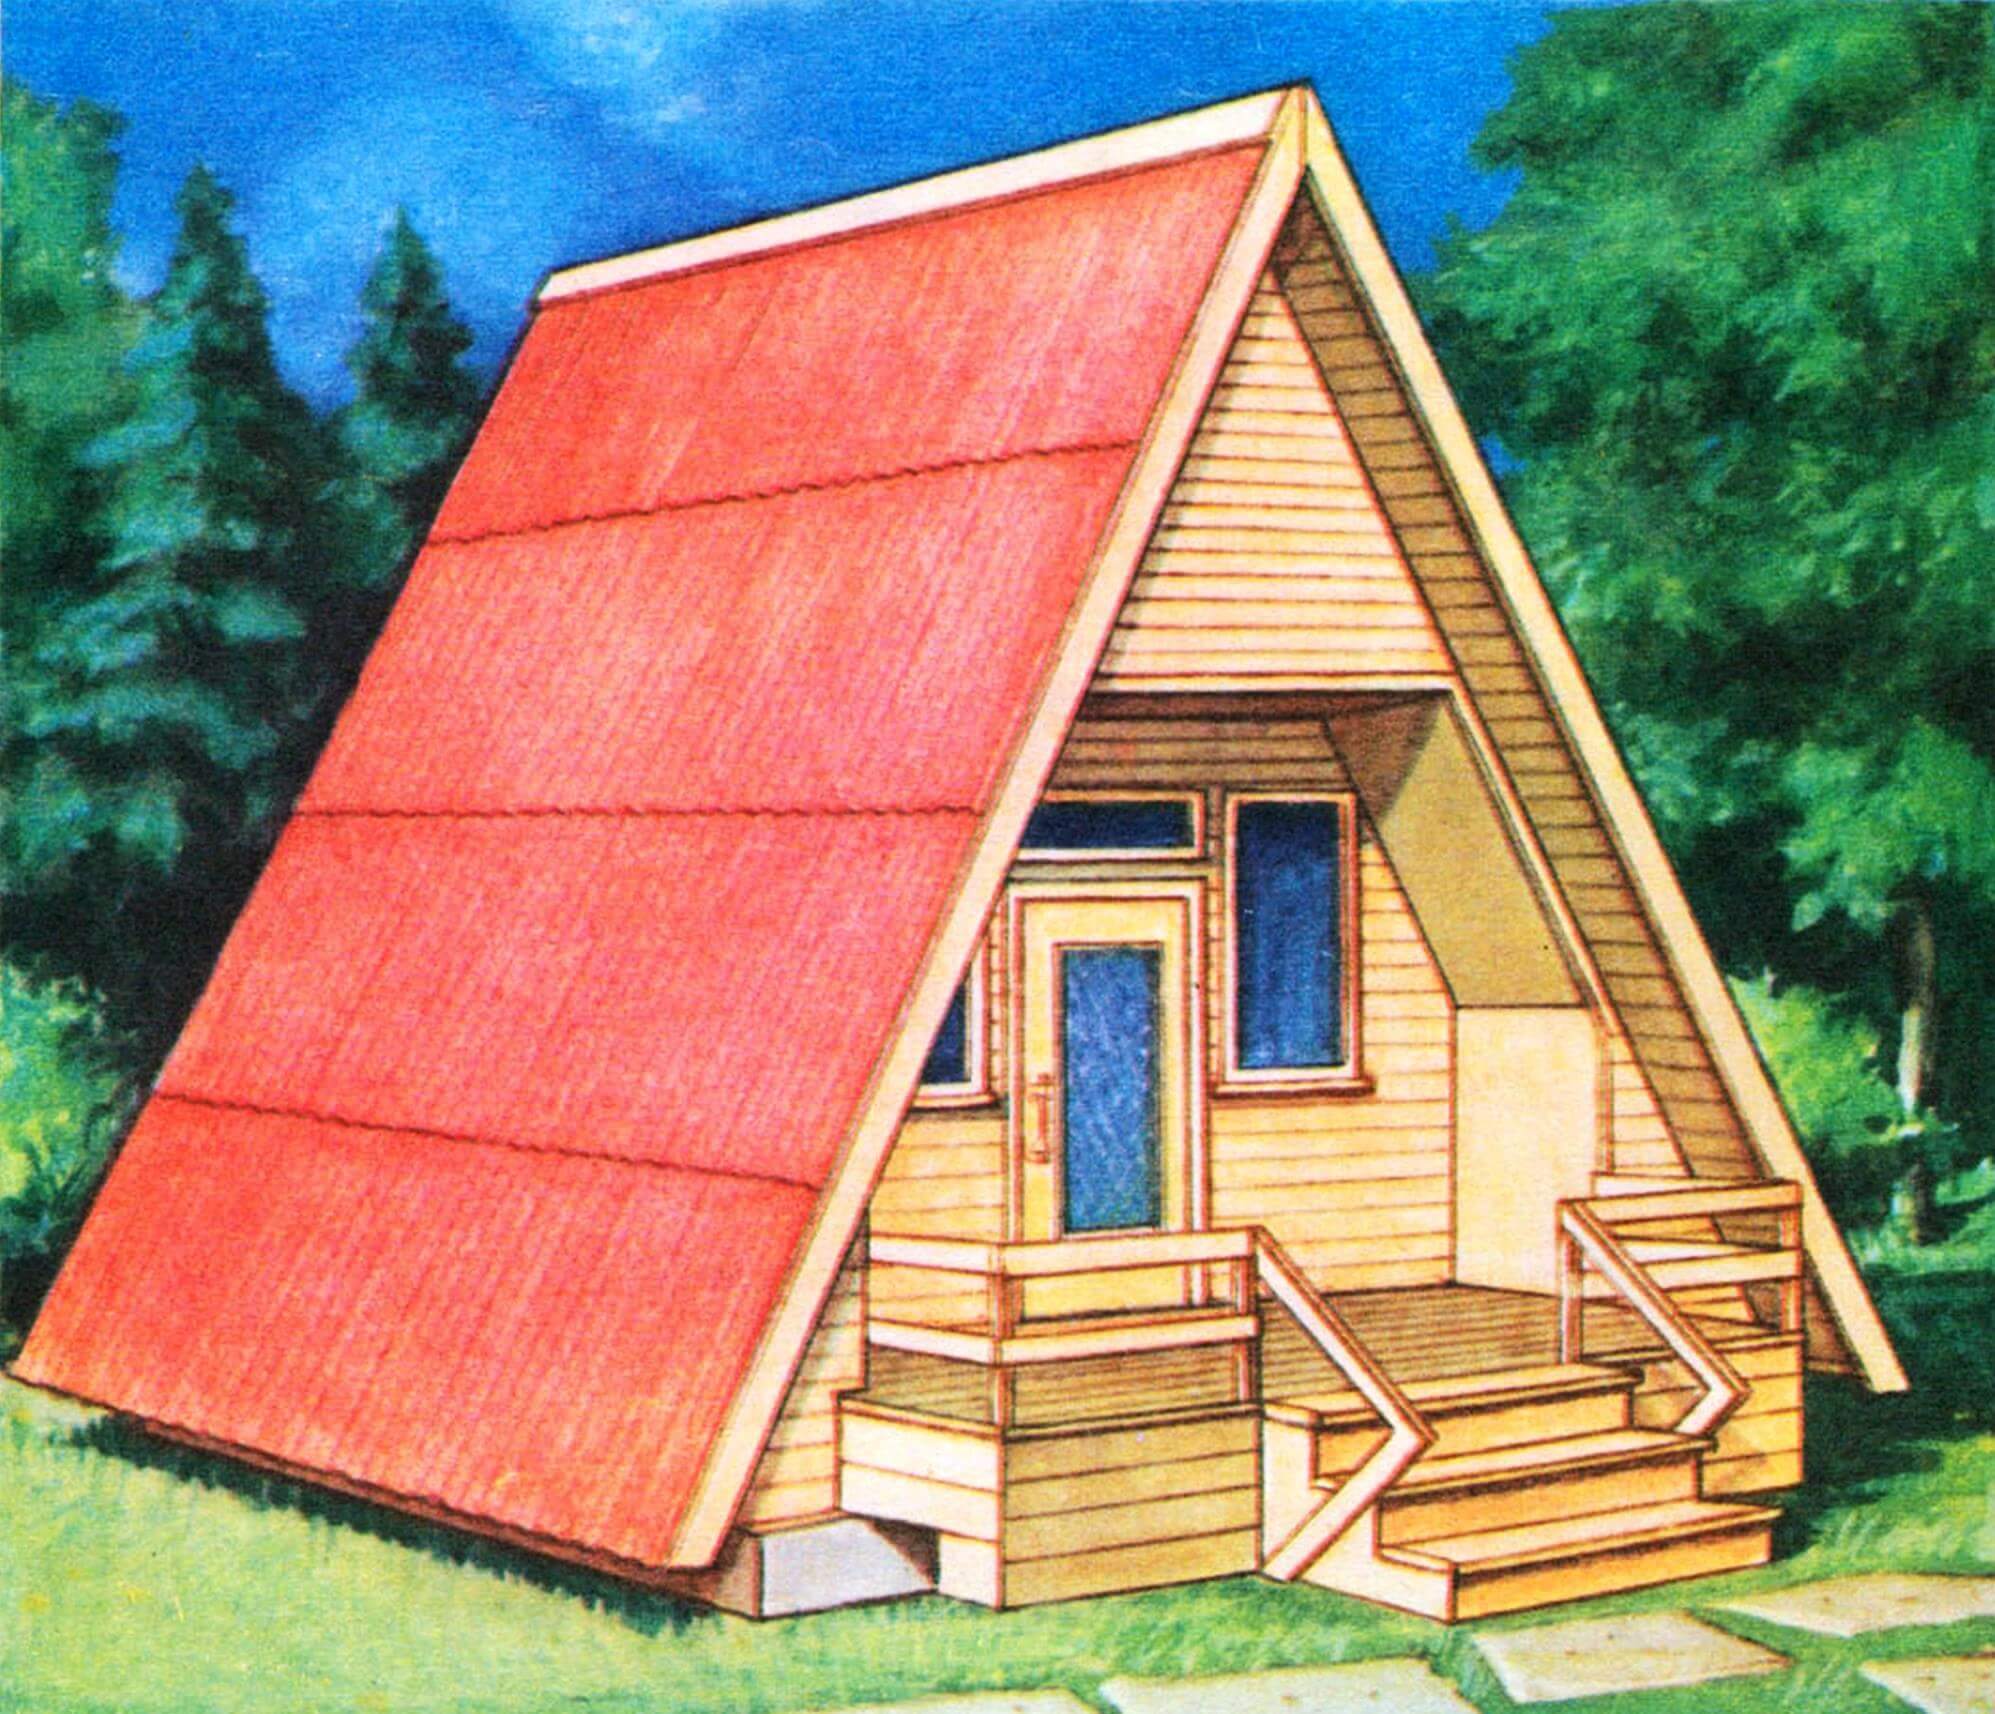
Laconic forms, creating an original appearance of the home, make it easy to manufacture, which allows gardeners to build a building without outside help. The constructive scheme also leaves its mark on the interior: the walls in the upper part have a break, emphasizing comfort and giving the rooms an originality that you will not find in a city apartment.
Before starting construction, it is necessary to plan the territory: the house should be located closer to the entrance to the site so that it does not occupy space intended for growing vegetables and fruits. Construction is carried out in two stages: first, the foundation is laid, and then the main volume is built on and equipped.
FOUNDATION is the basis of any house. This is the most complex and material-intensive element of the structure. The durability of the entire structure depends on how it is laid. The proposed project uses a perimeter strip foundation made of rubble concrete, in combination with columnar supports for load-bearing purlins and an open veranda.
The site for the future house must be leveled and the main axes must be marked using pegs and cords. Then, according to the foundation plan, trenches are dug with a depth and width slightly exceeding the design ones. The bottom is successively covered with gravel and sand to the lowest level. Each layer is carefully compacted.
At the end of the excavation work, formwork panels made of boards, plywood, etc. are installed along each wall of the trench. The formwork in the upper, above-ground part is connected with boards so that the distance between the inner walls is 300 mm.
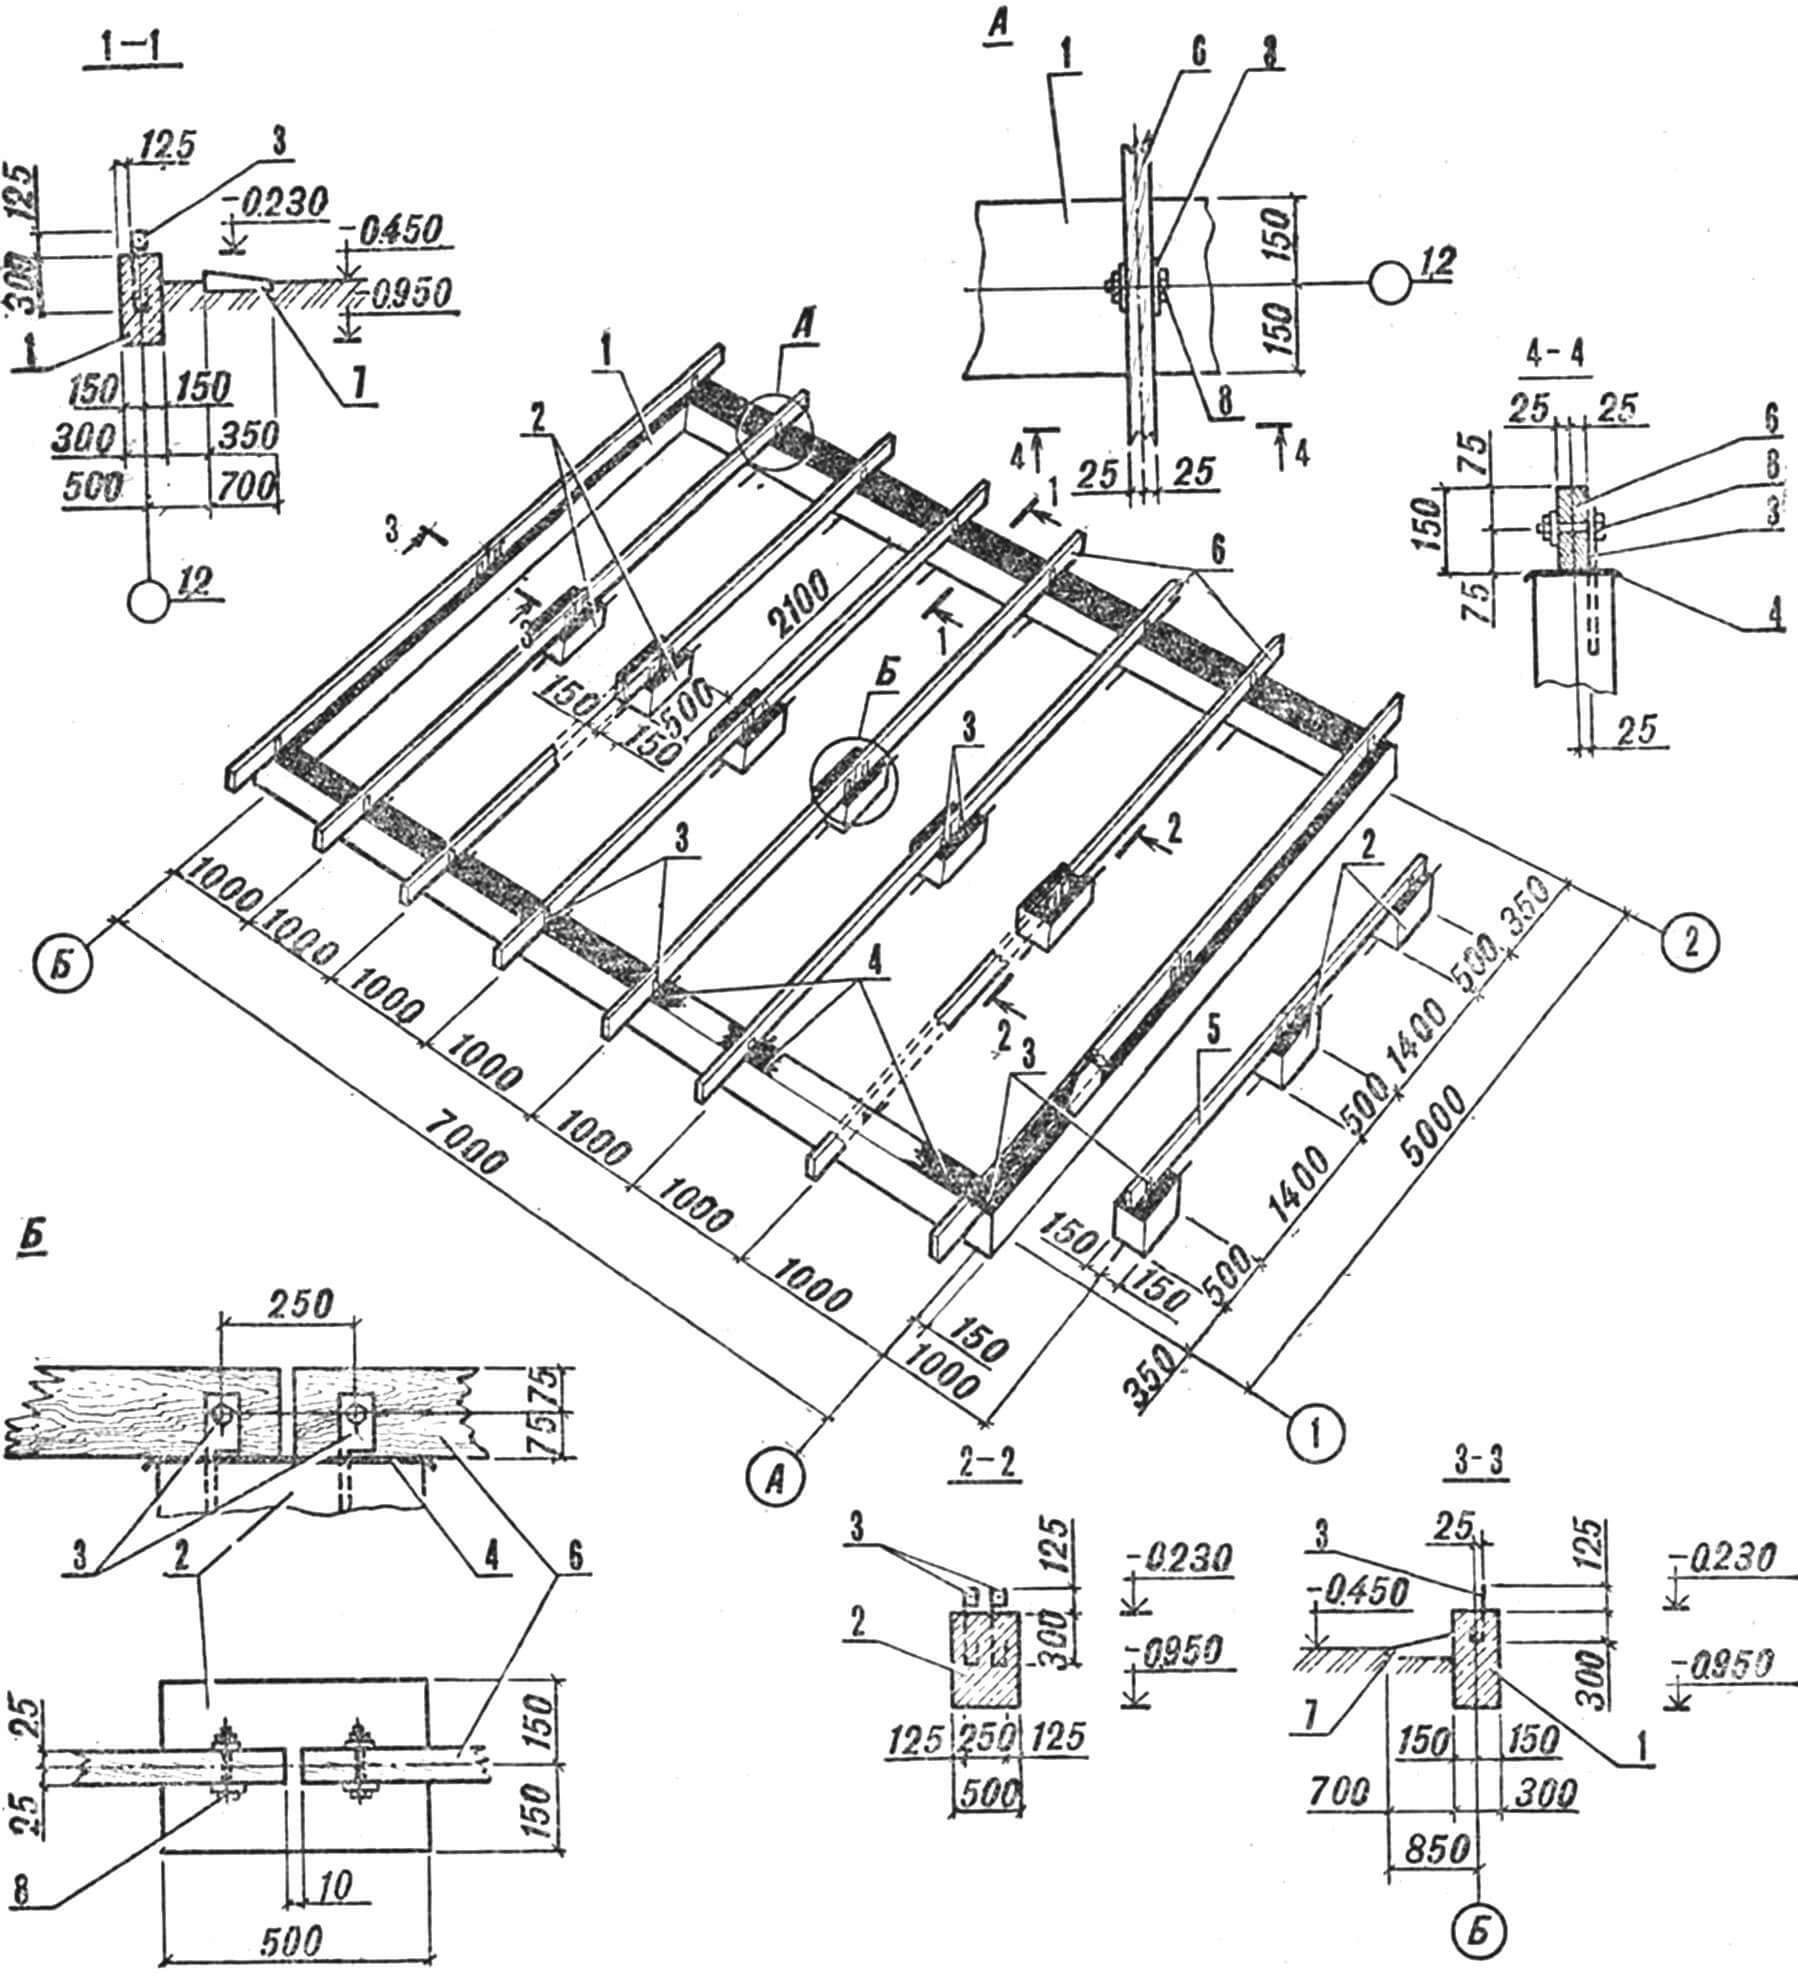
1 – strip foundation, 2 – columnar foundation, 3 – embedded parts for fastening the load-bearing purlins, 4 – waterproofing (two layers of roofing material), 5 – load-bearing veranda purlins, 6 – load-bearing purlins of the house, 7 – blind area, 8 – M12 bolt
The laying of rubble stones is carried out in horizontal rows with bandaging of the seams. The first row of the largest cobblestones is laid dry and, thoroughly compacted, filled with M100 concrete. Subsequent rows are, as it were, sunk into the solution covering the previous ones. Laying and filling are carried out to the design mark – 0.230. Let us recall that the 0.000 mark is conventionally taken to be the level of the finished floor of the first floor. The most crucial moment is the installation of embedded parts. The installation of load-bearing girders depends on the accuracy of their location. Therefore, before lowering these metal pins into concrete, it is necessary to mark their installation locations: the distance from the main axes A, B and additional (parallel to them) should be 25 mm. Fine aggregate is used in places where embedded parts are installed.
The finished foundation is kept in the formwork for about three days, periodically wetting it with water to prevent cracks from forming. After removing the formwork, the cavities (voids between the foundation and the ground) are filled with sand, and a blind area 700 mm wide is made along the perimeter of the entire building to drain rain and melt water. Moreover, in the direction of axes 1,2, with a distance of 350 mm from the foundation. The design of the blind area can be as follows: a layer of sand (100-150 mm), on which a layer of crushed stone (about 100 mm) is laid, and a covering of concrete or asphalt with a slight slope from the building.
FRAMEWORK. Installation of the main volume begins directly on the finished foundation. To protect wooden structures from soil moisture, all underground elements of the future house are covered with waterproofing – two layers of roofing felt. The embedded parts protruding from the foundation are passed through special slots in the roofing felt, made locally, and filled with hot bitumen. Load-bearing purlins are placed on top of the waterproofing and secured to the eyes of the embedded parts with M10 bolts. These beams serve as the foundation of the entire house and the lower horizontal connections of the rafter frames.
It is more convenient to carry out partial assembly of the frames – connecting the rafter legs with the ridge assembly overlays and the floor beam – on a separate site. This is done like this: the rafter legs are placed on the ground according to the configuration of the roof, connecting the two ends of the beams with ridge plates, they are lightly grabbed with M10 bolts. Then, after checking the distance between the free ends (it must correspond to the length of the load-bearing purlins), fix the floor beam. Only after this are the ridge assembly bolts finally tightened. To simplify the assembly of subsequent rafters, it is advisable to make a kind of slipway after assembling the first ones, or rather along them. To do this, the finished structure is fixed on a flat surface with the help of pegs, driving them in so that the entire structural element can be freely removed, and in its place can be placed the previously prepared parts of the next ones, which are assembled in the same way.
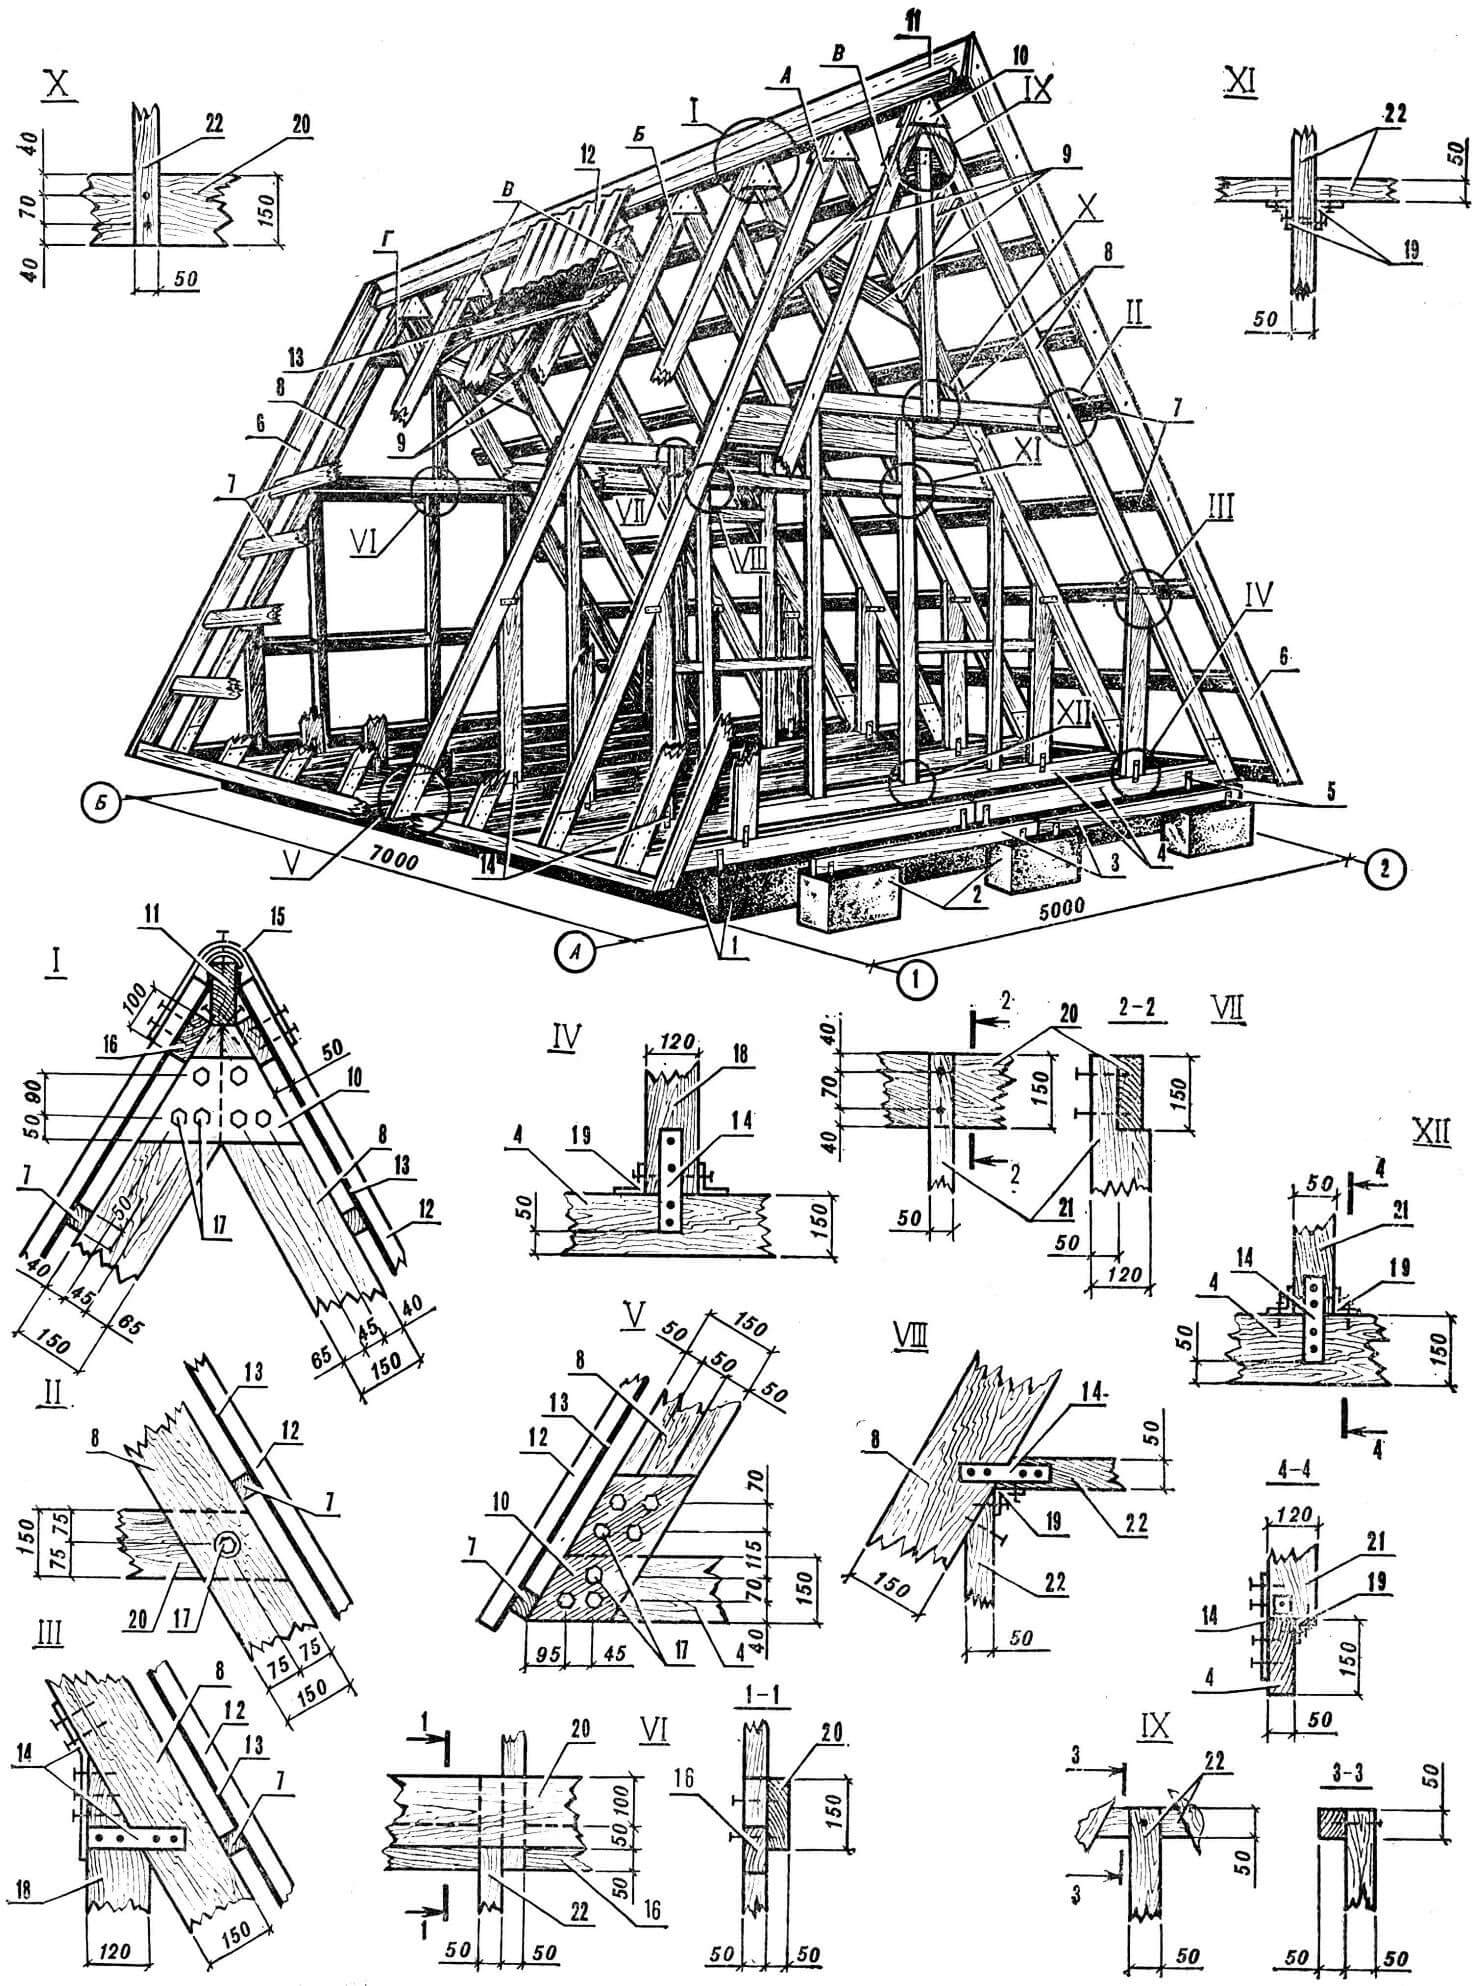
1 – strip foundation, 2 – columnar foundation, 3 – load-bearing purlins of the veranda, 4 – load-bearing purlins of the house, 5 – embedded parts, 6 – front board, 7 – sheathing boards, 8 – mounted rafters, 9 – wind ties, 10 – linings – corner No. 5, 20 – floor beams, 21 – doorway posts, 22 – timber with a section of 50X50 mm.
When all eight layered rafters are prepared, their installation on the load-bearing purlins begins. First of all, the outer rafters are installed, forming the pediment of the main facade and the rear facade. Using the simplest device – a plumb line – check their verticality and, having fixed them in this position with supports, connect the lower corners with metal plates on M12 bolts. A ridge board is laid along the upper nodes with pre-marked attachment points for all frames. It is attached to the erected structures with nails (an oblique face), and all subsequent rafters are, as it were, brought under the ridge, having previously nailed their lower corners, and, aligning them with the corresponding points on the ridge board, are fixed at all nodes.
To remove temporary supports that interfere with further construction, as well as to give permanent rigidity to the entire house, so-called wind ties are nailed to the rafter legs in the upper – attic – part. They connect three frames at each edge.
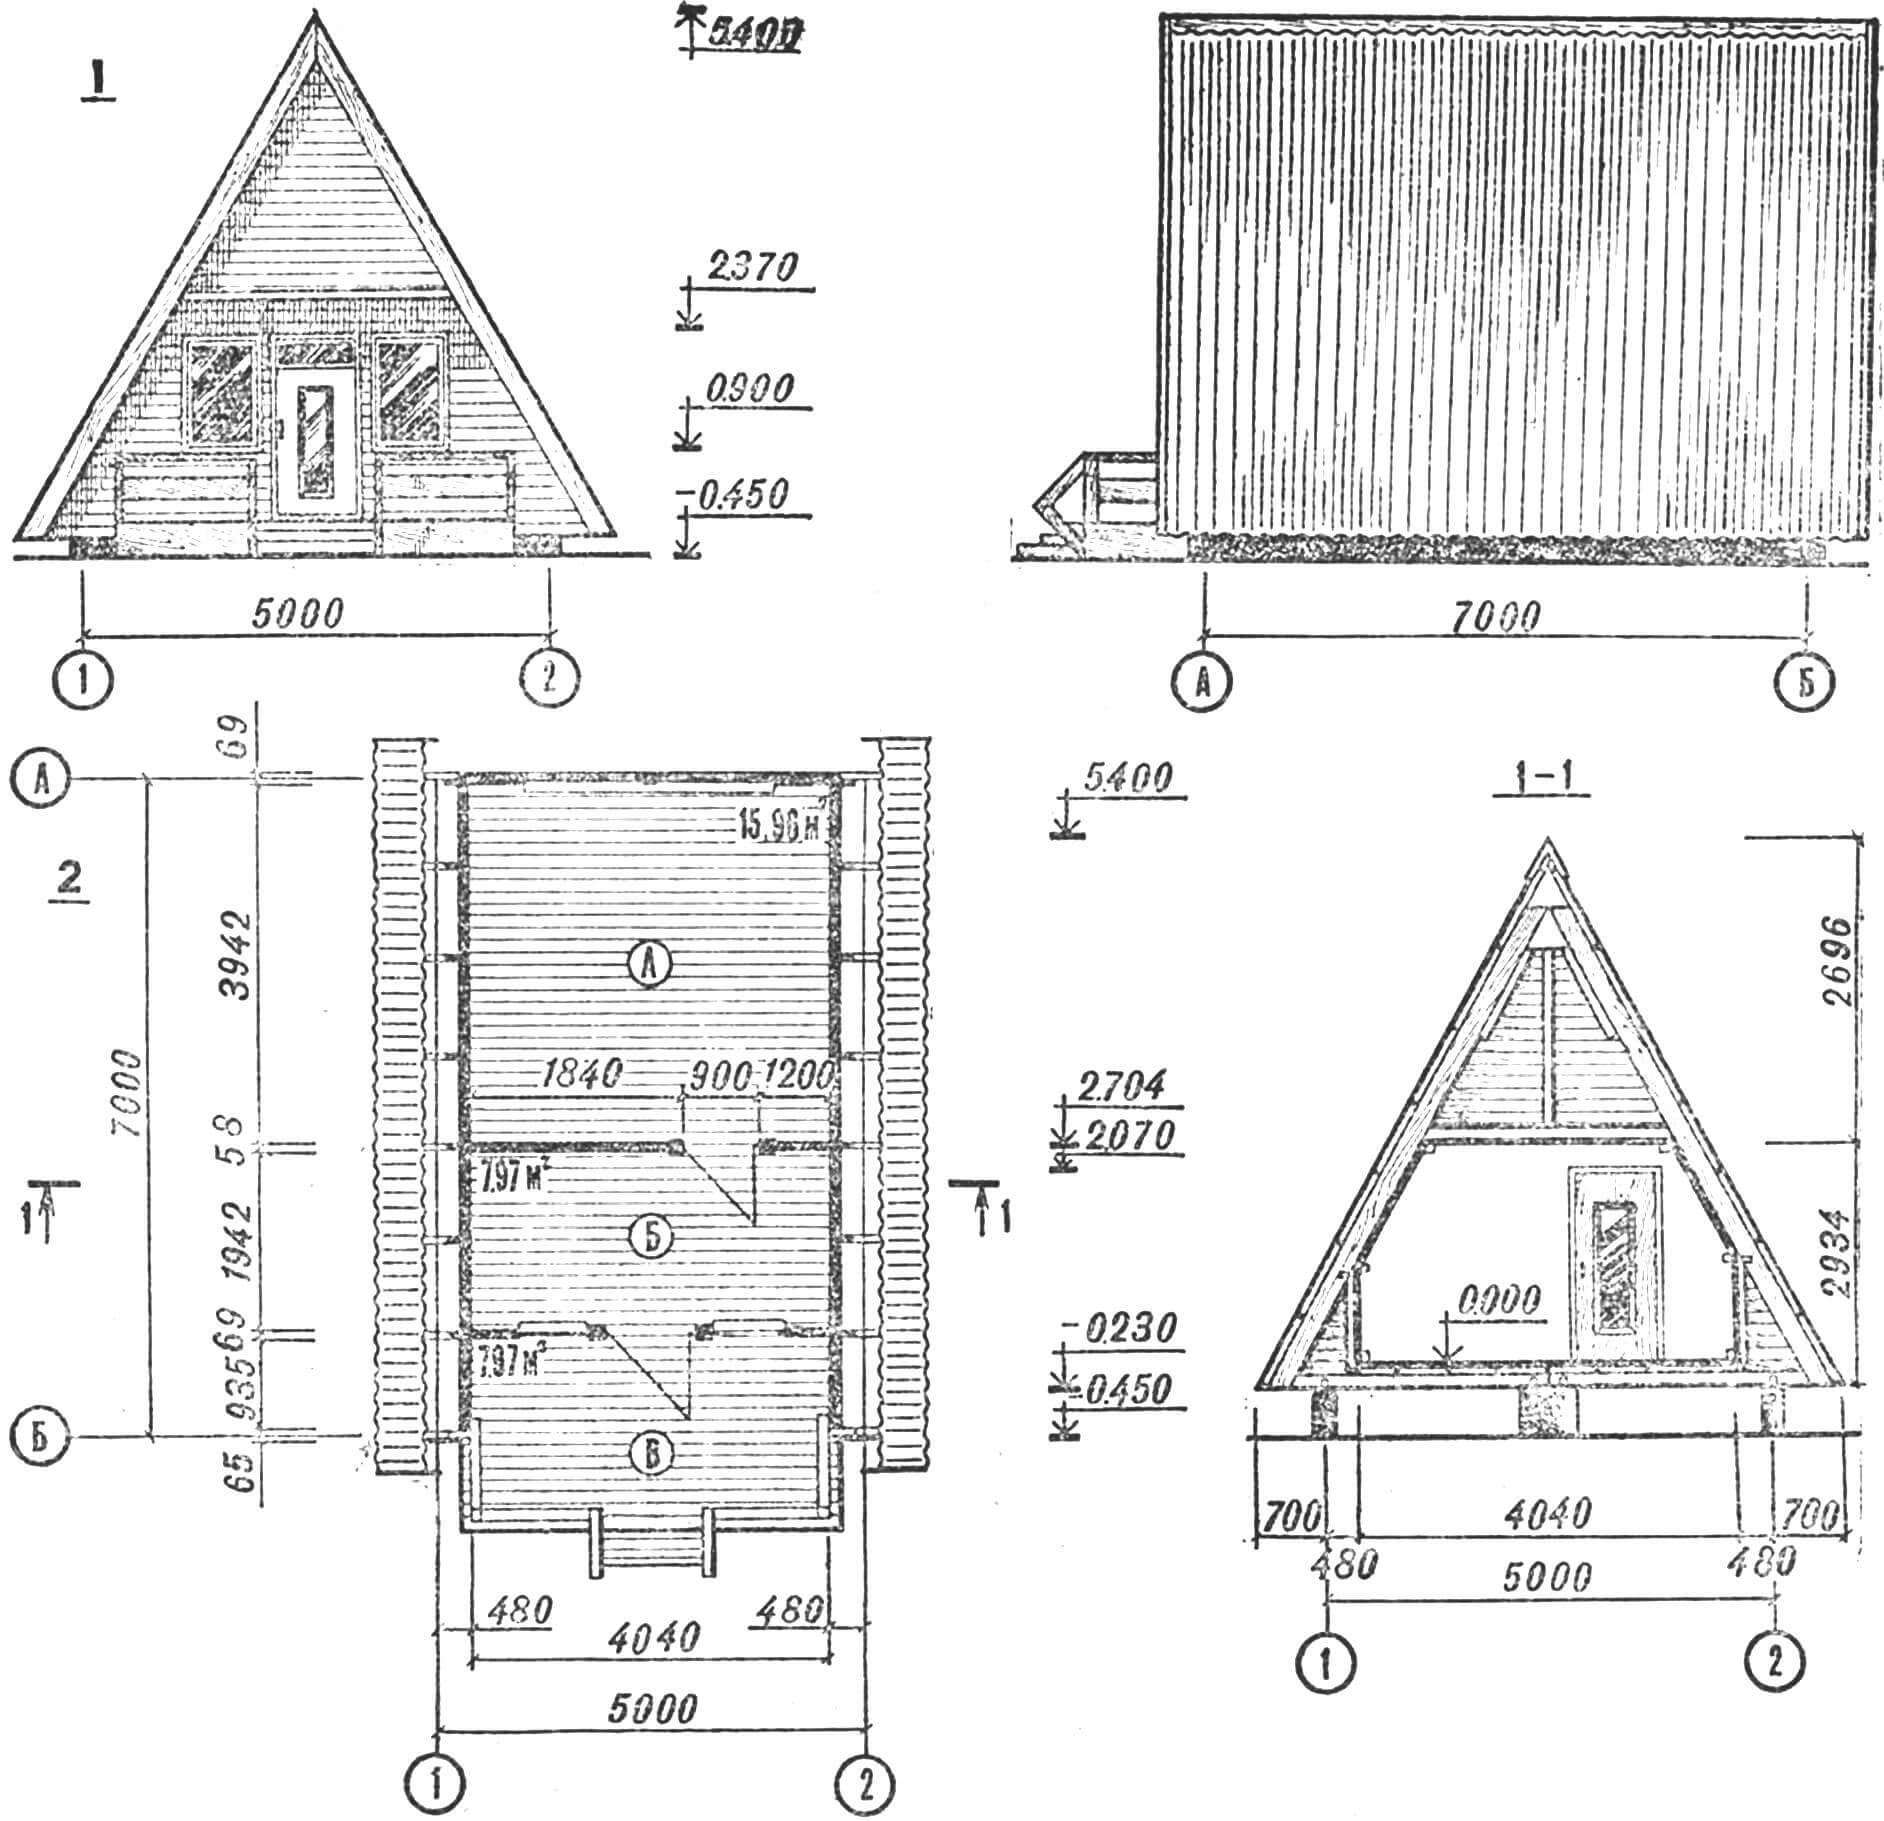
1 – facades (between axes 1-2 and A-B), 2 – plan (A – living room. B – kitchen-hallway, C – open veranda).
Now you can calmly rebuild the internal volume: install wall posts, partitions, prepare door and window openings. Decorative and finishing elements are attached to all these structural parts.
ROOF. In order not to deal with internal arrangement in the open air, it is necessary to immediately install the roof. The covering material can be different: galvanized roofing iron and tiles, rolled roofing felt and corrugated asbestos-cement sheets (slate). We will focus on the latter as the most accessible. In addition, using slate sheets, you can very quickly cover the entire roof.
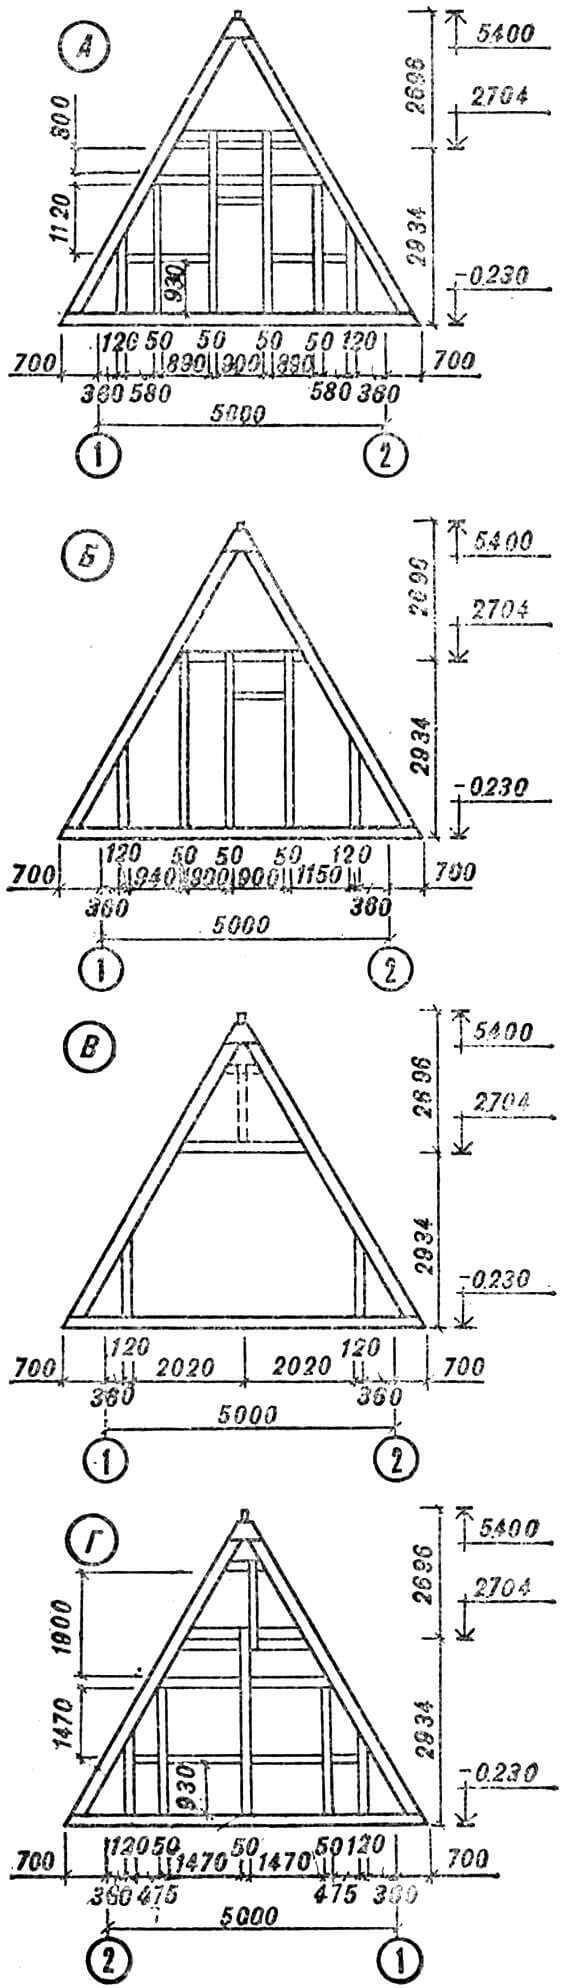
A – frame of the main facade, B – frame of the partition, C – intermediate frame (the dotted line shows an additional rack for finishing the pediment of the main facade), D – frame of the rear facade.
You should start with the sheathing: small cross-section beams are nailed to the rafters in increments of 500 mm. Their ends extend beyond the outer frames by 500 mm; the resulting overhangs will protect the walls of the building from precipitation. Roofing felt is laid along the sheathing, and on top of it are corrugated asbestos-cement sheets, which are attached to the sheathing boards with galvanized nails with rubber gaskets. The sequence of work is from bottom to top, so that each subsequent sheet partially overlaps the previous one. The ridge is covered with special ridge templates or a curved strip of roofing iron.
FINISHING WORK
After the roof is erected, finishing work begins. First of all, it is necessary to lay the floor in the rooms and on the open veranda. To do this, logs are laid along the load-bearing purlins of the rafter frames in increments of about 500 mm. In order to save long beams, it is not necessary to select logs along the length of the entire house: they can be made composite. Each beam is attached to the lower floor beams with nails. Finished floor boards are laid out on top of the logs, but perpendicular to them: it is good to use so-called floor slats with a thickness of 28 mm, since each board has a tongue on one side and a groove on the other side. This connection, in combination with nails, will securely fix each board and give the entire floor additional rigidity.
Upon completion of work with the floor and decking of the terrace, cladding of the façade walls begins. Boards nailed horizontally will give the house an elegant appearance. To protect from rain, it is better to use boards with quarters, and if they are not available, then ordinary ones, nailed with an overlap, will do. In both cases, work is carried out from the bottom up, since each subsequent board partially overlaps the previous one.
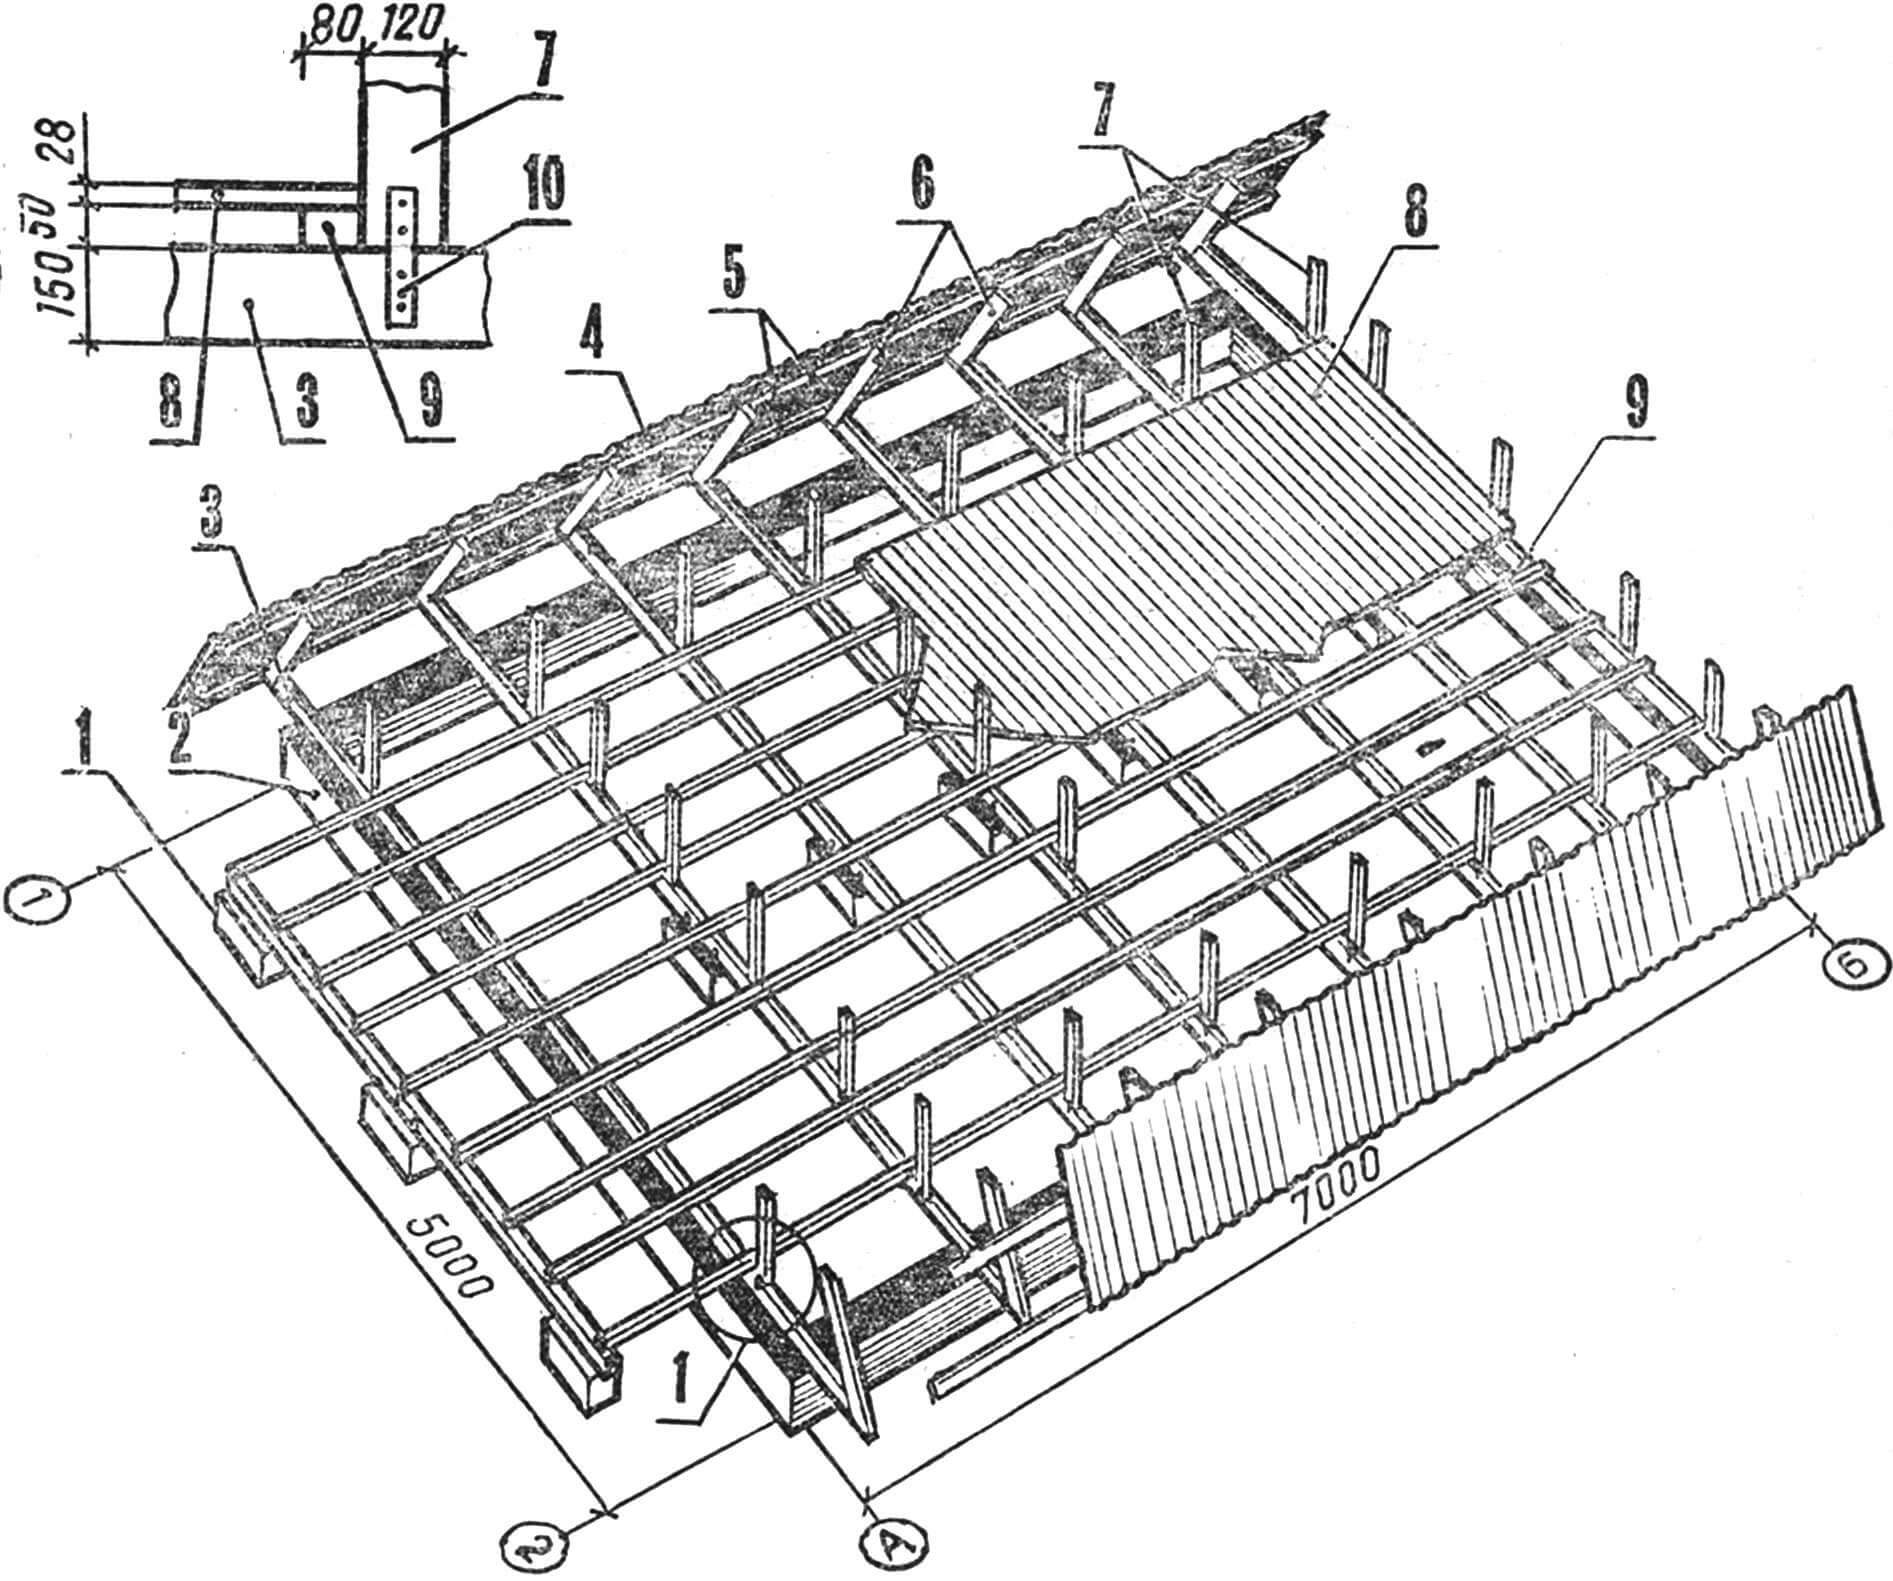
1 – columnar foundation of an open veranda, 2 – strip foundation of the house, 3 – load-bearing purlins, 4 – roofing, 5 – sheathing, 6 – rafter legs, 7 – racks, 8 – floor boards, 9 – joists, 10 – metal lining.
All walls are upholstered on the inside using a double covering: insulating soft fibreboard 25 mm thick and thin hard fiberboard (hardboard) 4 mm thick. When using the house from spring to autumn, insulation made from soft fiberboard will be sufficient. If the building is intended to be used in winter, then it is necessary to additionally insulate the walls with mineral wool.
The sheet covering of the walls is attached to special bars nailed along the load-bearing structures, with a distance from their front edge of 25 mm, that is, the thickness of the insulating fiberboard layer. Hardboard is nailed over the insulation to the main structural elements. The joints between the sheets are sealed with overlay slats, and the corner joints with plinths.
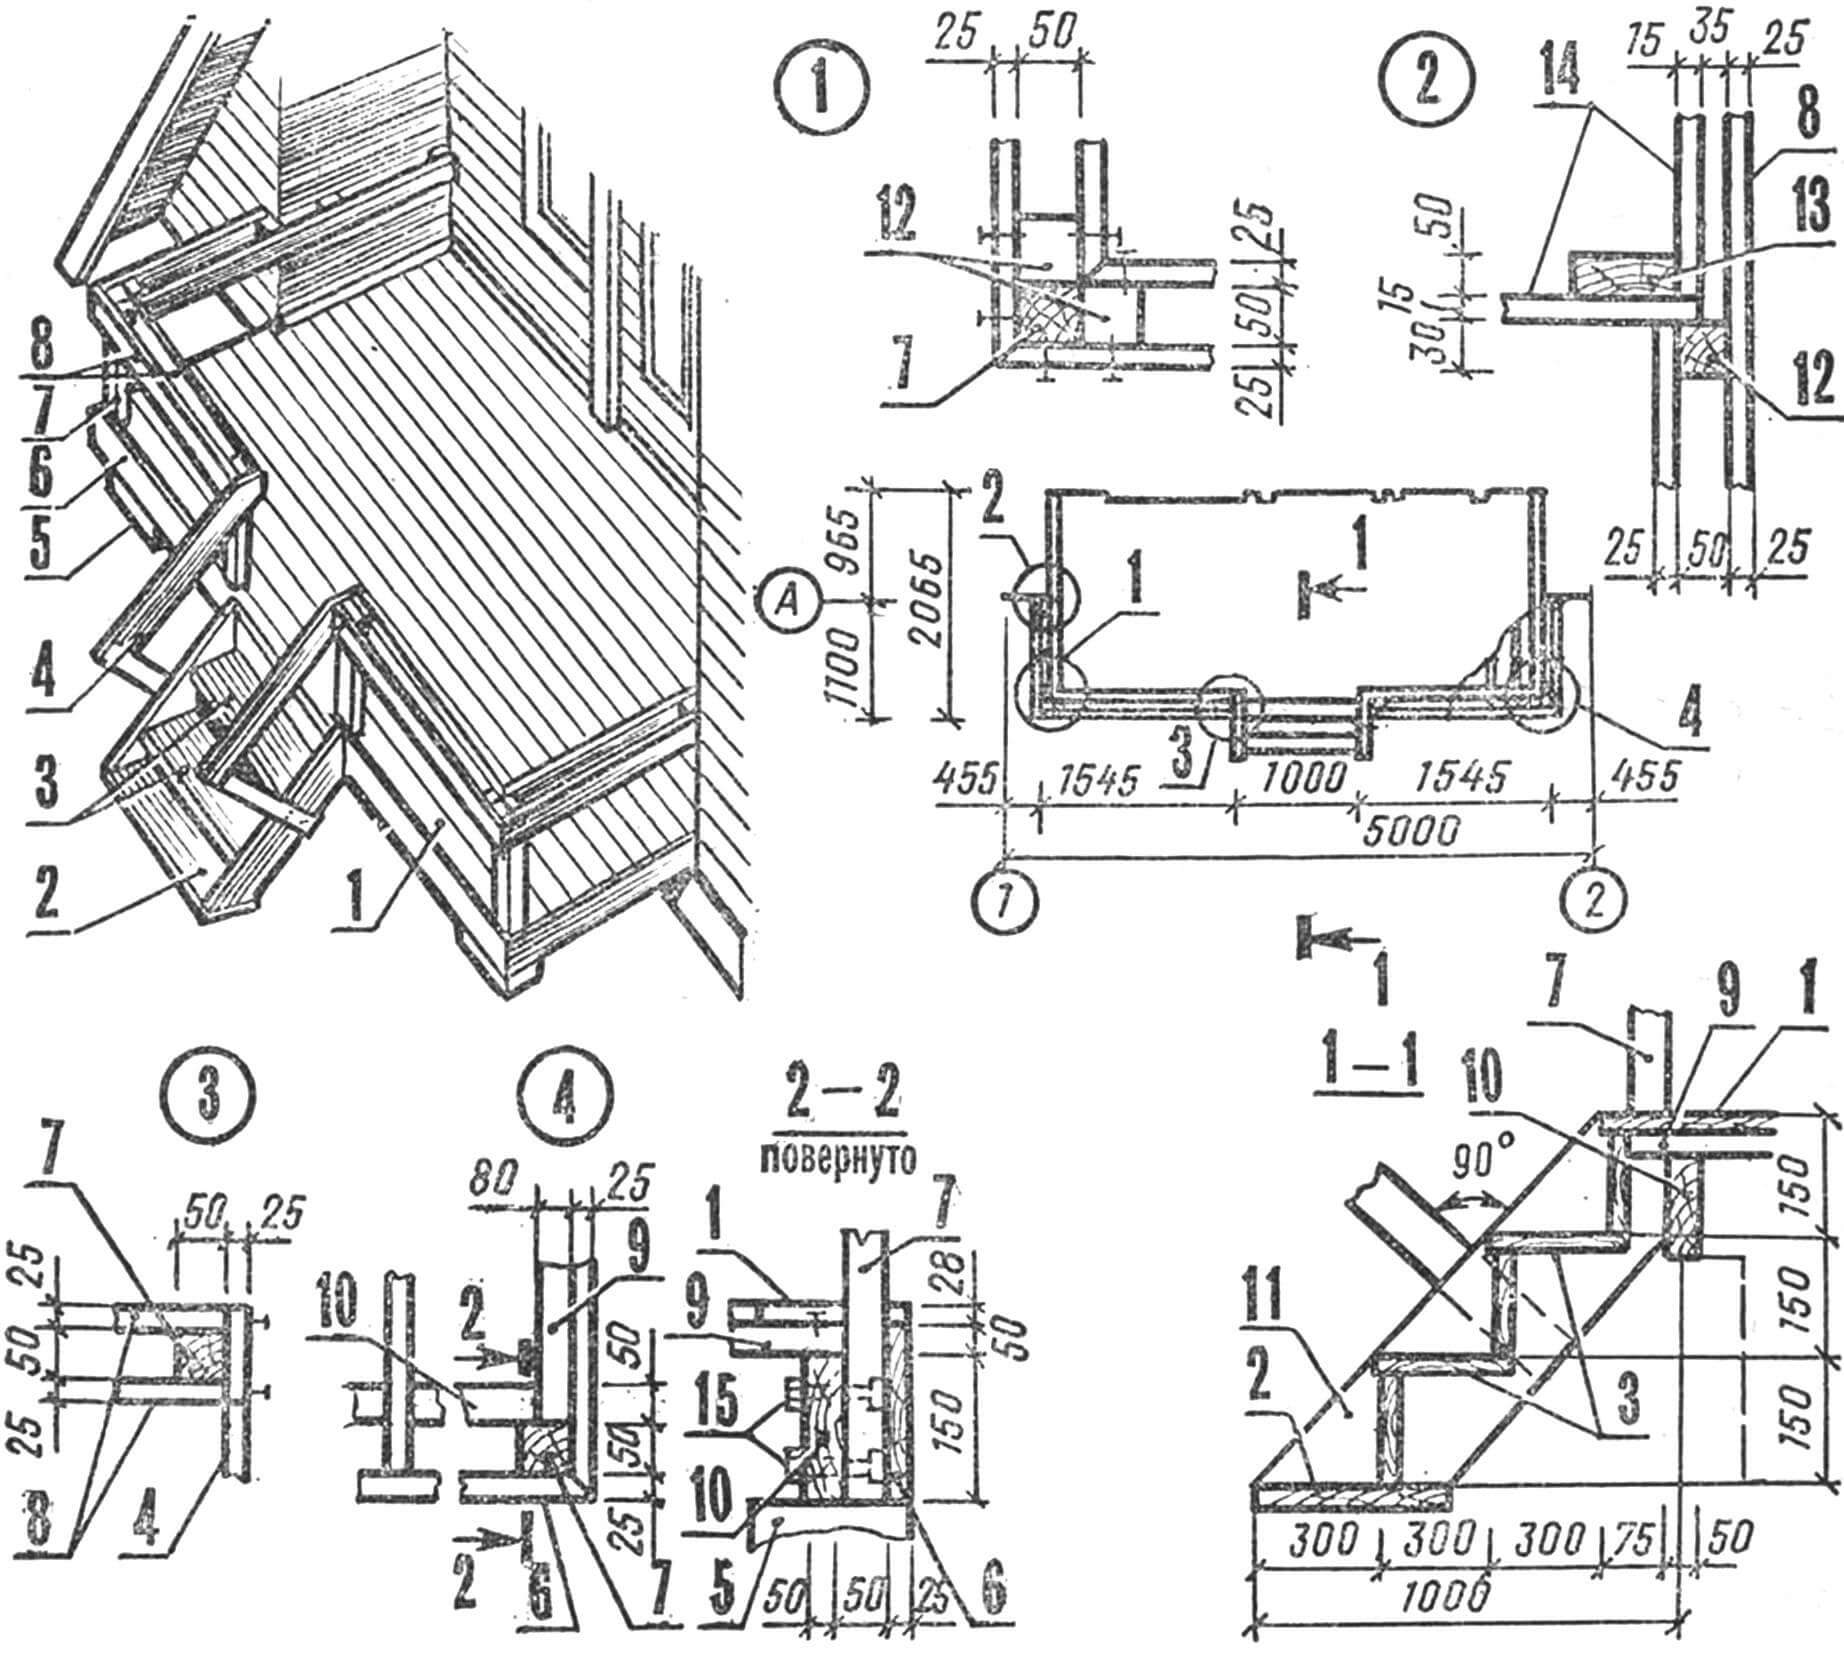
1 – flooring boards, 2 – staircase support leg, 3 – steps, 4 – staircase railing, 5 – columnar foundation, 6 – plinth board, 7 – fence post, 8 – fence, 9 – joists, 10 – load-bearing beam, 11 – string of the stairs, 12 – block, 13 – frame post, 14 – outer skin boards, 15 – fastening bolt with nut (M10).
The hut structure of the house allows you to place various cabinets and built-in furniture in the walls; it all depends on the imagination of the builder.
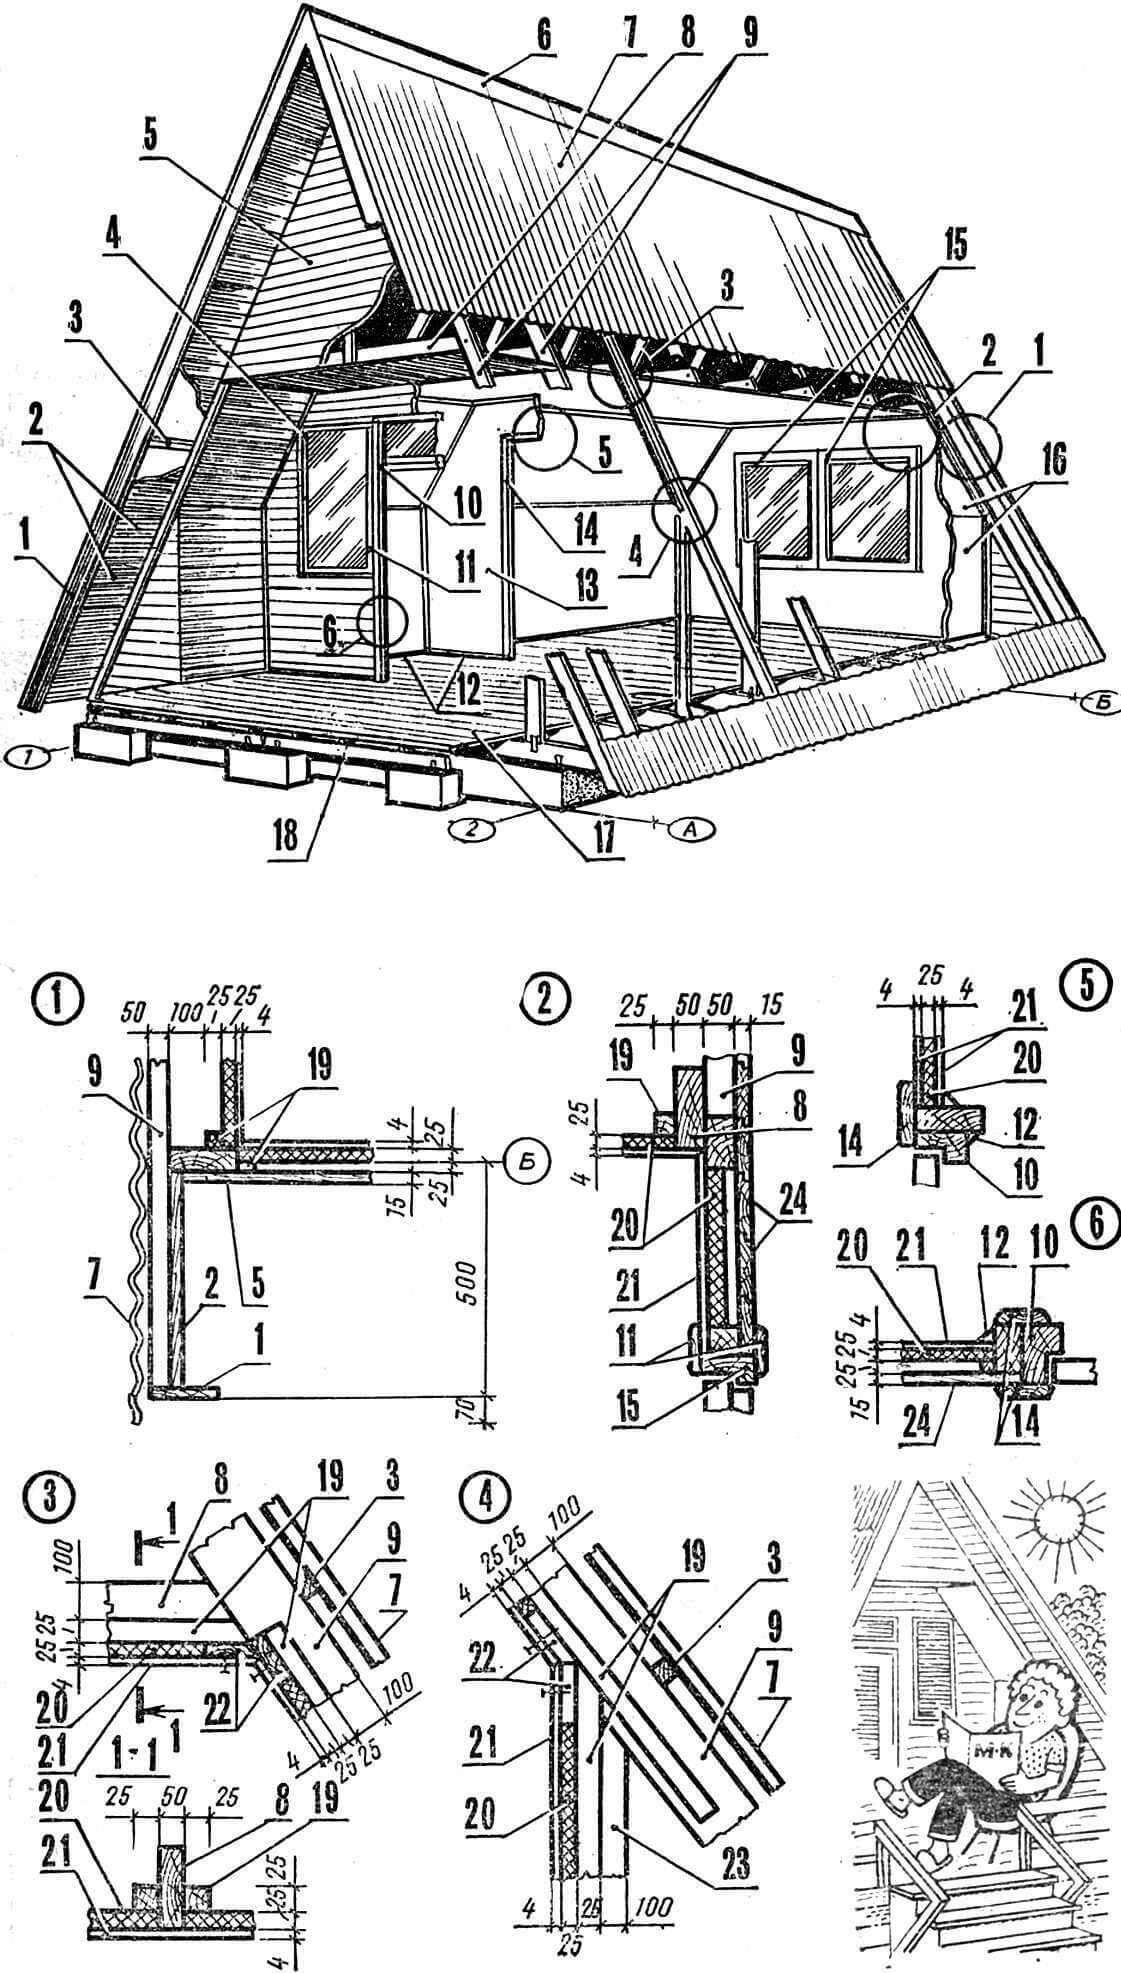
1 – frontal board, 2 – overhang finishing boards, 3 – sheathing board, 4 – trench block OH15-09, 5 – pediment boards, 6 – ridge overlay, 7 – roof covering (corrugated asbestos-cement sheets), 8 – floor beam, 9 – rafter legs, 10 – frame of the door block, 11 – window frames, 12 – plinth, 13 – partition, 14 – door frame D0 21-9A, 15 – window blocks OH 15-15, 16 – wall covering slabs, 17 – finished floor boards, 18 – joists, 19 – 25×25 mm block, 20 – insulating fiberboard, 21 – hard fiberboard (hardboard), 22 – 25X100 mm board, 23 – stand, 24 – external facade boards.
After upholstering the internal walls and partitions, door and window blocks are inserted into the prepared openings. Having filled the gaps between the window (door) frames and openings with tow or rags, nail the trim and window sills. Then metal drains are installed and the open veranda begins to be built.
OPEN VERANDA
Since the decking and walls of the veranda have been laid along with the floor and roof, all that remains is to install the fence and stairs. The design of the latter is not difficult. It is assembled separately and installed locally. The fence consists of four posts, bolted to the outside of the supporting beam, and paired boards connecting them. At the bottom, along the perimeter of the entire site, a plinth board is nailed.
COLORING
To paint a wooden house, you must prepare the appropriate materials in advance. The interior walls of the room can be painted with enamel or water-based paints, choosing light colors, since the rooms have sufficient depth, and the windows are located in only one of the walls. It is best to coat the outer surfaces of the facade sides with parquet varnish: after all, the wood itself has a pleasant color and texture, and the varnish coating will reliably protect it from the effects of the elements and time.
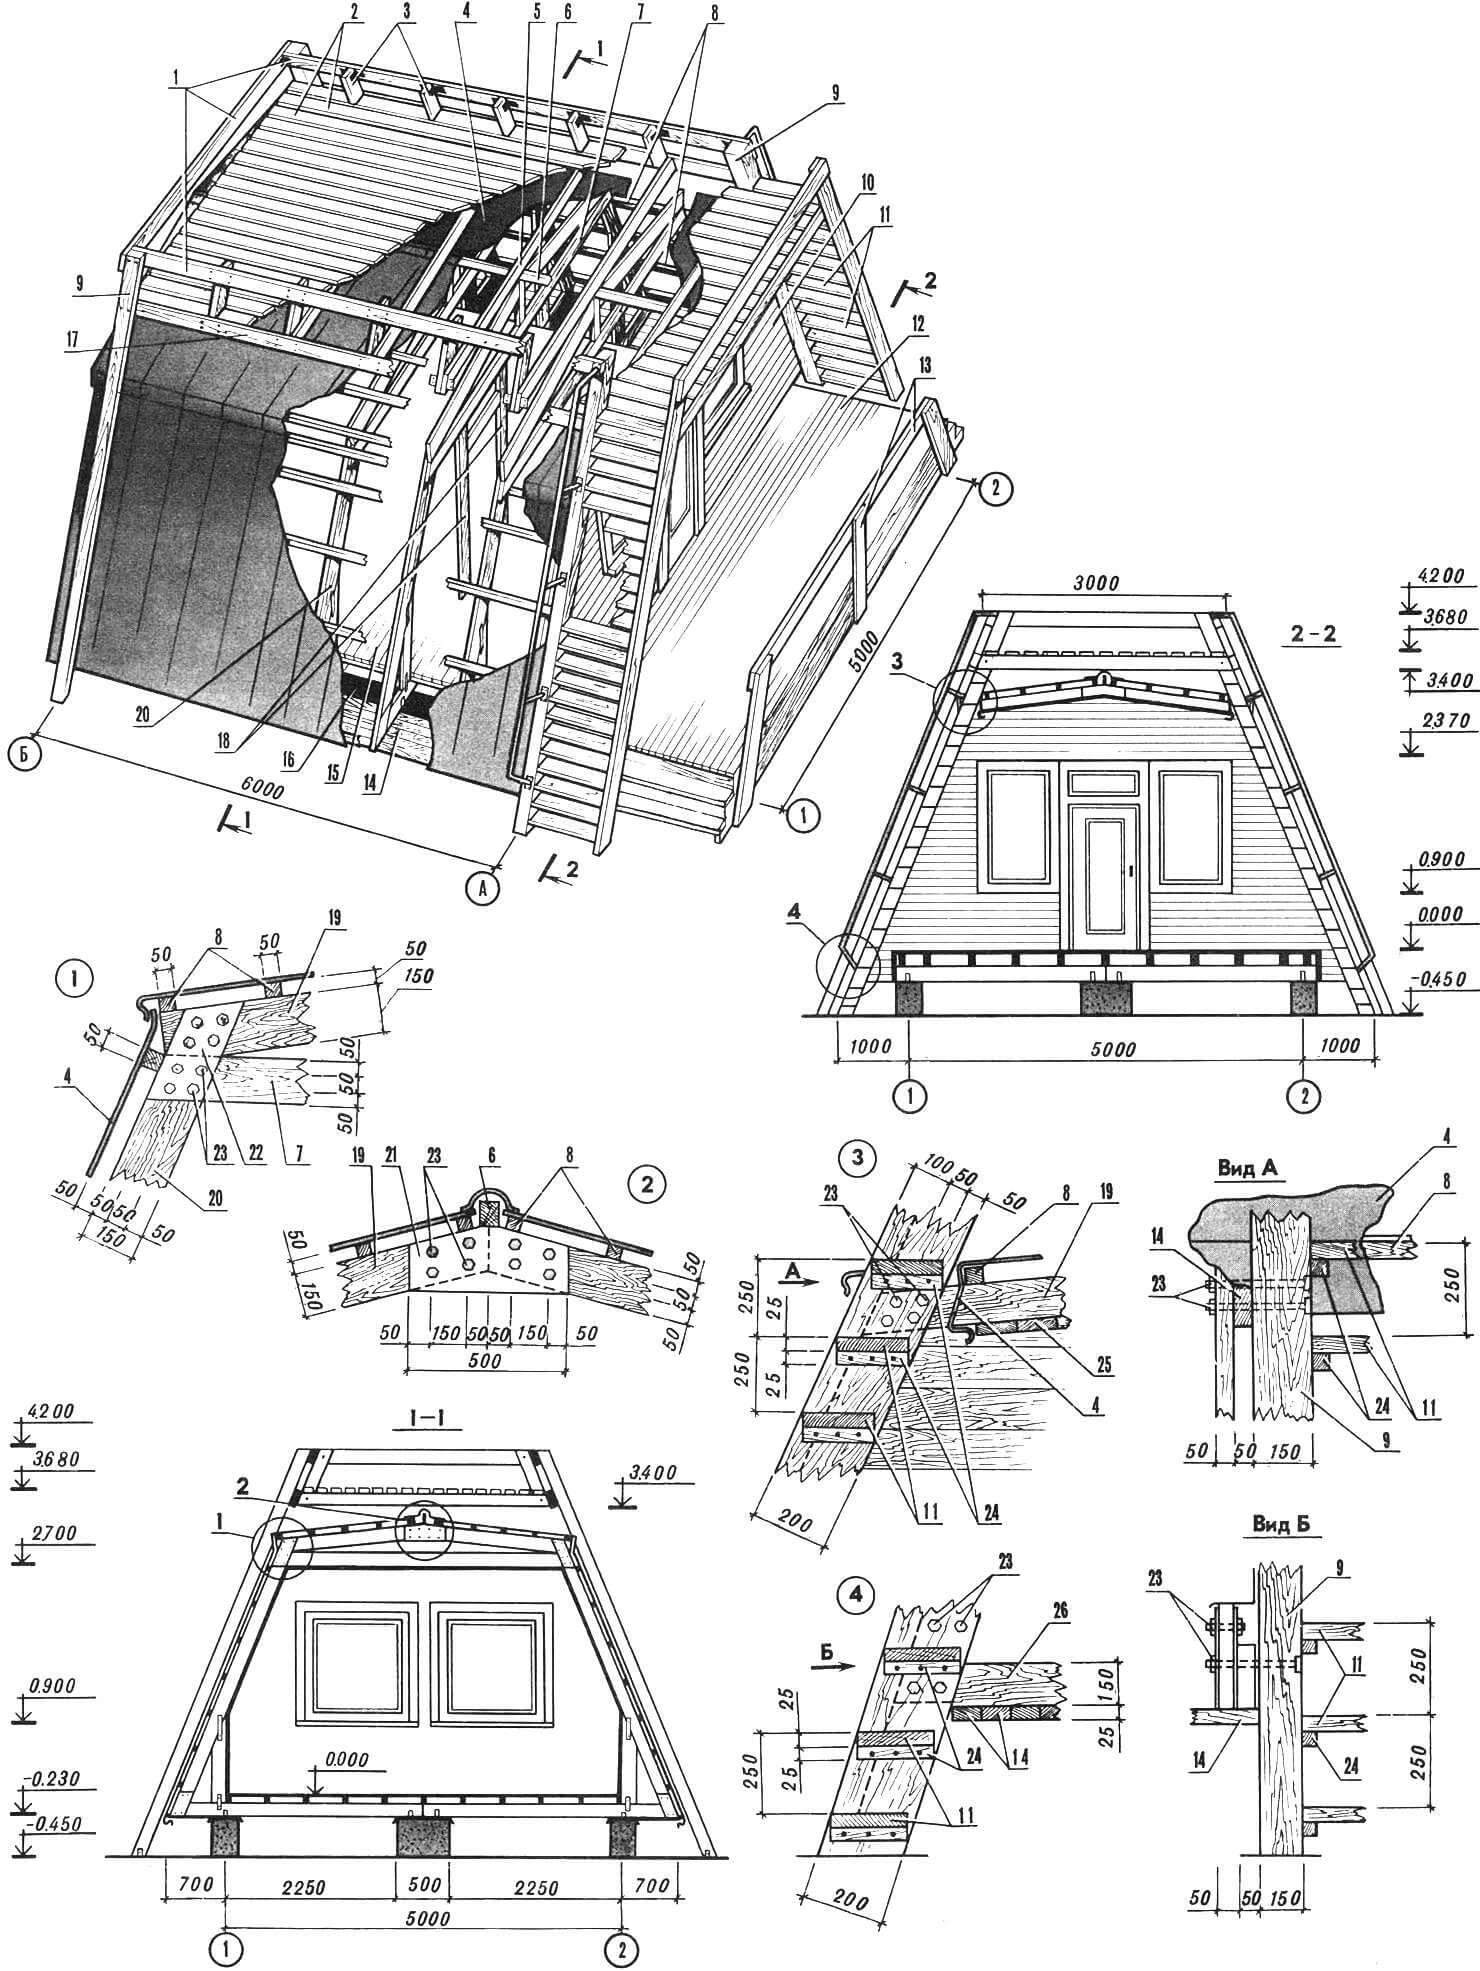
“SHUT” WITH ATTIC
As a rule, a two-room house is not enough for a large family. Therefore, many people begin to add terraces, glazed verandas to an already finished house, or, if the roof allows, equip an attic.
The proposed house is designed specifically for those who go to the site with the whole family on weekends. The layout is made so that all rooms have separate entrances, but are under a common roof. Therefore, the rooms on the first floor, with an area of 12 and 16 m2, are somewhat spaced apart, and between them there is a kind of covered hallway with entrances on both sides of the house. It also contains a staircase to the attic, which is located above all the rooms on the first floor. If desired, the long attic can be divided into two parts. Then the house will already have four rooms.
1 – foundation, 2 – front board, 3 – facade finishing boards, 4 – asbestos-cement ridge template, 5 – ridge beam, 6 – steel overlay, 7 – attic floor boards, 8 – sheet ceiling covering, 9 – first floor floor, 10 – sheathing, 11 – rafter leg, 12 – partitions, 13 – staircase to the attic, 14 – load-bearing purlin, 15 – foundation waterproofing (two layers of roofing felt), 16 – roofing (asbestos-cement corrugated sheets), 17 – joists, 18 – floor beam , 19 – roofing material.
The advantage of this layout, especially the presence of two entrances on opposite sides, is the ability to divide the plot into zones using the house itself.
Structurally, the attic house basically repeats the previous one: the same strip foundation in combination with intermediate columnar supports for load-bearing girders, only the above-ground part has increased slightly in height since the attic appeared. The roof made of corrugated asbestos-cement sheets, sealed with a special template in the ridge, has a large slope, which will ensure good drainage of rain and melt water.
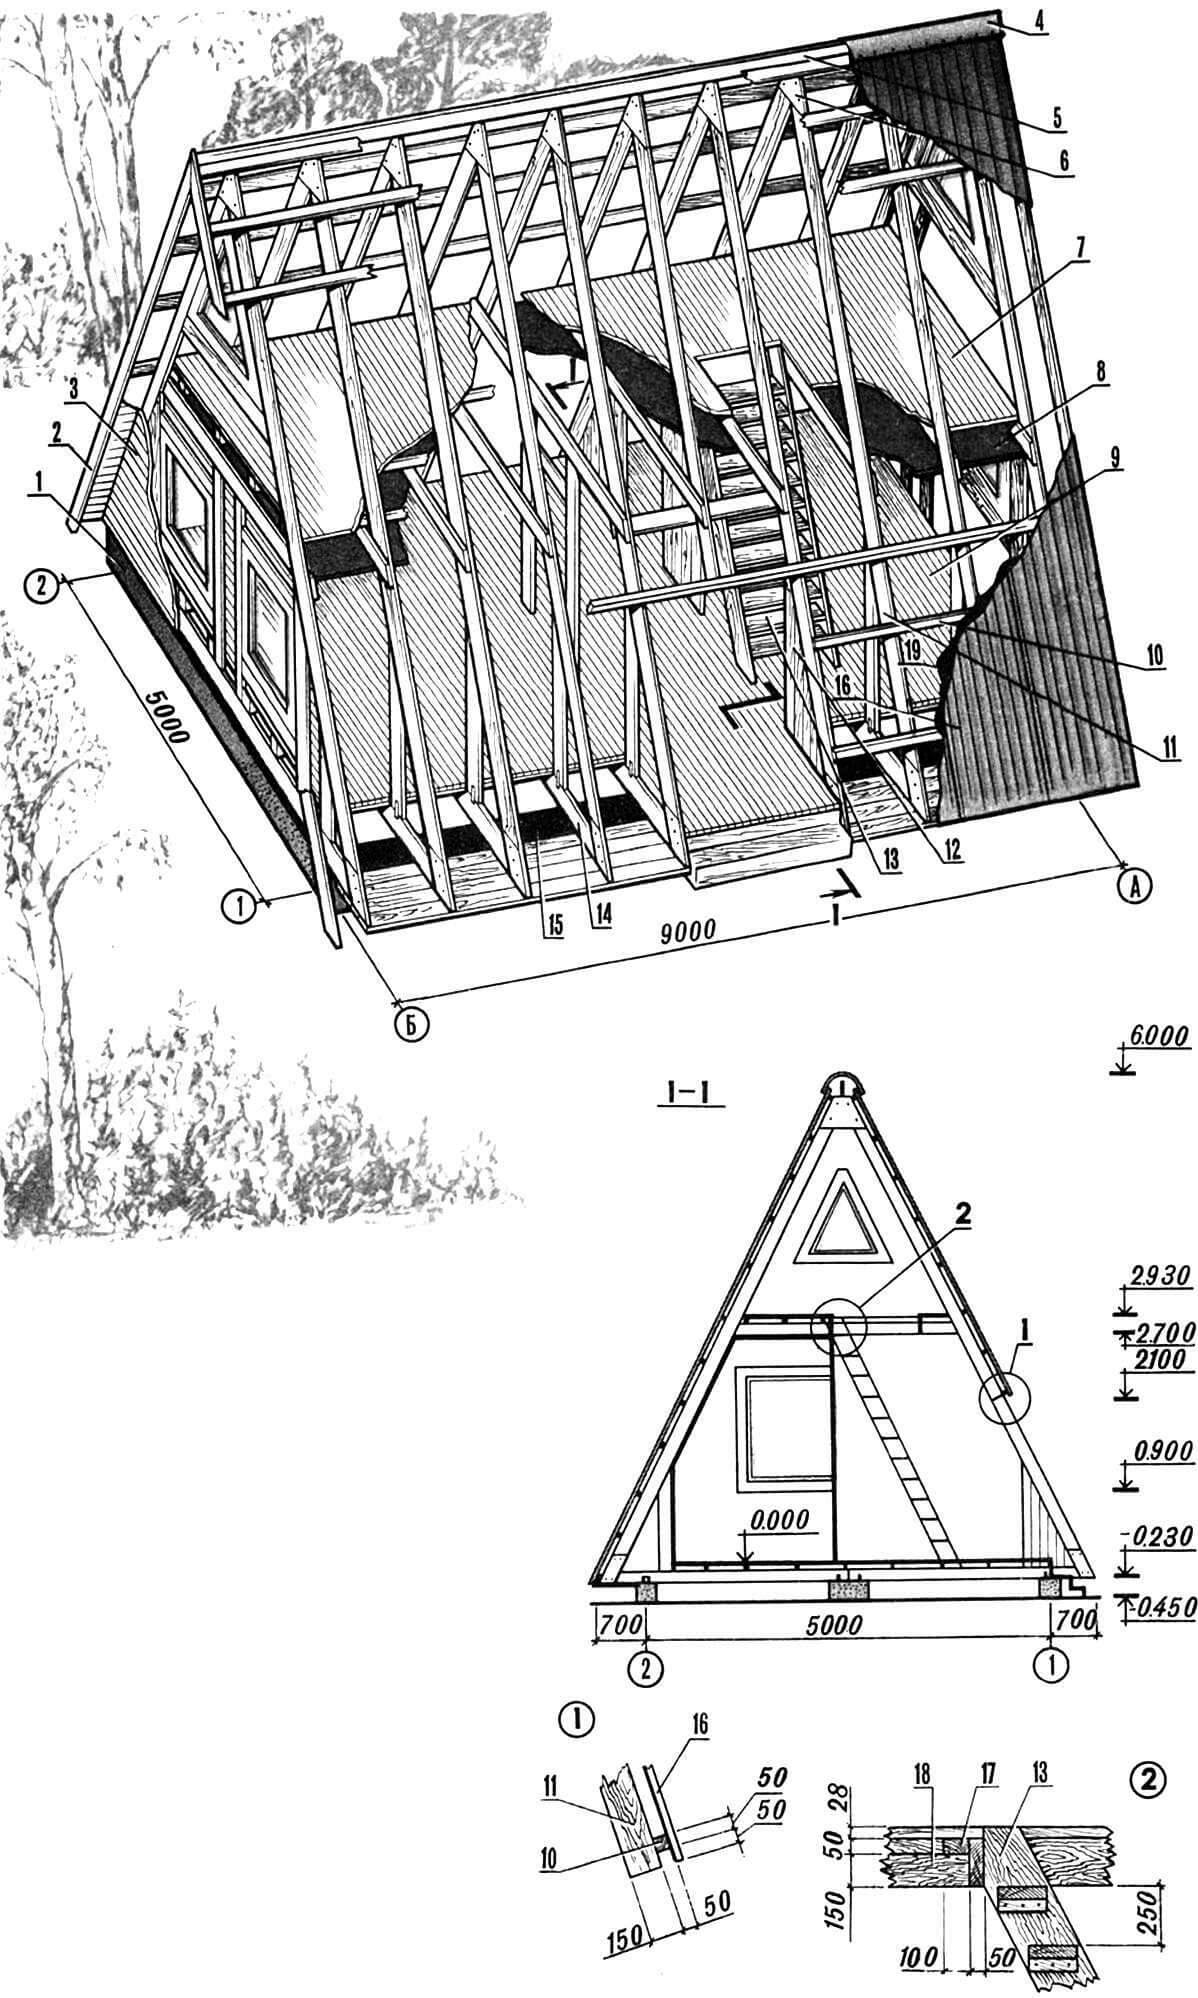
“SHUT” WITH SOLARIUM
Unlike the previous house, where the upper part of the roof is adapted for an attic, in this version it has a solarium. If you look at facade 1-2, you can see that the top of the house has been cut off, and its place has been taken by an open area for recreation. This is no accident. After all, the area of the site is small, only a few acres. And in order not to take away space from the vegetable garden and garden, the recreation area has moved upstairs. Of course, a solarium somewhat complicates the design of the house, but it saves precious space for a garden.
Now specifically about the design. To prevent the solarium from being too narrow, it is necessary to slightly reduce the slope of the main rafters, which, in turn, will increase the total area of the premises – the large room will be 20 m2, and the small one will be 10 m2 .
1 – solarium fencing, 2 – decking, 3 – fence posts, 4 – roofing (galvanized iron), 5 – decking support beam, 6 – ridge beam, 7 – floor beam, 8 – roof sheathing, 9 – solarium post, 10 – façade cladding, 11—steps, 12—terrace flooring, 13—terrace fencing, 14—side overhang cladding, 15—room floors, 16—foundation waterproofing (two layers of roofing material), 17—supporting purlin for solarium flooring, 18—partition racks, 19 – additional rafters, 20 – main rafters, 21 – central steel linings, 22 – side steel linings, 23 – M10 bolts with nuts, 24 – support bars for steps, 25 – cladding of facade overhangs, 26 – load-bearing girder of the house frame.
Each rafter frame is assembled separately and consists of main and additional rafters and floor beams. The main rafter legs are attached to the load-bearing purlins laid along the foundation. The entire frame of the house is built similarly to a “hut”. But unlike the latter, our version has a sloping roof. Therefore, the coating is used from galvanized iron.
In parallel with roofing, the supporting counterparts of the solarium are installed. The lower ends are recorded on a special foundation, and in the upper part in the longitudinal direction they are binded by load -bearing runs and beams in the transverse. The lattice flooring is laid on top of the latter.
If the territory of your site does not allow you to build a gazebo or recreation area, arrange a solarium on the roof of the garden house itself. In addition to convenience, this design will make the architectural image of the entire structure more expressive.
In the front of the house, stairs leading to the site are erected on both sides. They will additionally decorate the house, and on a summer sunny day they will create a beautiful shadow on a small terrace in front of the entrance. The staircase is equipped with a light tubular fence, the appearance of which depends on the fantasy of the builder.
We hope that many gardeners will appeal to the house of such a non -traditional decision of the house.
V. Knyazeva, A. Grishchenko
Recommend to read
 WOOD ON THE CHAINSAW
Winter in our Northern lands long. Roads are not so thick, and those on time do not have time to remove snow from. It turns out that no trails of cars people here do not easy, moreover,... The RAF “Latvia”
Race through the streets of a nimble brightly painted machinery-trailers with checkered Board. Scurry Shuttle for precise routes, working tirelessly from morning to night. On the hood of...
