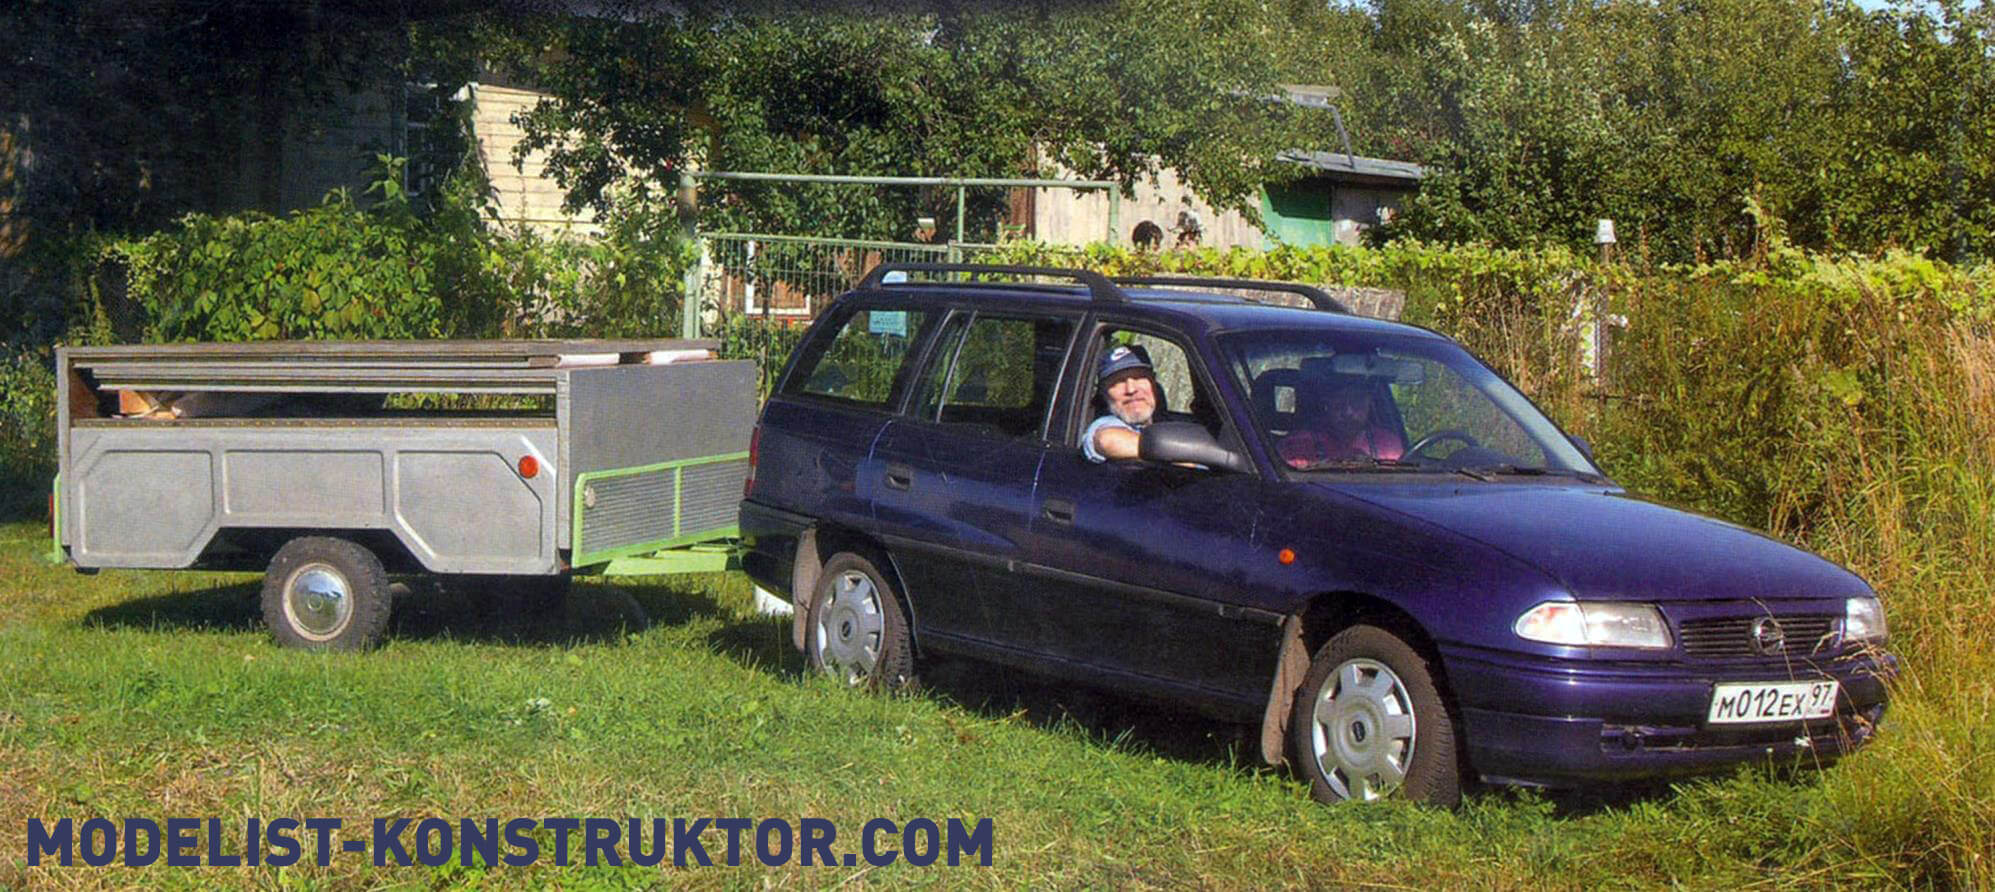
The idea to build a trailer cottage came during the operation of the previous one, also mobile (see “Model designer No. 5′, 2005). Let me remind you that that dacha was collapsible with a soft roof and smaller in size, since it was initially tied to the dimensions of the Skif-2M trailer. And although each of its elements was not heavy, it still took two people to assemble the dacha.
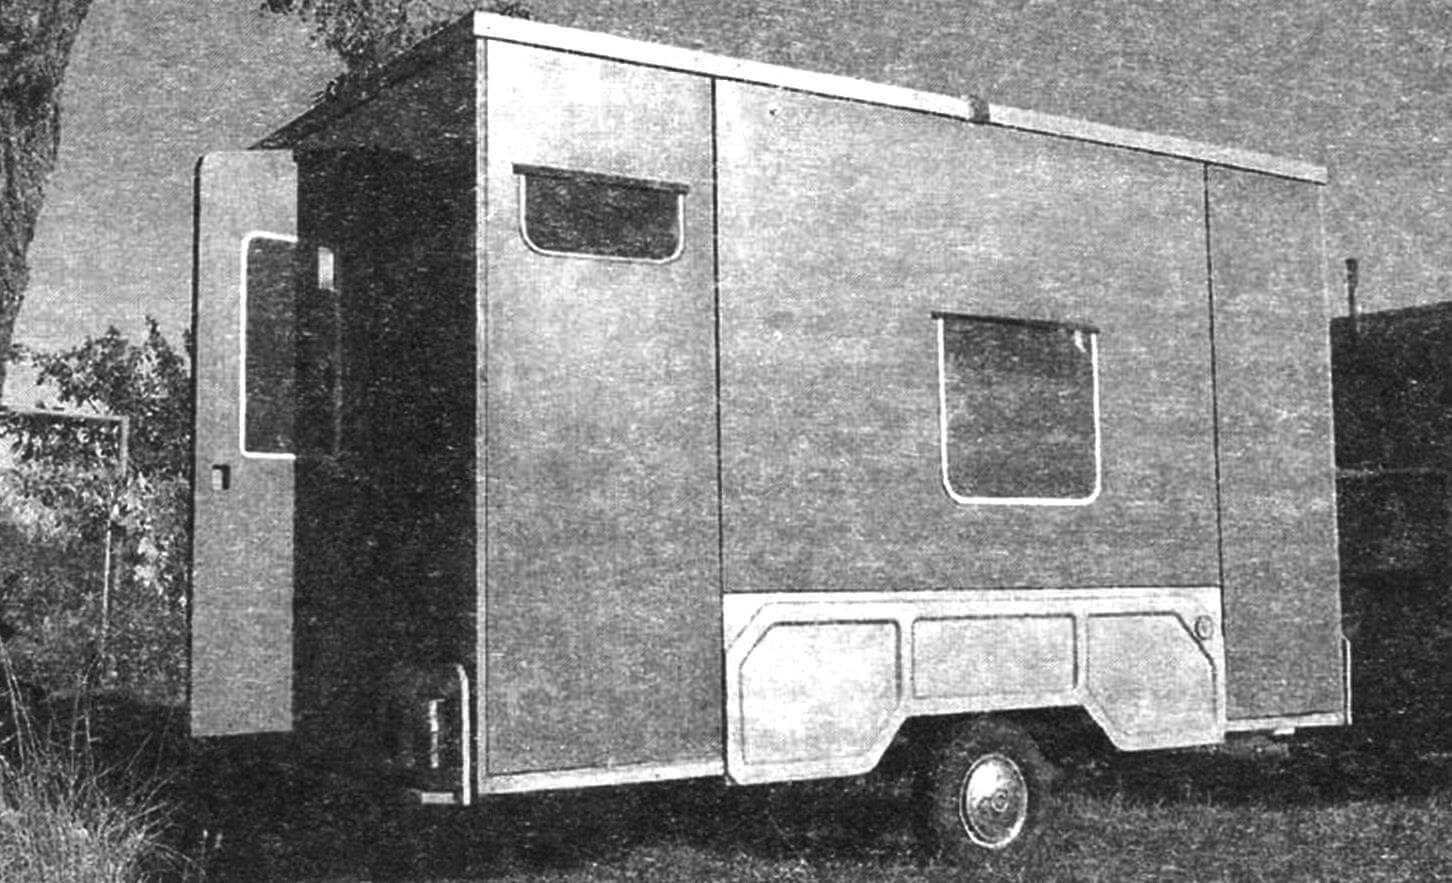
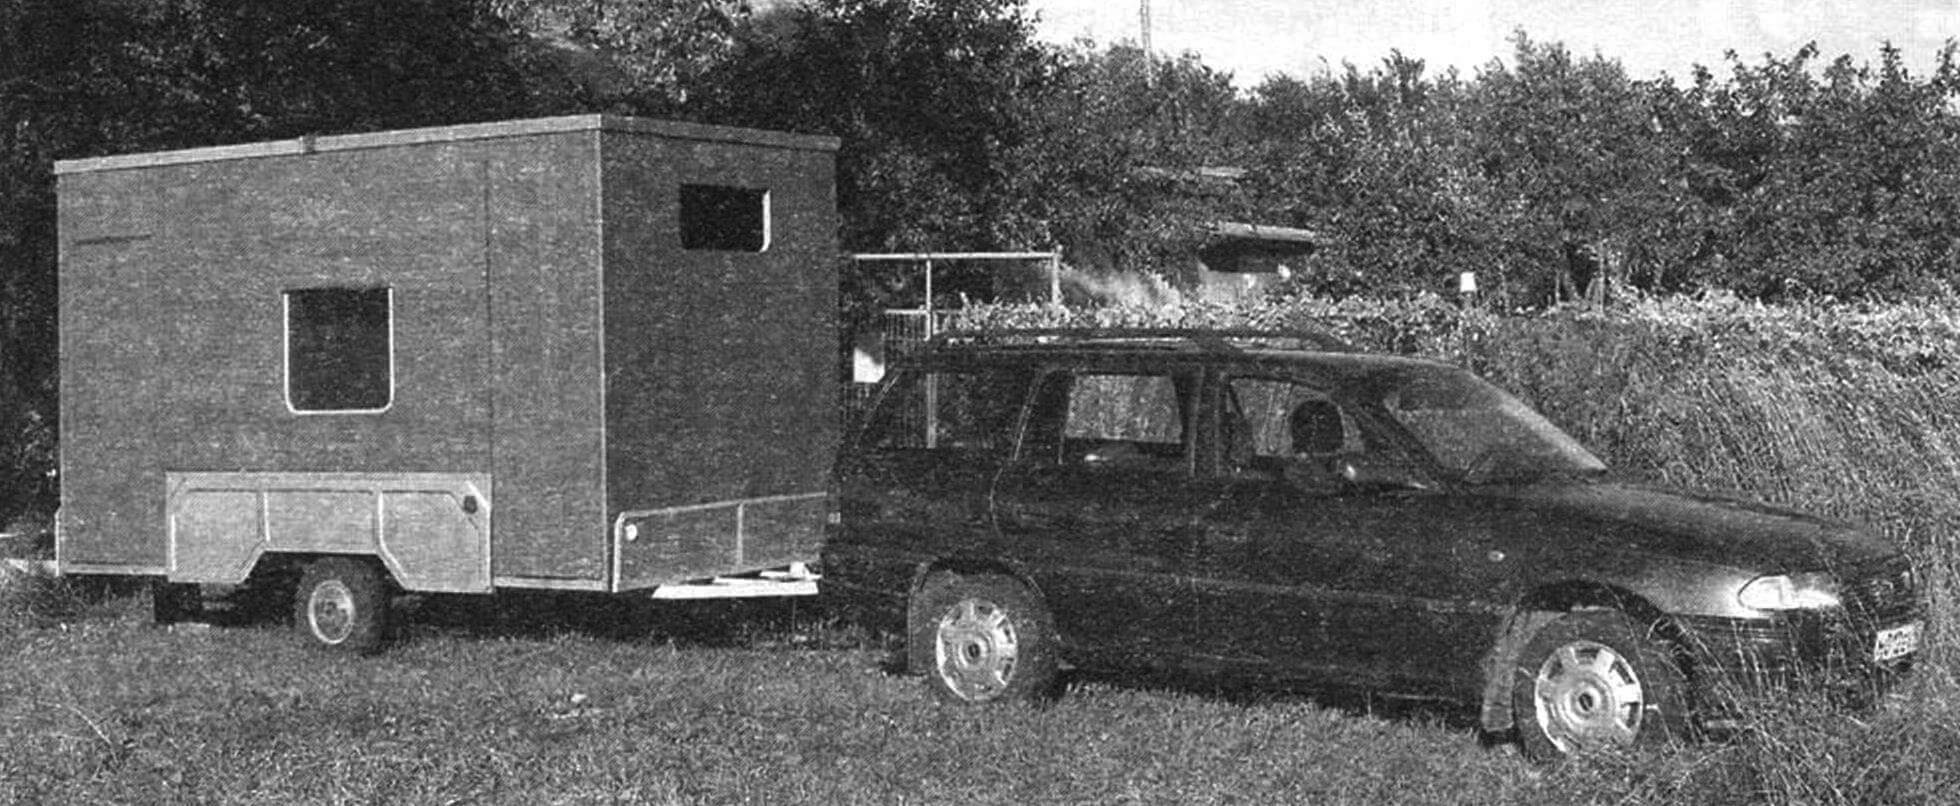
The new dacha is folding and unfolding. The shields of its walls are hingedly attached to the trailer frame (hung on it on card or piano hinges). To bring the walls into working position, you need to lift them from the stack – open them, like the petals of a flower from a bud. Only the unfolding process takes only a few minutes, not hours. At the same time, all installation operations can be performed by one person. And only sometimes does the need for a “third” hand arise – but this happens in strong winds (or when the dacha is installed on a slope). In these cases, family members will always help.
The design of the planned mobile dacha with its rather impressive dimensions made it almost impossible to use a ready-made (industrially produced) trailer for it. A serial trailer would still require significant modifications, so it was cheaper and even easier to make the trailer yourself – just the way you needed it. But the question – which one – was not resolved immediately. I had to think “on paper”. In the end, I designed it according to the dissolution type (with a retractable drawbar and rear subframe): in the transport position it is no longer than a regular trailer, and in the working position it corresponds to the dimensions of the dacha. But I also had to rack my brains over the layout of the elements of the dacha, although in the end everything turned out quite simple.
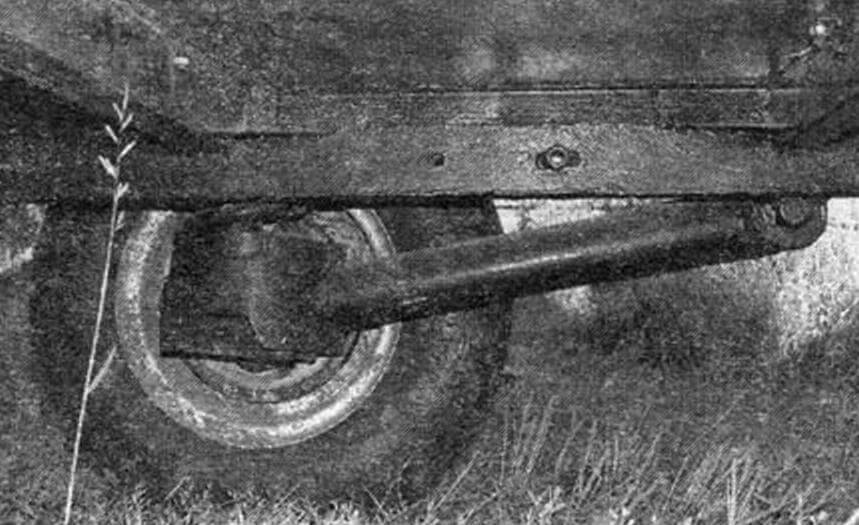
Having decided on the dimensions and layout of the components of the dacha, I first began to manufacture the trailer. The trailer is two-wheeled, but without a common beam-bridge. The suspension of each wheel is independent, on trailing arms. The levers are homemade and quite massive. Their hinge connection to the frame is made not through silent blocks (rubber-metal bushings), but on two ball bearings No. 80205. Therefore, the levers very easily “work out” all the unevenness of the roads. Each lever is suspended by a spring with shock absorbers from the front suspension of the Moskvich-2140 car.
The trailer frame is welded, two-spar with five cross members. All crossbars (except for the middle one) are made with cantilever outlets. The outlets are connected to each other on each side by lower frame trims rigidly attached to the frame of the side boards. The middle parts of the side walls rest on their upper frames after the dacha is assembled into working position.
The front and rear sides have more of a decorative purpose than a practical one, except for the fact that retroreflectors are attached to them, and a signal light is also attached to the rear. These sides are also rigidly welded to the power elements of the trailer: the first to the drawbar, and the second to the rear (also retractable) subframe.
The spars are made of standard rolled steel rectangular pipes with a cross-section of 65×40 mm, and the cross members are made of pipes with a cross-section of 55×40 mm. The side frames are also made from assorted pipes. But the stays of the drawbar forks and rear subframe had to be made from longitudinally welded corners. The fact is that each feather had to fit inside the spars freely, but without large gaps. It was never possible to find suitable pipes. However, the greatest difficulty in the manufacture of the feathers was not in adjusting their outer section to the internal section of the spars, but in ensuring the straightness of the feathers – they were “led” very much by welding. To do this, the feathers had to be very carefully straightened, and where necessary, sanded down.
The frames of the front and rear sides are also welded from standard rolled pipes. A bumper made of a 40×40 mm square pipe with automotive rubber buffers is also welded to the rear side trim, and an industrial-made towing device is mounted on the drawbar in front (the use of a homemade one is not allowed by technical requirements).
The frames of the front and rear sides of the trailer are covered with duralumin sheets, and the sides are glued from fiberglass using homemade matrices.
The floor of the dacha is composite. Its middle part is made of (Finnish) plywood 12 mm thick, lined with plastic on both sides. Here the floor is attached with M6 countersunk screws to the frame angle brackets.
The front and rear parts of the floor are made integrally with the corresponding end walls as a single corner element in the shape of the Latin letter L, in which part of the floor serves as the base and the wall serves as the vertical. During assembly, they are installed on the drawbar and subframe stays through rubber gaskets glued to the floor.
In the L-shaped element, part of the floor and the end wall are assembled on latticework made of wooden blocks. Only in the walls the bars of the gratings are installed flat in relation to the facings, that is, they face them with the wider side, and in the floor – with an edge. At the corner joint, the strapping block is common and made with a rebate. The floor here is lined on both sides with 8 mm plywood, coated on the outside with epoxy mixed with aluminum powder. The outer walls are lined with sheets of plastic (textolite) 2 mm thick, and the inner walls are lined with the same 4 mm plywood as the floor, only the plywood is stained with stain. In all elements, the cavities of the gratings between the facings are filled with slabs of P-40 construction foam.
All connections of the grating bars are made with epoxy glue. Sheets of cladding, both external and internal (both plastic and plywood), are glued to the gratings and foam with “dots” of epoxy glue. The floor parts of the corner elements with their free ends are docked flush to the middle part of the floor and attached to it with three card loops each. If necessary, by disconnecting the hinges and removing the L-shaped elements, you can use the trailer as a regular cargo trailer.
The end walls on the vertical sides are hinged on piano hinges with flaps – the outermost parts of the side walls. Piano hinges are installed along the entire height of the doors and are also covered with leatherette linings for sealing. The joint between the sash and the middle side wall is covered in all places with corresponding folds (quarters) made in the edges of both parts. Gaskets made of thin foam rubber are glued to the folds (you can make soft foam or use special rubber ones).

The middle parts of the side walls are made like the end ones. The supports for them are the upper edges of the sides, to which they are also connected by piano hinges with sealing linings.
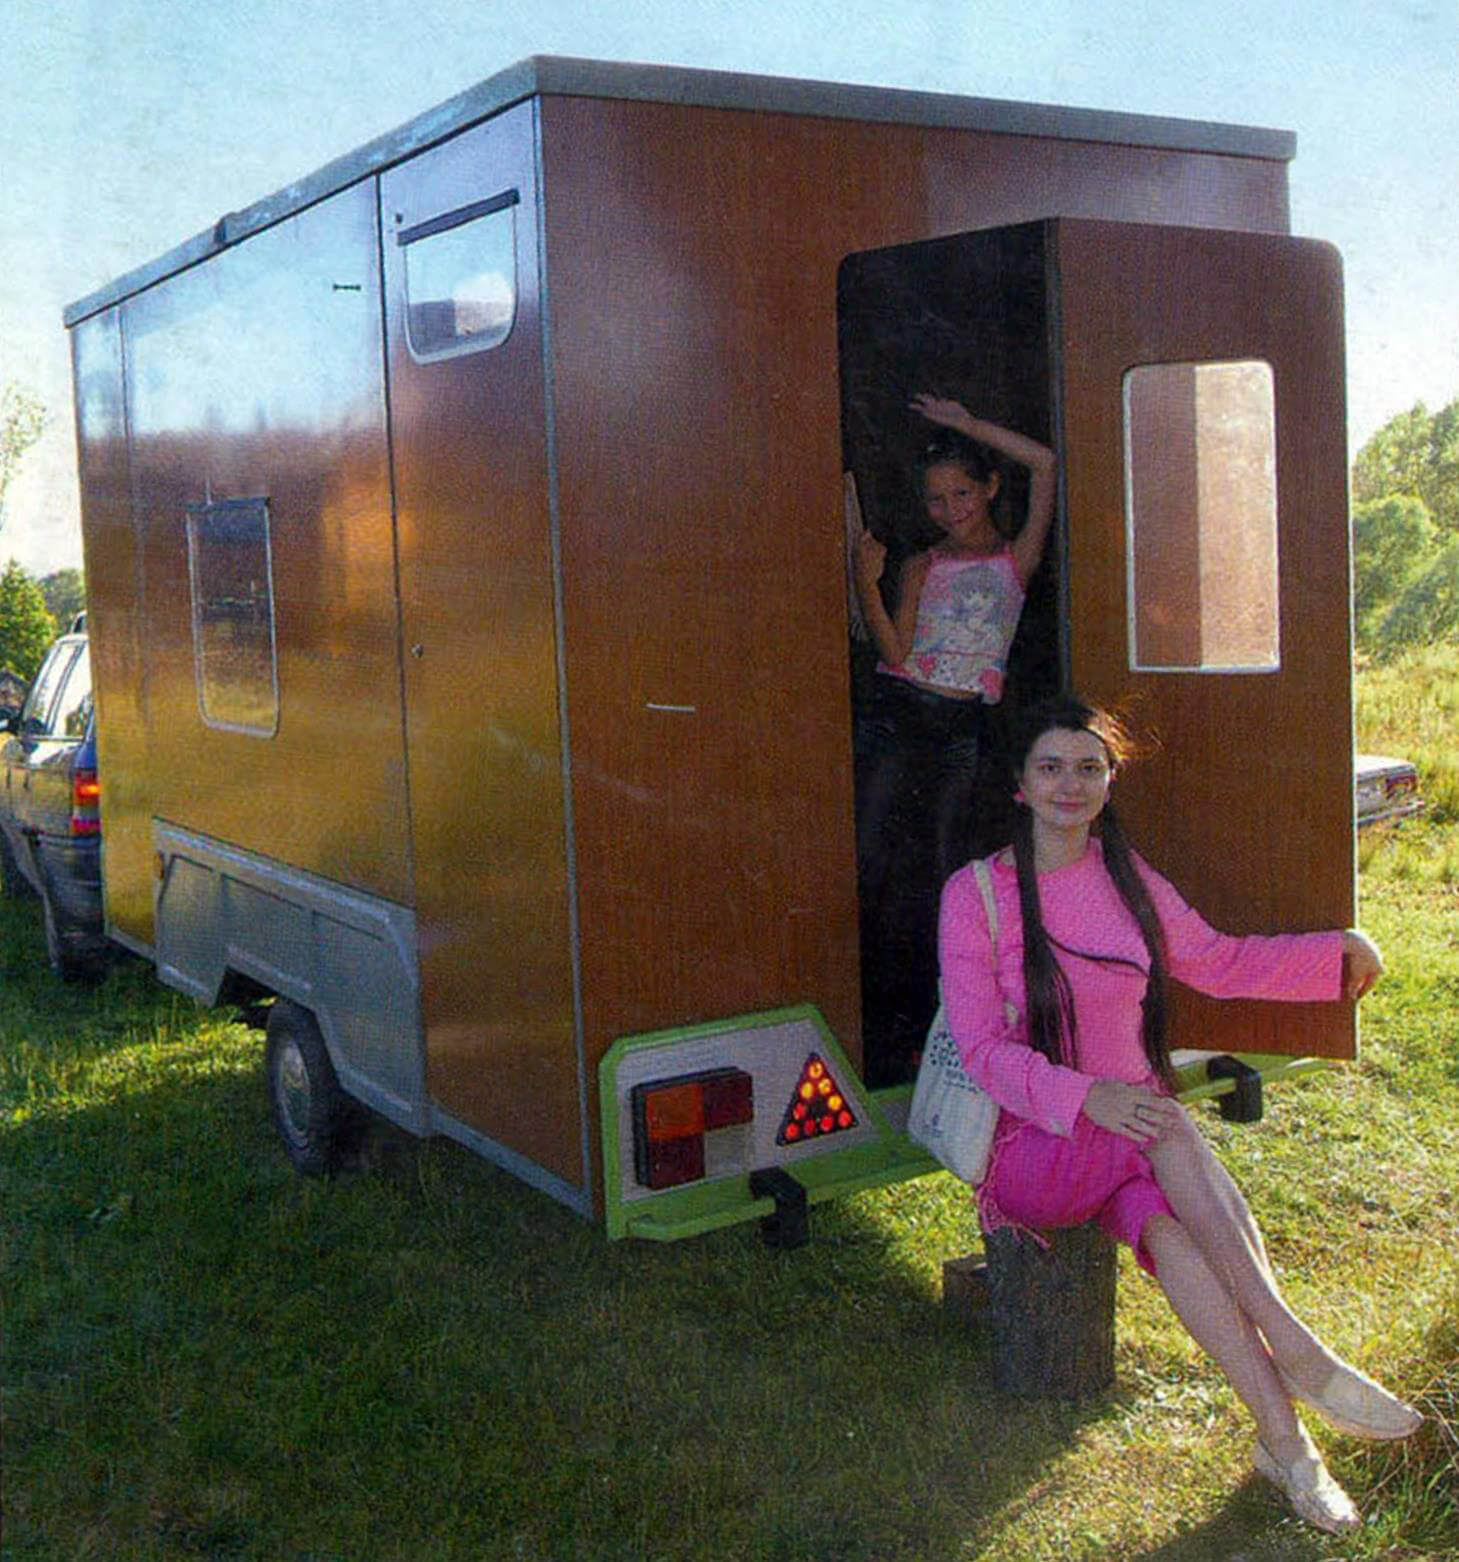
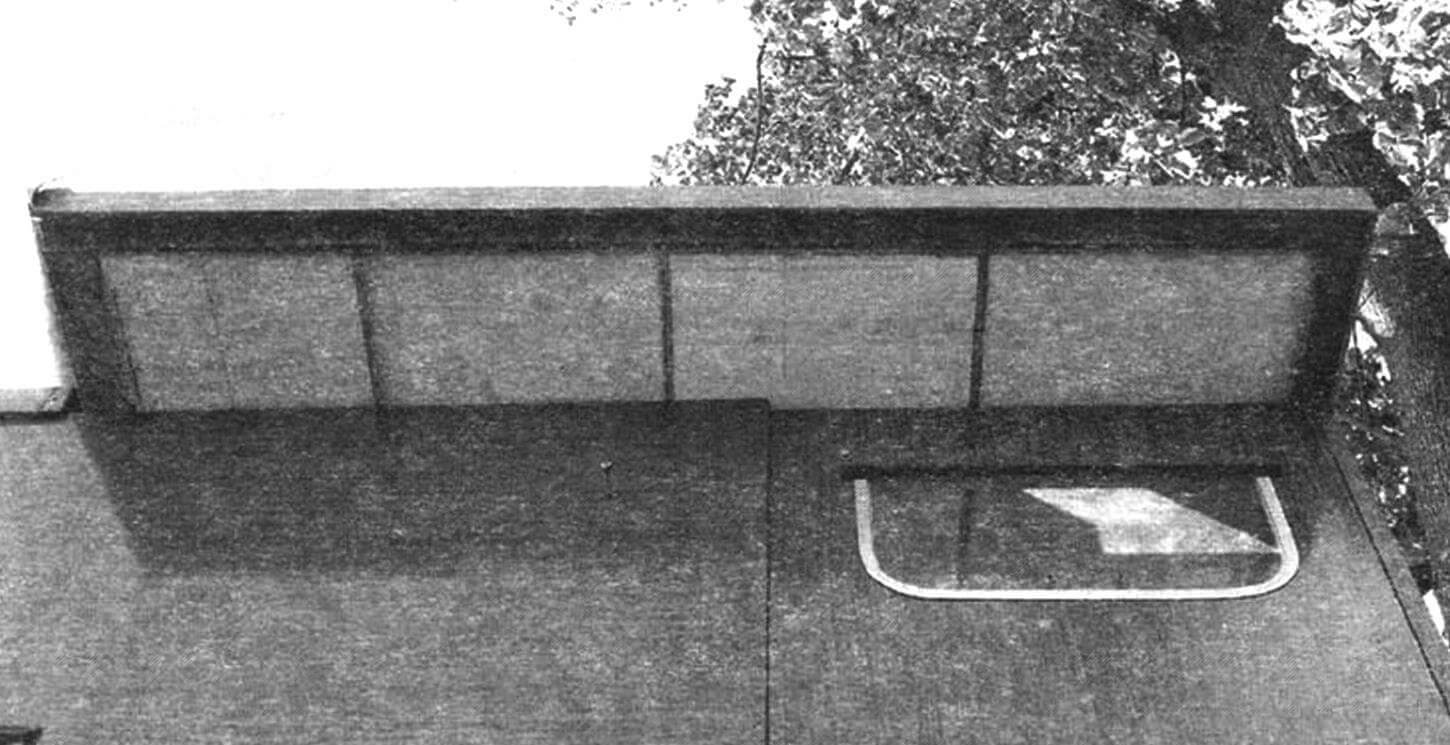
In the central parts of the side walls there are large “blind” windows, and in the front end wall there is an opening window: it is edged with a duralumin channel and covered on top with a small canopy made of leatherette.
The same vents are designed in the rear flaps of the side walls, but only one has been cut out so far – on the left side. As operation has shown, enough light enters the kitchen-hallway through one window and a hatch in the roof. Although, frankly speaking, the window is more needed on the other side, for exhaust ventilation – after all, a gas stove is installed there and food is prepared.
A doorway was cut into the rear end wall, and a door with a non-opening window was made from the cut out part. The door is hung on three piano hinges with leatherette overlays, and its rebate and inward movement are limited, as with vents, by means of edging.
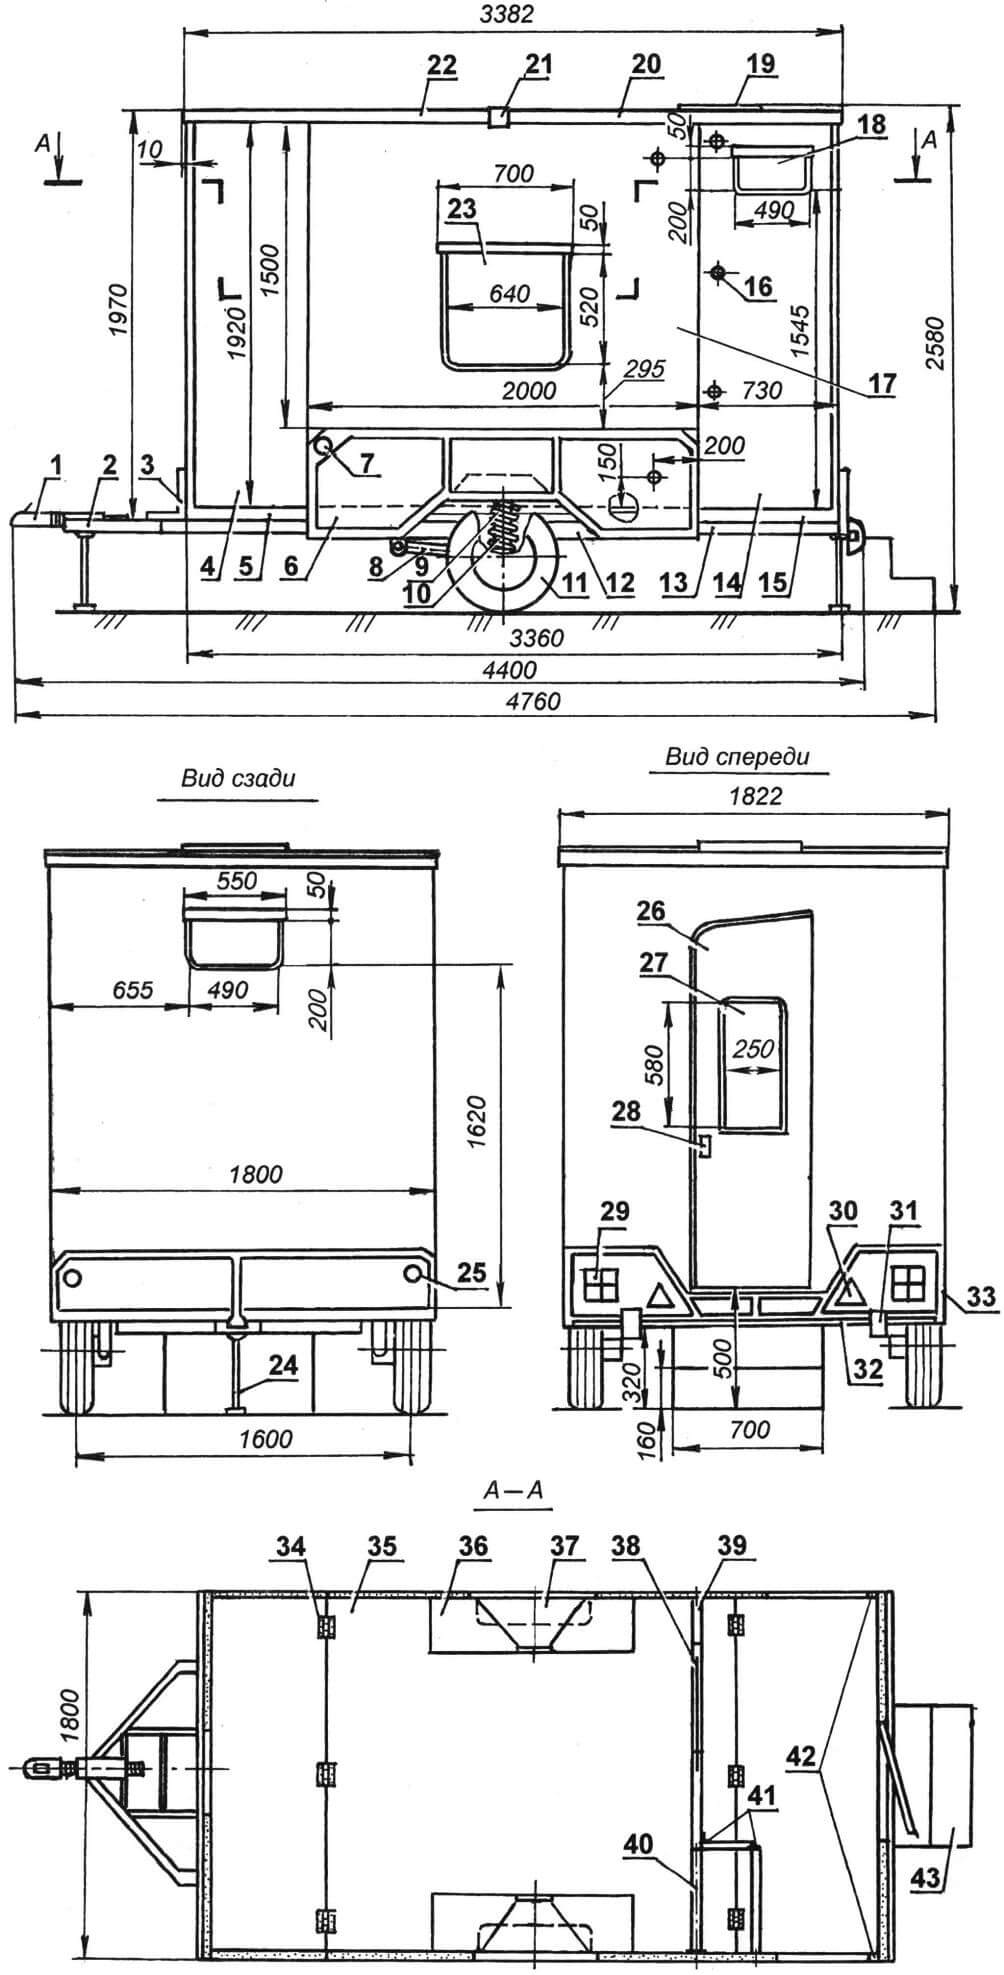
1 — coupling device (industrial production); 2 – drawbar; 3 — front side; 4 — front flap of the side wall (2 pcs.); 5 — front L-shaped element (part of the floor and end wall); 6 — trailer side panel trim (laminated fiberglass); 7 — side (yellow) reflector (2 pcs.); 8 — wheel suspension lever (2 pcs.); 9 — suspension spring (from the GAZ-21 Volga car, 2 pcs.); 10 — suspension shock absorber (from the Moskvich-408 car, 2 pcs.); 11 — wheel R12 (from a motorized stroller, 2 pcs.); 12 — trailer frame; 13 — rear subframe; 14 — rear flap of the side wall (2 pcs.); 15 — rear L-shaped element (part of the floor and end wall); 16 — M8 bolt (10 pcs.); 17 — side wall (2 pcs.); 18 — window (plexiglass, edged with a duralumin profile, with a canopy made of leatherette 3 pcs.; 19 — hatch flange; 20 — rear half of the roof; 21 — lining (faux leather); 22 — front half of the roof; 23 — living room window (plexiglass, framed with a duralumin profile with a visor made of leatherette, 2 pcs.); 24 — support or jack; 25 — front (white) reflector (2 pcs.); 26 — entrance door window (plexiglass, bordered with a duralumin profile); 28 — door handle; 29 — rear signal lights (2 pcs.); 30 — rear (red) reflectors; 31 — rear bumper buffer (rubber, 2 pcs.); 33 — rear side; 34 — hinged card hinge (6 pcs.); 35 — middle (main) part of the floor (plywood, lined with plastic on both sides); 36 — steel floor insert (sheet s2, 4 pcs.); 37 — wheel niche casing (steel); sheet s2); 38 – retractable door (plywood, s10); 39 – internal partition; 40 – connecting rod (pipe Ø28, 2 pcs.); 41 — piano hinges of articulated joints (6 pcs.); 42 — corner hinge joints with sealing linings (piano hinges, leatherette, 4 pcs.); 43 – attached porch
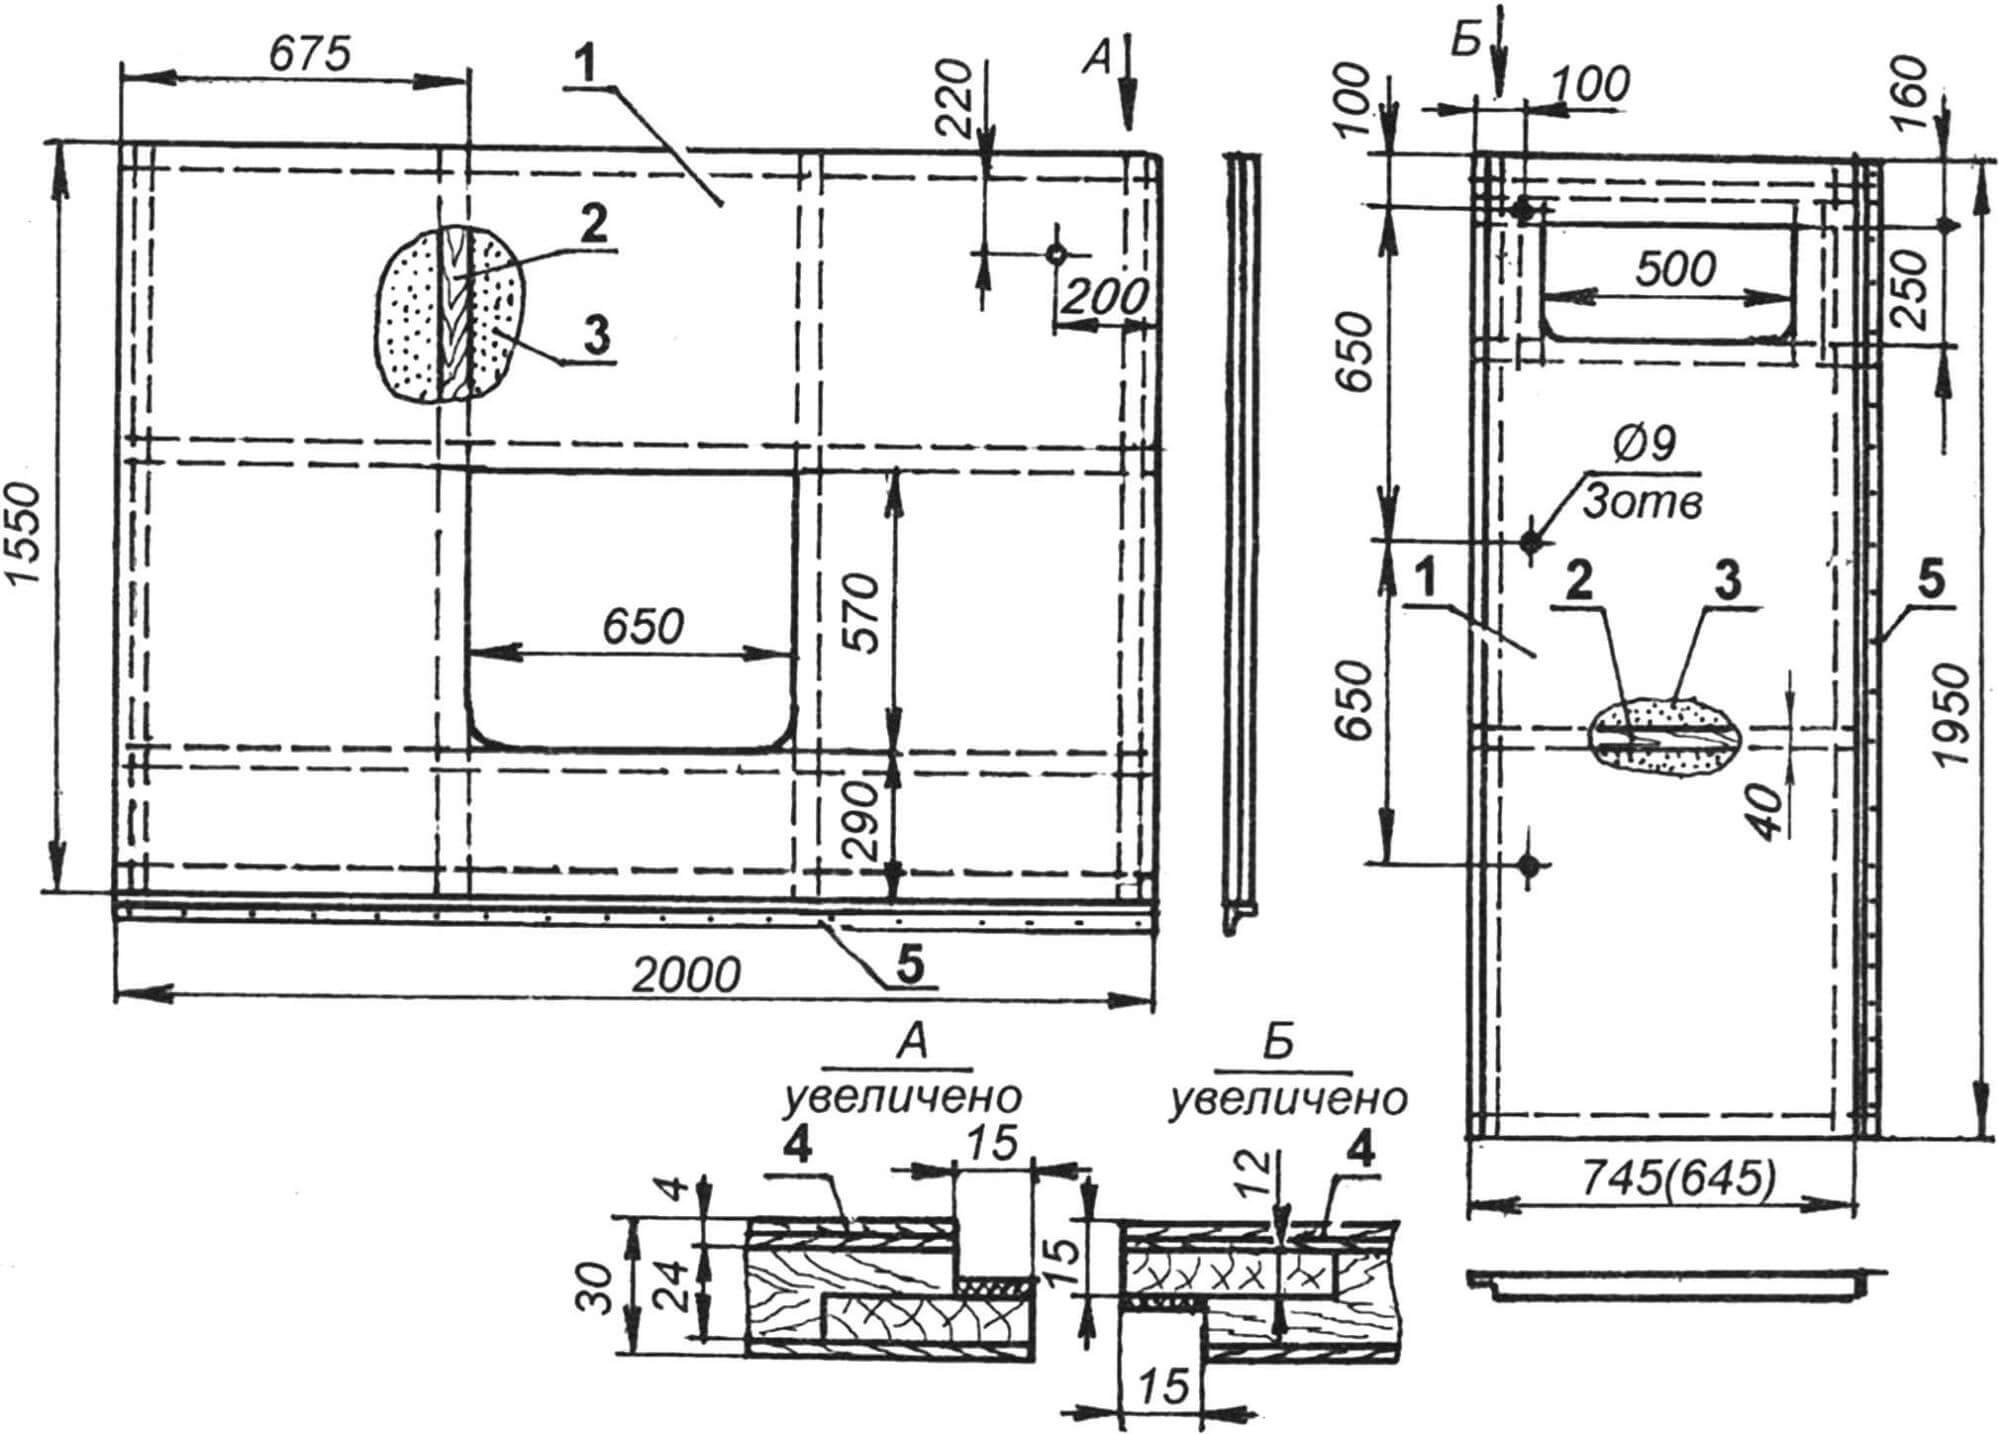
The walls of the dacha are the same in thickness and design: the base is a lattice of pine bars with a cross-section of 40×24 mm. The bars in the wall gratings are laid flat in relation to the sheathing, that is, the wider side faces them. The outer cladding of all walls is the same – made of sheets of plastic (textolite) 2 mm thick. The niches of the gratings between the skins are filled with P-40 foam – it does not burn and does not absorb water, but serves as a good heat and sound insulator. The internal lining of the walls of the kitchen part of the room is made of “refined” (lined with plastic) plywood 2 mm thick, and in the living part – of ordinary plywood, tinted with stain and coated with natural varnish. I believe that this type of decoration for a living room intended for overnight stays is the most environmentally friendly.
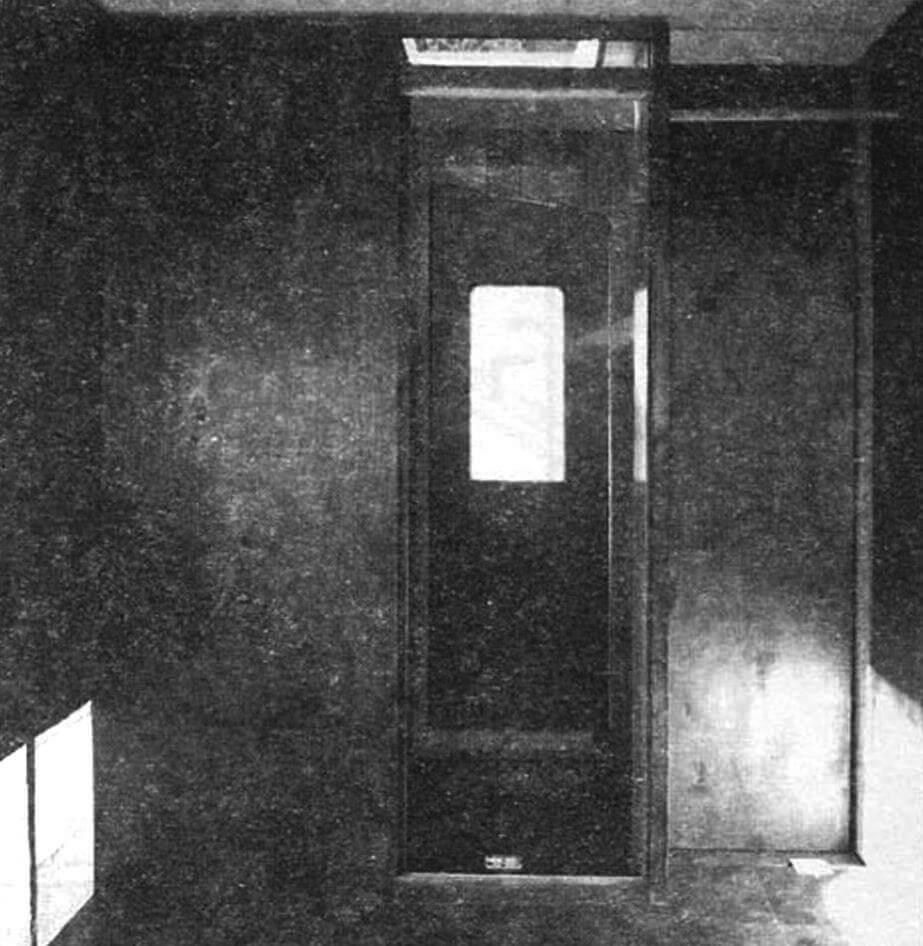
In plan, the area of the dacha is divided by an internal partition into two rooms: a recreation room and a kitchen-hallway. The rooms are connected to each other by a doorway with a sliding plywood door (10 mm thick) inserted inside the partition during its manufacture (between the facings). The “breakable” partition consists of three parts connected on piano hinges (the joints are covered with leatherette pads). After installation, two short parts of the partition form a small, but floor-to-ceiling high, niche for things on the living room side. Parts of the partition are assembled on wooden bars made of bars with a cross-section of 40×24 mm and sheathed on the kitchen side with sheets of “ennobled” plywood, and on the room side with regular plywood (4 mm thick).
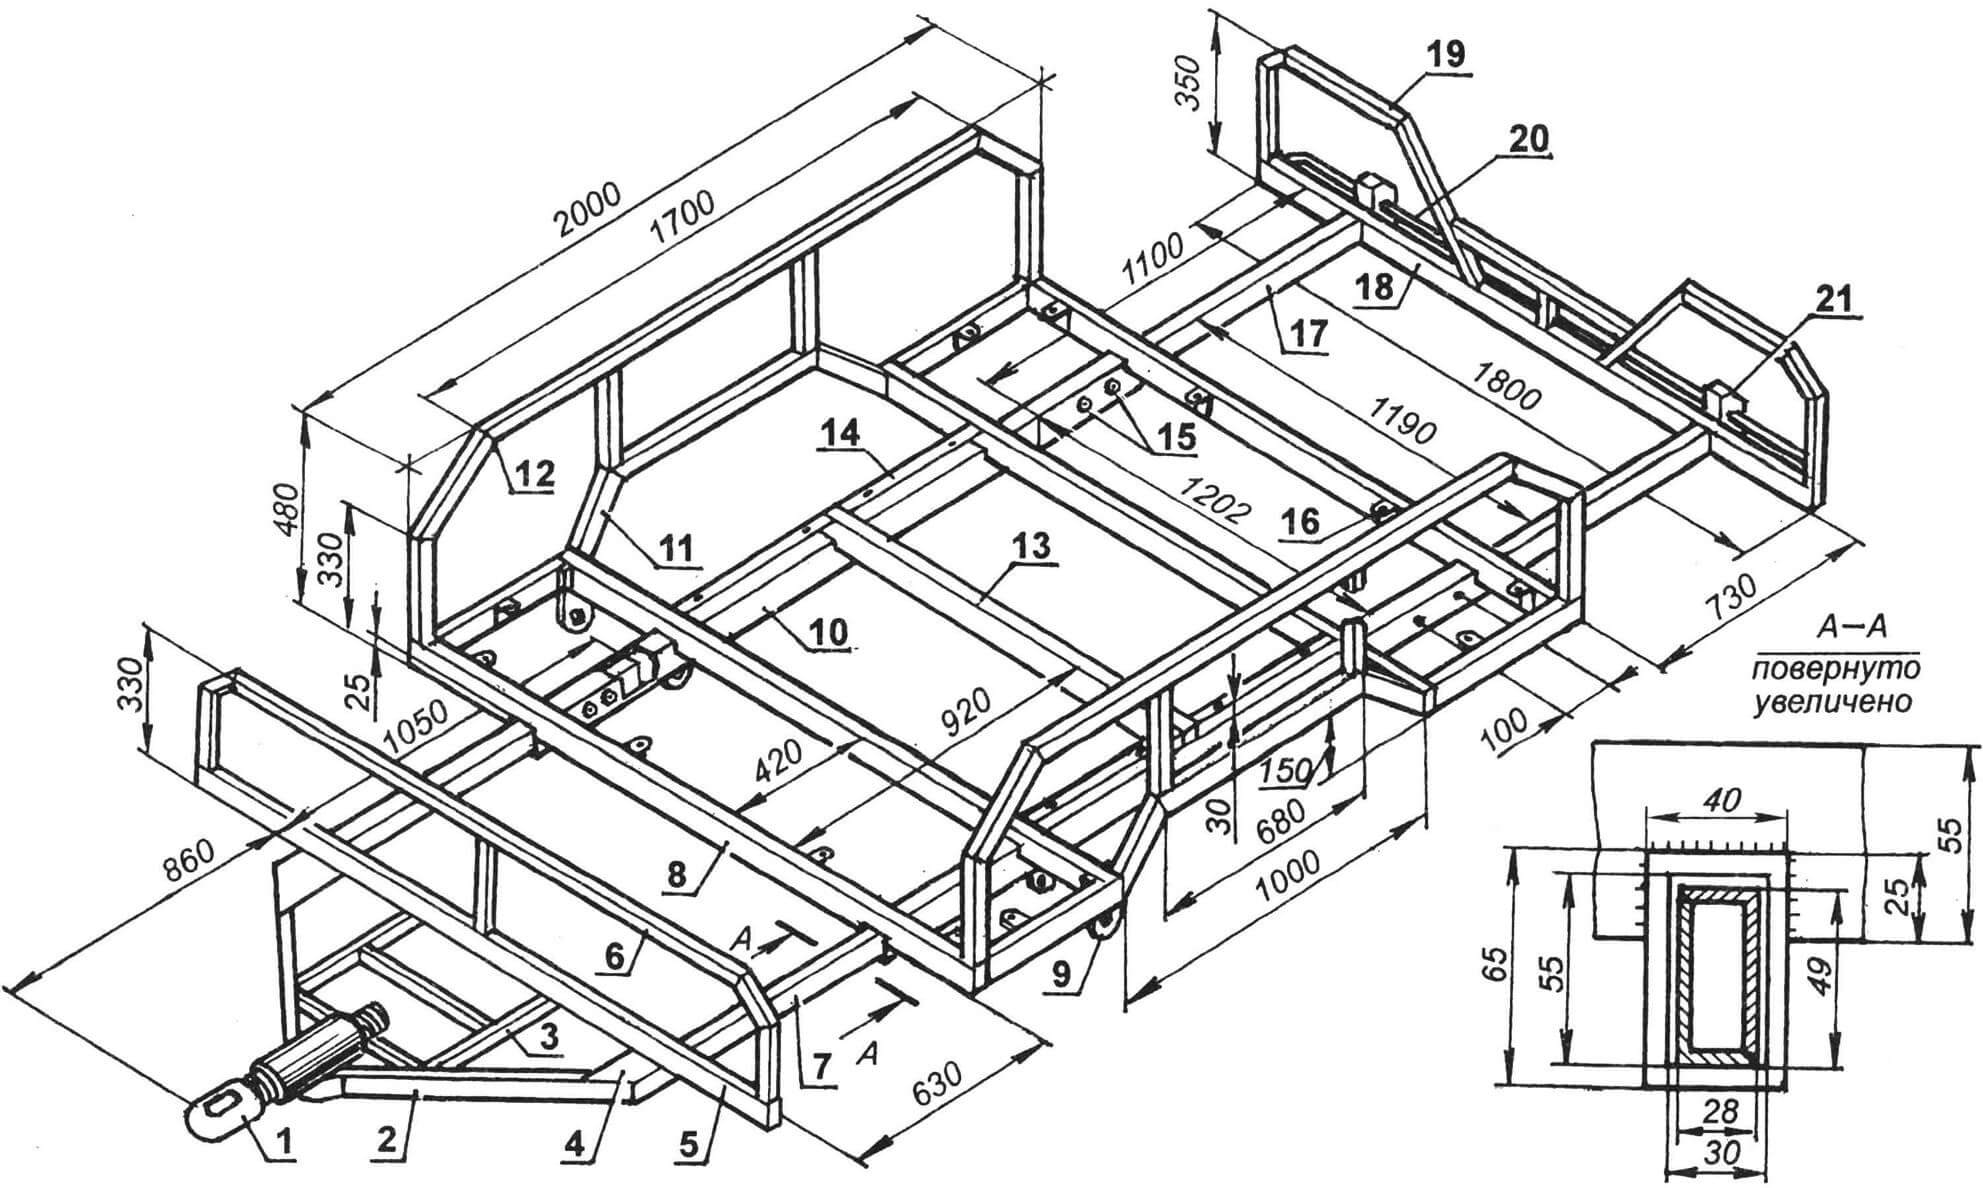
1 — tow hitch; 2 — drawbar beam (pipe 55×25, 2 pcs.); 3 — spare wheel support frame (bent channel 25×15, steel sheet s2); 4 — scarf (steel sheet s2, 2 pcs.); 5 — front side trim (pipe 40×25); 6 — arc of the front side with a stand (pipe 20×20); 7 – drawbar feather (pipe 49×28 – welded lengthwise from two corners 45×28); 8 — ordinary transverse frame (pipe 55×40, 2 pcs.); 9 — eyelet for mounting the suspension arm (steel, sheet s5, 4 pcs.); 10 — spar (pipe 65x40x5, 2 pcs.); 11 — side panel trim (pipe 40×25, 2 pcs.); 12 — arc of the side board with racks (pipe 20×20); 13 — middle cross member (pipe 55×40); 14 — supporting shelf of the middle part of the floor (bent corner 30×20, steel sheet s2, 4 pcs.); 15 — M16 nuts welded to the side members (8 pcs.); 16 — bracket for fastening the middle part of the floor (bent corner 30×20, steel sheet s2, as needed); 17 — rear subframe stay (pipe 49×28—welded lengthwise from two corners 45×28); 18 — rear side trim (pipe 40×25); 19 — rear side arches with a ligament and a stand (pipe 20×20); 20 — bumper (pipe 40×20); 21 — buffer (rubber, 2 pcs.)
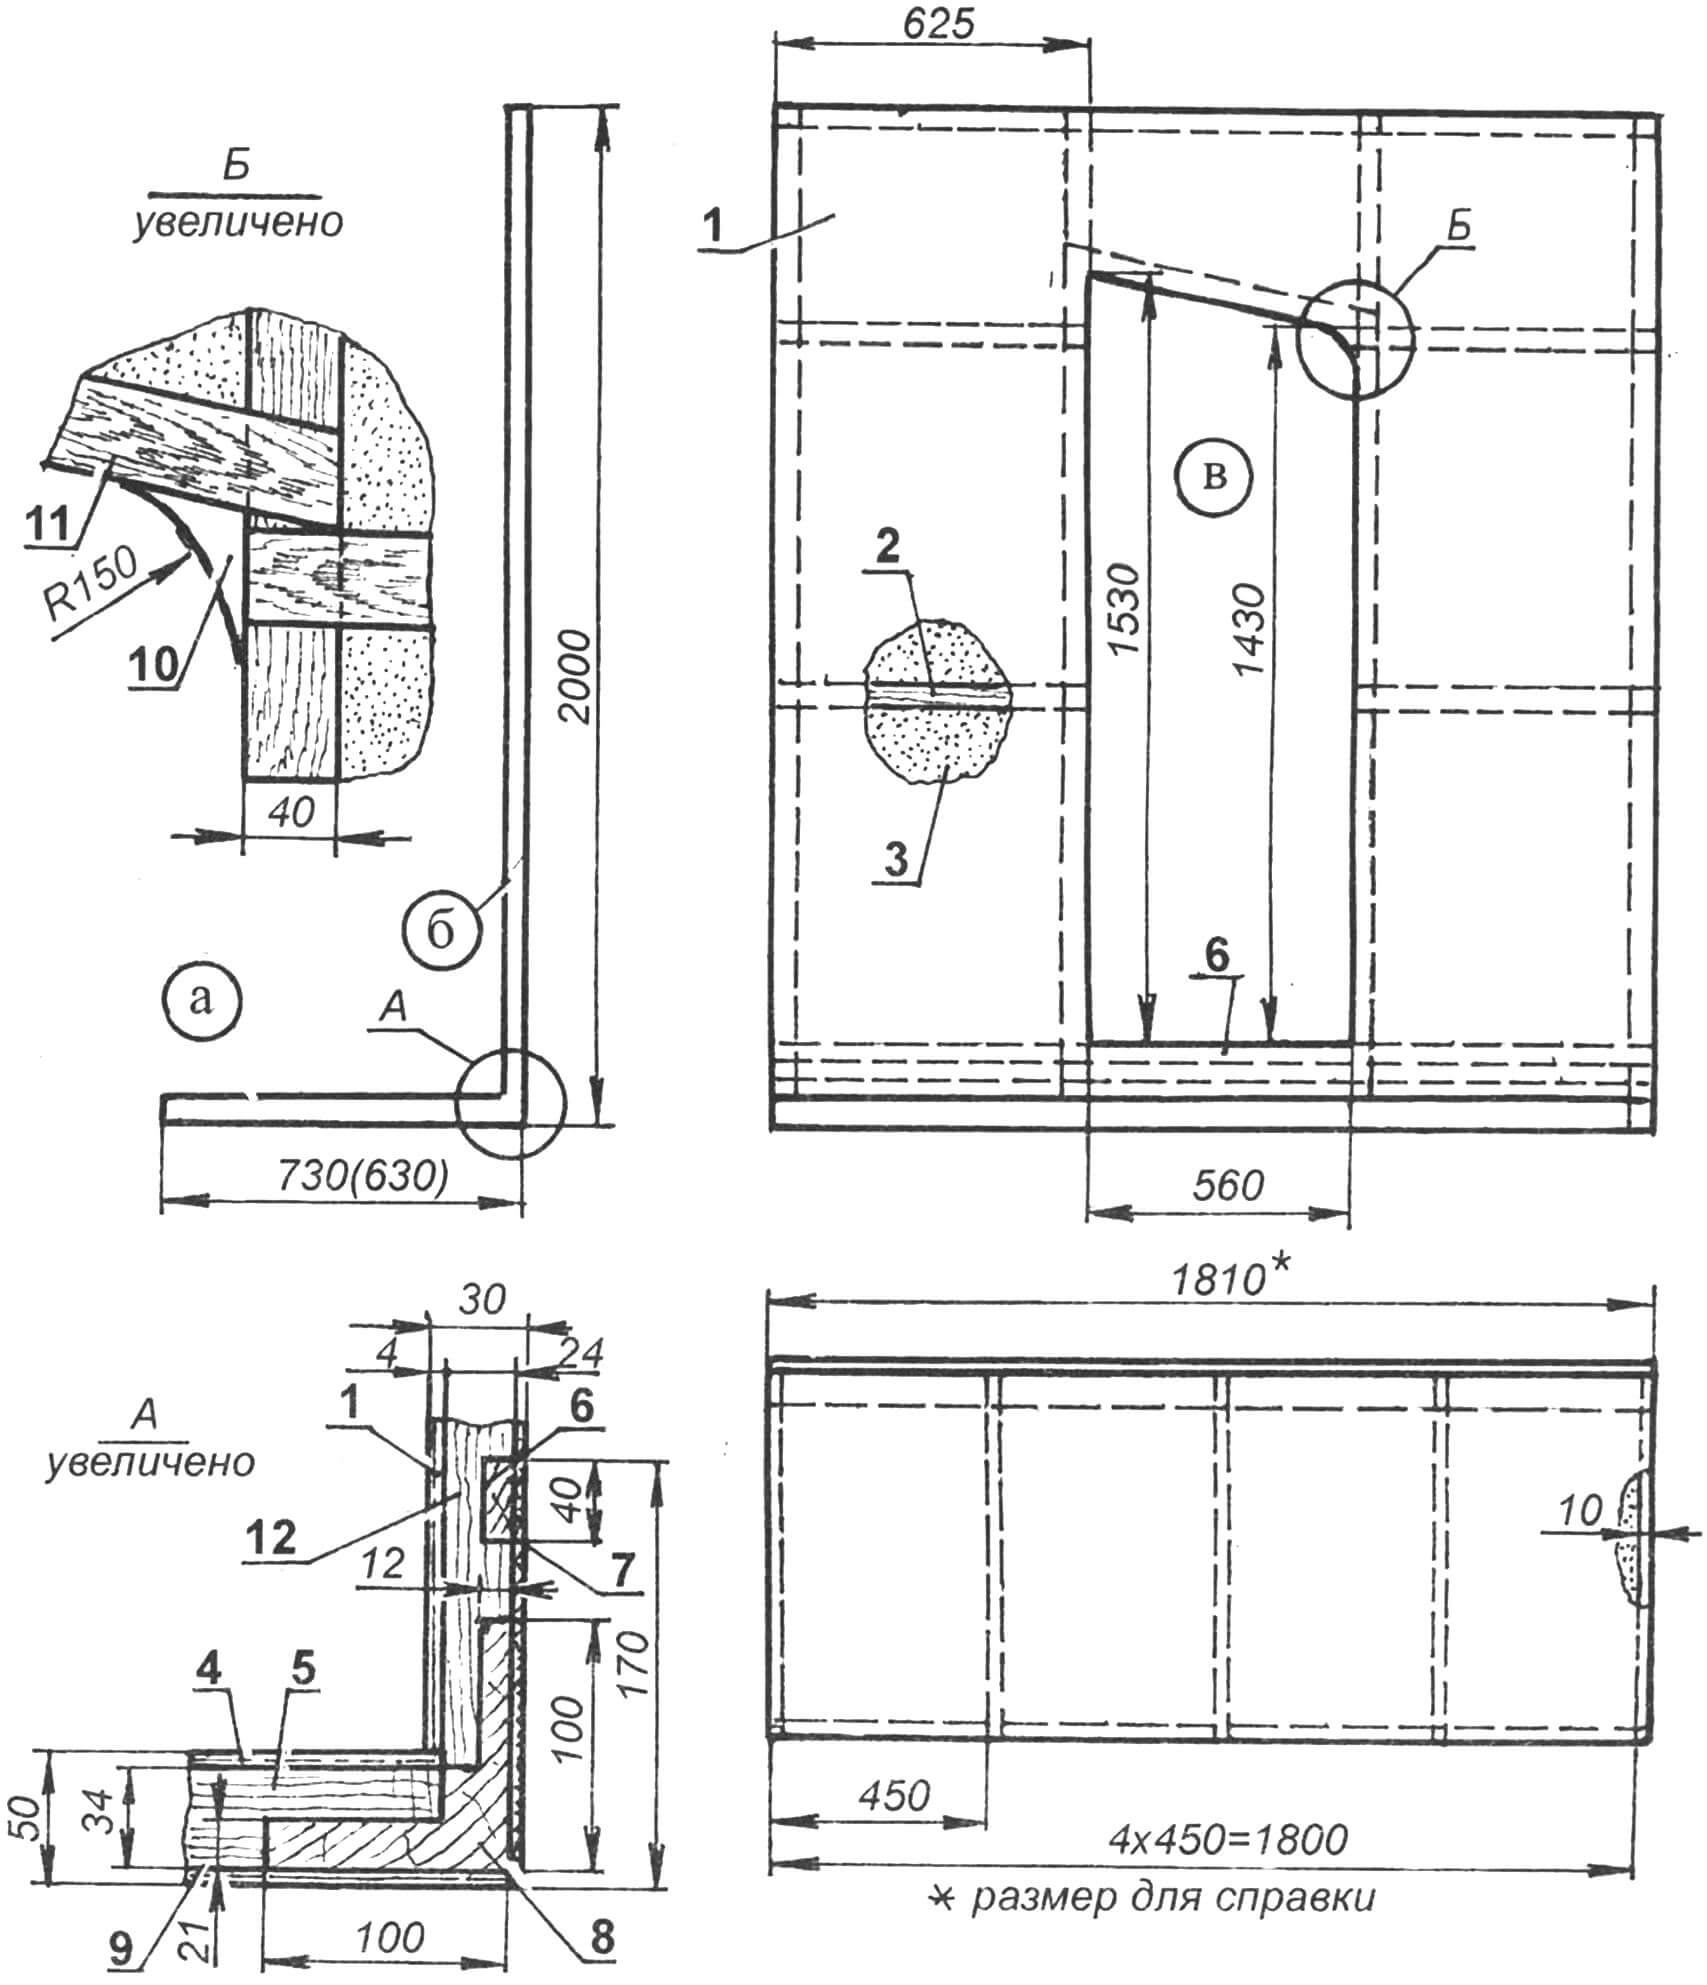
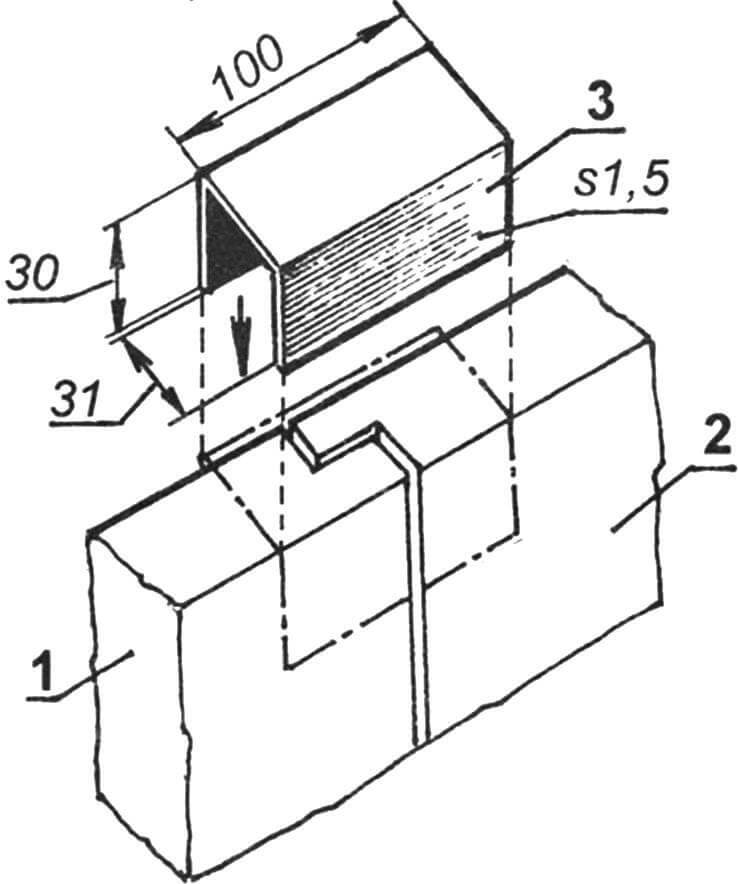
1 – internal wall cladding (plywood, s4); 2 — grille of the end part (block 40×24); 3 — heat and sound insulating filler (foam P-40); 4 — internal floor covering (s4 plywood); 5 — rib-bar of the floor grating (plywood s10, 5 pcs.); 6 — threshold (bar 40×12); 7 – external cladding of the end wall (getinaks, sheet s2); 8 — strapping (beam 100×100); 9 — outer covering of part of the floor (plywood s4); 10 — figured insert (board s24); 11 – lintel (block 40×24); 12 — wall stand (block 40×24, 4 pcs.)
A few words about wall manufacturing technology. First the lattice is made. Its bars are joined half-timber and connected using epoxy glue. Then, on a flat area (on the floor), one of the skins is laid out and a grid is glued to it and loaded while the glue polymerizes. Then the cells are filled with sheets of foam plastic slightly thicker than the bars. First, smears of glue are applied to the inner surface of the casing. After giving the glue time to harden, level the surface of the foam flush with the bars using hot nichrome wire, apply epoxy to both strokes and glue the other skin. If you have experience in similar work, then the operations can be combined.
The ceiling and roof of the dacha are combined, that is, they are a single structure, but consist of two halves (conditionally – front and rear, since they can be swapped). The only difference between the halves is that one of them has an overlay made of waterproofing material attached to it, which covers the joint between the parts of the roof. The joining bars are slightly raised above the roof plane, forming transverse shoulders that intercept and drain water that gets onto the roof.
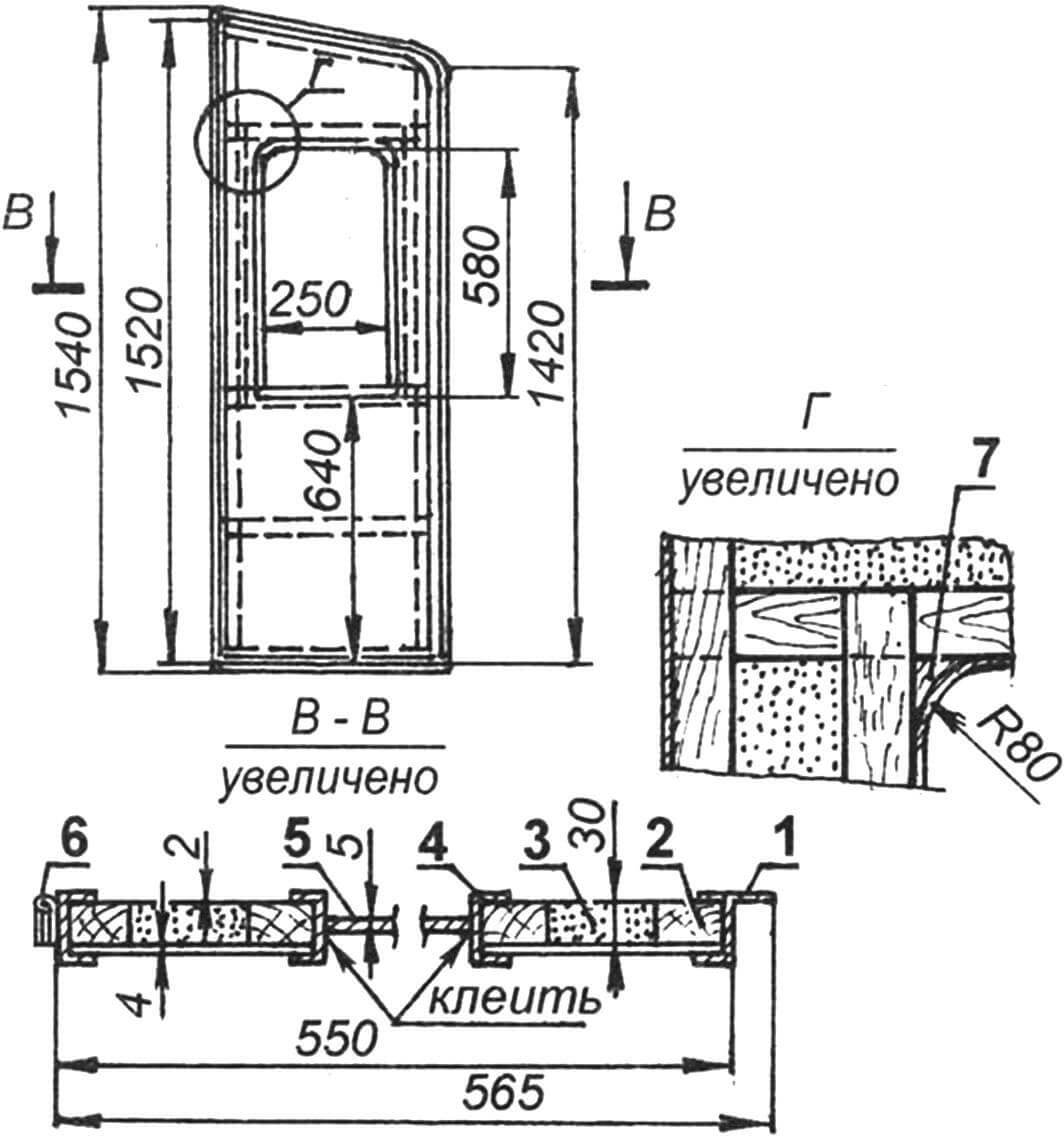
1 — door edging (duralumin I-beam profile with one or, in some places, two shelves cut off); 2 – bar 40×24 lattice; 3 — heat and sound insulating filler (foam P-40); 4 — window edging (duralumin channel); 5 — window (plexiglass s5); 6 — piano loop; 7 — figured insert (board s24)
There is one more difference between the roof halves. One of them has a hatch with clear dimensions of 450×380 mm, with flanges higher than the roof (to prevent water from flowing in). Through the hatch you can climb to the roof to sunbathe there or take photos or videos from there. The hatch is closed with a yellow plexiglass lid, and therefore the room seems sunny even in cloudy weather.
The filling of the roof is made according to the type of the front and rear parts of the floor: stiffener bars with a cross section of 52×10 mm are made of 10 mm plywood and are also installed on the rib; the niches are filled with foam plastic and lined with plywood. On the outside, the roof is covered with two layers of fiberglass on epoxy mixed with aluminum powder, and on the inside, it is covered with treated 2-mm white plywood.
1 — external cladding (getinaks, sheet s2); 2 — grate (bar 40×24); 3 — heat and sound insulating filler (foam P-40); 4 — internal lining (plywood s4); 5 – piano loop
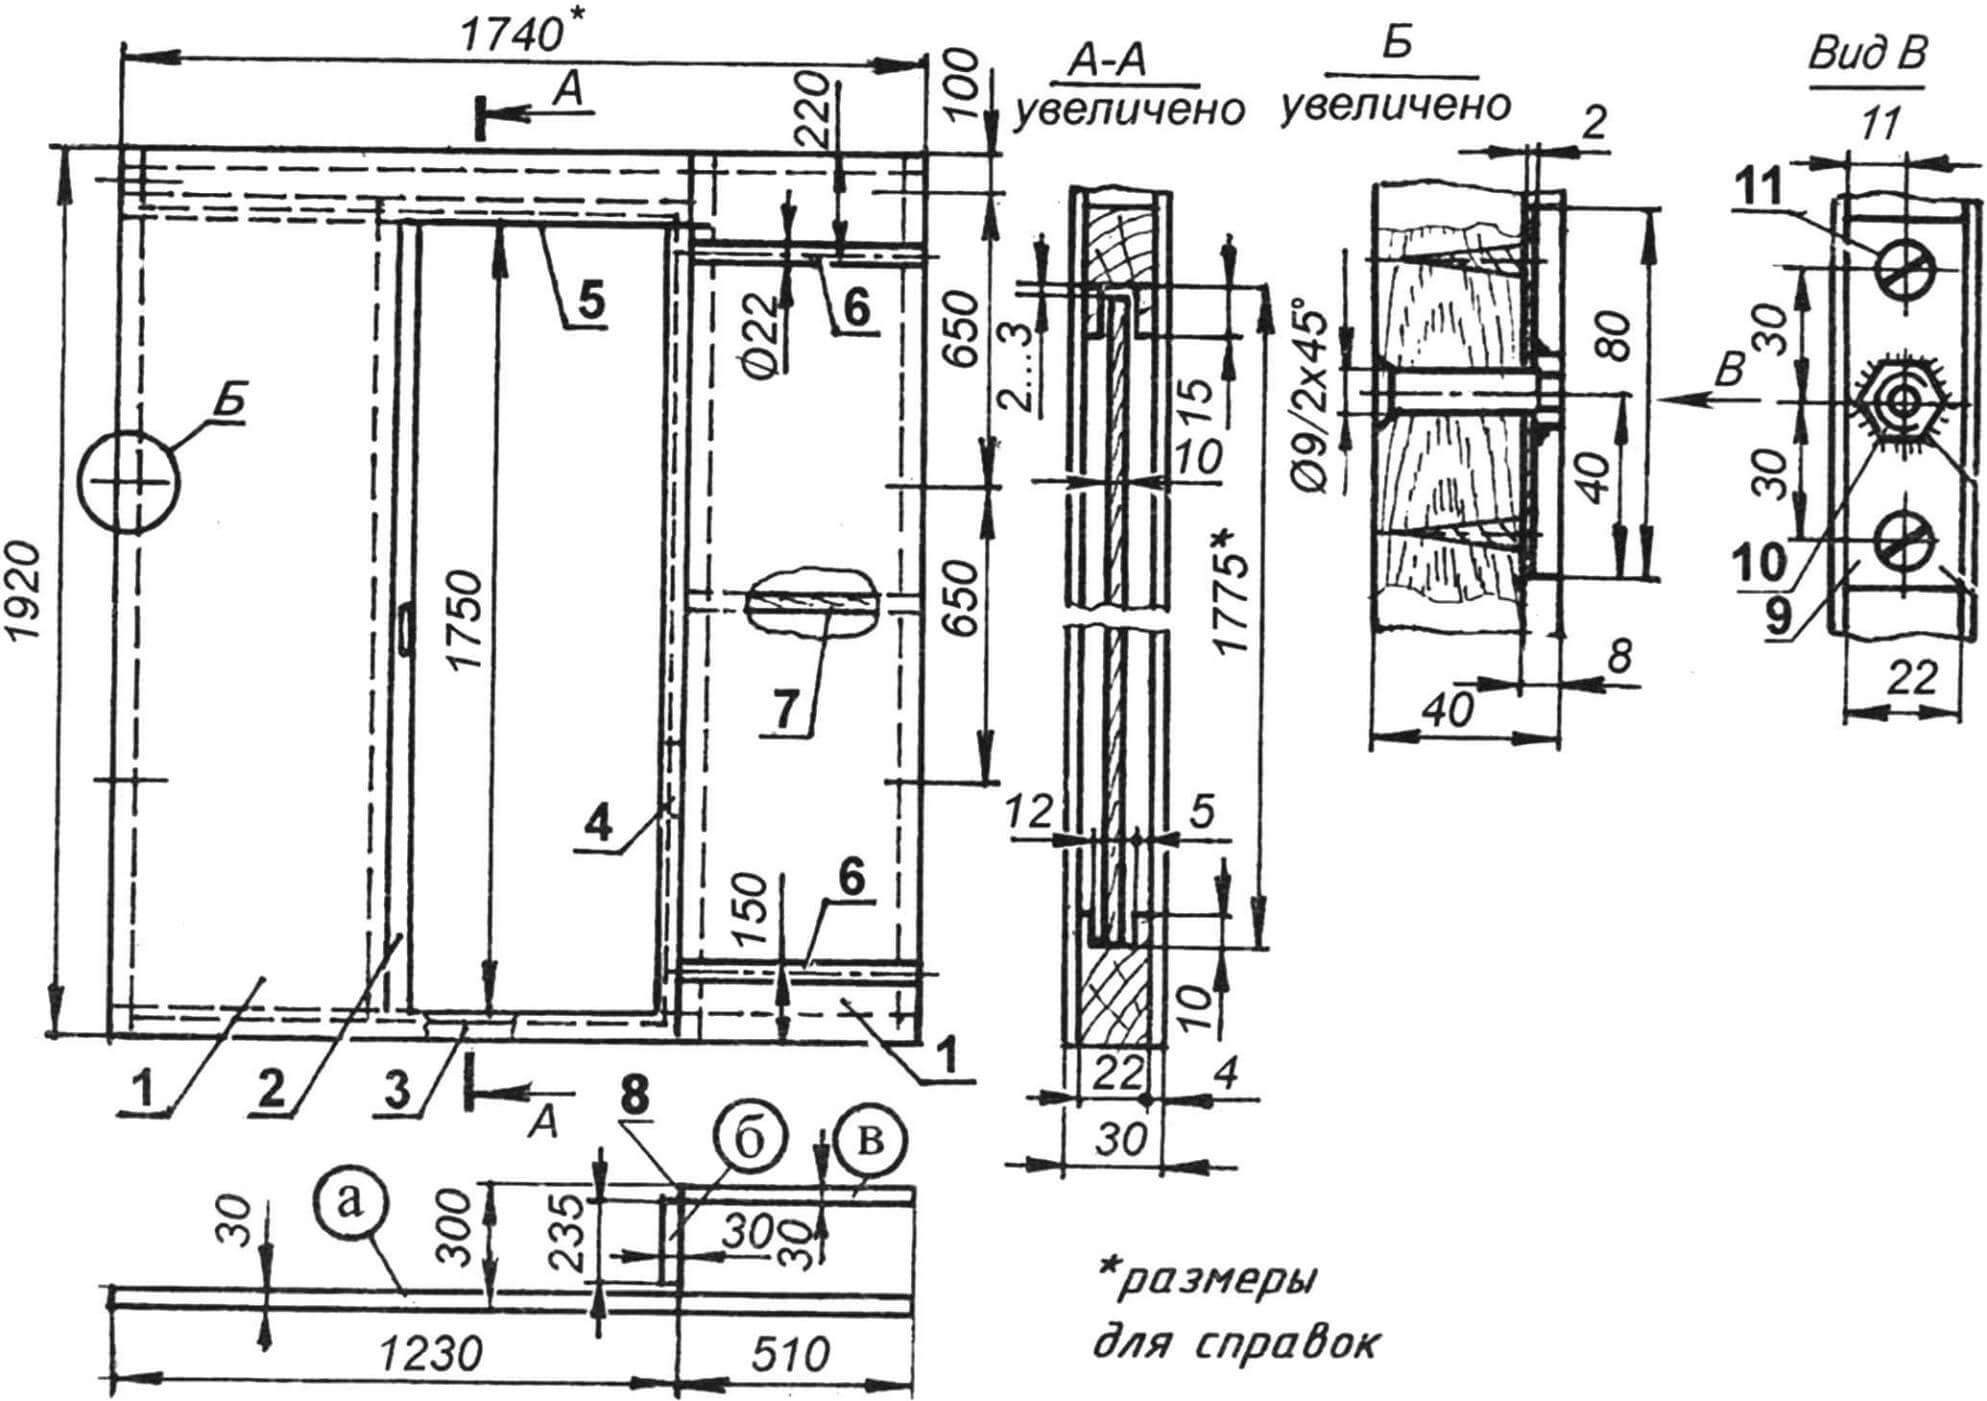
1 – sheathing on the side of the living room (s4 plywood); 2 — door (plywood s10); 3 — doorway threshold (block 40×22); 4 — door jamb (block 40×22); 5 – lintel of the doorway block 40×22); 6 — rods (pipe Ø22, 2 pcs.); 7 — bar 40×22 lattice; 8 – piano loop; 9 — overlay (steel plate 80x22x2, 6 pcs.); 10 — M8 nut (6 pcs.); 11 — screw (5×25, 12 pcs.)
The roof of a dacha also has an important structural significance: it connects all the walls and fixes them in a vertical position. To do this, a groove-groove is made in the ceiling along the edges along the perimeter with a width equal to the thickness of the walls (with small allowances) and a depth of 30 mm.
The dacha is placed in the stowed (transport) position in the following sequence. First, a soft pad is spread on the floor of the trailer, a partition folded in half is placed on it, and blankets and mattresses are placed on top (to a level just above the wheel wells) (or spacers are installed). Then, one to the other, – the halves of the roof turned 90 ° relative to the assembly position. Then the wings are closed (pressed to the end walls) and the side walls and the last – the corner elements are lowered alternately: first the front, and then the rear. Well, at the end, the praise of the M16 feathers of the breath and the rear subframe are fixed to the limit to the limit and through the joint openings.
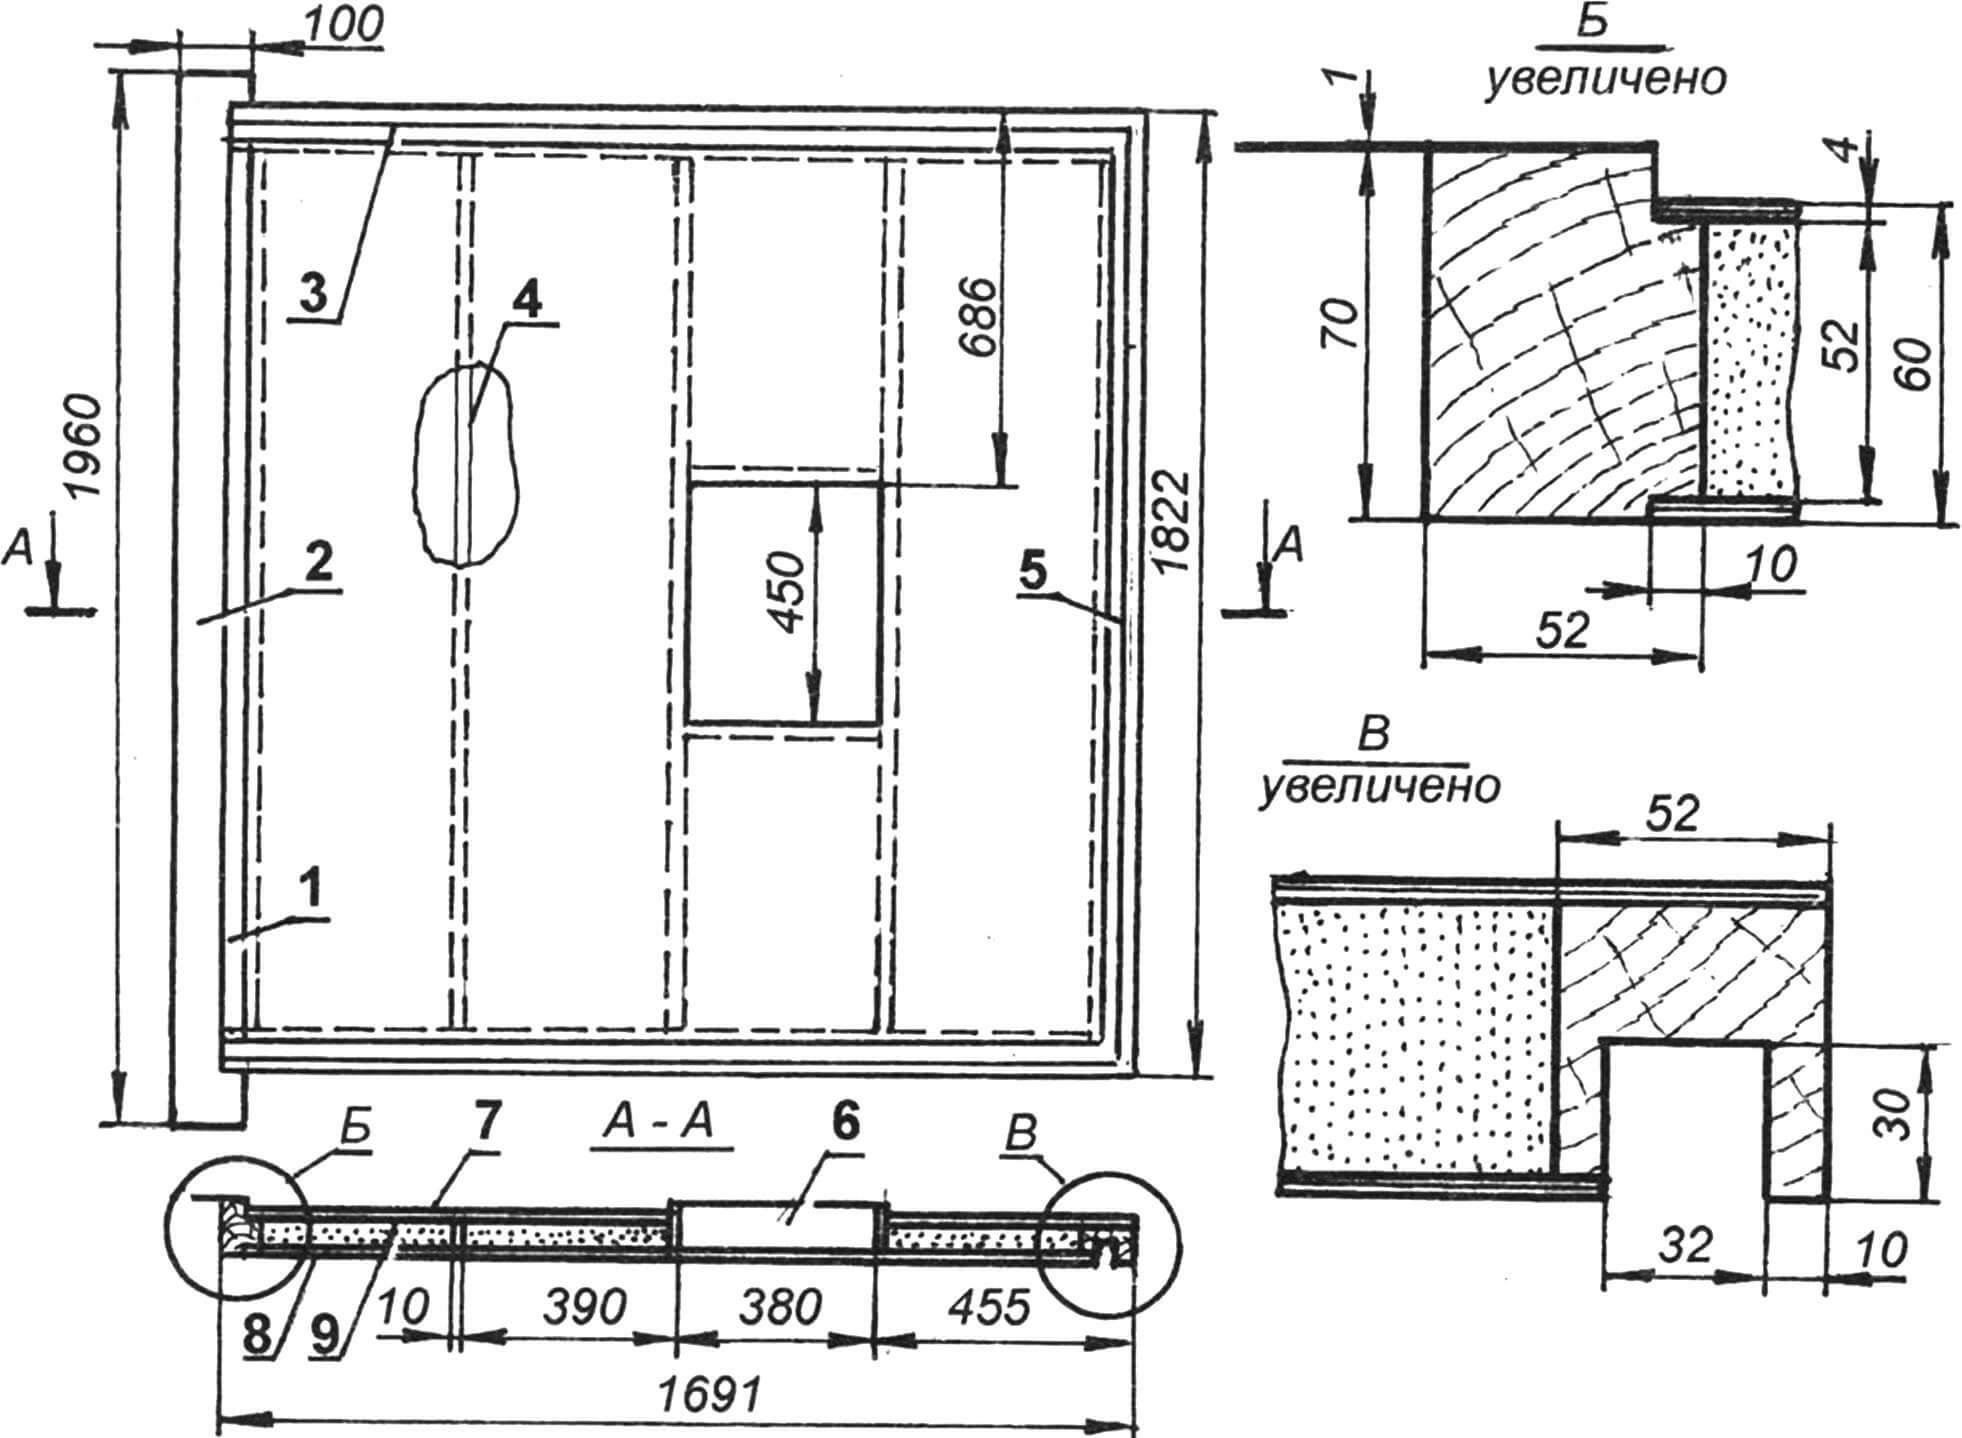
1 – docking beam (beam 70 × 52); 2 – lining (leatherette); 3 – longitudinal groove beam (beam 52 × 52, 2 pcs.); 4 – transverse rib (plywood S10, 3 pcs.); 5 – transverse groove beam (beam 52 × 52); 6 – board (plywood S10, 2 pcs.); 7 – upper sheathing (plywood, sheet S4); 8 – lower casing (plywood, sheet S4); 9-heat-insulating filler (P-40 foam)
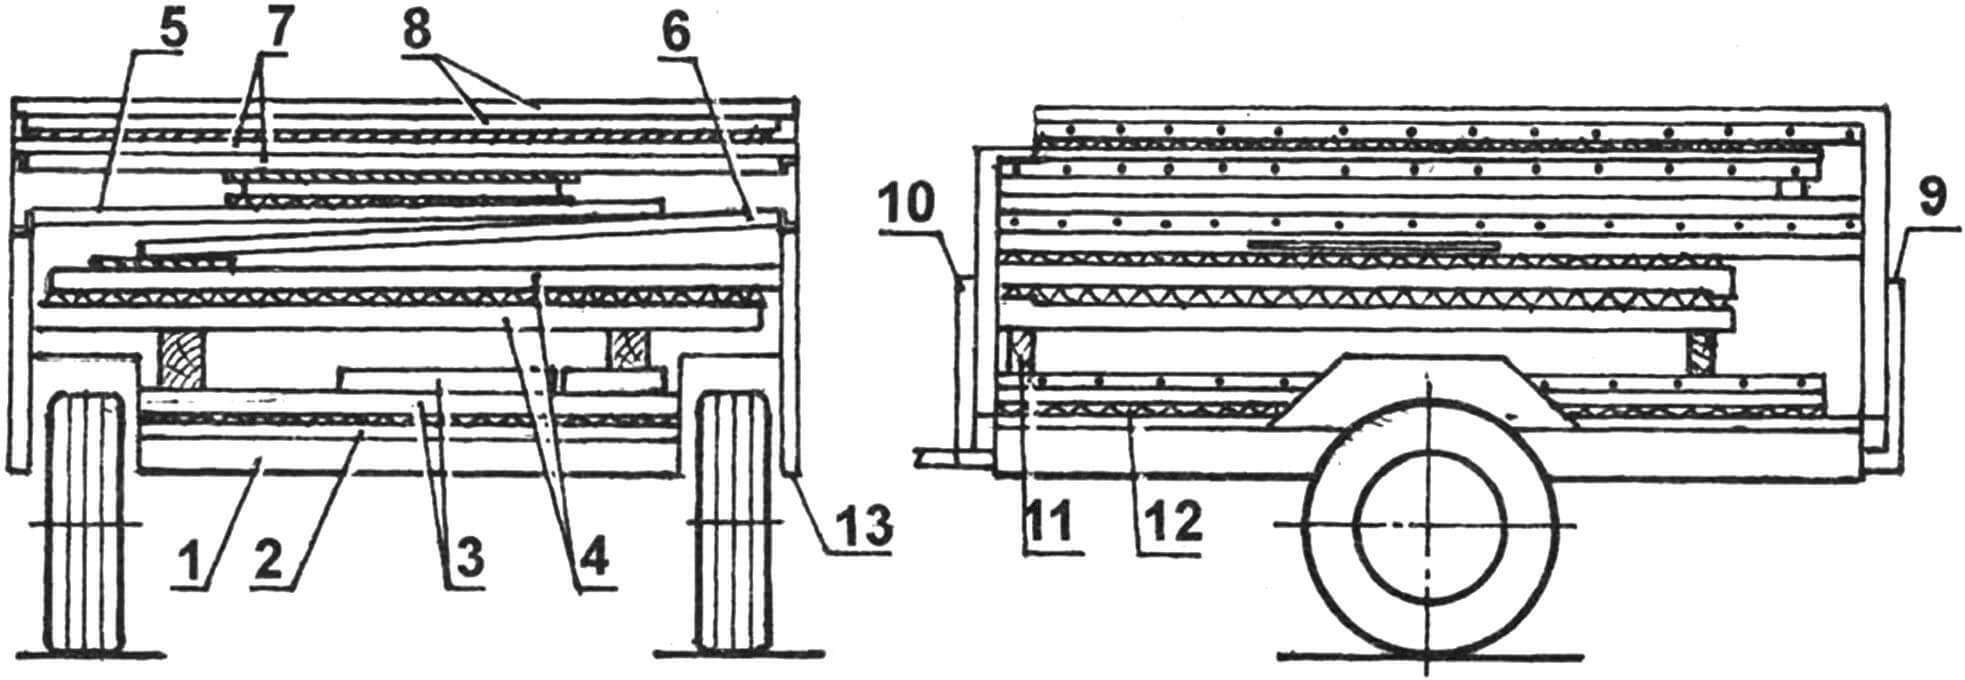
1 – trailer frame; 2 – half a trailer; 3 – double -folded partition; 4 – halves of the roof (rotated by 90 °); 5 – left side wall; 6 – right side wall; 7 – front corner element with folded sashes; 8 – the rear corner element with folded sashes; 9 – the rear subframe in the extended position; 10 – drawn up in a pushed position; 11 – a solid spacer (according to the need); 12 – soft gasket (according to need); 13 – side side
When laying the cottage in the camping position, soft gaskets (or the worn “second” clothing) are laid between the contacting surfaces), and in the intervals, spacers made of soft wood or hard foam. In the cavity and niches between the elements you can add things, inventory, etc.
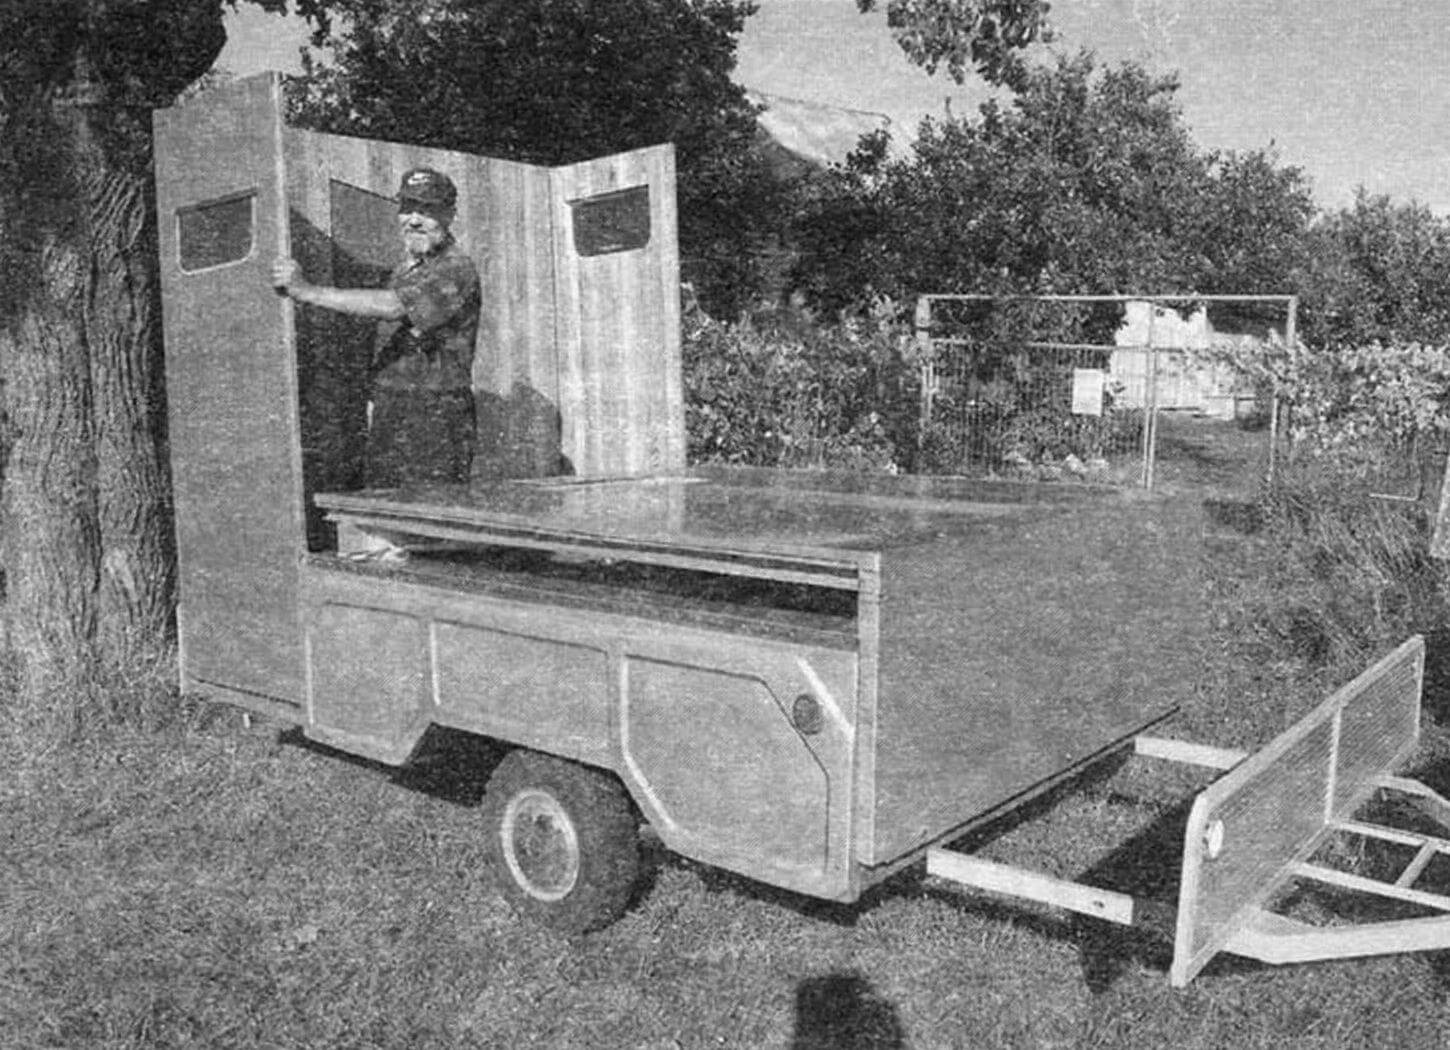
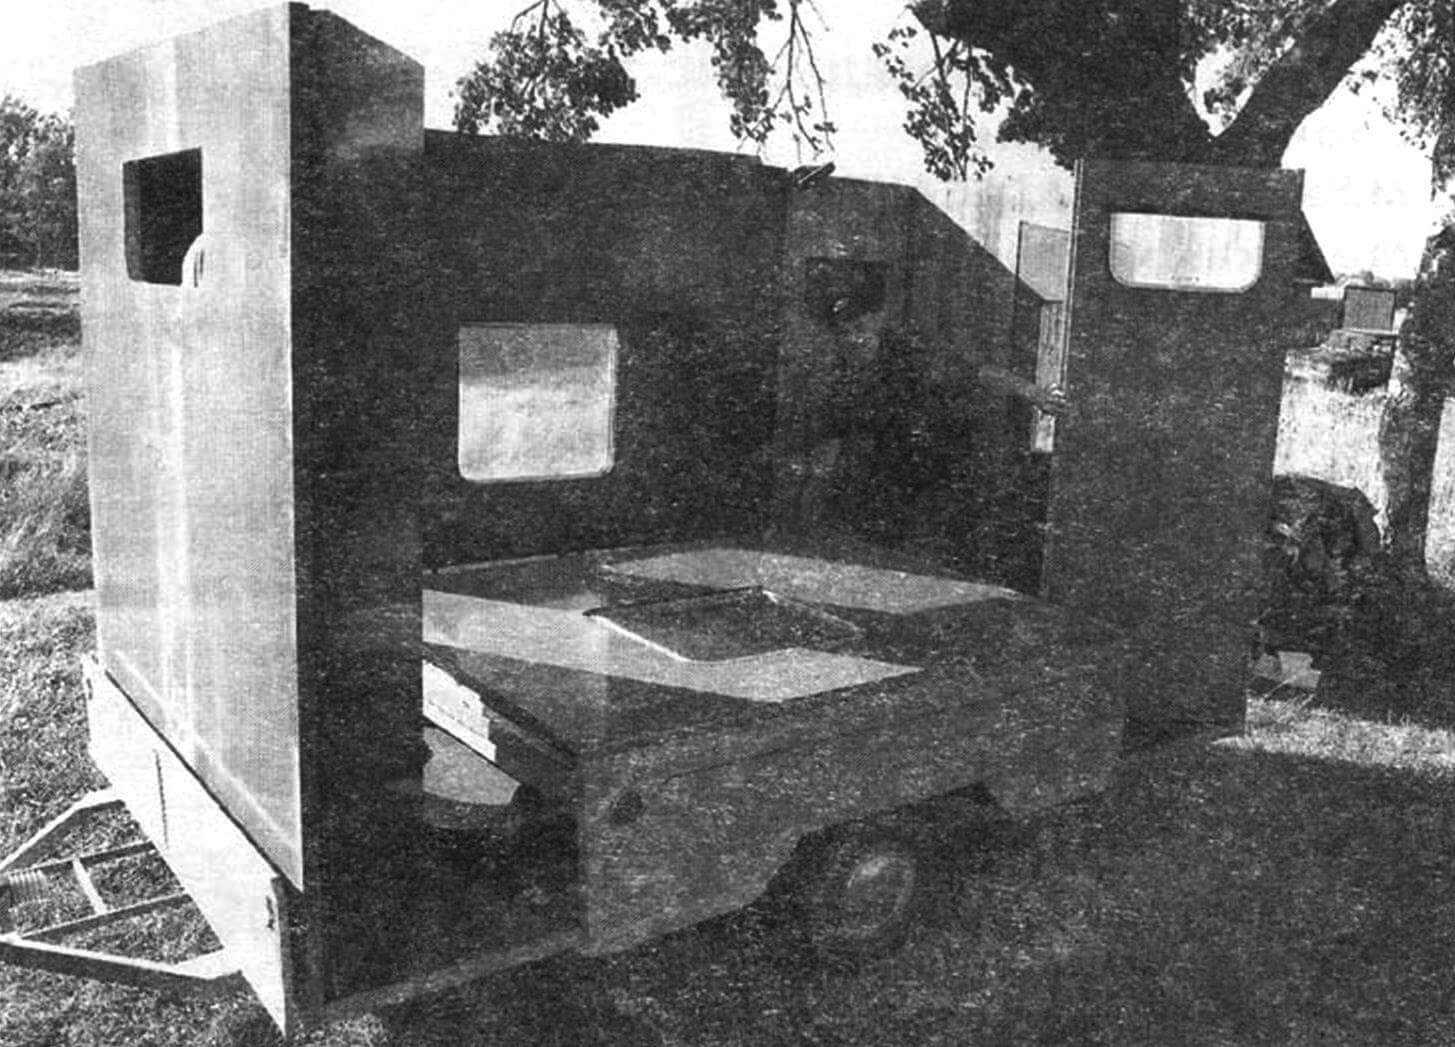
The assembly of the cottage in the working position is carried out, as they say, in the reverse sequence, but with some features. Before this, you need to choose a relatively flat platform, and such that it was pleasant to rest, and the nature of the big damage cannot be applied. First, the bolts in the spar are turned away, the rear subframe is made of them and in a new position it is again fixed with bolts. Stands or jacks are installed at the corners. The posterior L-shaped element that has previously made a pre-“rise with turning” is lowered. Exactly the same operation is carried out from the front side of the trailer – with a breath and a end wall. Next, one of the side walls rises, and the sash presses to it, opening it. The same is carried out on the other side.
1 – side wall; 2 – sample; 3-Fixer bracket (Duralumin Channel)
When performing these operations for insurance, I use P-shaped facial brackets from small segments of aluminum channels to fix the side walls from dumping under the pressure of the wind or from the tilt of the trailer (I remove the brackets during the installation of the roof). After that, the partition is mounted inside the cottage: on the right side it is attached to the M8C bolts to the middle side wall, and from the left – to the posterior sash: then the rods are fixed.
In conclusion from the floor, the first half of the roof (which without a lining) rises (slightly above the walls), rotates by 90 ° (just do not confuse – in which side, otherwise it will have to be rotated by 180 °) and carefully so that the upper edges fall into the groove , fits on the walls. They also act in the same way with a half of the roof, adjusting, if necessary, a waterproof protective lining.
After the installation of the cottage at the angles of the trailer or under the drawbar and the rear subframe is placed wooden pillars or supports from improvised materials. You can use a jack from a set of machine for these purposes. A folding porch or a small segment of the logs edged on the opposite sides is placed near the front door, in order to make it more convenient to enter.
The dwelling is equipped with folding furniture, and the kitchen with a portable gas stove and a refrigerator. In the narrowed part of the kitchen (where the niche protrudes from the dwelling), a pallet is placed and a power shower is arranged.
V. Kolyaskin
Recommend to read
 ANY CLEAVAGE
be easily treated with sandpaper, if you use this wooden rod of suitable diameter. The operation is performed through wrapped around it a piece of sandpaper required granularity.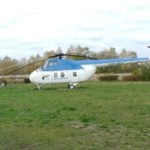 MI-4 “IN VEST”
The appearance in the USSR Armed Forces helicopter Mi-4 with a lifting capacity of 2000 kg originally destined to transport paratroopers, immediately attracted the attention of numerous...
