FULL KVADR

FULL 
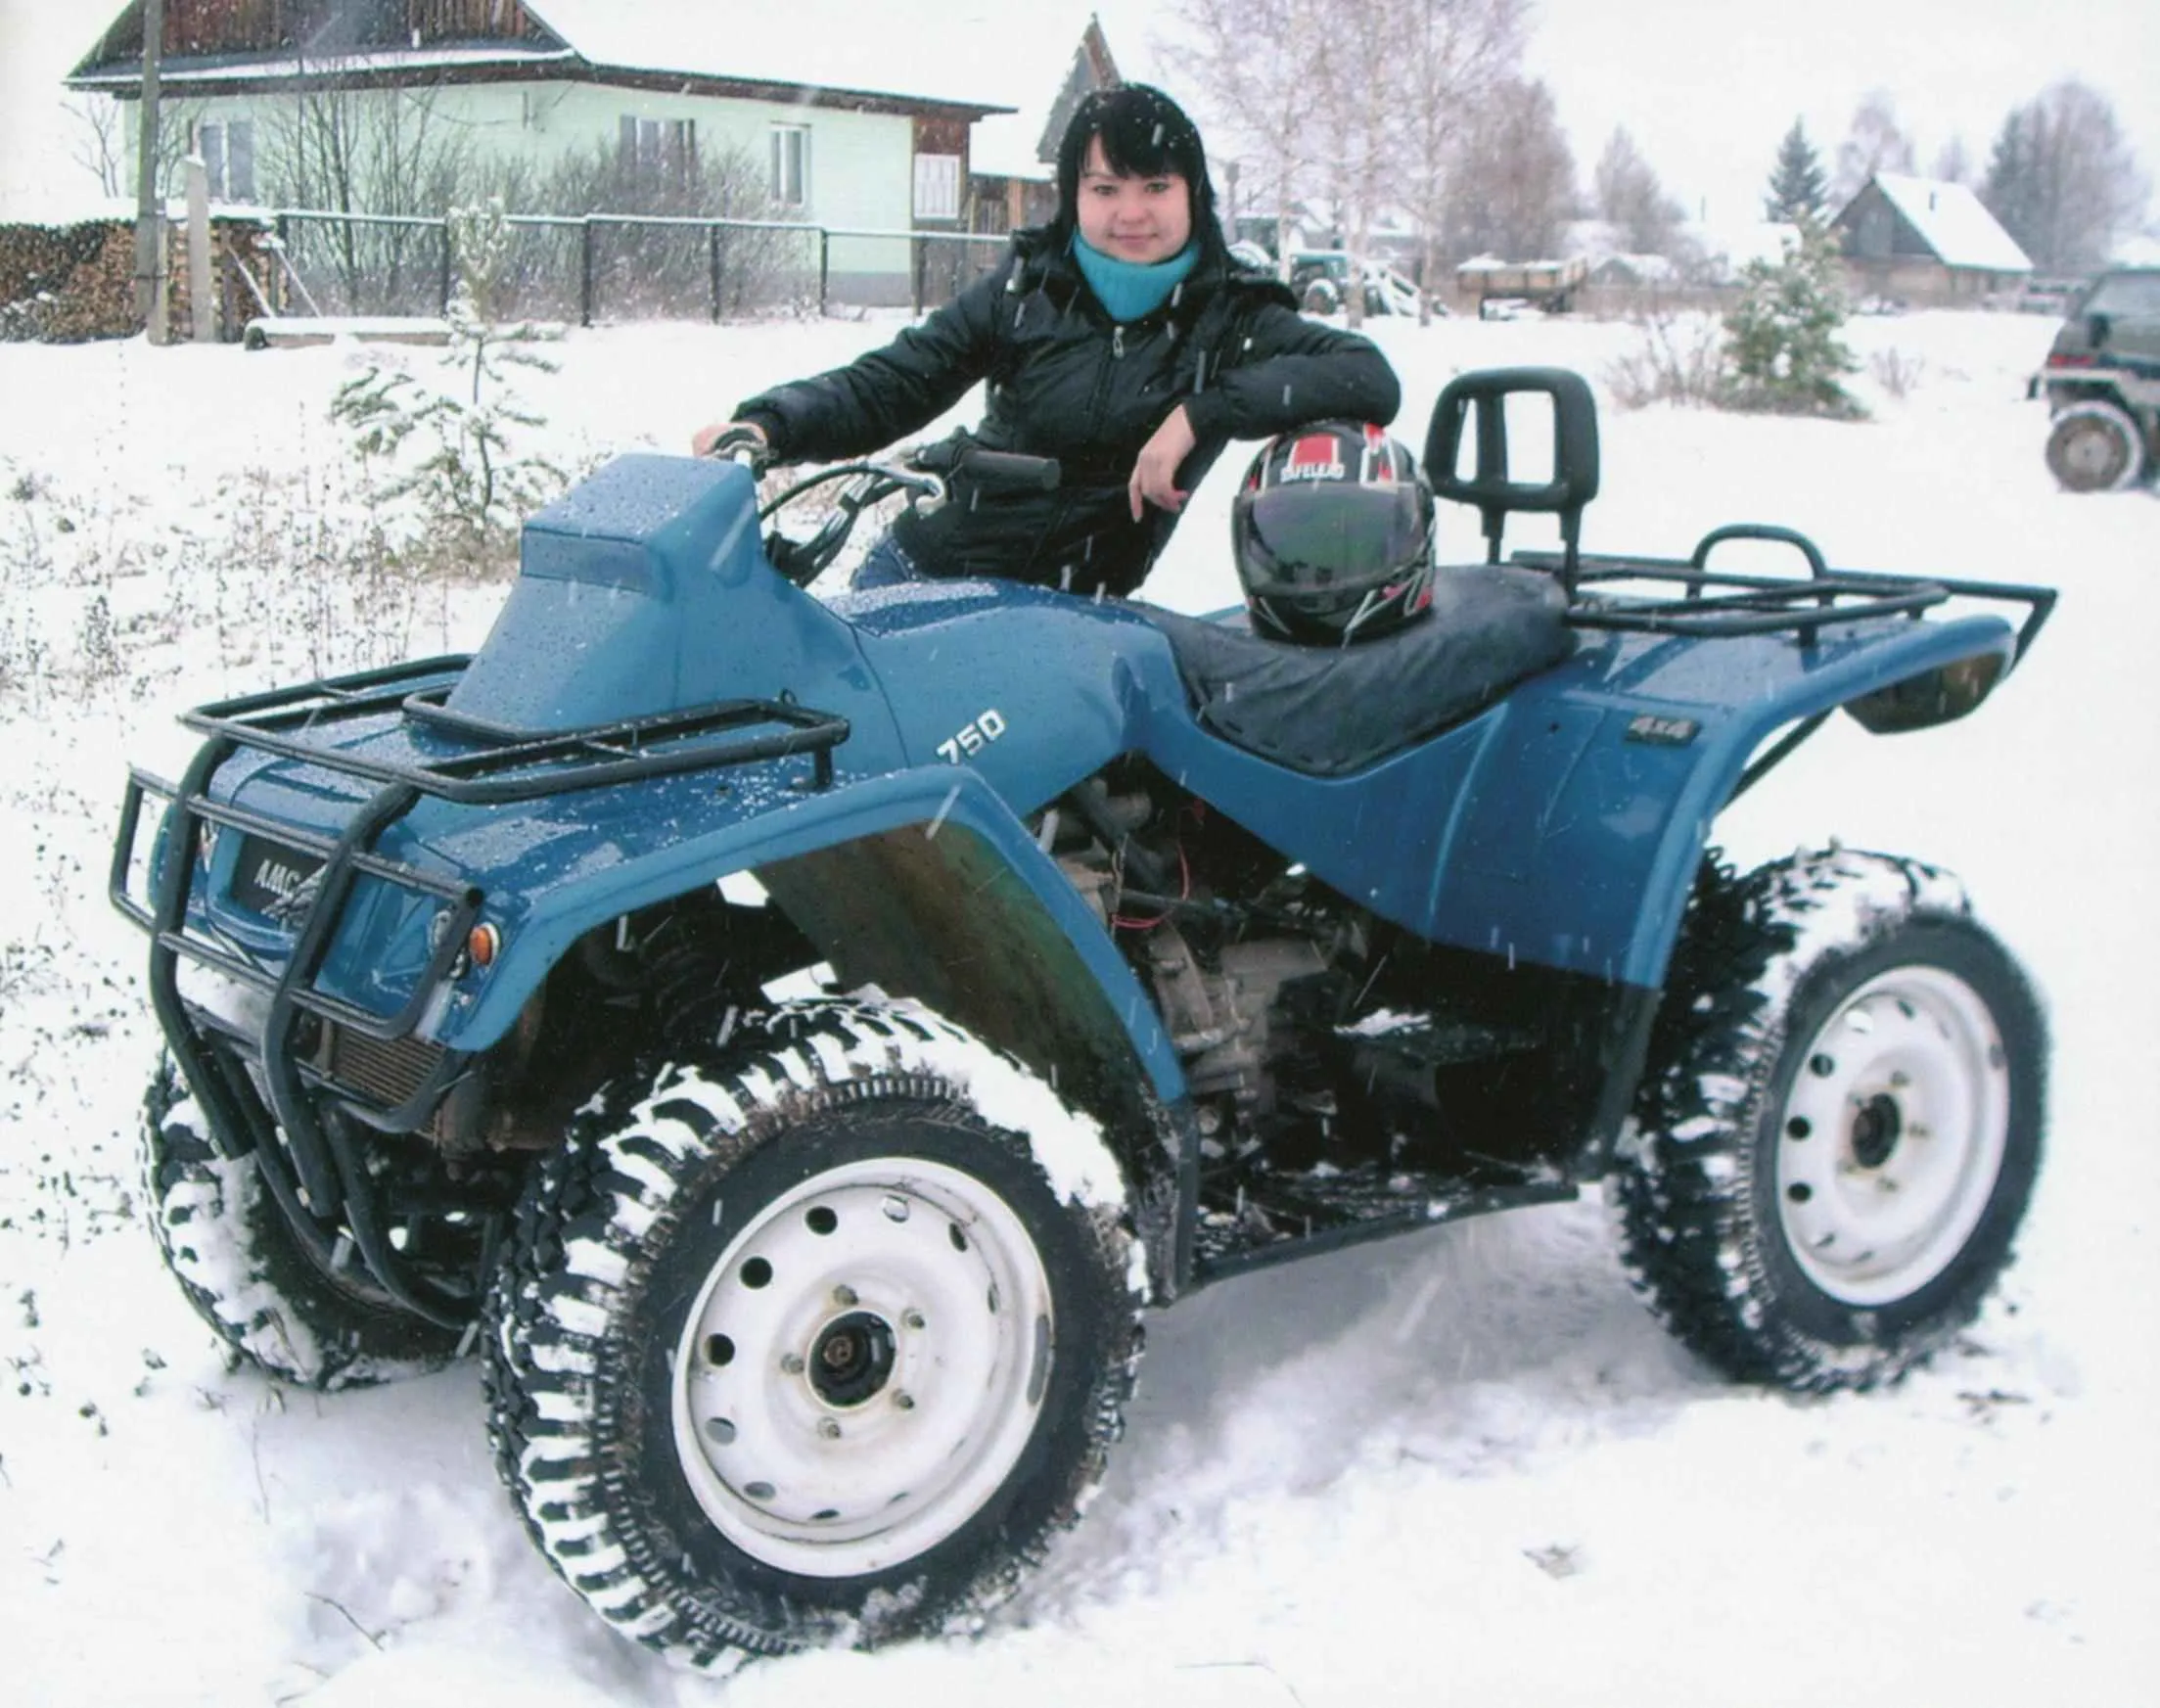
Introducing the ATV, our constant author S. Pletneva from the city of ocher, Perm territory. Once they built the machine indicative of the increased level of development and skills of its Creator. However, judge for yourself…


A year passed since then, when leaving the garage, tried out your first ATV with rear driving wheels (see “M-K” № 6, 2010). And then came the thought and not whether to make the now all-wheel-drive ATV (from the English. All Terrain Vehicle — ATV; this international designation received a similar machine).

Fortunately, this time turned up a buyer for the buggy (see “M-K” № 1 for 2010), and the money went to a new project.

Quad bike ATVYear of work for 3 — 4 hours after work and on weekends — and the new machine was ready for testing, there was only a small (and I would say enjoyable) revision: connection of lighting equipment, installation of ignition lock, rear view mirrors and other stuff.

Power unit for my ATV was the engine from the car “Oka” is a 32-horsepower, two-cylinder, four-stroke, liquid-cooled. And if for a car of its power was often not enough, for kvadratika should be enough with a vengeance.


The machine frame is spatial, welded. Its basic elements (two pairs of members: upper and lower) are made of circular tubes of the type VGP-25 (water and gas supply tube 25 mm in diameter with a wall thickness of 3.2 mm), minor (struts, crossmember, etc.) of VGT-20. Spars — bent: the lower horizontal, upper — vertical. Bent pipe by bending, “the cold.” Eyelet (pair of ears) for mounting levers and suspension was welded to the frame directly, and various brackets — installation of components and assemblies (“place”).

Quad bike ATV

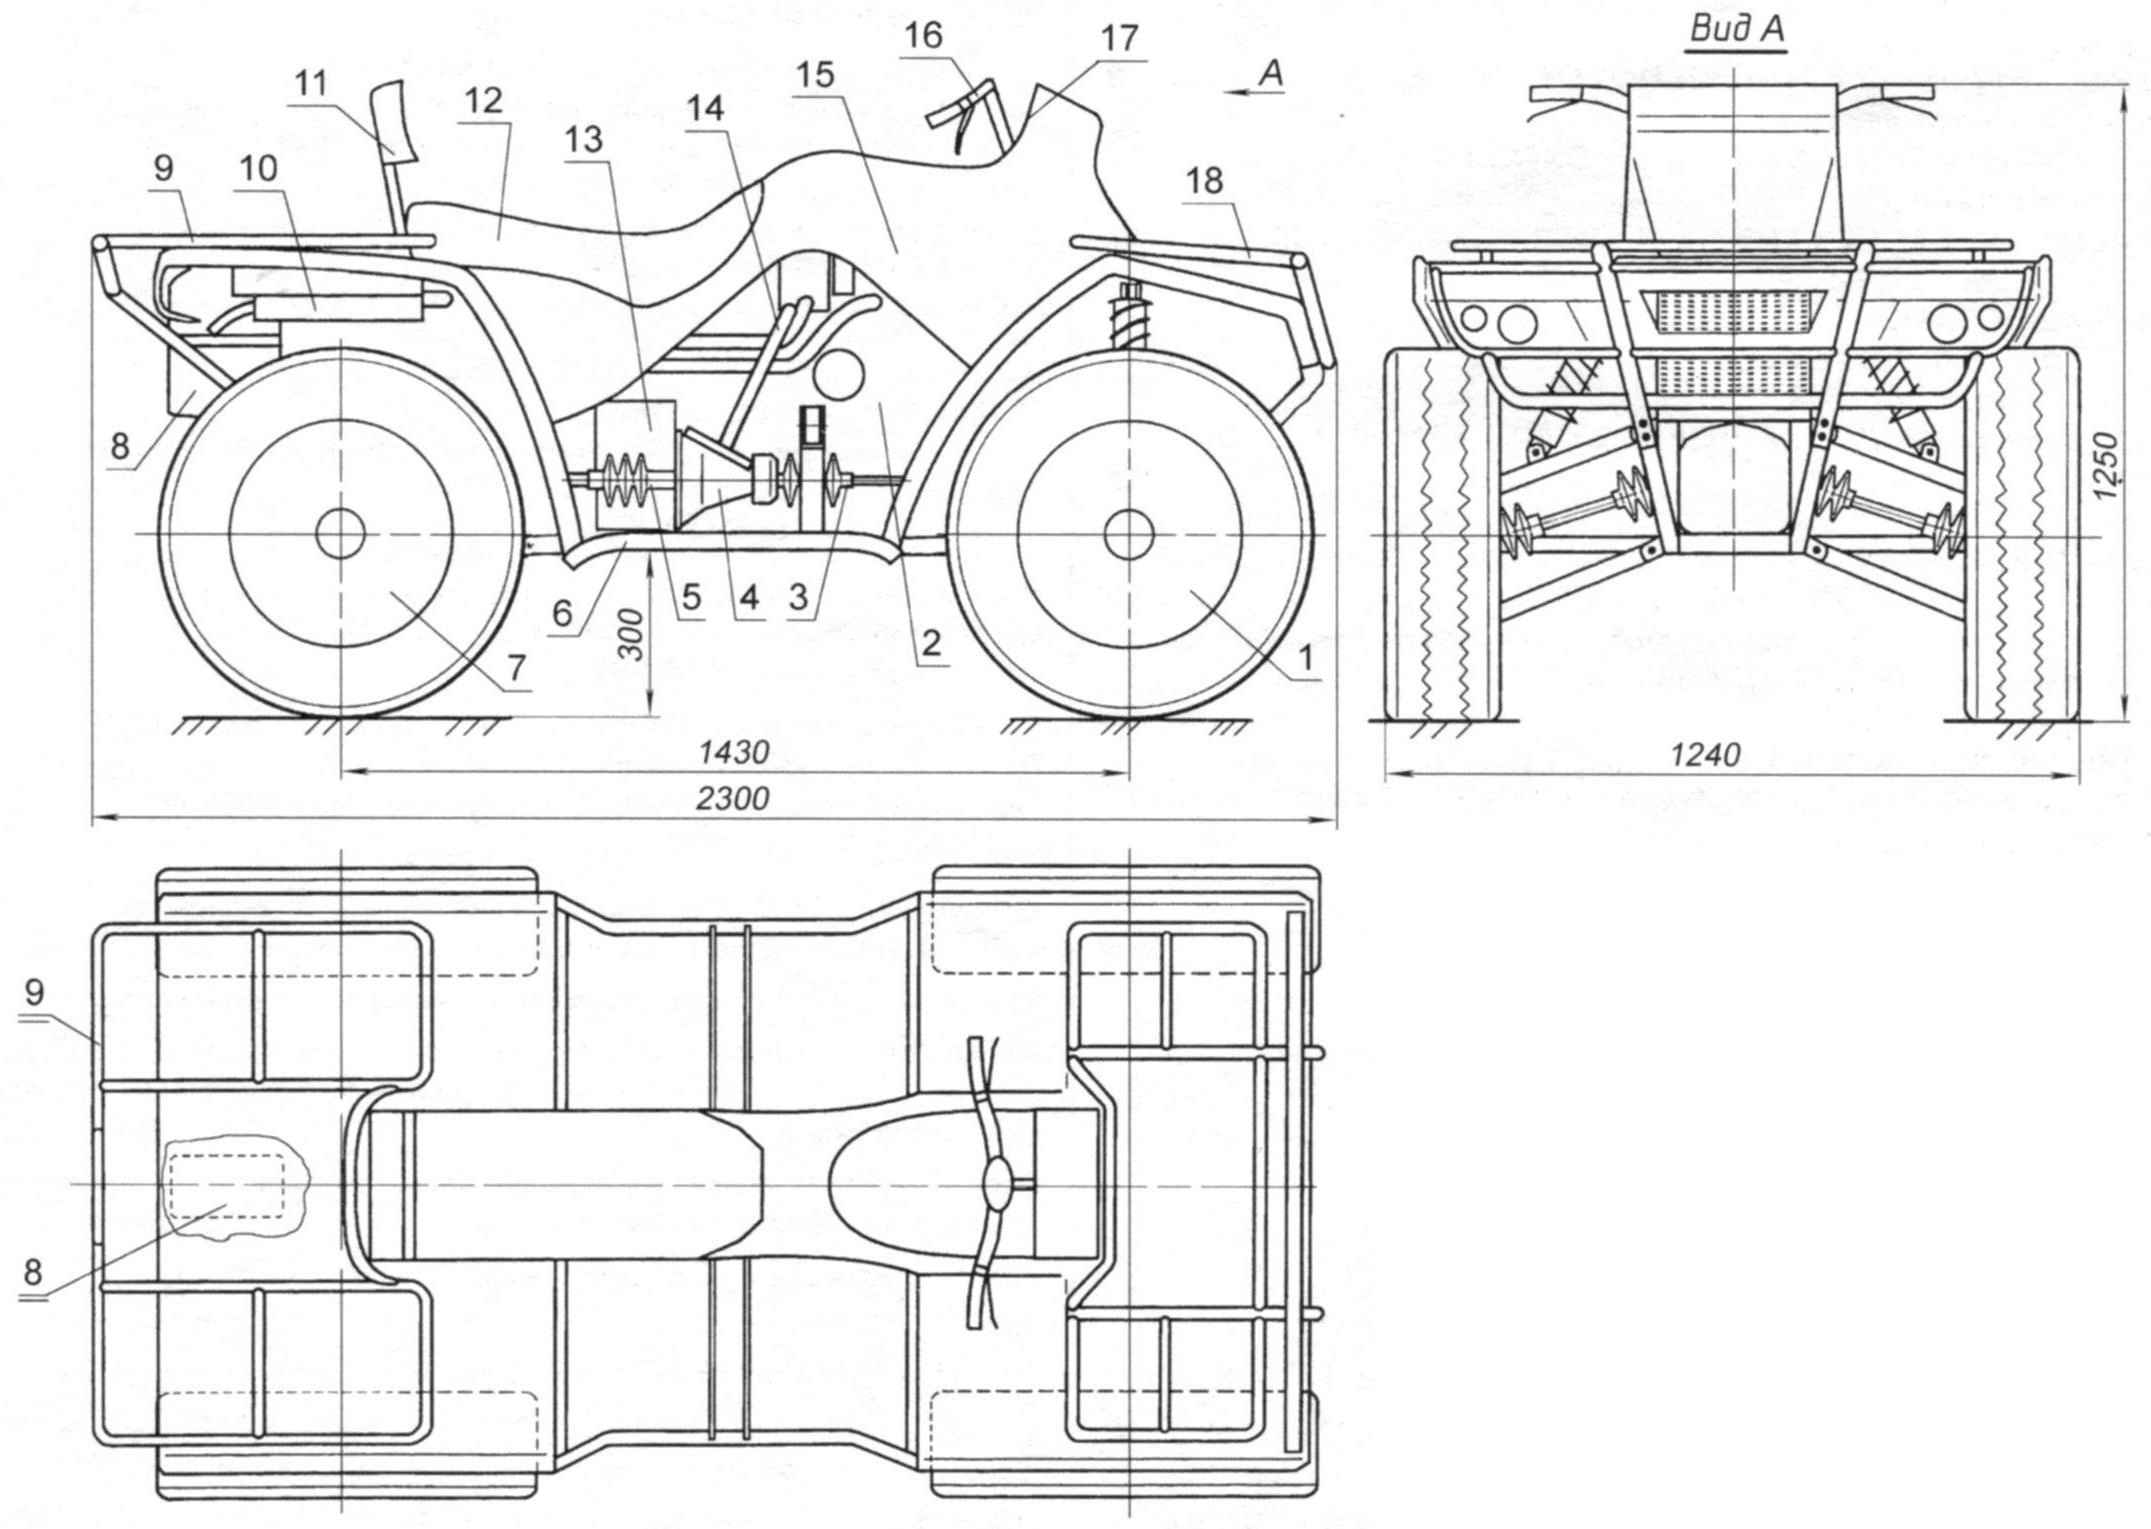
ATV-all-terrain vehicle:

1 — front wheel (of the car “Chevrolet-Niva”, 2);

2-the engine (from the car “Oka”);

3 — drivetrain front wheel drive;

4 — gear shift (from the car “Oka”);

5 — transmission drive rear wheels;

6 — frame;

7 — rear wheel (from the car “Chevrolet-Niva”,2);

8 — fuel tank (20 litre canister);

9 — rear trunk;

10 —damper;

11 —spinal focus of the passenger (the headrest from the car “Oka”);

12 — saddle;

13 — clutch basket (from the car “Oka”);

14 — lever transmission;

15 — body kit (fiberglass);

16 — the wheel (from a motorcycle “Ural”);

17 — instrument panel (from the car “Oka”);

18 — front trunk


Transmission of vehicle — a kind. Although the car is four-wheel drive but transfer case in it. As you know, in “eye” the engine is located transversely, but on the ATV it is installed along. This allowed us to direct the output shafts from the gearbox (transmission) is not on the right and the left wheel (as in car) and the front and rear axles. That’s only the powertrain mated to the basket of the clutch and transmission had to be shifted relative to the longitudinal plane of symmetry a little to the left to decrease the horizontal angle of the longitudinal hinge shaft of the transmission. Well, their vertical angles were thus small.

Quad frameComposed of transmission units of different domestic cars, mainly for VAZ models. And ready-made industrial units also had to be refined. For example, the CAT (“Oki”) for optimal (reduced) speed and increase the torque of the main gear removed a few and replaced it with chain transmission. The shaft also made the other elongated, with releases on both sides of the checkpoint. The rod can be fixed in three positions: to activate 1st and 2nd gears, 3rd and 4th and back. The lever of a choice of these provisions is on the right side, and the shift lever with the left hand.

Millennia gearboxes — rear axles the VAZ “classics”, but their axles along with socks removed and replaced with shafts with constant velocity joints from the front-wheel-drive models. CV joints as hinges used in the other intermediate shafts trasmission.

Kinematic diagram of the transmission of the Quad-cycle-Rover

Kinematic scheme of transmission, the Quad-cycle-ATV:

1 — motor (from the car “Oka”);

2 — the clutch (from the car “Oka”);

3 — gear shift;

4 — joint (from VAZ-2108, 12 PCs);

5 — gear main gear with the differential (from the VAZ-2105, 2 EA.);

6 — shaft (from VAZ-2108, 6 PCs.);

7 — the wheel (from the car “Chevrolet-Niva”)


Low gears and locking differentials no.

ChassisSteering — motor type (lever and shaft) at the top and automobile type (steering rods) below, only simplified, without steering gear, with one fry. The wheel first used a motorcycle “Minsk”, with a diameter of 22 mm, but it was a little bit thin. Later found and put a motorcycle “Ural”. Steering shaft — pipe with a diameter of 20 mm and a wall thickness of 2.8 mm. At the lower end it has a stopper. At the bottom of the shaft rests on a thrust bearing, and in the mid-section is rotated in detachable nylon bracket-bushing.

The bipod is made of steel sheet of 8 mm thickness according to the shape resembling the letter “T”. At the edge of the “rack” is a hole with a diameter of 20 mm is inserted and welded the steering shaft, and in the ears — conical hole under ball end steering rods. These holes are reinforced with suitable welded washers. Bipod lugs slightly bent down so they were almost parallel to the tie rods.

Wheels — 15-inch, from the car “Chevrolet-Niva”. Tires with the appropriate bore diameter sizes are 205/70 (width/ height in percentage of width) with off-road tread pattern. The diameter of the running wheel is about 660 mm.

Frame quadricycle

Frame kvadrotsikla:

1, the lower spar (tube d25x3,2,2);

2 — top side rail (pipe d25x3,2,2);

3 — front (tube d25x3,2, 2);

4 — support the rear upper control arm (pipe d25x3,2,2);

5 — rear brace (pipe d20x2,8, 2);

6 — pole front upper suspension arm (pipe d25x3,2, 2);

7 — front brace (pipe d20x2,8, 2);

8 — upper support front shock absorber (the area 35×35);

9 — front upper support front shock absorber (sheet s5, 2 PCs.);

10 — front strut support mounting engine (sheet s3, 2 PCs.);

11 — rear support strut mounting engine (sheet s3,2 PCs.);

12 — eyes of fastening of levers and shock absorbers suspension (sheet s5, 18 pairs);

13 — bracket saddle (sheet s3, 2 PCs.);

14 upper cross-connection (pipe d20x2,8);

15, the lower cross-connection (pipe d20x2,8,2);

16 — radiator support (steel d25x3,2 cut lengthwise in half 2 PCs.);

17 — front console footrests (pipe d20x2);

18 — rear console rear (tube d20x2);

19 — relationship of the front and rear consoles, rear (tube d20x2);

20 — cross bar foot pegs (sheet s5, 4 PCs.);

21 — eyelet fiberglass body kit (sheet s5, set)


Wheel suspension — independent, on two triangular wishbone each (upper and lower) with shock absorbers from the car “Oka” (front). The levers are made of welded round pipes of type AIV-20. Elastic elements (springs) and dampers from the car “Oka” (rear). In the wheel ends of the front levers welded on the wheel hubs and steering knuckles from the car VAZ — 2109. And those and others had to be refined. Hub mounted studs under the wheels from the “Fields”, and in front with fists — a homemade swing arms.

Silencer — homemade, two-piece. To avoid temperature warping body kit covered his remote cover, and the inlet pipe insulated with asbestos.

Kit ATV — fiberglass. Villeval was his first, and therefore first examined the guidelines for the implementation of relevant works. But as it turned out — this process is tedious, although the result is worth it.

Suspension arms of the wheels

The suspension arms of the wheels

(a — upper front control arm; lower front control arm; lower control arm rear suspension; d — upper-arm rear suspension; all the parts except especially noted, is made of pipe VGT-20):

1 — beam (2 PCs.);

2 — cross member;

3 — sleeve (pipe d37x32, 2);

4 — eye of the shock absorber (steel, sheet s3);

5 — ball joint (tie rod end car “Lada”)


First produced from steel square tube section 10x10x1 mm required contours of the body kit. The benefit of this pipe is easy to bend even by hand through the knee. Contour welded to the frame with jumper wires from the same pipe, in places where later (after vyklicky body kit), it would be easy to “tack” to cut. Then curved of hardboard (fibreboard) wings and fixed them with screws to the circuit and the jumpers. Where the bending was cool, he is attached to separate strips from the same hardboard. The front led ne-Napolitano purchased at the hardware store. You can use the foam or the same foam, but the Styrofoam proved to be more suitable material — good cutting thin sharp knife. The individual elements of it pasted in the General design on the mounting pins.

Steering column Assembly

Steering column Assembly:

1 — steering shaft (pipe d20x2,8);

2 — plate connection wheel (steel, sheet s6);

3 — brace plate (steel, sheet s6, 2 PCs.);

4 — plug bracket-steering shaft bushing (nylon, sheet s18);

5 — supporting washer (steel, sheet s6, 2 PCs.);

6 — fry (steel, sheet 18);

7 — a stopper of a wheel (steel, sheet s6);

8 — bearing housing;

9 — resistant tip (steel, lap 15);

10 — thrust bearing


Falshback complex forms. Bend it from the hardboard was not possible. Therefore, shaking his motor with plastic wrap, filled with layers of foam designed for him. After each layer — drying mandatory, otherwise a thick volume of foam may not be dry inside. Filled as long as the layers are not left outside the contour. Finally after complete drying of the foam was knife deduce the desired shape. Faces make amends coarse-grained emery paper.

Replacement gear set main gear to the chain with a transmission ratio i=2,3Under the instrument panel to go in the course of the dashboard of the Oka. Fastened it on the disc too with the foam. Since the large-pore foam and the pores are filled with gypsum, and then processed. When the blanks started to answer conceived design and its surface was more or less smooth, coated workpiece paint PF-115. Since I was not going to make a blockhead matrix for vyklicky body kit, and immediately villeval on it the kit, with the subsequent finishing of the surface before the plaster skim coat and painting nerd could be neglected.

Making fool to vyklicky body kitSo fool and ready to be applied to the wall of a quality product required: 10 kg epoxy resin, 1 kg of plasticizer to her and atverti 1 kg-calves, 15 meters not thick fiberglass, 5 meters of glass Mat, paint brushes, gloves. It is very desirable to work in the media, protect breathing. And the more expensive it is, the more reliable. But the experience, as it is known, can not buy, so I typed it in the process.

As a separation layer between the dummy and the product used transparent duct tape. Carefully, without gaps pasted it strips the whole boob. Took only 1.5 roll of wide tape.

A"dummyThe resin was dissolved in 200 — 300 grams of hardener and a plasticizer. Used measuring cups and syringes, which is not very convenient. Prior to this, cut strips of fiberglass such size that the flat surfaces lay large canvases, and on uneven sections of tissue were able to repeat them without making folds. By the way, fiberglass is moderately stretches diagonally weaves, “wrapping” the desired shape.


First, slathered thickly with epoxy one part nerd, imposed on him and on top of fiberglass impregnated with resin again. The adjacent piece of fabric glued on the same technology with an overlap of 3 — 5 cm had to Work fast — resin harden fairly quickly, and the higher the temperature, the faster. Yes, even the resin a little bit heated near to a powerful lamp lighting for best yield.

After alkaki boob fiberglass in one layer, started to glue it with glass Mat. The glass Mat I got is thick enough, and it was good to gain thickness. But he never hugs bumps, so I used it only on even (or uncool deflection) surfaces, and without overlap. Impregnation with resin was carried out in the same way as when working with fiberglass. Just keep in mind that resin for impregnation sakamato out very much, so dilute it need more. Uneven surface after a label sakamato was taped in several layers of cloth. Each subsequent layer was applied after a little clutch previous to flowing the resin. And since the process of veclachi Dodgers took not one day had after day break “serawit” the surface of a large emery paper and degreased, because the resin during this time it is cured completely. The final layers on top of the Mat again covered with fiberglass, and not even one layer.

The trunk: a — front; b - back

Racks:

a — front; b – back


As the surface I needed, as they say, the smoother the better, and the experience was not enough, the dips and holes still remained — where they filled one with resin and overlay pieces of fiberglass. Resin had not enough. Have already bought in hozmage, in boxes. To work with her like me more, since it is already packaged, and it only remained to mix the components. And she was drying faster than the acquired firm.

Painted blue After complete drying of the laminated body kit made it cuts, dividing the product into three parts: the hind wings and the tail, fallback with podseleniem, front fenders and front end. Carefully, gently prying and pulling by hand, podkovyrova, separated the product in parts effortlessly from the boob.

Now, removing parts, began to process them individually, leading to the desired result. In General, the ordinary preparatory and painting work on the “entire” technology: first, coarse grinding with the removal of large bumps, the resin and fiberglass; then laboriously sealing putty with fiberglass recesses; further grinding the outer surface of the primer with a plasticizer. In conclusion, the painting “metallic” and lacquered with a plasticizer.

Fool too neatly cut and placed into the far corner — just in case. Kit attached to specially made and welded in place to the mounts on the frame.

In conclusion, welded thin wall steel pipe outer diameter 20 mm, front and rear racks, and in addition to them — “connectors” replacement bumpers.


Basic data of ATV:

Weight, kg…………………………………………430

Length, mm………………………………………2300

Width, mm

(on the outside sidewalls of tires)………1250

Height, mm:

on the steering wheel……………………………………….1250

seat………………………………………..900

Ground clearance, mm…………………….300

Base, mm…………………………………………1430

Track, mm………………………………………1045

Maximum speed, km/h…………….65

Sergei PLETNEV, the city of ocher, Perm Krai

Recommend to read

  • ARMORED CAR USA HUMMERARMORED CAR USA HUMMER
    After the First world war, the car confidently entered the arsenals of all armies, effectively replacing cavalry units and horse-drawn vehicles at the same time with the advantages of...
  • HANDHELD VACUUM CLEANER…HANDHELD VACUUM CLEANER…
    This kind of "vacuum cleaner" uses the property of plastic to electrify the friction of the fabric. And the device it is very simple. In the lid of a conventional soap dishes, cut a few...