Performance characteristics:
Year of adopting — 1942
Wing span, m — 10.00
Length, m — 8.50
Height, m — 2.75
Wing area, sq. m — 17.15
Empty weight — 2490
Weight takeoff — 3010
Engine type — M-105PF
Power, HP — 1180
The speed of the earth — 514
Speed at altitude — 570
Practical range, km — 645
Practical ceiling, m — 9900
Weapons
20-mm ShVAK cannon, 12.7-mm UBS machine gun (2 PCs) Bomb nigrescens RS-82 or 2 bombs from 25 to 100 kg each.
THE COLOR OPTIONS IN THE YEARS OF THE GREAT PATRIOTIC WAR OF 1941-1945.
THE YAK-7 B
from the composition of the 271 IAP/64гиап, which in the spring of 1943 was flown by senior Lieutenant V. Y. hasin.
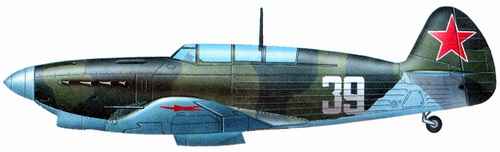
YAK-7B
Khabarovsk. The spring of 1942. The upper surface is painted in green and black colour, bottom – in blue-gray. Tactical number white. The inscription on the fuselage red with white trim.
THE YAK-7 B
Pilot – A. V. Chirkov. Summer 1943, the Upper Surface is painted in green and black colour, bottom – in blue-gray. Tactical number white.
THE YAK-7 B
GvIAP. Kuban. 1943 Upper surfaces painted in green and black colour, bottom – in blue-gray. Tactical number and the fin tip is white. Spinner and emblem, white and red.
THE YAK-7 B
434 IAP pilot tbsp-T. V. Orekhov, Stalingrad, September 1942. The upper surface is painted in green and black colour, bottom – in blue-gray. The nose of the fuselage red. Tactical number white.
THE YAK-7 B
Trophy instance. The test center of the Luftwaffe. Rechlin, Germany. 1943 the Paint on the hood is almost all gone.
YAK-7 AND
Kalinin front. Spring 1942
The upper surface is painted in green and black colour, bottom – in blue-gray. Tactical number in yellow. On rudder visible remnants of white paint.
Assembly instructions:
This model can be performed in two degrees of difficulty easy and hard. Severe involves the installation of machine-gun nish with machine guns, transparent cockpit, cabin equipment, the niches of the chassis and the chassis is released. The model also can be made movable elevators, put them on the axle.
Before working, you need to prepare the workplace and tools. The workplace can serve as a clean, flat surface. The tools you will need: scissors, cutter (blade), awl, markers (paint) to touch-up the ends of parts as well as staples (wire) for the axles of the landing gear and attach the wheels, toothpicks and a pencil, which is easy to tighten from paper thin tubes, and glue, preferably PVA. For bonding of certain elements, for example, transparent canopy, need superglue. Some details are better to cut with the cutter that can be drawn from the chip saw blade for metal or blade. To do this, cut the blade shear, as shown in Fig. 10. In the manufacture of the cutter, and it must be very careful. Children to operate the cutter it is desirable only in the presence of adults.
When the working place and tools are ready, you can begin to assemble.
Assembly screws and fairing screws
The propeller is assembled from the parts 34,35. Det. 35 – the basis of the blades, det. 34 – the back side of the blades. When gluing, be aware that the blades of the butt (bottom screw) have a round cross-section. Fairing screw going from parts 1, 2, 3 with the help of gluing. Bonding is details intended for connections between the sections. They are designated by double numbers, e.g. (1-2). Figures (1-2) denote the number of the sections which they connect. After gluing sections 1, 2, 3, they set the frames a And B, the assembled screw and close the frame In (Fig. 11). In section 1 is mounted the barrel of a gun (det. 66).
Assembly of the fuselage
The fuselage of this model is divided into three sections: nose, middle and tail. In the nose and tail pieces are mounted skeletons, from which to start Assembly. The bow frame is assembled according to the scheme in Fig. 1 of children. 91, 96, 98 and frames C, d, D, E, F, and the tail – of det. 97, 99, 100, and frames 3, I,K,L,M.
You must now begin to assemble the sections, which are collected as the fairing screws. Acting on the edge of adhesion make cuts with a gap of 1-2 mm (Fig. 2). In sections 5 and 6 cut openings machine gun niches (Fig. 2). Sections 4, 5, 6, 7, 8 assemble the bow section, and of sections 11, 12, 13 -tail. Sections 9 and 10 have not yet collected. In the finished bow and aft mounted frames (Fig. 4), which should enter into them tightly, without gaps.
Go to the Assembly of the middle part of the fuselage. If you chose easy Assembly, just glue children. 9, 10 and install them between the nose and tail sections. If you chose a heavy degree of complexity, it is necessary to collect children. 9, 10, turning down at the same inside or cut off the unpainted parts, and connect them with children. 8 the bow.
Now assemble the cockpit. Gather the back (det. 16), the seat (det. 15), side panels (det. 14, 17), helm (det. 56, 57), pedal unit (det. 58, 59, 55) and the wall of the cabin (det. 19). Assembled parts according to Fig. 6 mounted inside the cockpit (det. 19), to the side panels (det. 14, 17) glue the instrument panel (det. 18). The assembled cockpit installed in the middle part of the fuselage, glue the edges to the edges of the trim, set also the sight of the guns (det. 106) in Fig. 15. Middle and tail parts connect.
Assembled fuselage set: in the bow (Fig. 3) niche machine-gun with machine guns (det. 60, 64), exhaust pipes (det. 53, 54), oil cooler (det. 26, 27, 28, 83); in the tail section (Fig. 5, 7) – stabilizers (det 74, 75, 46), tail fin (det. 20), tail wheel (det. 68, 70, 71, 76). The stabilizers glued the elevators (det. 45, 101), and to the caudal keel – rudder (det. 20,90,93,94,95) In Fig. 8 collect the canopy (det. 72, 73-76, 69) and install it on the fuselage. The quality of the films applied film.
Wing Assembly
From children. 85, 86, 87, 88, 89, 92, 102 assemble the frame of the wing (Fig. 9). Cut and joined by means of gluing the bottom of the wing (det. 49, 50). Collected and installed on the lower part of the wing (Fig. 13) landing gear (det. 31, 33), boxes of air filters (det. 105). Set the frame of the wing on the lower part of the wing, then glue on the top of the wing (det. 47, 48). In a niche chassis mounted chassis (det. 29, 30, 65, 103, 104) and shields chassis (det. 40, 41, 43, 44) in Fig. 10. When assembling the landing gear and to connect them with wheels, you can use the wire (for greater strength). Main wheels assembled in the order shown in Fig.12 (det. 32, 51, 52,77,78, 79, 80, 81, 82). Bottom wing set assembled vodoradiatora (det. 37, 38, 39, 42, 84) -Fig. 9. On the wingtips glued navigational lights ANO (det. 61,67). In the assembled wing set fuselage, wherein the wing spar (det. 85) must be in the slit sections 8 of the fuselage. The close interface of the wing fairing wing (det. 25,24,23). Fighter model ready. It is advisable to cover it with varnish for better preservation.
Parts list:
1) Section 1 fairing screw;
2) section 2 fairing screws;
3) section 3 fairing screws;
4) section 1 of the fuselage;
5) section 2 of the fuselage;
6) section 3 of the fuselage;
7) section 4 of the fuselage;
8) section 5 of the fuselage;
9) section 6 of the fuselage;
10) section 7 of the fuselage;
11) section 8 of the fuselage;
12) section 9 of the fuselage;
13) section 10 of the fuselage;
14, 17) the side of the fuselage;
15) the pilot seat;
16) back;
18) dashboard;
19) the cockpit;
20) the tail fin;
21) of the rudder;
22) fairing machineguns;
23, 24, 25) wing fairings;
26) the oil cooler;
27) the inner lining of the cooler;
28) valve oil cooler;
29, 30) pull the landing gear;
31) the upper wall of the niches of the chassis;
32) the wheels of the chassis;
33) of the side wall niches of the chassis;
34) the blades;
35) screw;
36) stand the main chassis;
37) scoop vodoradiatora;
38) the inner rear part of the casing vodoradiatora;
39) of the inner front panel removed vodoradiatora;
40) inner landing gear door;
41) outer landing gear door;
42) the covering of oil cooler;
43), the internal shutter wheel;
44) outer wing wheels;
45) handlebar height;
46) a stabilizer;
47) the upper left part of the wing;
48) the upper right part of the wing;
49) the lower right part of the wing;
50) the lower left part of the wing;
51) the outer part of the wheel chassis;
52) – tread wheels;
53) the exhaust pipe;
54) dual exhaust pipe;
55) of the control pedals;
56) the casing of the wheel;
57) a steering wheel;
58) the stand of the pedals;
59) rocking pedals control;
60) niche machine guns;
61, 67) navigational lights;
62) front antenna;
63) the inner part of the cover of the cab;
64) the barrels of the guns;
65) cylinders chassis;
66) gun barrel;
68) front tail wheel;
69) the outer cover of the canopy;
70) fork tail wheel;
71) the outer part of the tail wheel;
72) bulletproof glass;
73)the front of the cab;
74) right frame stabilizer;
75) the left frame of the stabilizer;
76) the inner part of the tail wheel;
77, 78, 79, 80, 81, 82) wheels;
83) the oil cooler;
84) vodoradiatora;
85) wing spar;
86, 87, 88, 89, 92) rib of the wing;
90) the spar of the Elevator;
91) the lower part of the front frame of the fuselage;
93, 94, 95) of the rib of the rudder;
96) the lateral part of the front frame of the fuselage;
97) side of the rear frame of the fuselage;
98) the upper part of the front frame of the fuselage;
99) the lower part of the rear frame of the fuselage;
100) the top of the rear frame;
101) spar of the Elevator;
102) the basis of the frame of the wing;
103) the ending of the landing gear;
104) the base of the landing gear;
105) the air filter box;
106) sight.
Tips to the hobby
You got a beautiful model, try carefully cutting out the parts. Before gluing check that the parts fit together; if necessary, adjust them to each other. Only then can glue them. In places where tint items, it is best to use paint (gouache or oil). When painting be careful and cautious. They can be used not only paint, but to paint a model in its own way, using as a model the drawings on the cover. Before painting, the assembled model should be carefully putty epoxy putty, nitroshpaklevok AL-22 or AL-30. For painting with oil paint or enamel is better to use oil putty PF-002. After the putty the entire model (except for transparent parts) on the top layer of soil, then carefully apply the abrasive cloth. Then carefully (with the cutter) run the jointing tool seams, hatches, etc. and again treated with skin. Now start painting. Paint can with brush or airbrush. In the first case, it is better to use alkyd enamel. However, the best results can be obtained with an airbrush and nitropaints.
The materials to build a model of the YAK-7 (download )
Recommend to read UNDER THE NATO STANDARD In early 70-ies of XX century views on the use of surface naval forces has changed significantly. In the West, only one country — the United States continued to rely on shock aircraft... FROM THE DESK — IN THE BATHROOM No hurry to get rid of the drawers of the Desk, if the Desk came used useless: they make great shelves for the bathroom. Remove the front wall of the drawer and pull out grooves...
 Scale model 1:33.