Winds on the cutter scented shavings. And from small billets emerge the contours of a rolling pin, tolkushkoy, arm day hand tools… there are all sorts of useful things you can do with a lathe. But to make it the simplest version, for example on the basis of the drills, but anyone can do it DIY, as almost all parts of the machine available and easily processed material: pine or birch sticks.
The base of the machine is formed by two guides, United with a gap of 20 mm cross bars.
Three vertical racks, mounted on the base screws, have landing axle under the neck hand drill, a fixed clamping machines.
The tailstock is also of a piece of wood. It can move along the guide rails and to clamp in a selected position of the long bolt, the head of which is fixedly secured in the guide Shoe.
In the same way on the longitudinal bars of the base between the tailstock and the front fastening drill mounted base plate a stop for the cutters. Stand point blank — thin-walled dural tube is introduced inside a wooden rod. A slit at its upper part and bent from a metal strip of the ring clamp allows to fix the rod with a horizontal emphasis at the desired height. Base plate having a longitudinal groove, can be displaced in the perpendicular direction.
Leading center, clamped in the Chuck of a drill, made of studs with screw on it a nut-lamb. The pointed end of the hairpin serves as the axis around which sharpened the blade nut is rotated detail.
Support center, also in the form ostrenga rod, is mounted in the blind hole of the tailstock.
A section along the axis of the rack cap (outdoor installation option of the machine)
Simple lathe with manual transmission:
1 — clamp rear rack, 2 — pillar, 3 — hand drill, 4 — clamp b-pillar, 5 — average stand. 6 — clamp-pillar, 7 — front 8 — senior center. 9 — support centre, 10—bolt M8 with nut, 11 — tailstock. 12 — cross bar base, 13 rear guide rail. 14 — front guide 15 — the clamp, 10 — base plate. 17 — clamping shoes 18 — focus 19 — clamp 20 — rod stops, 21—, 22 — bolt M8 with nut, 23 — pin with M8 nut. 24 — leg.
For outdoor option, the machine will require four wooden legs that are attached to the base metal grub screws, firmly planted in blind holes of the legs, and four nuts are securely fastened in the sockets of the transverse bars of the base.
As you can see, the machine design simple and affordable. However, in the manufacture of its components and Assembly, it is useful to use the following recommendations. Check the surface details of a square and a surface gauge. Finishing sandpaper; don’t forget to dull the sharp edges. The connection of all elements on the screws or nails. When you install the drill make its case firmly lay in the wheel struts and the axis of rotation of the cartridge was parallel to the guides of the base. The tailstock must peremeschatsya without backlash. The alignment of leading and supporting centers is provided when making the holes for the center I back of the headstock — drilling on the lathe: Chuck the drill bit and serve the tailstock on the guide.
To work on such a machine is more convenient with the assistant, leading a detail of the rotation, the use of electric drills will significantly expand its capabilities.
V. GORSHENIN
Recommend to read SNOWMOBILE “MORGANOK” This machine is designed and built by the young craftsmen and DHT Gorky aircraft plant them. S. Ordzhonikidze, under the guidance of the teacher L. N. Pisarevskogo. The boys set a goal... AND FURROW AND PIT Treatment of soil with electrofret. Especially for owners of cottages, gardens, gardens (see, for example, "M-K" 3'83, 1Г90). And in conditions when the prices are steadily rising, when... 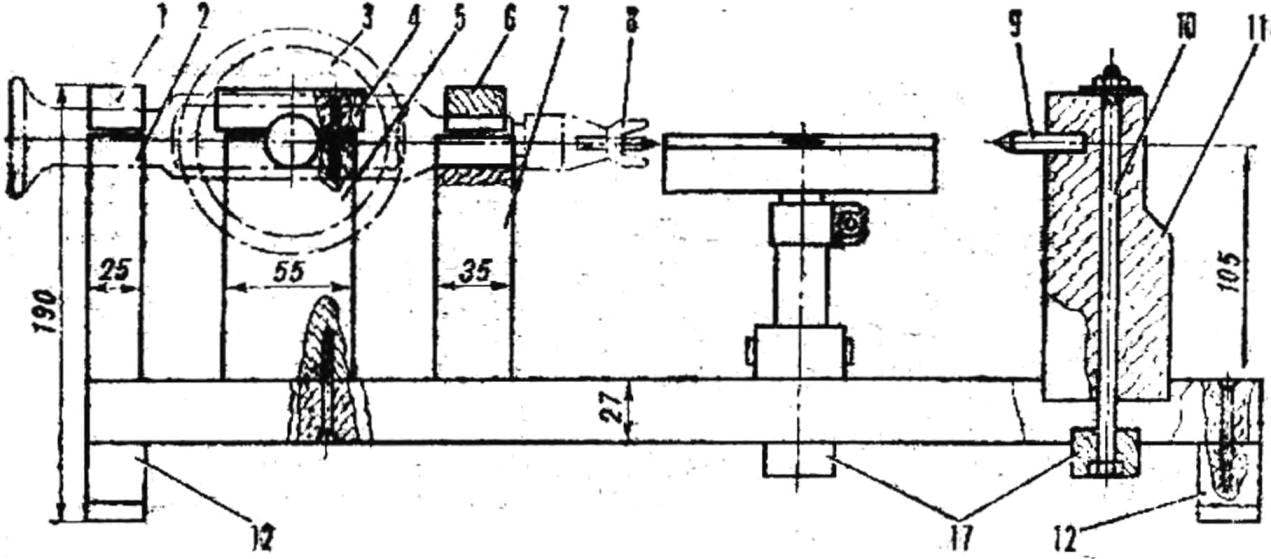
 Winds on the cutter scented shavings. And from small billets emerge the contours of a rolling pin, tolkushkoy, arm day hand tools… there are all sorts of useful things you can do with a lathe. But to make it the simplest version, for example on the basis of the drills, but anyone can do it DIY, as almost all parts of the machine available and easily processed material: pine or birch sticks.