Whether the case, if dad is cut (Yes, with the active participation of the baby) of a regular plank this is the duck and make it veselochka for children’s clothing. Yes, even beat a child with an unusual use: to say that the duck will never drop and will always bring in its beak that hangs on her. With this hanger the child having their relationship – it’s not some soulless metal regular hook.
Manufacturer
Of course, not necessarily to a child’s hanger was shaped like a duck – it is only important that the image be familiar with and understand the kid: for example, a cock or a hen. The shape of the hanger should have a simple form, easily reproducible during manufacture.
For our version you will need cut plates with a thickness of 20 – 25 mm: this is easy to process, and the final strength will be enough, even with a margin for a possible children’s mischief.
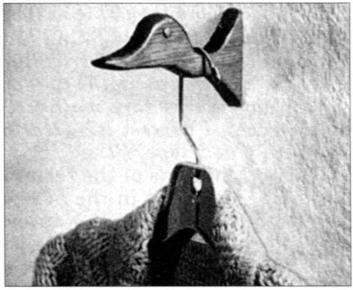
The hanger hook in the form of ducks:
1 – body hook; 2 – eyelet hanger mounting
Well, if the workpiece surface is already smooth; otherwise, it must be carefully cleaned with emery paper so it was convenient to represent the outline of the shape for subsequent cutting.
The proposed figure is easy to move on the plate in squares of the grid. Then saw off the unwanted parts, and do not have a jigsaw, and a simple handsaw to remove large pieces, and the rest of the way to bring auxiliary instruments. For example, the coarse part of the revision to produce by bastard a file, large notches which allow quick and fairly easy to remove layer after layer of a large proportion of wood, and the rounded shape of the working surface to prepare the corresponding curves of the figure.
Having come nearer thus to the circuit pattern, further processing carried out with emery paper of different grits: first larger, then smaller and smaller until you reach the desired smoothness of the entire edge of the shape.
You can now proceed to a General polishing the entire surface, ensuring not only the absence of all burrs or Burr traumatic for the child, but also the widespread of smoothness required for the subsequent finishing of the figure.
Finish
After the surface is completely sanded, it can be painted or lacquered. And here, too, there are different approaches.
For example, color can be made as oil or enamel paints, and nitroenamels – but not necessarily bright, eye pleasing colors that attract the child’s attention. Paint can be applied with a brush, or small paint roller in several layers with substantial intermediate drying of each layer – largely depend on the strength and durability of the coating.
More modest, but no less beautiful look will be “duck”, if its polished surface is varnished. Here, too, there may be some options: lacquer furniture is light, transparent, and sometimes dark. The latter has a different, usually brown, color.
But the light “color” depends on the basis: if it is just brushed the tree – shade and will be the main, translucent from under the varnish. But also the so-called stain is an aqueous or alcoholic liquids of various colors, which soaked the wood prior to varnishing. This gives it a particular a particular shade that is visible through a layer of bright nail Polish.
Regardless of what is used for finishing: paints, stains, varnishes, -the first layer always thoroughly rubbed to the surface of the wood soaked in and became a reliable base for application of subsequent layers.
Linkage
The shape of the figure allows you to attach the hanger directly to the wall with screws through the prepared holes in the top and bottom of its base, facing the wall. But reserved for hanger space may eventually become for any reason inconvenient, but the child grows very quickly – will have to outweigh. And after changing to the old place will be holes that need to be repaired. Therefore, regardless of these future inconveniences it is better to use more mobile the weight hanger to make it easier to change the place of its attachment.
In this sense, it is better to use a traditional mount cabinets and shelves – metal lugs. Moreover, only one such part, screwed in the upper end of the hanger, facing the wall, as shown in the figure. In the end of the hanger should make a hole under the hat screws, dowels or nails.
B. VALENTINE’s