
 From time to time the furniture (and often separate items) in the apartment updated, although the old is obsolete it is not enough to send it to a landfill. What to do with it? To sell? Present? But who needs it, even if the owners decided to change it. But to throw away is unsustainable. But if the boss — man artisan, he will find a decent use unneeded piece of furniture and make it what you need to, and buy — lack of resources.
In such circumstances became an “extra” in our apartment Cabinet three-door wardrobe with two compartments, covered with a light veneer panels. Decided to move him into the corridor. But the closet was so wide that install it, not narrowing, it was not possible: the passage remained very small.
Then decided closet not only to make narrower, but at the same time “modernize” and enhance its functionality, without reducing the useful volume.
The idea was that by reducing by half the depth of the wardrobe, to make the newly formed (or you can say, remaining) parts additional section: upper mezzanine, and the bottom box for shoes. The main section for clothes decided to make mostly open, freeing her from two doors which are used for the mezzanine and Shoe box.
Thinking through pre-design of the future Cabinet-the wall of the hallway, focused primarily on the height of the room. And here I faced a choice — without changing the length and height of the main section, make: high (full-width average — the widest door wardrobe) mezzanine and low Shoe box, or Shoe box high and low mezzanine, or both sections are the same. Last option disappeared immediately — it required the most rework. Consulted with family (because in the future the Cabinet will have to use all), and together decided to stay on the first version — high mezzanine: it was intended to store winter things in summer and summer in winter. In addition, this option allowed all adults to freely reach the hooks, located in a niche high on the mezzanine.
First things first, even without disassembling the wardrobe, outlined the cutting line of the hull panels: wall, roof (ceiling) and floor (bottom). They were in the middle of the walls, partitions and bottoms, separating all these parts in half lengthwise. The roof panel had a front ledge on the walls, the thickness of the doors. From the bottom panel such protrusions were front and rear. After that was dismantled and sawed these panels the pines markup.

Fig. 1. Closet, from which will be made for the hall closet:
1 — bottom; 2 — left door; 3 — cover; 4 — shelf for hats; 5 — side wall (2); 6 — rear panel (hardboard); 7 — right door; 8 — medium; 9 — the partition between the compartments; 10 — shelves for linen
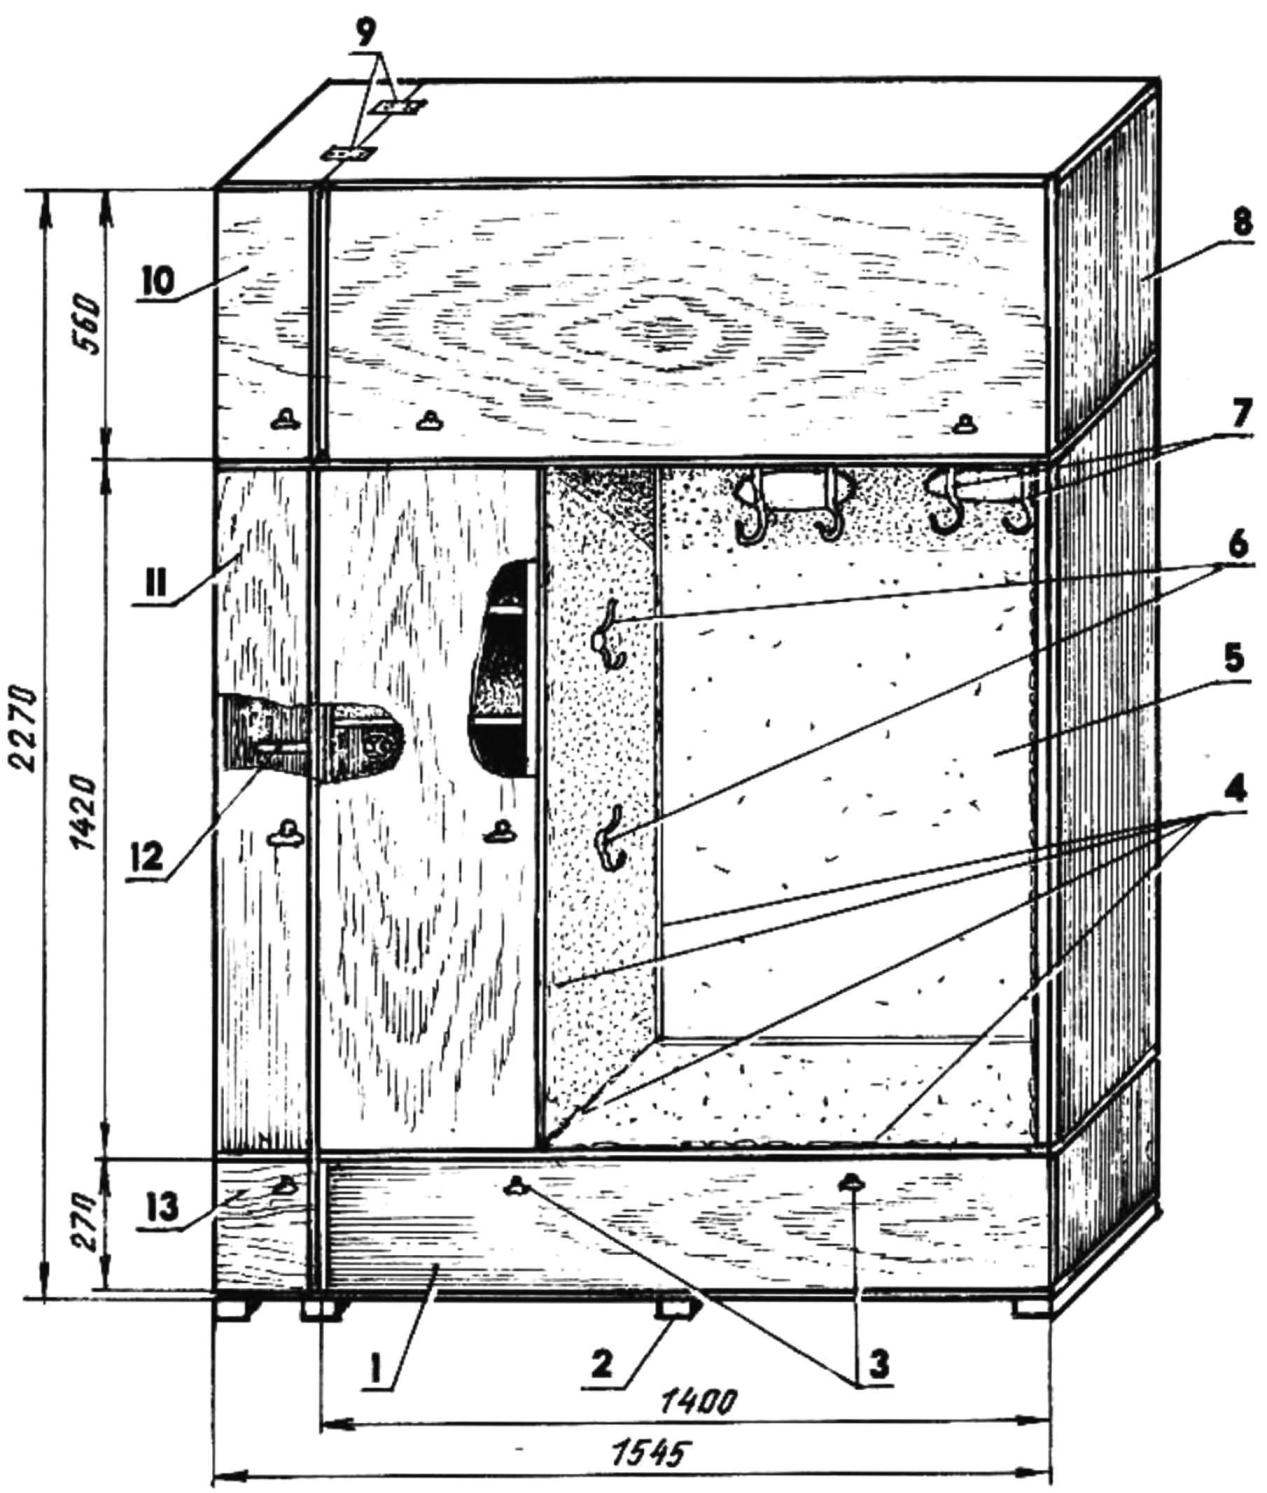
Fig. 2. Wardrobe in the hallway with the column collection:
1 — Shoe Cabinet drawer; 2 rails (4 PCs); 3 — stick (8 pieces); 4 — Kant (painted a clothesline); 5 — write padding (foam rubber s10, viniliskozha); 6 hooks (4 PCs); 7—hooks for outerwear (4 items); 8 — unit Cabinet; 9 — lintels (steel 20, sheet s2); 10 — unit columns, 11 — main section column; 12 — coupling (pin M10); 13 — the bottom drawer column
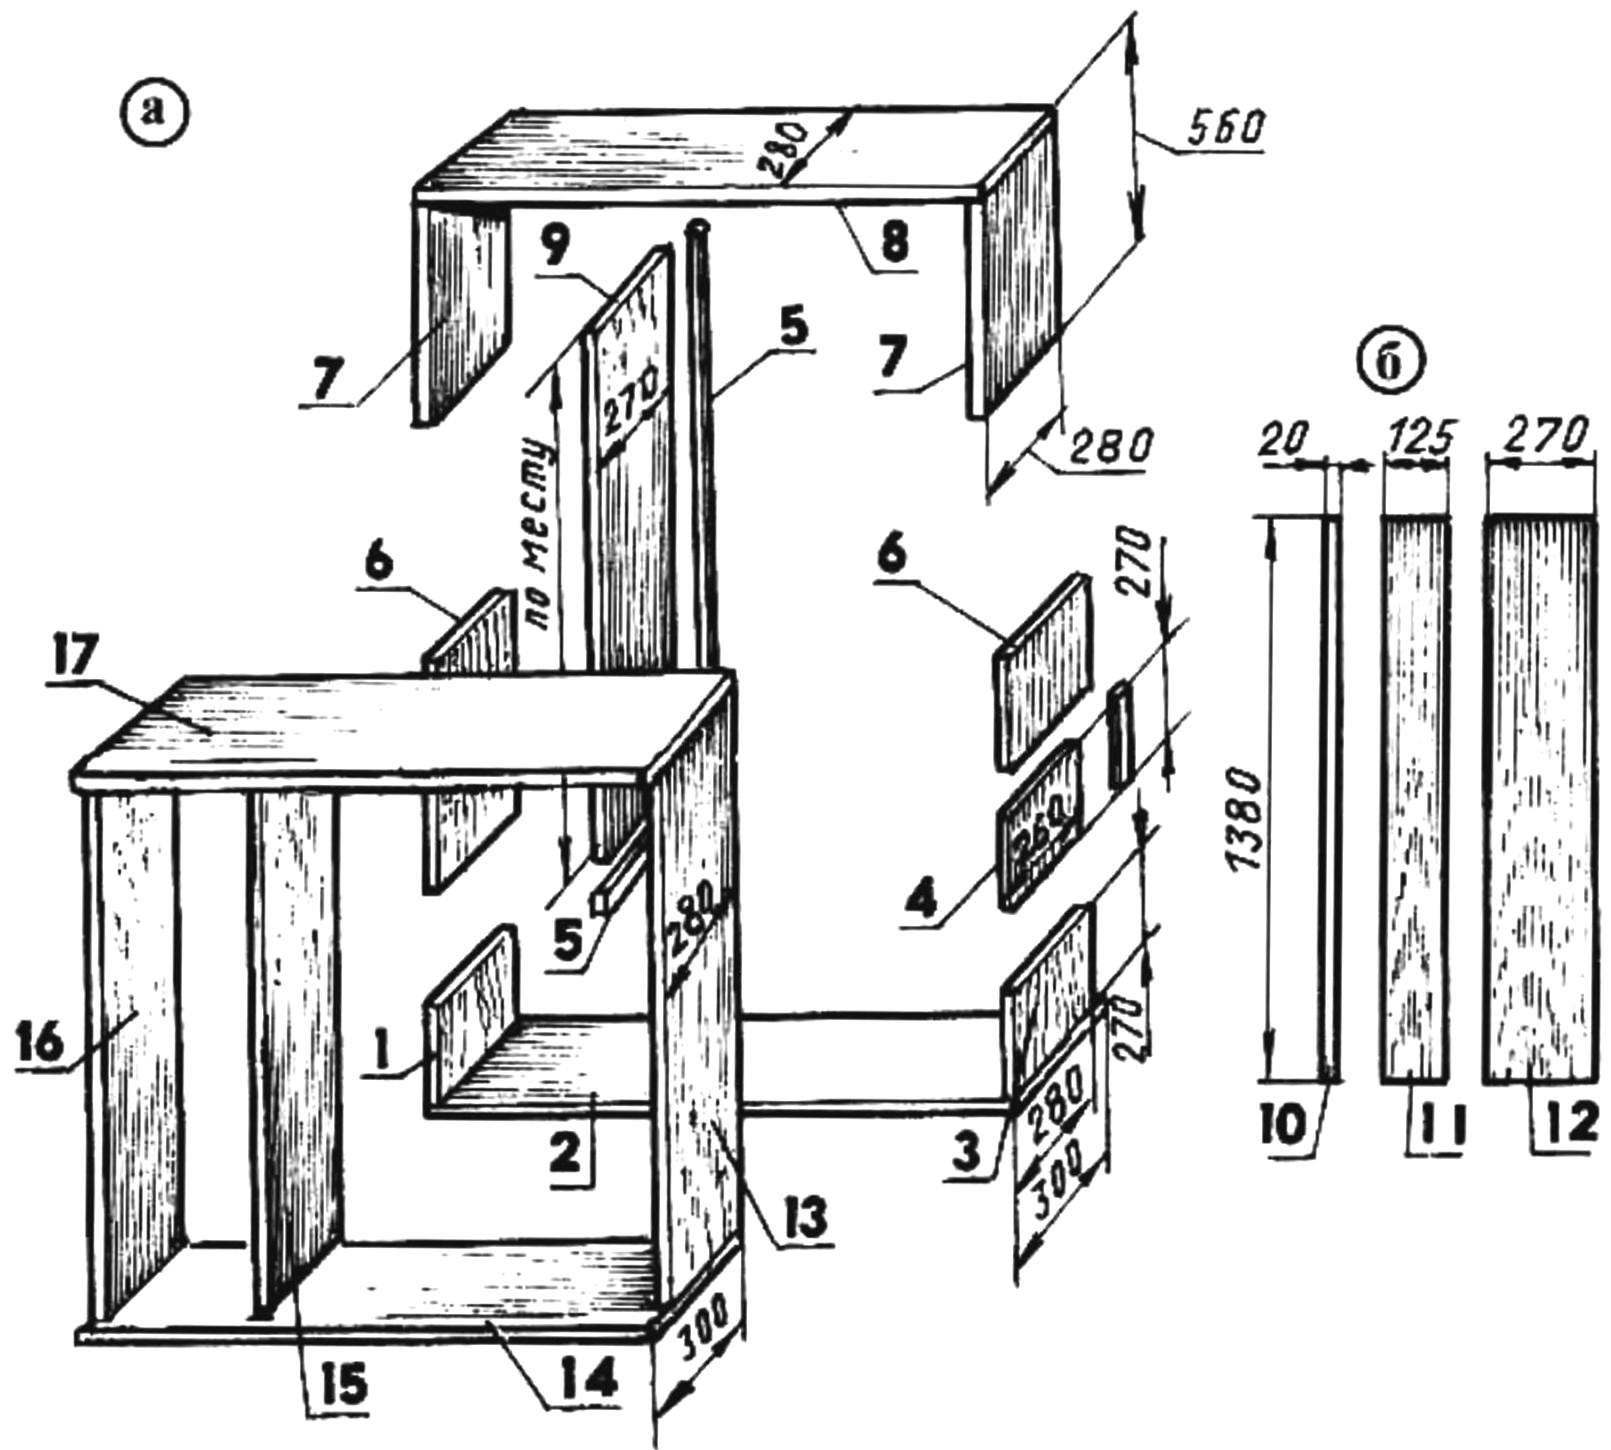
Fig. 3. Cutting hull panels (a) and right door (b) wardrobe manufacturing wardrobe:
1 — panel for the left side wall of the Shoe box; 2 — pane to the bottom of a Shoe box; the 3 panel to the right side of the Shoe box; 4 — panel for partitions of a Shoe box; 5 — waste; 6 — the remnants; 7 panels for the side walls of the mezzanine area (2); 8 — pane to cover the mezzanine; 9 — panel for the back wall of a Shoe box; the 10 — bar pads on the front edge of the right side Styopka main compartment: 11 — panel doors for the main section column; 12 — panel for a door of a Shoe box; 13 — the panel of the right side wall of the main section; 14 — bottom panel main section; 15 — partition panel main section; 16 panel left-side wall of the main section; 17 — the upper panel of the main section
Door Shoe box made of beveled extreme wardrobe doors, which had to be cut along, leaving the desired portion with a width of 270 mm, and the total height of the Cabinet after the Assembly was 50 — 70 mm lower than the height of the room. This door size was determined by the height of the Shoe box “in the world” (excluding the thicknesses of the bottom and ceiling panels). The same size from cut halves of the side walls sawed off the lower part, which are mounted on the ends of the separated halves of the bottom and secured here with the regular clips.
Sawn off part of the door mounted on the edge of the separated halves of the bottom, the ledge rear sides. Length door (1380 mm) was such that on the one hand it (the door) closed edge of the side wall, and none on the other. I again faced a choice: cut to the thickness of the panel edge of the door or leave as is and cover the door only the front edge of one of the side walls. Chose the second option. The door to the edge of the bottom card was attached by four hinges.
On the other side of the bottom between the side walls installed and attached with long screws the rear wall of the Shoe box. This wall was previously cut from the back of the closet partition, which divided it into large and small offices.
Then inside the Shoe box, just below the partition between the compartments, set back bulkhead, cut off from one of the residues sawn-off (rear) half of the side wall of the closet. Wall to the rear wall nailed a couple of nails.
Then, turning the Shoe box up the bottom, privernuli to last long screws the rear wall and the partition. And towards the bottom of the bottom attached three-plate cut from a sheet of chipboard, and the plates glued strips of felt, additionally beat gwozdecki (sinking their hats).
Turning a Shoe box again in its original position, put on top of the bottom panel of the main section and attached it with long screws to the rear and side walls and the partition wall.
After this, directly on the Shoe box was collected the main section, connecting its parts together with standard clips.
The main section of the Cabinet to the length and height changes are preterpela. Even the back wall of hardboard remained the same. I just moved it with the back half cut off on the front and secured by the same screws with washers. This section was aligned flush with the upper and lower panels of the front edge of the right side of the wall (on the left edge of the wall — talking later), increasing its width up to 300 mm due to the straps from the right door of the wardrobe (det. 10 Fig.Z).
But, since the section was removed two doors, in their place, a niche. All internal surfaces plastered niches not thick foam and fitted viniliskozha (technology trim is the same as for insulation of doors).

Fig. 4. Sectional Cabinet Assembly:
1 — door Shoe Cabinet (det. 12 Fig.3); 2 — partition of a Shoe box (DST.4 Fig.3); 3 — card loop (set of 4); 4 — the bottom of a Shoe box (DST.2 Fig.3); 5 plate-rails (chipboard, felt, 3 PCs); 6— lateral with Lenka the Shoe box (children.Z Fig.3, 2); 7 — rear wall of the Shoe box (children.9 Fig.3); 8-bottom panel main section (det. 14 Fig.3); 9 — side wall of the main section (det.13 and 16 Fig.3); 10 — slip strap (det. 10 Fig.3); 11 — the back wall of the main section (the back wall of the wardrobe DST.6 Fig.1); 12— the top panel master section (det. 17 Fig.3); 13 — lateral wall of the mezzanine (det.7 Fig.3, 2); 14 – rear wall mezzanine (hardboard, sheet s5): 15 cover mezzanine (det.8 Fig.3); 16 —the mezzanine door hinge (piano hinge); 17 —the door of the mezzanine (the middle door of the wardrobe — children.8 Fig. 1); 18 — an arm of fastening the mezzanine to the lid main section (aluminum corner 40×40, 2); 19 — plank (Board s15. 4 PCs); 20 — partition the primary partition (det. 15 Fig.3); 21 — a linen shelf compartment (half the shelves in the closet —children. 10 Fig.1); 22 the door of the Laundry Department (DST.2 Fig.1)
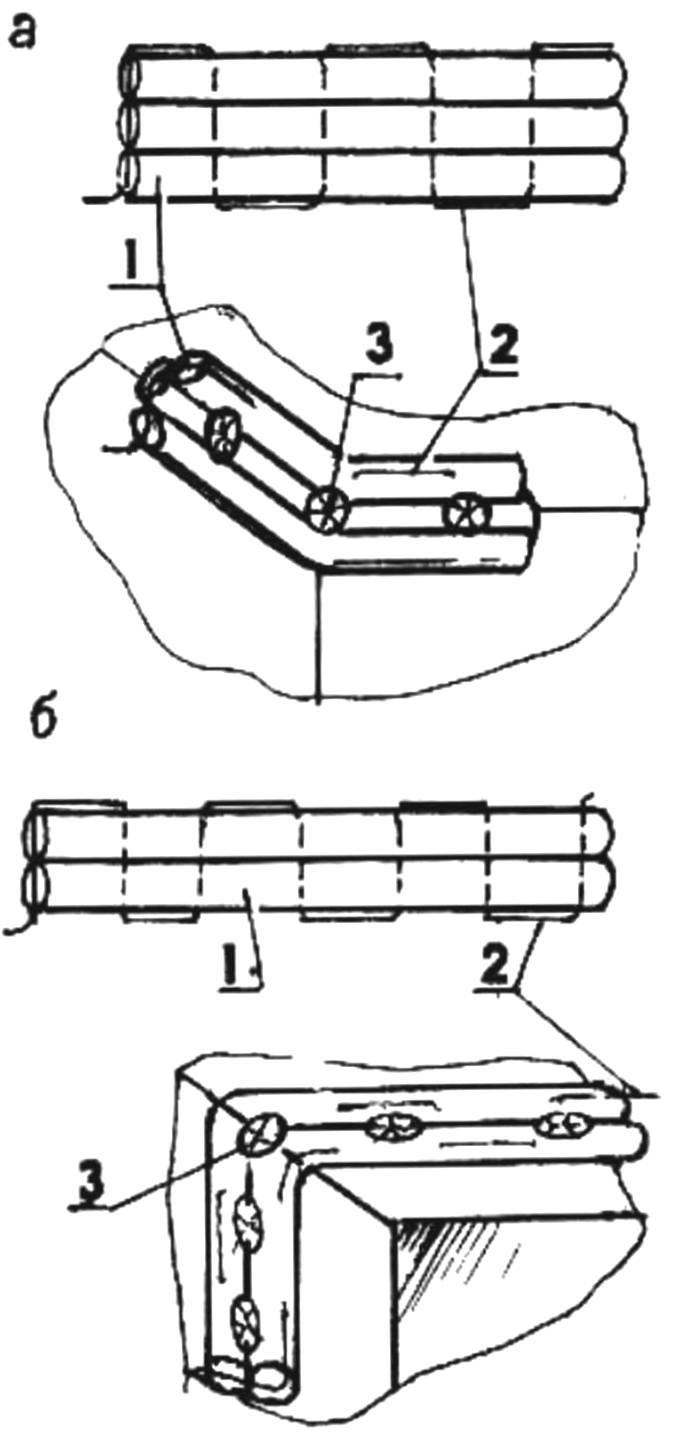
Fig. 5. Kant: upholstery niches (a — angular, b — edge):
1 — clothesline; 2 — stitched thread; 3 — a nail with a shaped hat
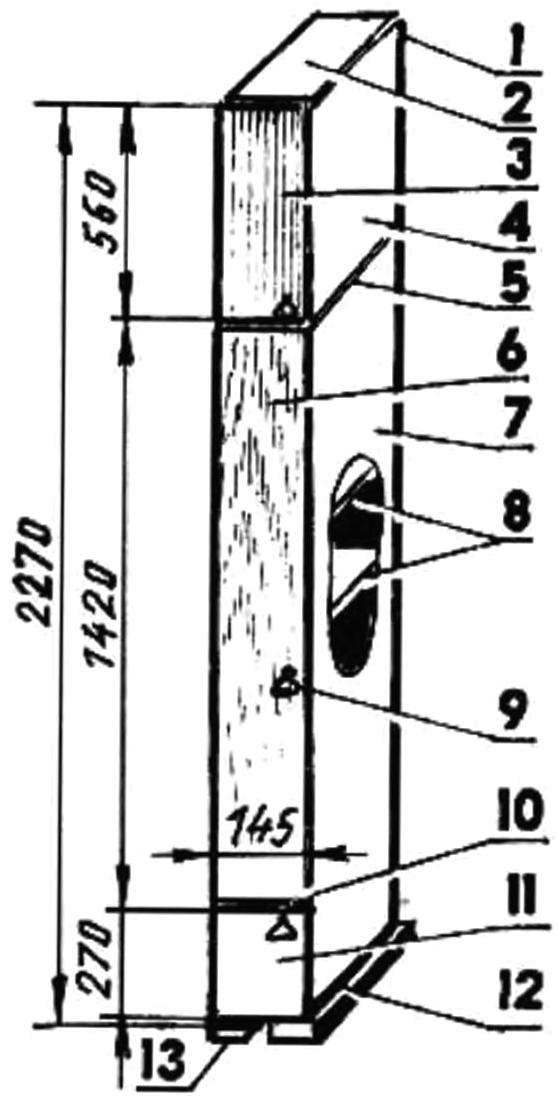
Fig. 6. Column:
1 — rear wall (hardboard, sheet s5); 2 — cover mezzanine; 3 —mezzanine door; 4 — right side wall of the mezzanine (the left already on the thickness of the doors); 5 — the ceiling of the main section; 6 door main section; 7 — right-side wall of the main section and the bottom box (left on the wall thickness); 8 — shelves of the main section; 9 — handle (3 pieces); 10 — floor main section; 11 — door bottom drawer: 12 — the bottom of the bottom drawer; 13 — rails (PVC, felt)
This work is easier to perform, his section on the floor. The edging of the corners of the niche was producing a band made of three twisted ropes, painted the color viniliskozhi. Edge niche has turned over a tape of two such ropes To the rope didn’t break up, they are stitched along the entire length between them. Nails used with ornamental shaped caps, scoring them between the ropes.
For attaching hooks to the back of orgalitovoj panel attached to the four vertical wooden laths with a thickness of 15 mm (width depending on attachment points of hooks).
The middle door of the wardrobe used entirely for door mezzanine, only now place it horizontally, opening upwards. The door is attached to the mezzanine krysheval panel hinge, piano hinge Transverse dimension door (560 mm) was determined by the height of the mezzanine. It cut from the side walls of the back of the wardrobe (det.7 Fig.H) relevant details mezzanine rack and added them to krysheval panel the standard clips at the Bottom of these same side walls of the top panel main section fastened by short screws through the aluminum angles 40×40 mm. posterior wall of the mezzanine, cut an additional sheet of hardboard.
After Assembly of the Cabinet is aligned flush with the other parts of the left edge of the side walls of all sections. This used the wooden rail, her obtenus same viniliskozha which finished niche.
Manufacturer of side speakers was mainly due to the fact that the closet remained unused material, throw which was just sorry. This wide strip is removed from the extreme doors, and a large shelf for hats of compartments for clothes, three shelves of the linen sections, parts of the side walls. Added material from available stock.
Sidebar on the tiers repeats “floors” all for the hall closet: the lower section, the main mezzanine.
Column width (145 mm) was determined by the remainder of the strip removed extreme door wardrobe — made of it the main door section.
The column is made of Autonomous and connected with the Cabinet in three places along the height. Basic connection — steel stud with M10 nuts and washers with a large outer diameter. The pin passes through the side wall of the column and the left side wall of the main compartment. The bottom connection is via a common base plate, and top with two bridges between krasivymi panels of the Cabinet and speakers.
Now, looking at made thing, I understand that narrow column, collected from the remains of quite a different texture of material attractiveness in the design of the structure is not added. But to disassemble the column does not raise a hand: I need a lot of small parts and spare parts I have, including a tool that is always at hand.
MARTYNOV, Vitebsk, Belarus
Recommend to read
 TILLERS FOR ANY SOIL
Based on its first walk-behind tractor I took the "Vyatichi", technical description, sketches, key components and parts of which were published in the journal "modelist-Konstruktor"....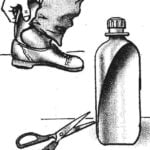 SPOON…BOTTLE
Any application not find the large plastic bottles of mineral water and other beverages. I want to offer another option — to cut out such a Shoe spoon helps to wear tight shoes. S....
