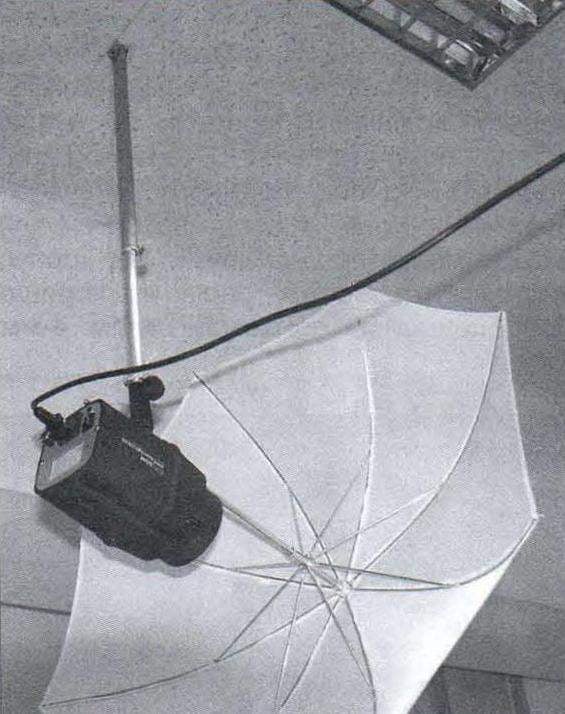
But only Amateurs believe that quality photography need a good camera and “Pro” will say that the main thing is light, especially indoors! Solve lighting issues help the flash. However, they give a negative effect, shadows and highlights. Therefore, in studios they are complemented by lenses or reflectors.
But typical stand-tripod, lighting occupy expensive space, and extending to them the wires get in the way of customers and master the three-legged tripod, choosing the best angle and looking into the lens and not on the floor. So wait that get umbrella-reflector or an umbrella-diffuser with lamps.
And here is the solution to literally “falls from the ceiling.” If the ceiling is a conventional suspension with Amigrenin panels, the edges of the aluminum profile of the support frame strong enough and securely attached to the ceiling, so they can hang lighting equipment and the best – in telescopic rod to allow height adjustment of the suspension.
Diffused Studio light:
1 – suspension bracket; 2 – stretching; 3 – lights-flash; 4 – umbrella-diffuser; 5 – umbrella-reflector; 6 – metal profile of ceiling; 7 – ceiling bracket stretch marks
The upper end of the suspension, mounted on a metal ceiling profile
Locking a node of fixing of the mutual position of suspension rod (plate with welded nut and screw with a handle, a button)
To the suspension is not rocked, the lower end of the fixed wire stretch marks (well, it’s just in case). Tip for mounting lighting equipment and umbrellas are easy to copy with the standard tripod tripod.
The idea is there. It remains only to manufacture and assemble the device.
Telescopic suspension. After specific measurements of the ceiling height the length of the rods was determined in 250 mm and 300 mm, adjustable total length of the suspension up to 500 mm. of the Outer rod is of duralumin tubes with a diameter of 18 mm and a wall thickness of 1 mm. Internal – from the same material but with a diameter of 14 mm.
For gear for suspension of stretch marks produced the triangular washer that is placed between the free end of the inner dural tube is a rod and a turned steel tip, fastened together with copper pin.
Suspension for Studio lighting:
1 – tip for mounting the flash and umbrella (steel, lap 15); 2 – triangular braces washer (galvanized steel sheet s1); 3 — internal rod (dural tube d14x1); 4 – outer forestay (dural tube d18x1); 5 – short capture (sheet s1); 6 – long capture (sheet s1); 7 — fastening grips to the outer rod (M4 bolt with nut, 2 sets.); 8 – nut M5 lock; 9 – plate clamp (steel, sheet 1); 10 – pin (M5 screw with a handle, button); 11 – pin (copper wire d3)
The host of the clip-retainer, consisting of a M6 nut welded to it the plate and the corresponding screw with a handle, a button firmly presses the inner rod to the outside. The host assembled in the following order:
– the hole in the outer rod is inserted inside the nut with welded plate, which is pressed against the pipe wall;
– the external rod placed inside;
– screwed in a nut screw which rests in the inner rod and locks the two rods.
Two overhead plate grab the edge of the “Eurobodalla” and are attracted to preplanetary the end of the outer tube of the rod by two screws М4х30 mm.
Attach streamers to the ceiling using a bent 1 mm “galvanized” hooks with eyelet.
In the end of this work, the light pouring in the Studio as required-from the ceiling, and the tripods and the wires don’t get underfoot.
A. MATVEICHUK, Zavodoukovsk, Tyumen region.
Recommend to read SIX CLONES “KARL” Mid-1930s, the Political leadership of the fledgling Germany wants revenge for the defeat in the First world war. The command of the Wehrmacht, forced perevooruzhit the army requires a... MY SOROKOVINY Not naraduyus its homemade and truly versatile tractor with 40 HP, although the time and effort it took a lot. And most of these costs took the Assembly design, and procurement... Scroll back to top
 To purchase a digital camera, even the mirror, with a huge number of pixels, and at an affordable price, it is not a problem. Moreover, even simple and inexpensive “point and shoot” allows you to take pictures are quite good quality, even automatically adjusted to the conditions of photography. A little podnatorev in the work of the photographer, some decide to deal with this matter professionally and rented a corner in any busy supermarket. There is a camera room, there are customers.
