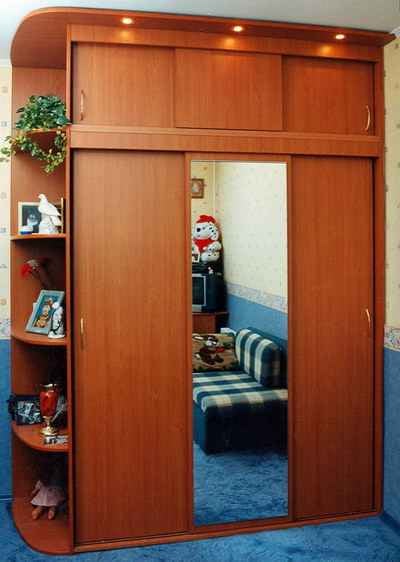
The operation for the conversion of the dresser started with a visit to the store “Furniture”, where determined appropriate reconstruction, which dictated the selection of accessories: rails, rollers, handles of the doors. If we talk about accessories, the choice is big enough. But all of it can be divided into two types: lower support rollers and the top — many of those and others even rotate on bearings. But my choice fell on the simplest of plastic — those that do not need to do large and complex frames for fittings either in doors or in panels. That’s just the handle, on the contrary, did just flush (flush), the door with them can wider to reveal — the handle would not interfere.


Another important point that needs to be addressed. Need to see if the door panels sagging. If so, door must be installed so that the setting for each other doors deflections were in the same direction or in the opposite direction, but not towards each other. If we find the doors in their deflections is not possible, for example, when the trim on the doors-sided, and flip the panel upside down do not allow any previously completed cut, you have to increase the gap between the doors based on their deflections.
Similarly, it is necessary to check deflection and bottom panels, shelves, covers. If he (deflection) is, it is desirable that these panels be installed so that they were “hump” up and then panel partially (or completely) straighten under its own weight and partly under the weight laid on them things. The bottom panels can be installed, and a deflection downward, but it is in the middle of the panel it is necessary to enclose and attach it to the bar corresponding to the height of the cap. In part, the deflection of the shelves, bottom and lids can be eliminated with the appropriate mount them to the rear: with the rear edge you can even straighten completely.
A remake of the dresser in the closet trying to make so not to have to cut off parts of some parts, especially the front (door and door), preferring to do the side panels and intermediate the respective extensions. I did it, and had to take out only the walls of the mezzanine section of 37 mm Extension made of wooden planks and fit later texture to the outer planes of the picture surface finishing of the panels.
The width of the walls and shelves of an old dresser reduced to a size doors, deep in the closet.
He was 55 mm. also sawed Off the excess part of the partition and shelf panels, of course, on the back side — there is edge trimmed.
During the reconstruction of the chifforobe extensions docked to the upper edges of mezzanine rack (the side walls and partitions) using PVA glue and dowels.
Some corner joints had to be redone to move to other places, the benefit stem nut was steel and to turn them was not difficult.
The old holes, so they do not accumulate dust, patched wooden stoppers on the PVA glue. In the same way “choked” and nest from under the furniture hinges on the back sides of the doors. These parties had carried out other nests: at the bottom under the roller elements at the top — under clinch.
The marking for sockets made in accordance with the drawings given in the mounting instructions of accessories. You should pay attention only to the fact that when the radius of socket 15 mm and its centre is at a distance of only 10 mm from the edge, that is, a segment height of 5 mm beyond the plane of the door. The depth of the socket — 9 mm.
This size, as well as perpendicular to the drill axis to the plane of the door it is necessary to provide, especially when running nests under the support elements, otherwise unavoidable bias, and because of this and failure of these parts during operation.
For new models of motor vehicles has a special limiter and even level.I have such fixtures was not, so the drill was salobral 7-8 mm on the eye, and the remainder chose a chisel manually. Perpendicularity is provided by gon.
Remodeling “of the interior” (inner volume) of the enclosure is not made — a compartment for clothes and shelves for clothes left in their original locations.

Hinged wardrobe:
1 — ground strap; 2 side door Cabinet; 3 — the middle door of the Cabinet; 4 — side shutter mezzanine (2 PCs); 5 — average door mezzanine; 6 — partition mezzanine; 7—baffle Cabinet; 8 — the side wall of the mezzanine area (2); 9 — rear wall mezzanine (hardboard s4); 10 — rear wall of the Cabinet (hardboard s4); 11 — lateral wall of the Cabinet (2); 12 — rack shelf (place); 13 — roof panel mezzanine; 14 — bottom panel mezzanine; 15 — roof panel rack; 16 nisheva the Cabinet panel; the details of the poses.2,3,4,5 — chipboard, veneered, s18; POS. 1,6,7,8,9,11,12,13,14,15,16 — ennobled chipboard, s16,5

Possible installation of door panels depending on HX deflections:
a,b, unilateral; b,g — bi-directional (option “g” — deprecated)

Wardrobe:
1 — ground strap; 2 — rear door Cabinet; 3 — front door of the Cabinet with mirror; 4 — rear door mezzanine (2 PCs); 5 — front door mezzanine; 6 — partition mezzanine; 7— baffle Cabinet; 8 — extension (Board); 9 — rear wall mezzanine section; 10 — lateral wall of the mezzanine section (2); 11 — lateral wall of the Cabinet (2); 12 — rear wall of the Cabinet (hardboard ,s4); 13 — shelf (place); 14— intermediate bearing (Board); 15 — roof panel mezzanine; 16 — bottom panel mezzanine; 17 — roof panel rack; 18 — the bottom panel of the Cabinet; the details of the poses.2,3,4,5 — chipboard, veneered, s18, parts POS. 1,6,7,10,11,13,15,16,17,18 — ennobled chipboard, s16,5

The scheme of mounting accessories for sliding door wardrobes (from the manual):
1 — bottom; 2 — rail (4 PCs); 3 — the roller element (2); 4— side panel of the Cabinet; 5 — the screw of fastening and adjusting the roller element (2); 6— retaining element with a spring stopper (1 or 2); 7 — the screw of fastening of the fixing element (2); POS. 2,3,6 — purchase the finished product
Orgalitovoj rear wall of the wardrobe was part attached to the edges of the panels with nails. I replaced the one piece (from the mezzanine, its separate rear wall).
They sounded carefully on a sheet of hardboard rectangle (diagonals with precision to the millimeter) equal to the formed by the outer edges of the edge panels—the cover, the bottom and the side, has tried also to carefully cut it.
New rear wall attached to the panels with small furniture screws with washers. This Assembly gave the wardrobe necessary rigidity.
The back wall had to be cut and for the mezzanine section, as the former was low.
Set the wardrobe on the highest level, lining-Wai on the floor, where necessary, under the lower edge of the side support panels corresponding wooden plate.
Of course, the doors of the closet “eat” part much-needed usable space. But they are free from those inconveniences which creates ordinary wardrobe.
In addition, the wardrobe still has that quality about which we were unaware: it is the most direct way to educate their owners, disciplinarum them — because you have to think carefully about the rational distribution of its contents. In this wardrobe each thing must have its place. Otherwise look for the right thing it would be long, alternately opening one door and closing the other. It’s in the wardrobe can be contemplated from almost all of its contents, open simultaneously two or even three doors.
So if you are a modern man, but also tidy, the wardrobe is just for you.
A. POLIBIN
Recommend to read
 TABLE LAMP
This elegant Desk lamp is enough to have two rods with a cross-section 12X12 mm, length of 480 mm and three cubes of appropriate size. The most suitable material for this purpose is... “SPANISH” BOMBER TUPOLEV
(The end. Beginning in № 3'02) The plane SB (ANT-40) — high-speed bomber, made of a metal cantilever monoplane with two engines M-100A located on the wing. The fuselage is...
 Early furniture has served its owners for quite some time, sometimes even several generations. But in our time it quickly becomes outdated morally — design or design. And then this furniture can be a field for experimentation and prudent master, and a novice homebrew. Here they can test their design and engineering skills, but also to give old furniture new life.This “old faithful” and I had — tricuspid wardrobe Cabinet with mezzanines. It panels the walls were made of “refined” particle Board, but the front side doors very solidly trimmed bright polished veneer.
