First a few words about the principle of imitation flame. However, in our case the term “imitation” is not quite accurate: because in the furnace of fireplace “lives” is the real flame, or rather, his images, achieved with the help of projector and slides.
Take a look at our pictures. As you can see, inside the fireplace is a matte screen and with a few filmoscope the image is projected to the fire.
To get these slides to take the picture on a color reversible (but preferably, highly sensitive) film the flames of a spectacular bonfire. Of course, to photograph a fire is best in the late evening, at dusk. I advise you to shoot with different exposures as many shots to “maneuver” to select those five or six slides, which amount to a “plot” for the future of slide film. Oh, by the way, when shooting it makes sense to use a tripod n all the frames to exhibit one point. This will allow in further easily to combine basic detail of the fire — fixed (unlike the flames) logs, coals, etc.
Device fotocamera:
I — cover (plywood or hardboard), 2 — overhead projectors 3 — upper Board (chipboard 20 mm thick), 4 front panels (chipboard 20 mm thick), 5 — pads (plywood 12 mm thick), 6 — matte screen (glass or Mylar tracing), 7 — mirror, 8 — the inner walls (plywood thickness 12 mm chipboard 20 mm thick), 9 – shelves (particle Board with a thickness of 16-20 mm glass thickness 5-6 mm), 10—the door (chipboard 20 mm thick), 11 — rear panel (hardboard or fiberboard with a thickness of 5-10 mm) 12 — the bottom (chipboard 20 mm thick), 13 — feet (washers made of plywood 20 mm thick), 14 — grille.
The method of connecting the body parts from CPD:
1 — part with holes for the nut and screw, 2 – part with open eat screw with countersunk head, 3 – screw, 4 – nut.
Method of manufacture “bricks” or “stones” with the natural texture of the surface:
1 — glue (epoxy, PVA or silica), 2 — plywood or cardboard plate, 3 — sieve with dry sand.
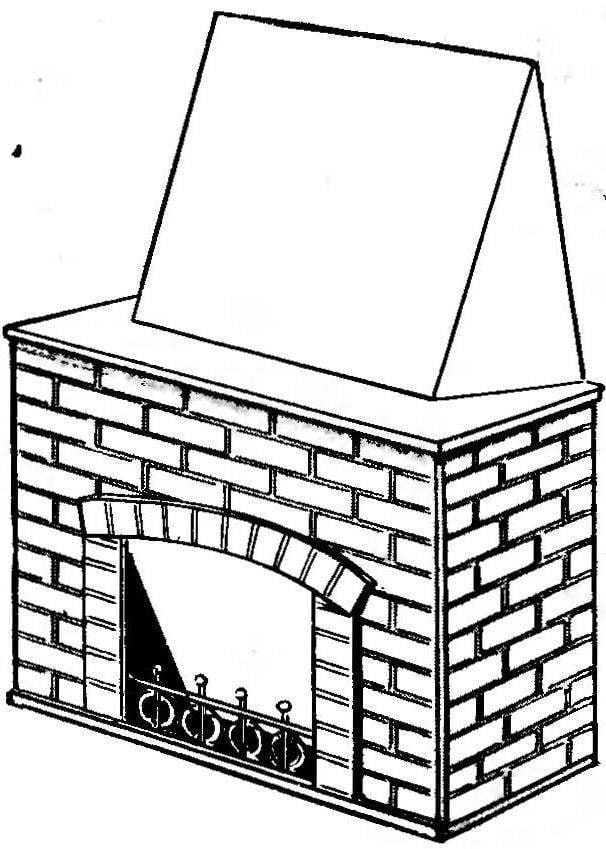
Probably, there is no need to describe in detail the design of this fireplace. In fact, it’s just a box of any material at hand — rails, plywood, chipboard and fiberboard, sheets of hardboard. Will talk about some methods better simulate the surface of our structures, giving it an almost absolute certainty.
Let’s say you wanted to “lay out” your fireplace “brick”. Best imitation of it is obtained from plates of thick cardboard, cut into a brick-and glued on the front to the side walls of the fireplace bustilatom or polivinilatsetatnym (PVA) glue. Then use any filler (e.g., carbonate) sealed the joints between the “bricks” in such a way as to obtain simulated seams, and the entire fireplace is painted the first layer crackn. There would be the best white emulsion, tinted with gouache paint or dry pigment suitable tone.
Causing the first elephant, mix the two banks of the paint lighter and darker than the main
tone. Now crumple half of a newspaper page swab, lightly dip it in paint and make a few test prints on a sheet of paper. If “print” is a clear, paint on “bricks”.
After drying, the same operation is done with paint of a different tone. As a result, “bricks” are becoming quite a natural colour texture. It remains to paint the seams between the “bricks” gray paint — and your fotokartin ln can hardly be distinguished from the present.
Good looks and a fireplace, lined with so-called wild stone. To simulate these stones can be all the same cardboard, hardboard or plywood, but to create on the surface of these plates is quite natural texture suggest the following method.
On cropped in accordance with a pre-designed sketch of the plate is applied maple (epoxy, polivinilatsetatny or even silicate), and then the surface is “sown” normal river sand from sieve ILN sieve. After the glue dries, the excess sand will evalaute and you will see plastuni with the surface, very reminiscent of stone. To enhance the effect, I advise you to look for the different shades of sand and grit. The finished plates are glued to the surface of patacamaya exactly the same way as “bricks.” It should be noted that sandy finish is well suited for cardboard “bricks” — we just pick up a fine sand suitable color.
And now about the main thing — “Plamena – proizvodima” installation. The easiest way is to put at the top of the box PA maximum distance from a translucent screen of three to four children’s film projector. You can, of course, to design the device, switching the projectors and providing on and off these devices in a desired sequence and rhythm; easier still to provide every projector with individual breaker with an arbitrary frequency on-off. As such breaker is the perfect starter from the fluorescent lamp is enough to connect it in series to the filament lamp of the bottom of the projector. – While images of flames in razlicitih phases will overlap each other, then alternate, and all this will create quite a true game of the living flame.
As can be seen from our figures, the luminous flux of the projector carrying the image enters first in naklonno located a mirror which reflects them, and is on a translucent screen. The mirror here is used the usual. It is only necessary that its dimensions should not be less than the image in this area.
As for the screen, then it will have to do it yourself. The simplest option is to use frosted Mylar tracing paper, pulling it on a wooden frame. Almost ideal tension can be achieved by gluing the film to the frame with glue BF-2 or “Moment” and then propadu her electric iron.
The configuration of the optical system is not too complicated. Poocheredno including overhead projectors (without the starter-breaker!), get a clear image on the screen. And we must try to image of coal and logs coincided when using any of projectors or all projectors at the same time.
That’s all. Can only advise: it is often “drown” photocabin to seldom — TV. Soon you will see that the first promotes communication and understanding, and the second is just a fruitless pastime. However, everything is good in moderation.
Igoog MNEVNIKI
Recommend to read SCALE — POTATOES Dissolved in water the salts deposited on the walls of the vessels for boiling in a permanent scale, which is difficult even mechanical cleaning. However, the scale is well softened and... BOARD AND SAIL Long-awaited summer, and with it the time of descent of your windsurfer on the water. But how to start it moving on the water surface? How to rotate? And it is at first, and perhaps most... Scroll back to top
 Unfortunately, for most citizens a real fireplace — a luxury almost unavailable. The fact is that modern concrete structures where we live, does not provide a system of chimneys. However, it is not so difficult to build a simulation of a real fire, and mount it from almost real brick or stone. More difficult to recreate blazing in the fireplace fire, but to solve this problem is possible.