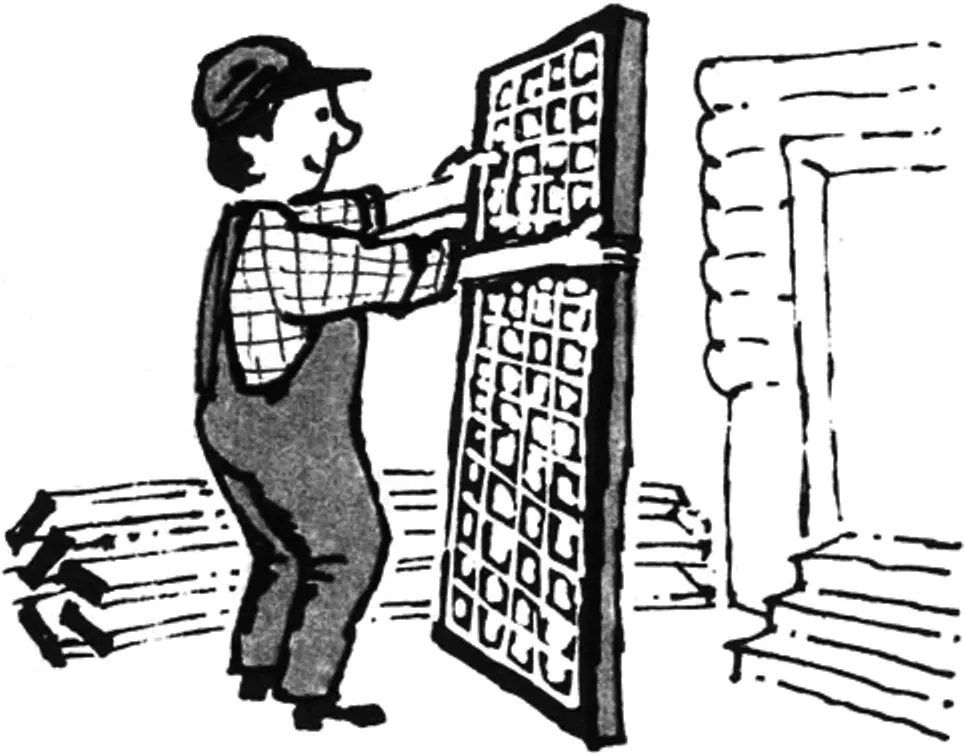
It’s a pity to throw away plywood offcuts, thin boards, and chipboard, even if you have nowhere to use them. However, I have a suggestion: make a kind of wood-air panel from the offcuts.
You will need glue (PVA or epoxy), battens, strips, paint (or varnish), and possibly fabric (for example, an old sheet). The necessary tools are a handsaw or a circular saw.
So I outline the main idea, and the details will depend on your possibilities or intentions.
First, from the material you have, cut more or less identical tiles (say, 100×50 mm). If you will use offcuts of different thicknesses, sort the blanks into three groups by thickness so you can lay three even layers.
The second stage of preparation is assembling a frame of battens to the size of the future panel. Do not fasten the frame yet—only lay it out on a flat surface where you will work with the blanks. Then proceed to assemble the wood-air panel itself.
Within the outlined frame, lay the first layer of blanks in a checkerboard pattern, as shown in the figure. This is the face layer, because regardless of all subsequent steps it should turn out the smoothest.
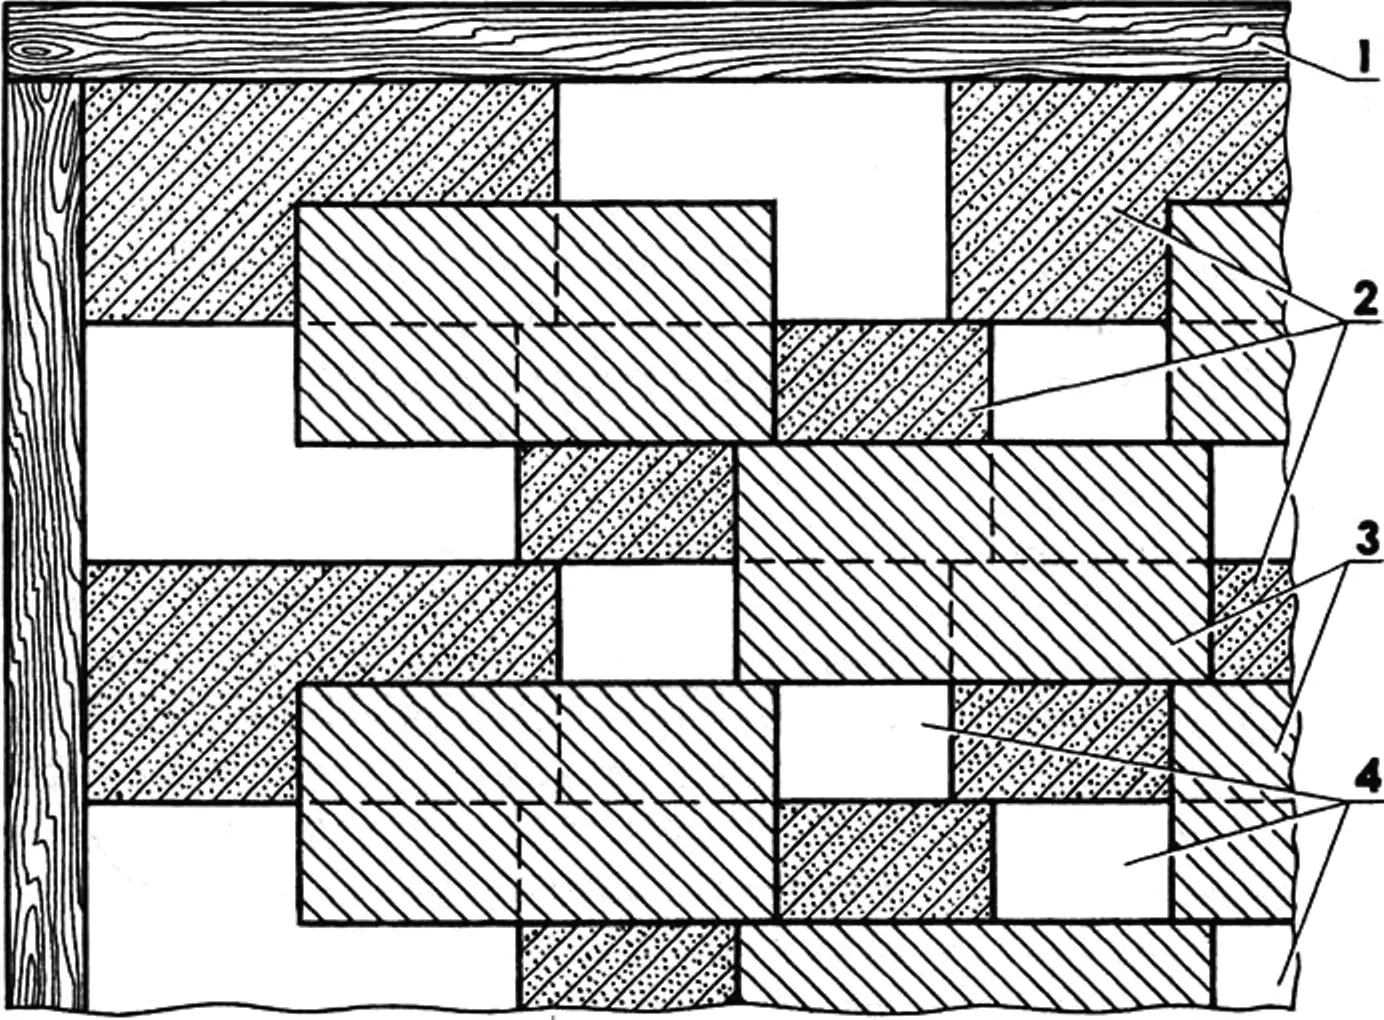
1 — frame; 2 — blanks of the first layer; 3 — blanks of the second layer; 4 — openings covered by the third layer of blanks or fabric.
Lay the second layer on top of the first also in a checkerboard pattern so that the center of each upper blank ends up over the corner joints of the lower ones. Coat the contacting surfaces with glue before laying. If needed, press everything down from above with something heavy.
Looking carefully at what you have got, it is easy to notice that the tiles join into chains running parallel to the diagonal of the frame. The task of the third layer is to connect the chains by covering the remaining openings, so at least three layers of blanks are required (although, depending on the design, two layers may be used).
So lay the glue-coated blanks of the third layer (also in a checkerboard pattern)—and as a result you will get an opaque but essentially lattice-like (or rather, cellular) panel.
Such a panel can already find a use. For example, it can serve as an original ventilation grille with seemingly concealed openings. Note: if the panel is assembled from three layers, it paints very well with a spray gun because, despite the complex shape, all its surfaces are accessible from both sides, and there seem to be no through holes.
You can also make shed walls for drying something from such panels, although simpler technologies probably exist for that.
Now about how to make such a panel so you can use it as a decorative panel. For this, coat the face-layer blanks with glue and lay a piece of fabric on them evenly, without pressing hard. When the glue has dried (set, polymerized), proceed to the most interesting part. Here epoxy glue seems most convenient to me. It will become clear why.
So saturate the fabric in the gaps between the tiles with epoxy glue and place polyethylene bags with sand into these hollows—they will give the fabric a concave shape. After the glue cures, the bags can be removed easily—epoxy does not bond to polyethylene. And the fabric saturated with it will gain rigidity and become a structural material. That is why epoxy glue is preferable.
At this stage there are options. For example, instead of bags you can lay polyethylene sheets with sand poured on top; it only matters that the fabric can move freely and evenly, forming hollows. You can even do without film and pour sand directly onto the fabric: part of it, sticking, will become a decorative layer. After painting, such a surface also looks interesting.
Now is a good time to discuss strength. The resulting panel does not have sufficient stiffness and sags. To avoid this, frame it with strips or battens. To reinforce the panel you can also glue blanks to the frame along the perimeter.
Other methods work too. Someone will use glue, someone screws, and someone something else—and each will be right, because they know best what they need. I will only hint that in large panels, to increase stiffness and strength, it is good to use a strip or batten across the middle of the panel—instead of one row of blanks in the second layer (of course, matching their thickness). How the edges of the panel and everything else will look depends on your possibilities, needs, imagination, and ingenuity.
«Modelist-Konstruktor» No. 9’98, A. POPOV
Recommend to read
 WEAPONS AIR FIGHTERS
The followers of Cordoba modeling we offer today a selection of two closely-related within the meaning of materials. In the first of them tells of a very successful training model, which... POLISH… SOAP DISH
When processing the surface of any material, whether metal, plastic or wood — always a problem: how best to fix sandpaper to make it easy to work with. In this case, can help out an...
