Every individual developer strives to ease the heavy physical labor involved in various construction tasks by mechanizing them whenever possible. However, as often happens, there is no electricity on the site at this stage.
One of the most difficult yet essential tasks is preparing mortar and concrete mixtures. In this case, both the performance and the quality of mixing are of great importance.
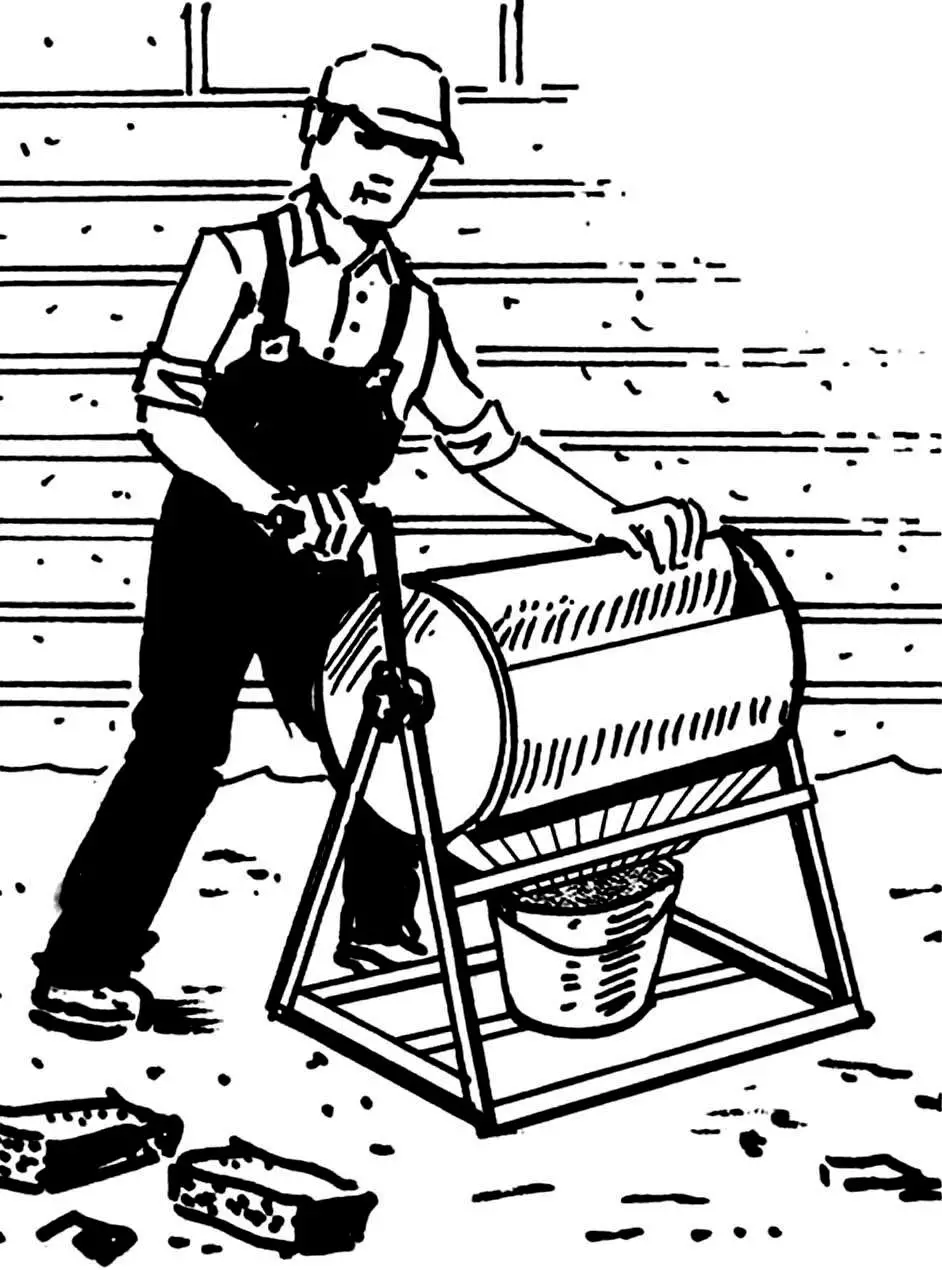
Obviously, a shovel and a trough won’t solve the problem, which is why builders in such situations try to purchase or build a hand-powered concrete mixer. However, choosing the right design and finding the optimal solution can be challenging. That was the case for me. After reviewing available mechanisms at construction markets and studying relevant literature, I eventually… developed my own version. I built the structure almost entirely from materials at hand and thoroughly tested it during the construction of my own summer house.
Now I present the improved design of this concrete mixer to the readers of the “Modelist-Konstruktor” magazine.
Externally, my concrete mixer looks almost the same as others. The frame is shaped like a regular prism laid on one of its lateral faces, and the mixer is of the drum type. The unusual feature of my mixer is that its casing is not welded into a closed cylinder as usual. Instead, the final quarter is bent inward in a spiral and extended until it intersects the diametral plane (or even a bit further) passing through the beginning of this quarter.
This mixer design eliminates the need for blades, ribs, or other internal mixing elements: mixing occurs partly during drum rotation and fully at the moment when components fall from the inner edge of the casing to the outer surface (like water in a waterfall).
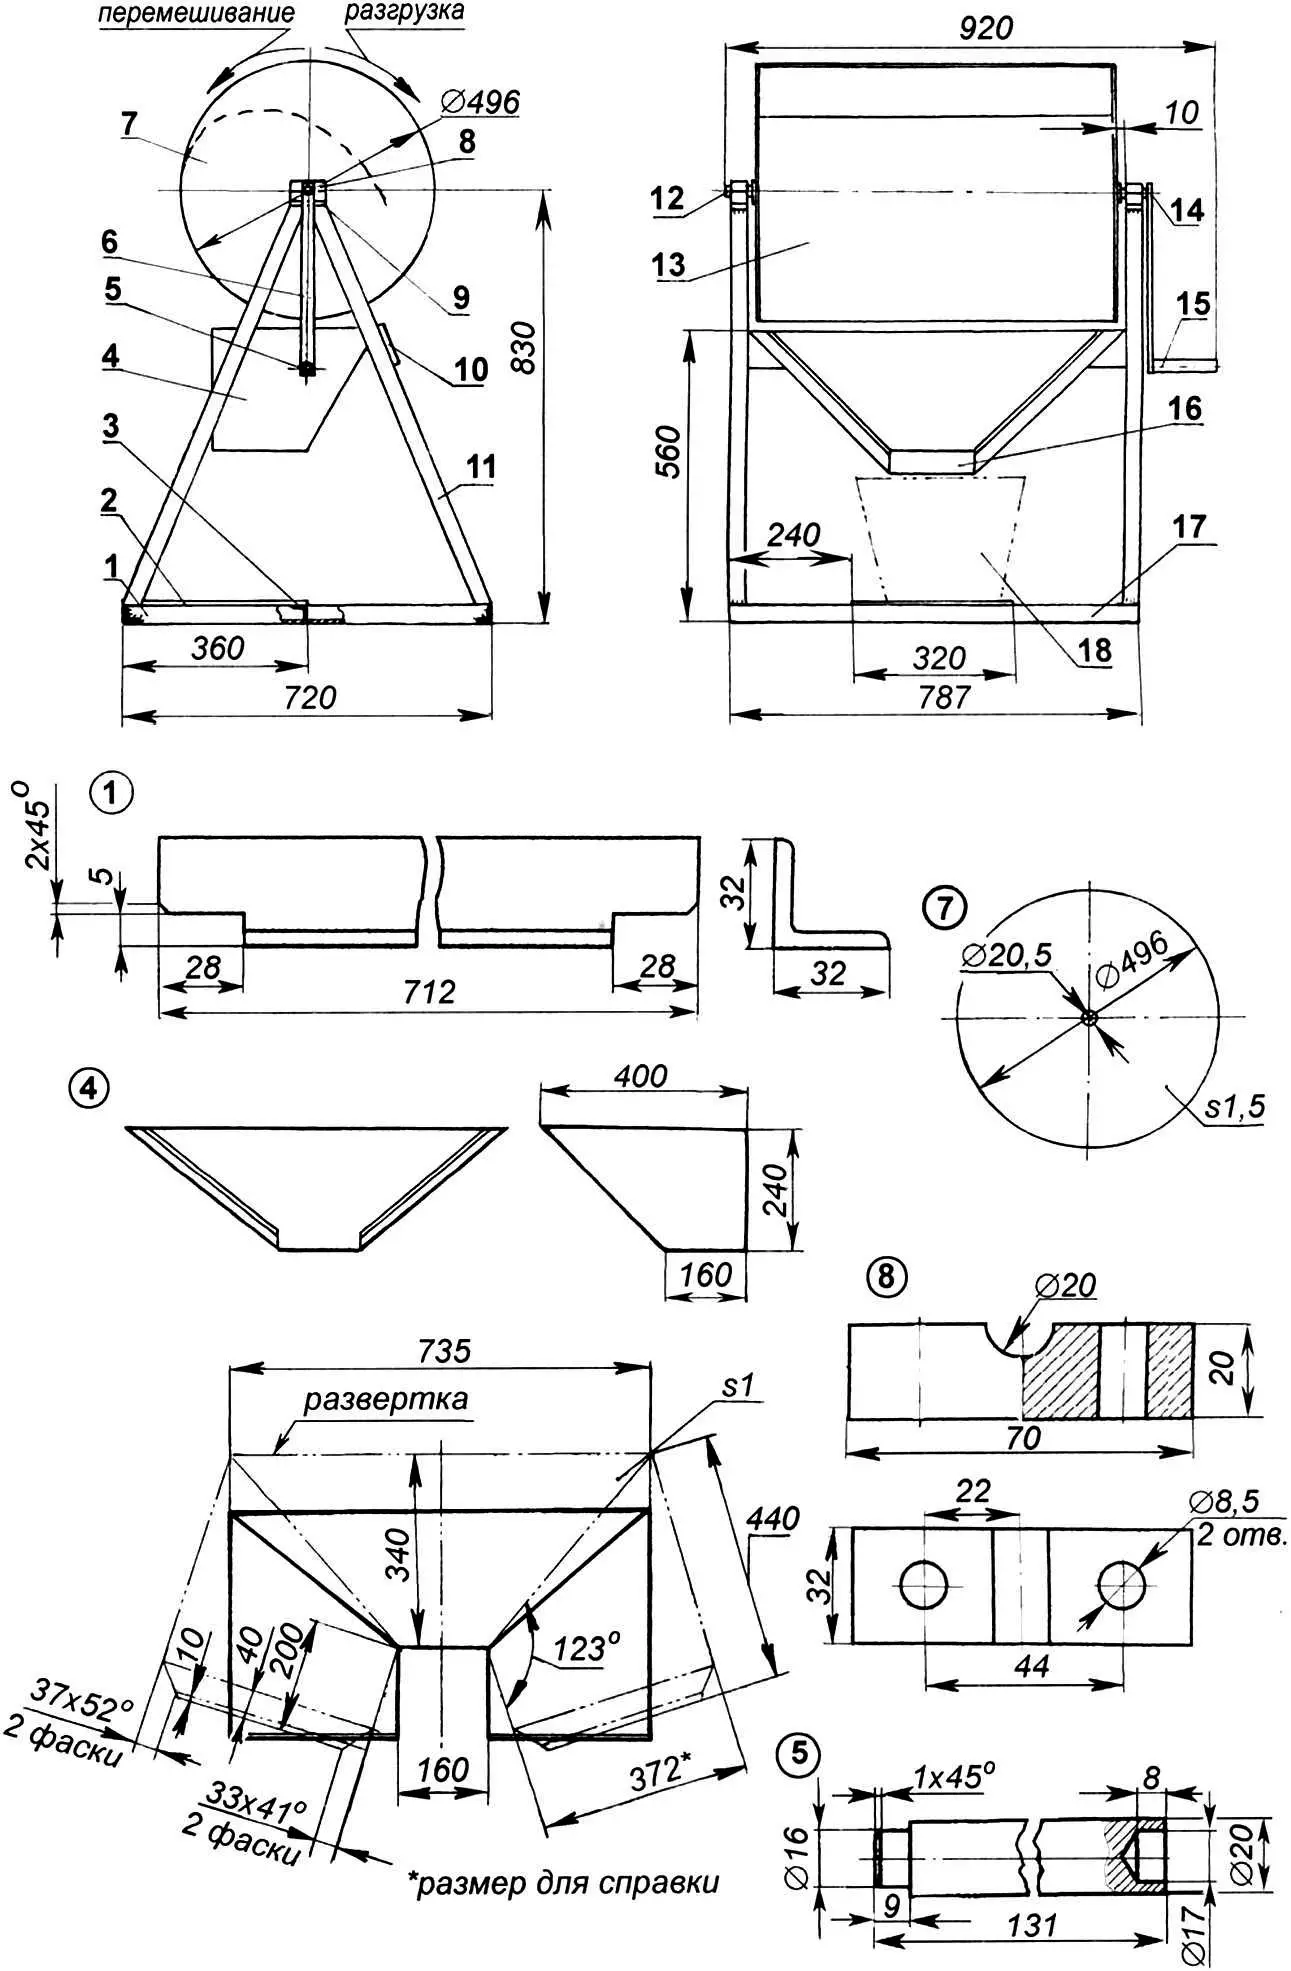
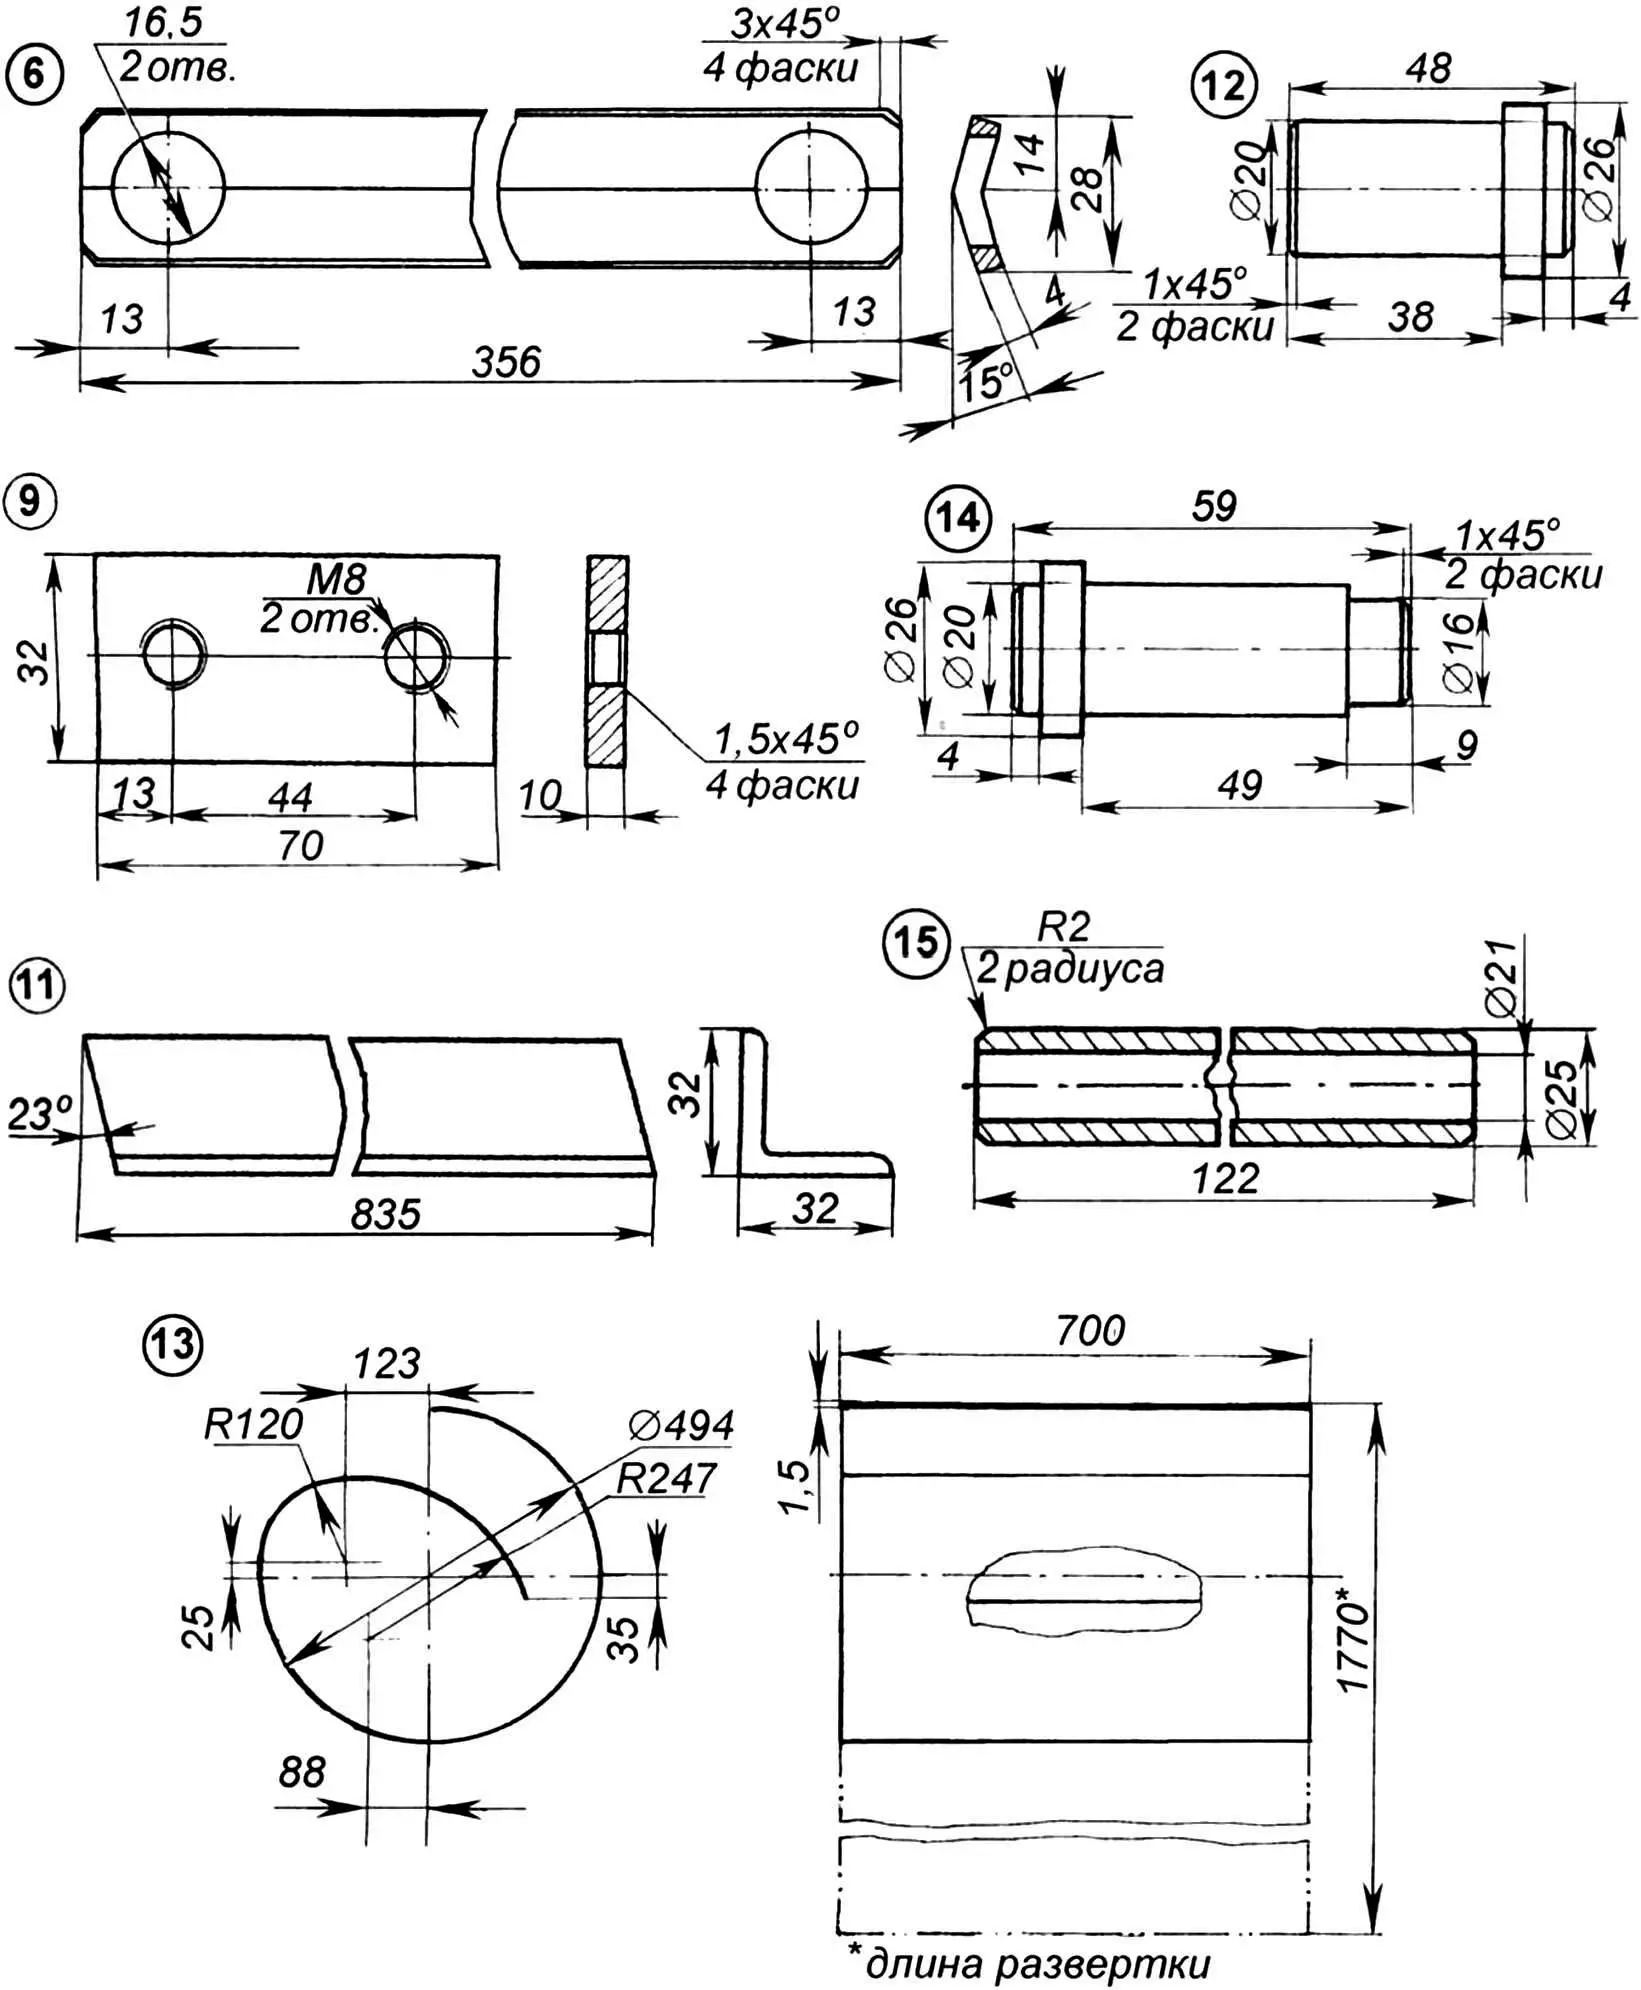
1 — longitudinal frame bracing (angle 32x32x4, 2 pcs); 2 — platform for placing the transport container (checkered steel sheet s3); 3 — crossbar (angle 28x28x3, L712); 4 — chute (steel sheet, s1); 5 — handle shaft (St3, round 20); 6 — handle lever (St3, flat bar 30×4); 7 — drum flange (St3, sheet s1.5, 2 pcs); 8 — sliding bearing half (hardwood block 32×20, L70, 4 pcs); 9 — cover plate (St3, sheet s10, 2 pcs); 10 — spacer (St3, sheet s3); 11 — frame upright (angle 32x32x4, L835, 4 pcs — mirrored in pairs); 12 — drum shaft (St3, round 26); 13 — drum casing (St3, sheet s1.5); 14 — drum axle (St3, round 26); 15 — handle (St3, tube 25×2); 16 — tension band (St3, flat bar 30×1.5, L160); 17 — transverse frame bracing (angle 32x32x4, L787, 2 pcs); 18 — transport container (bucket)
Another advantage of my concrete mixer over others is the absence of a special loading/unloading hatch that needs to be opened before discharging and tightly closed after loading. This significantly reduces the mixing cycle time, thus improving equipment productivity. But that’s not all. In conventional mixers, it is quite difficult to determine the mixture’s readiness. I can observe the mixing process as it happens and add water if needed — practically without stopping the mixer, maintaining productivity and ensuring high mixture quality.
The casing requires a fairly large steel sheet. However, it can be welded (or even riveted) from two or more smaller sheets if needed. The chute can be assembled the same way from several metal sheets.
The mixer’s frame (bracing and uprights) is mostly welded from equal-angle steel 32×32 mm.
Note that the blueprints are designed for fabrication in a properly equipped workshop with facilities for cutting, bending, and welding metal, as well as turning and drilling. However, this shouldn’t discourage hobbyists — the prototype of this mixer was made by me literally “on my knees” from whatever materials I had.
For example, I made the casing from roofing iron, the flanges from 10-mm plywood, and the frame from wooden beams. All parts were connected with M5–M6 bolts. Despite the primitive construction, I managed to prepare the entire volume of concrete I needed — for building the foundation of the summer house and preparing mortar for plastering its walls.
To prepare the mix, components — sand, gravel (crushed stone), cement — can be loaded in any sequence, but it’s better to place the cement between the inert materials. The mixing begins after adding water, which also helps the mixture slide along the drum walls. Practice shows that 10–15 drum revolutions (20–30 seconds) are enough to get a quality mix. So, the mixing cycle mainly depends on the time it takes to load the ingredients. To save time (and effort) delivering the mixture, the mixer can be positioned directly above the formwork.
The mixer can also be used to prepare clay paste in just a few minutes. Just make sure the dry clay is crushed to granules of 3–5 mm before use.
The mixture is unloaded by slowly rotating the drum clockwise.
After use, the mixer must be cleaned. Pour about a bucket of water into the drum and rotate it vigorously. To remove dried mortar or concrete residues, add a quantity of gravel — or even better, crushed stone — along with the water and rotate again.
G. KASATKIN
Recommend to read
 WITHOUT GETTING HANDS
Who painted the wall or ceiling a paint roller, he knows how to get dirty the hands. Simple device, consisting of pobedilovo package sandwiched between the tube and the plastic part... ALL ABOUT SCREWDRIVERS
Screwdriver is a tool, which, perhaps, to the greatest extent characterizes the "homebrew". Any self-respecting "handy" invent to themselves "personal" screwdriver, unlike any previously...
