The work on the case basically ends. You can start assembling the engine. Our model is equipped with one of the latest versions polutorachasovogo engine “MDS 09”. I must admit that after factory alterations to the engine it is possible to work. “MDS 09” today is the best and, unfortunately, the only domestic model motor polutorachasovogo class. He is relieved of most of the inherent flaws: easy to start, good holds mode and provides for resource time good power. Glow version of the engine “spins” up to 28, OOO rpm, and we used the proposed model with lightweight propellers up to 24, OOO rpm.
The motor mount on the aircar somewhat unusual. It is mounted using the angled bracket, is pressed against the rear wall of the housing with two screws M3 (all standard screws M2. 5 on the motor we replaced the M3, which greatly increased the reliability of all motor units), and a small auxiliary “box” screwed to the cylinder head it back the regular M3 screw. Thus, the motor is attached to the body at three points. Bracket perceives lateral load, and the check box is vertical. Regular foot Carter either cut down or used as brackets hinge of the hood.
The only disadvantage of this method of mounting the motor — increased accuracy of the marking and gluing steel threaded bushings in the wooden parts. If it fails, do not worry. Enough to re-do more than a simple angle bracket and drill holes in it for screws adjusted the markup and try again to fix the motor. And for protection against accidental displacement of the engine all three mounting screws shall have countersunk heads and seats for them to be countersink.
So the motor is in place. Then, vytachiv spinner and drawn in accordance with its shape the contours of the bow model, you need to choose the type of hood. There are two versions: with a removable top (the bottom part that covers the engine cylinder, rigidly mounted on the body) and celinechannel. The first is easier to manufacture, and the second facilitates the Assembly and disassembly of the motor. Our car used the first option: the lower part represents a node formed by a flat bottom plate out of plywood with a thickness of 1 mm and the hood cylinder — docked her curly part of the tree. If you initially prefer this kind of hood, design the Assembly so that the bottom plate of the bonnet made integral with the bottom coating of the sidewalls of the housing.
And just fit all the details, you can start profiling the sides and rear of the pole “appendage” of the body. Note that from the size of this “process” depends on the volume of the fuel tank. So if you’re used to long to mess with the adjustment mode before running the model or your engine is the increased fuel consumption, it is better first to put the tank is the maximum allowed volume, which sets its dimensions the shape of the rear part of the “fairing”. In the front part of the sidewall needs to have a vertical forming, as the hood pressed close to the cylinder. Then the sides to make narrower from top to bottom, to smooth out the heaviness of appearance of the engine parts.
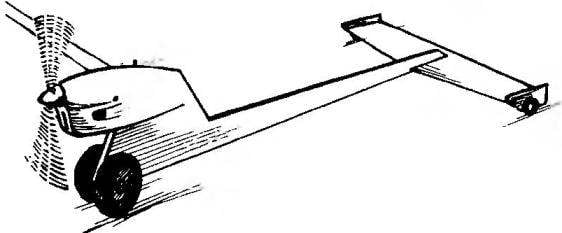
Detachable fairing hollows out a part from a whole piece of lime and adjusted to the other ready parts of the model. The front part of the pylon strut housing kruglitsa to obtain a streamlined cross section, and the axis of the main wheels in a drilled hole is glued a steel bushing under the ball bearing unit.
The stabilizer is cut from a sheet of aluminum with a thickness of 0.8—1.0 mm and is glued at a slight angle into the slot of the tail boom. The reliability of this connection needs to be increased due to drilling in the stabilizer of the mesh holes with a diameter of about 1 mm, as well as performances of a pair of pins through the bamboo with a diameter of 3 mm. of the Axis of the rear wheels can either be placed on upwardly bent lugs of the stabilizer, or is integral with miniature teardrop fairing, the slots of which a plate is inserted stabilizer.
There was one Assembly operation is the mounting of cord strap. Before that you need to complete the model of the aircar that all removable parts with maximum precision to determine the center of gravity as the length and height of the machine. If you have followed technological advice and used the recommended materials, the center of gravity will be located about 30 mm behind the front wheel axis and 5 mm below the level of the upper end of birch sidewalls of the housing. In the body side is drilled through for receiving a cord groove under the bar, where she pasted with a preliminary degreasing duralumin parts and the coil affixed to the shank strap thin cotton thread. After polymerization of the adhesive compound responsible is enhanced by two vertical screws M3 epoxy resin.
In the end, carefully trim the model to your taste and you are ready for test launches. Suppose you have experience in the operation of such models, still you will be pleasantly surprised how easily and without whims will start this machine, how steadily it goes even kartodromo with poor coverage. It seems that there really does influence the display effect of damping any vibrations of the enclosure.
Speed models are also looking very promising — after rotating the engine with our best “vartuli” aircraft type of new growth as the speed was equal to 12 km/h! And this is important: because in the future you will probably have to pick up your model and its own propeller.
V. NOVIKOV
the head of the circle of automodelisme
 Read in the “Modeller-designer” interesting article on the new generation car with aerobrigada, the boys from the circle, which I direct, has decided to develop the proposed innovation. Its essence was the transfer stabilizatory plate from the zone of slipstream in close proximity to the track surface of the track, where the model moves at a high speed must manifest the aerodynamic ground effect. Although models that are built in our group, has repeatedly won prizes in on competitions and seemed to be brought to constructive and technological excellence, yet wanted to try something new.