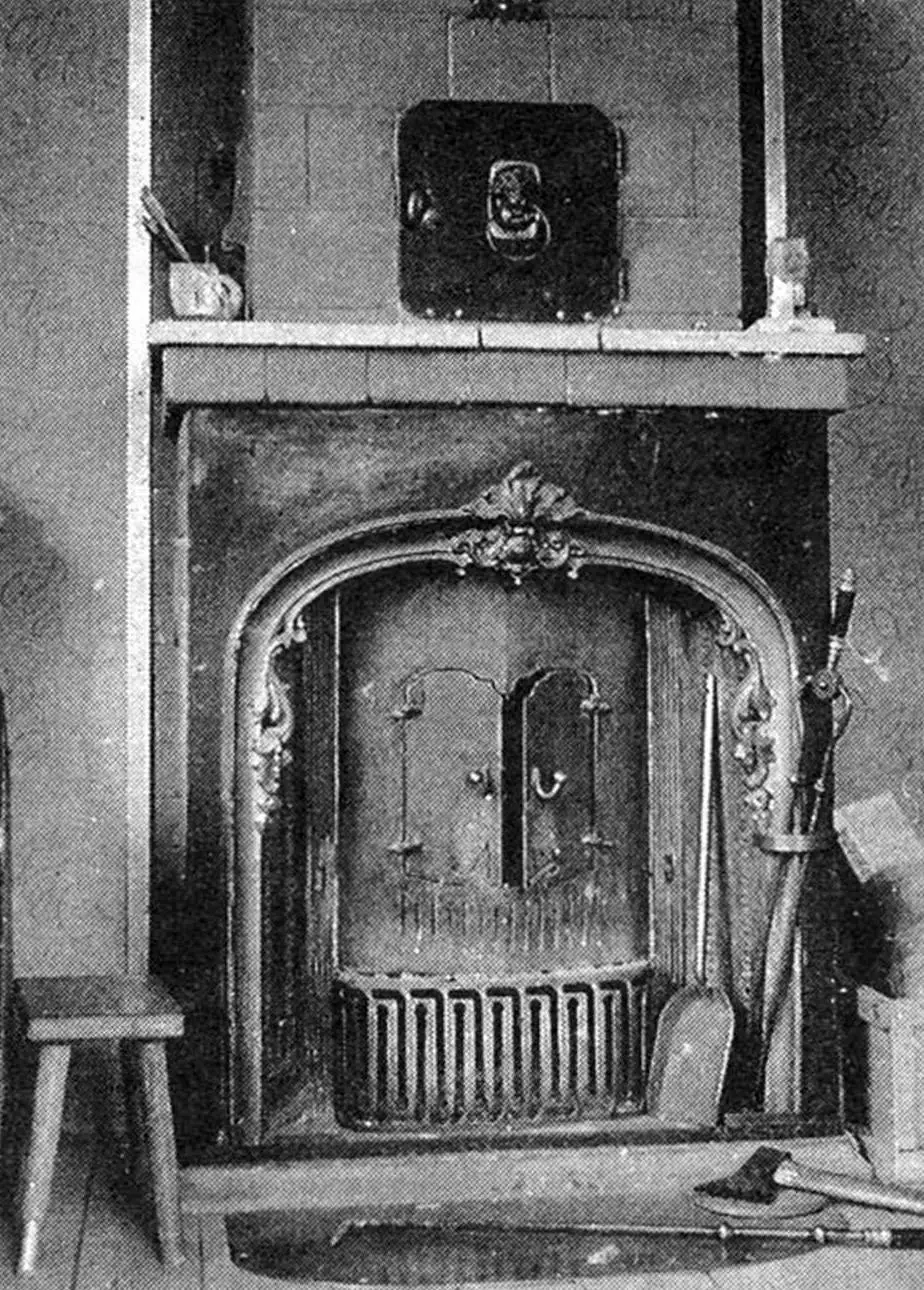
If the layout of a country house or dacha is such that the largest room borders the kitchen, then instead of separated heat sources (an ordinary stove or fireplace in the “living room”, and the stove in the kitchen) it makes sense to build a stove-fireplace-stove complex.
In our country house this is exactly how it has been done: all heat sources are combined into a single volume with one flue (of course, using it alternately), which provides a noticeable saving of space and materials. The feature of the complex is that the fireplace can be easily turned into a stove and vice versa. In addition, by manipulating the damper sliders, you can heat the kitchen from the large room or, conversely, actively supply heat to the room from the kitchen.
Rapid warm-up of the complex is ensured by brickwork of the flues in a quarter-brick (on edge) and by the presence of the so-called calorifer in it — a free cavity between the flues that communicates with the “atmosphere” of the rooms and significantly increases the radiating surface. A very convenient through oven is also provided: one door opens to the kitchen, the other — into the room. Besides its direct purpose, the oven also serves as a serving window when setting the table in the large room.
To make the complex you need: high-quality red (for the main brickwork) and refractory (for firebox cavities) brick (400 pieces in total); a firebox door sized 250×210 mm; four doors (130×130 mm) for the upper cleanouts, dampers, and the upper flue niches; nine doors (130×70 mm) for the ash pit, lower cleanout, dampers, and air vents; a grate (250×180 mm); an oven (520x250x250 mm); a cast-iron hotplate (410×340 mm) with one burner; four shutters (240×130 mm); four sheets of roofing iron (630×500 mm); a steel, brass, or bronze sheet (530×500 mm) for the fireplace damper; a sheet of “stainless steel” (630×250 mm); a steel angle (50×50, L350 mm); a duralumin angle (20×20, L3000 mm); a duralumin strip (30×2, L12000 mm); pieces of marble tile; strips of asbestos fabric with a total area of about 2 m2; sections of asbestos-cement pipe with a diameter of 120 mm; clay; sand and more.
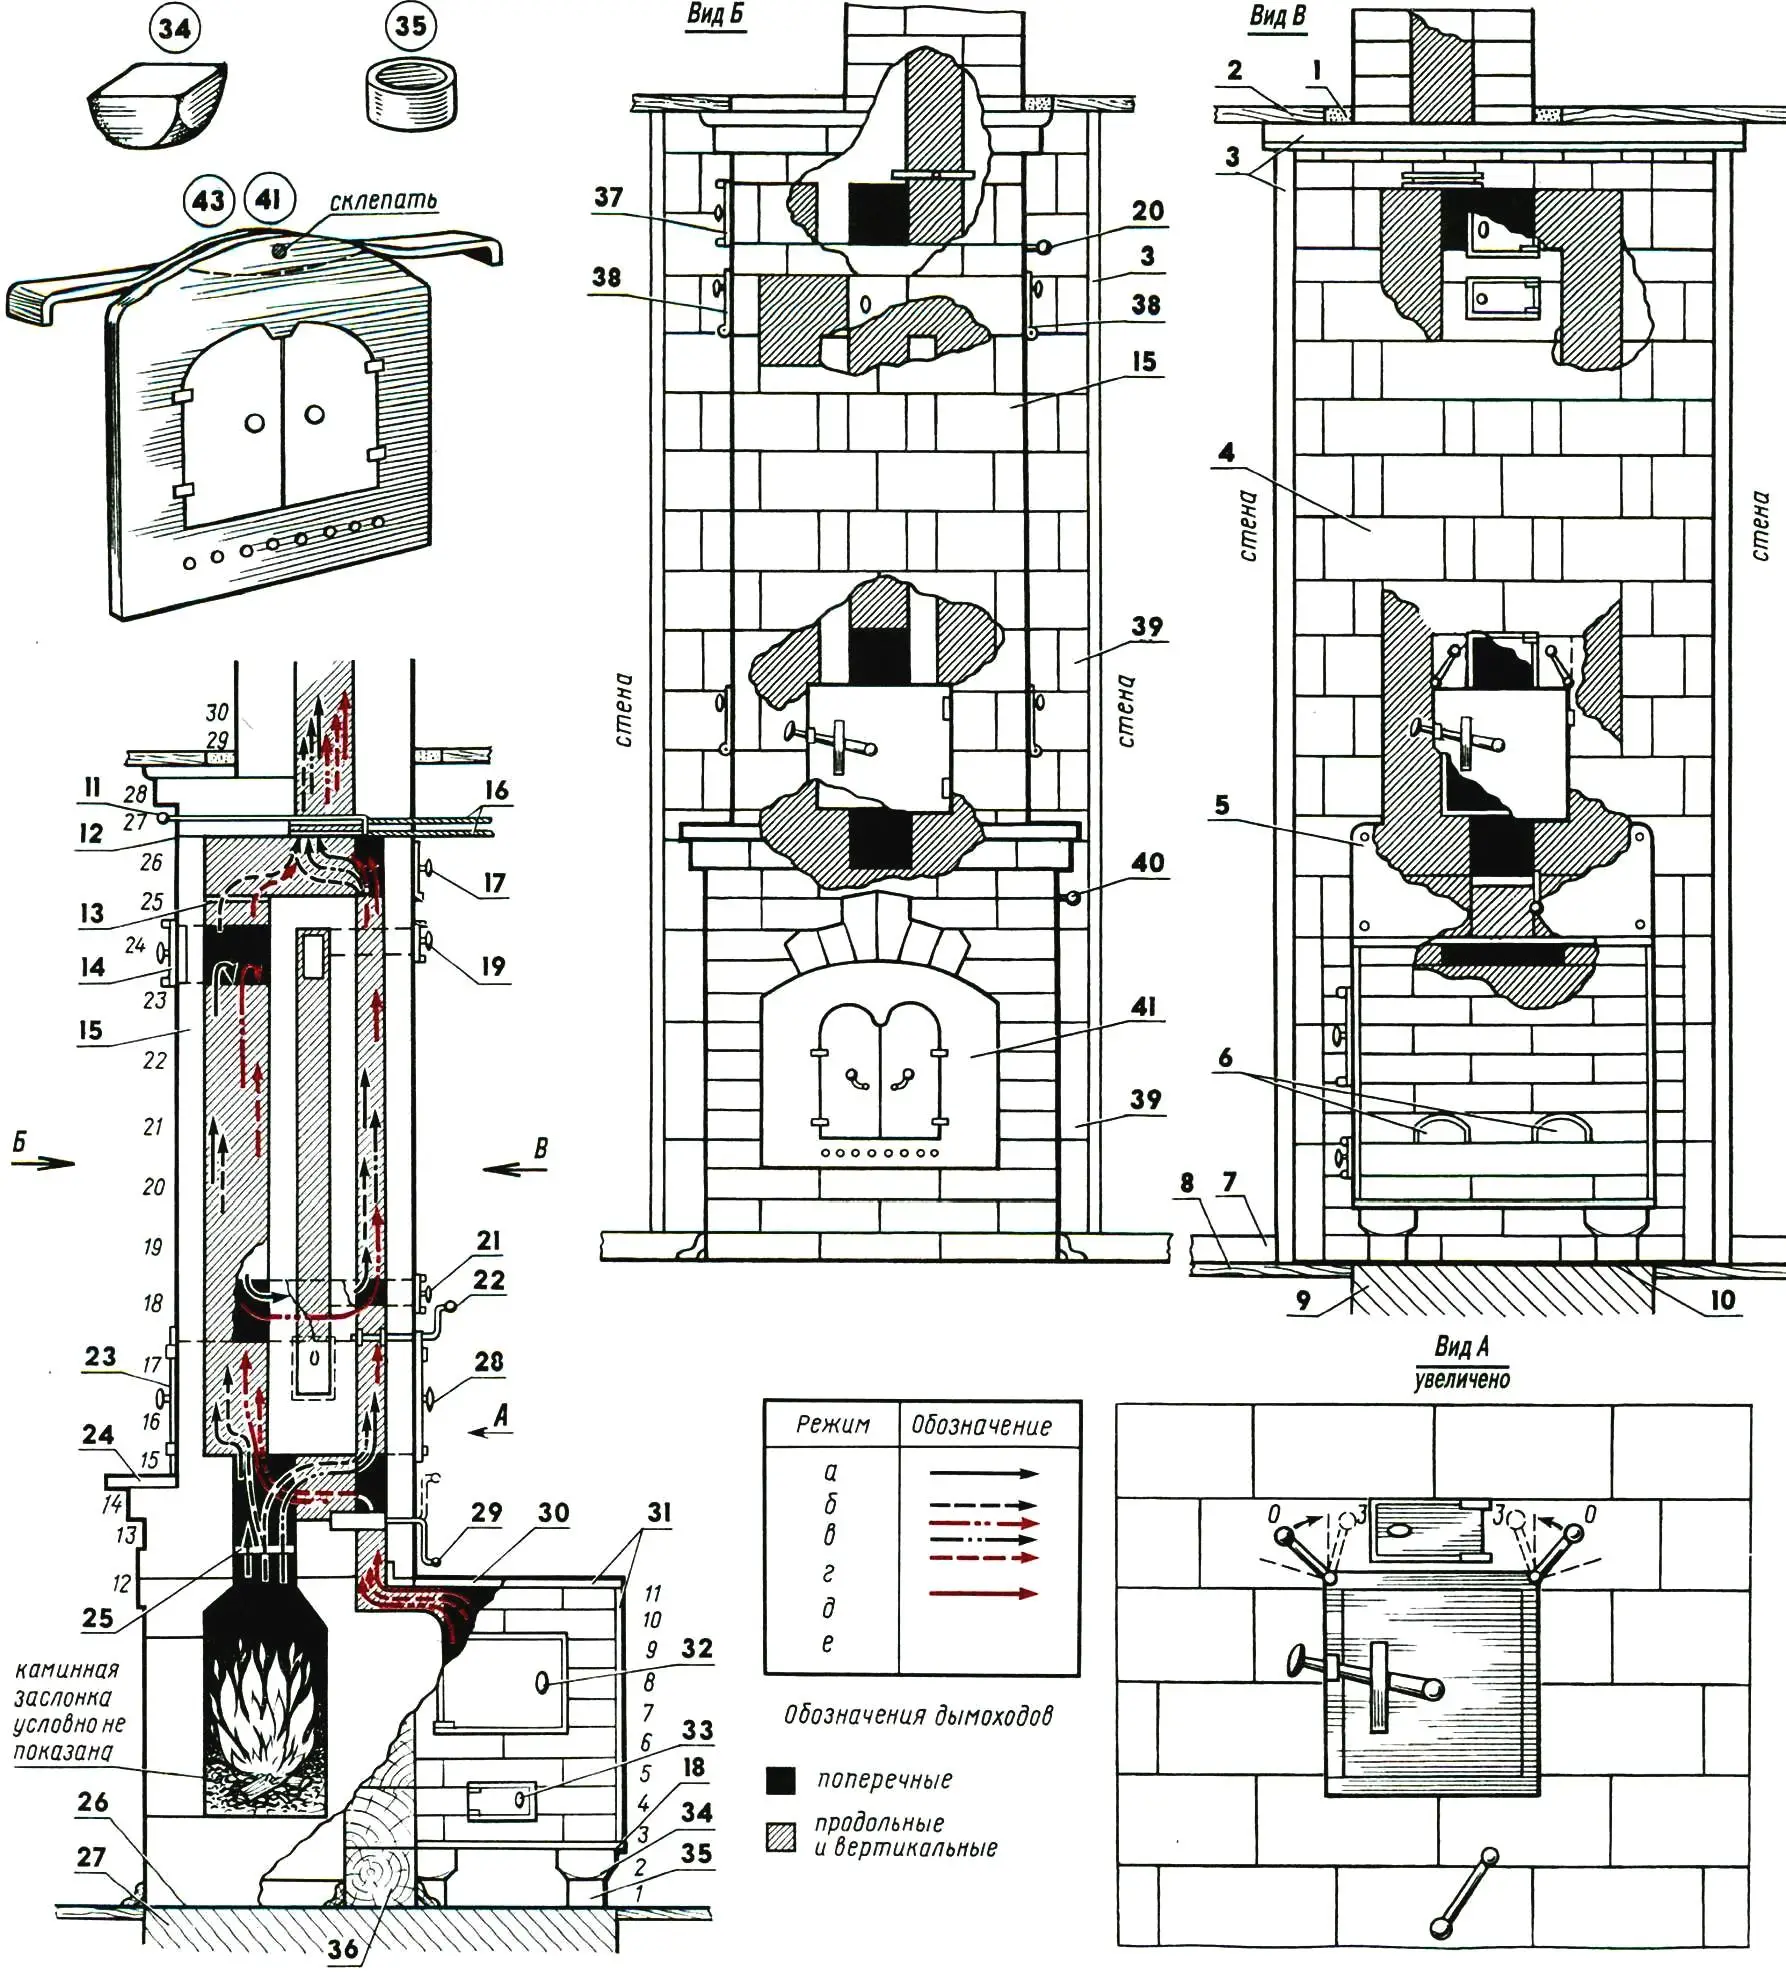
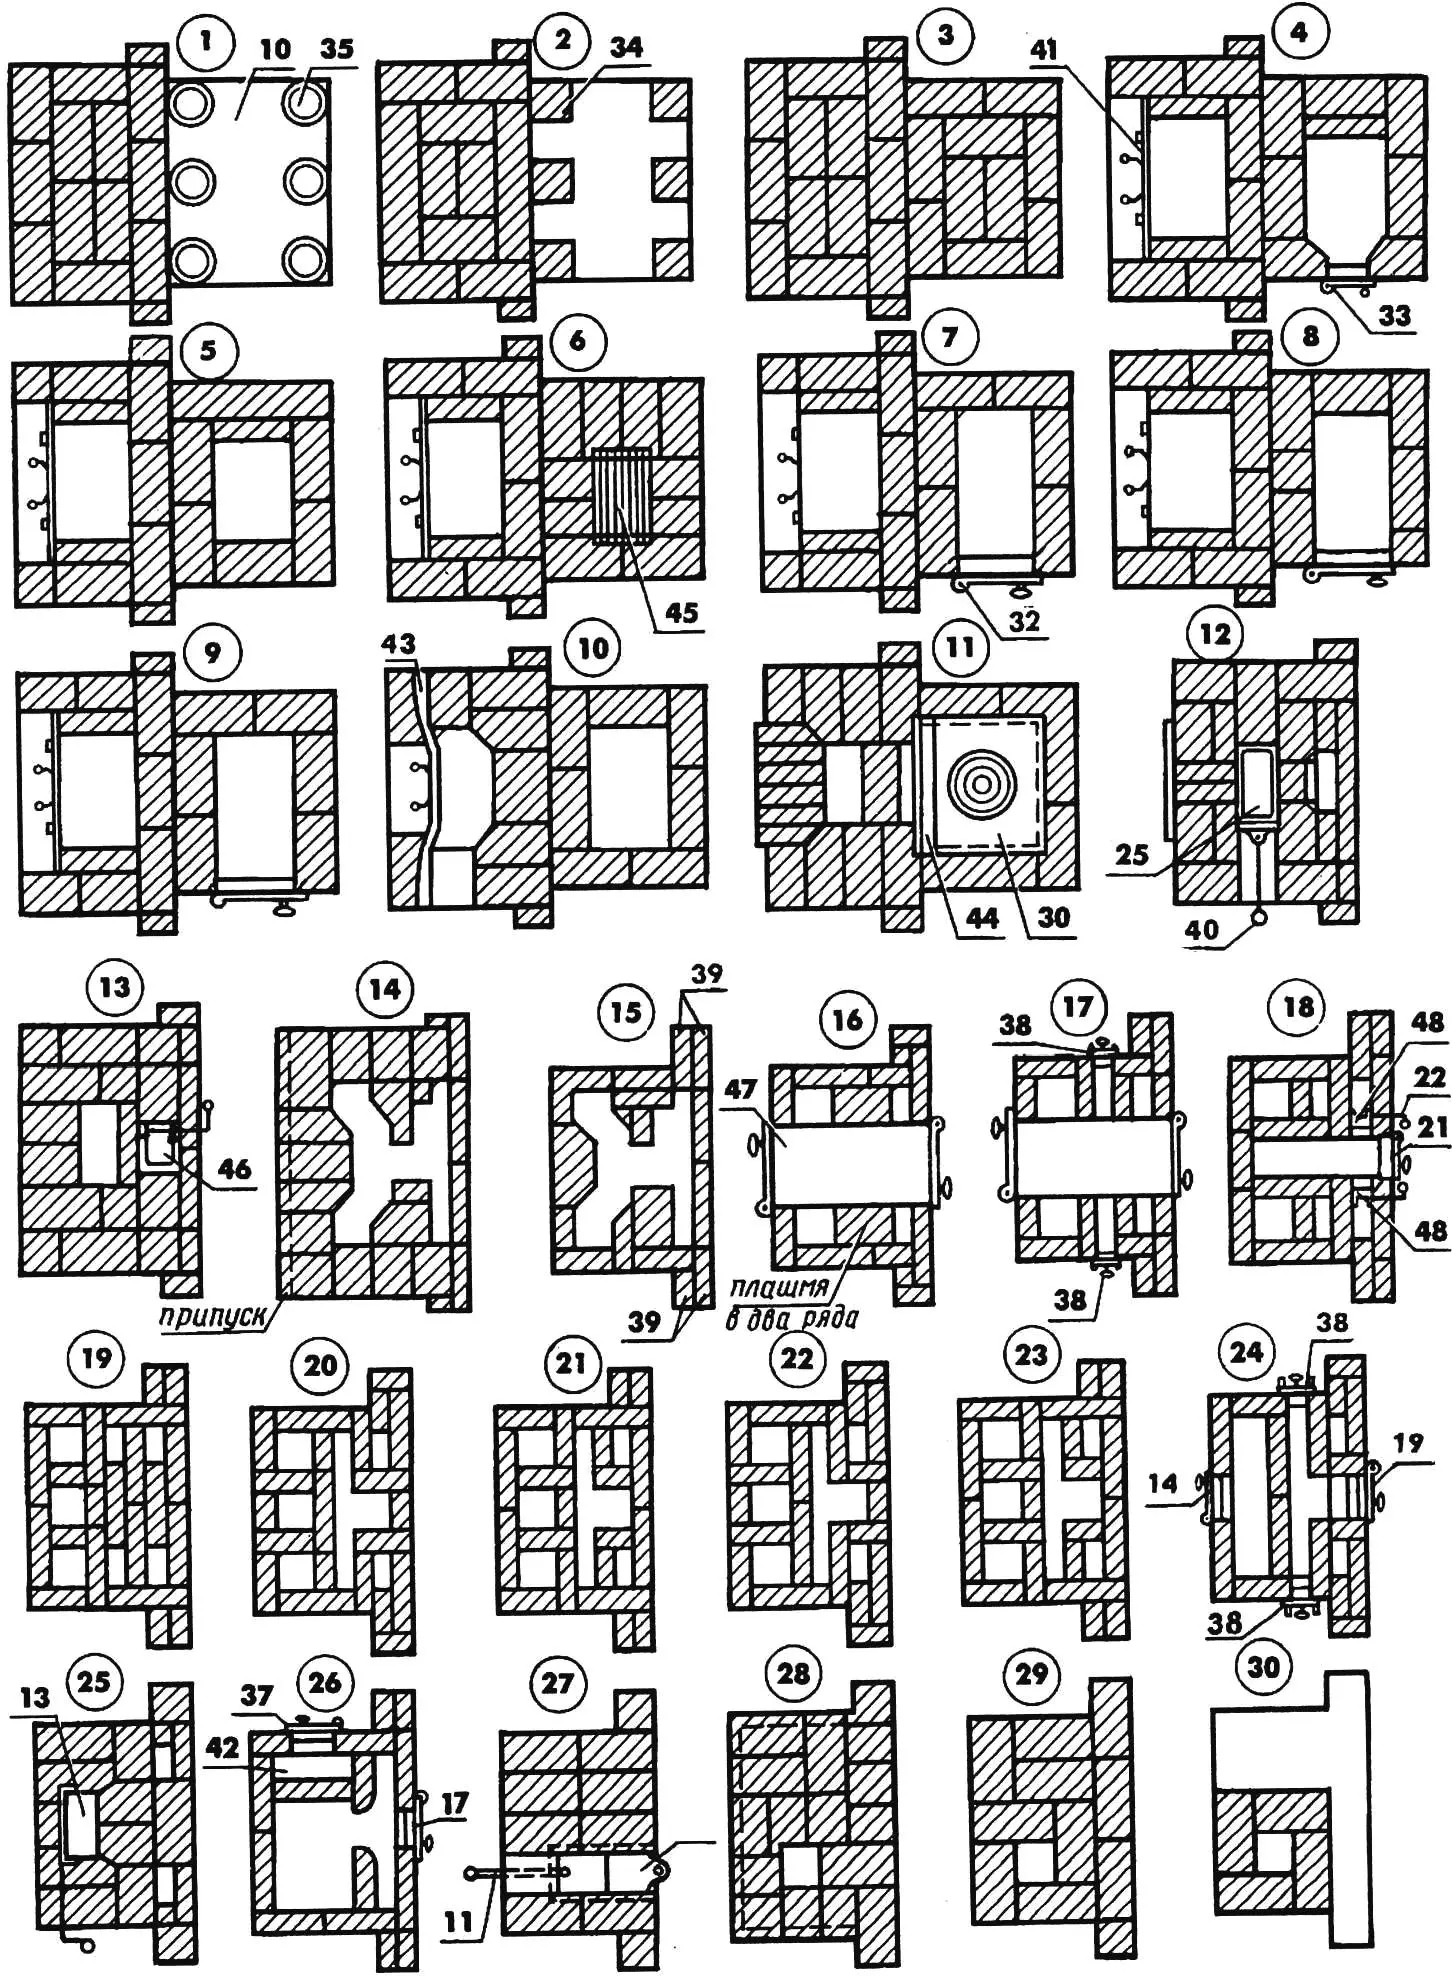
1 — thermal insulation; 2 — ceiling; 3 — cladding (duralumin strip 30×2); 4 — kitchen “mirror” with fireproof separation; 5 — screen (“stainless steel”, sheet s1); 6, 42 — flue niches (drying chambers); 7 — plinth; 8 — floor; 9 — stove slab foundation; 10 — waterproofing of the slab (ruberoid sheet and roofing iron sheet s1); 11 — damper handle No. 1; 12, 18 — gaskets (roofing iron sheets s1); 13 — damper No. 4; 14, 17, 21 — cleanout doors; 15 — fireplace “mirror”; 16 — damper No. 1; 19 — vent door; 20 — damper handle No. 4; 22 — damper handle No. 5 (double); 23, 28 — oven doors; 24 — fireplace board (marble tile); 25 — damper No. 2; 26 — waterproofing of the fireplace (ruberoid sheet and roofing iron sheet s1); 27 — fireplace foundation; 29 — damper handle No. 3; 30 — cast-iron plate with a burner; 31 — border/trim (duralumin angle 20×20); 32 — firebox door; 33 — ash-pit door; 34 — square block (6 pcs.); 35 — support (6 pcs.); 36 — inner house wall; 37 — niche door; 38 — vent doors of the calorifer; 39 — fireproof separation; 40 —damper handle No. 2; 41 — fireplace damper with shutters (steel; brass or bronze sheet s3 possible); 43 — arch reinforcement (steel, strip s1,5); 44 — edge frame (steel angle 50×50); 45 — grate; 46 — damper No. 3; 47 — oven; 48 — damper No. 5 (double). 1—30 — brickwork course numbers from bottom to top.
Since part of the brickwork (flues) is made on edge, the foundation for the complex is mandatory. On it you lay waterproofing — a layer of ruberoid and sheets of roofing iron: one under the fireplace, the other under the slab. Unlike the fireplace, the brickwork of the slab starts not with bricks, but with six shaped columns made of supports — 70-mm sections of asbestos-cement pipe with a diameter of 120 mm, filled with cement mortar, — and squares made from halves of brick.
The brick selected for brickwork must be of high quality: well-fired, with even corners and smooth faces. For the same reason it is necessary to carefully prepare the order drawings, use a good clay mortar, and make the joints as thin as possible — no more than 3 mm. A known rule is: the more brick and the less clay in the stove, the higher the quality of the brickwork. In this case, this rule is more than appropriate.
Next. All junctions of brickwork to metal parts (especially the walls of the oven and the firebox door) must be done using asbestos-cloth gaskets to compensate for their different linear expansion when heated.
The stove-fireplace-stove complex is controlled by several pivoting and sliding dampers. Three of them are main: the common No. 1, the fireplace-stove No. 2, the slab No. 3, and two manipulator ones: No. 4 and 5 (double).
To put individual components of the complex into operation in one or another mode, the following actions are required:
a) stove: close the fireplace firebox with the shutters and open dampers No. 1 and 2 (flues at full draft);
b) fireplace: open dampers No. 1, 2, 4 and 5 (maximum draft). The fireplace shutters may also be open;
c) stove with heating of the kitchen “mirror”: open dampers No. 1, 2 and 5;
d) slab with heating of the kitchen “mirror”: open dampers No. 1, 3 and 5;
e) slab with heating of the fireplace “mirror”: open dampers No. 1, 3 and 4;
f) slab in the maximum mode with preferential heating of the large room: open dampers No. 1 and 3.
Now a few clarifications.
Main damper No. 1 consists of two shutters riveted together like a “sandwich” for better heat retention after firing. It is accessible from the room and the kitchen, because it is equipped with a pull rod made of an 8-mm bar routed through the brickwork of the 27th course (see the order drawings).
Damper No. 2 is pivoting, but it can also be sliding, like No. 4.
As dampers No. 3 and 5, improved doors from factory-made units are used (sized 130×70 mm). Their factory handles have been removed, and the holes formed are riveted over. The pins from the lugs are knocked out, and instead, new handles made from an 8-mm bar are welded into the reamed holes.
The shutters in the fireplace damper are cut with the thinnest oxyacetylene flame according to a chalk pattern and hung on hinges so that the same gaps are preserved along the entire contour. Acting as an air inlet (ash-pit) damper in the stove mode, these gaps do not deprive the observer of the ability to admire the live flame even when the shutters are closed.
The order drawings show how the main brickwork is tied to the fireproof inter-wall separation. This prevents uneven settling and the formation of cracks between them.
Another explanation. The figures and order drawings show, so to speak, the main variant. Of course, deviations are allowed if they seem more attractive to readers. For example, we once came across a cast-iron artistic fireplace facing from an old ruined house. In this way, the fireplace part of our complex received an excellent finish.
You do not need to plaster the outer surfaces of the “mirror”. Better to treat brickwork imperfections with a rasp and then with the coarsest sandpaper (be sure it is fixed to a board). Next, rub the “mirrors” with a liquid clay solution and polish with medium-grit sandpaper. Then dress the joints (slightly deepen them) so that on the monotone planes of the fireplace a rhythmic geometric pattern of the brickwork becomes visible, and paint everything with iron red lead (minium), diluted in water with added skim milk (in a 1:1 ratio) so the paint does not stain.
Before the arch of the fireplace you must place a metal sheet (copper, duralumin, or “stainless steel”), because with the shutters open it is possible for embers to be “shot” onto an unprotected floor, which is fire-hazardous.
The laid complex needs to be dried for a week (with the doors and dampers kept wide open), then slowly fire it several times with a very small amount of wood, and only after the brickwork has dried thoroughly should you start operating it. If there are no mistakes, it can be expected that it will delight its owner with reliable work for more than one year. Our calculations, for example, paid off. In winter the house is always warm and cozy; in the fired stove slab you can bake pies perfectly, and in the fireplace, in special cases, even shashlik is cooked — for this, holes for skewers are drilled in the rear wall.
«Modelist-konstruktor» No. 7’98, D. KUDRYACHKOV
Recommend to read
 LEARN TO COUNT
THE DEVELOPMENT OF COMMON TECHNICAL REQUIREMENTS The need for the development of a lot of technical devices are always dictated by any particular need, and ultimately aimed at... WHAT IS NOT A CLAMP?
A simple clamp can be made of three parts: a section of steel channel, bolt and nail. This homemade tool does not give the factory.
