Carved from slate sidewalls connected between the front band narrower with metal corners and screws with nuts. The result is a “box” under the brickwork and grouting (see Fig. 2).
Next is marked the position of the porch and the perimeter of the excavated U-shaped groove with a depth of 50-70 mm.
Securing the design, again check with a level position. Then cement mortar with brick battle fill the lower part, thus setting the Foundation of the future of the porch.
After waiting, when the solution will seize, start to fill the box with bricks and put the steps, spreading them evenly around the perimeter of the structure. The clutch is in a half-brick. In the mortar between layers of brick is laid for the strength of steel wire with a diameter of 2-3 mm.
Further, from the slate cut of the front wall of the second stage, which is mounted vertically, entering the lower edge of the first step. Part is fixed to the corners of the main structure, also using screws and nuts (see Fig. 4).
Then resumes brickwork. Its internal space is filled with a mixture of brick scrap pieces of wire and mortar. Operation with stairs continues in the above-described sequence until the completion of the planned number of steps to your porch.
Fig. 5. Connection slate details the steps:
2—threaded hole;
3—the threaded hole for fixing the vertical bar of the first step
When he reached the top, cut out a large leaf area. Also, as before, is the markup, the holes are drilled and tapped. Bay the top of the solution, the sheet tightly and fasten.
And finally—a few tips. First, the parts must be strictly flush with the abutting horizontal planes. Second: in order not to make unnecessary holes in the intersection of two planes, both area are mounted with one screw (1, Fig. 5).
This design of the porch has a number of advantages: it’s strong geometric shapes, easily built, easy to clean, and most importantly, resistant to weather conditions and reliable in operation.
Recommend to read EXACTLY IN THE RING When sawing any, but in particular plastic pipes (due to its "softness") to withstand the cutting line is exactly perpendicular to the axis (or if necessary - on the contrary, under the... Into the sky — by parachute This powered paraglider (such craft are now more often called paramotors), developed at the design bureau of the “Eureka” amateur technical creativity club in the village of Torga,...
 Decided to share with readers design “durable porch”. Beautiful and durable step can be made quickly and simply to any person does not possess the skills of a bricklayer.
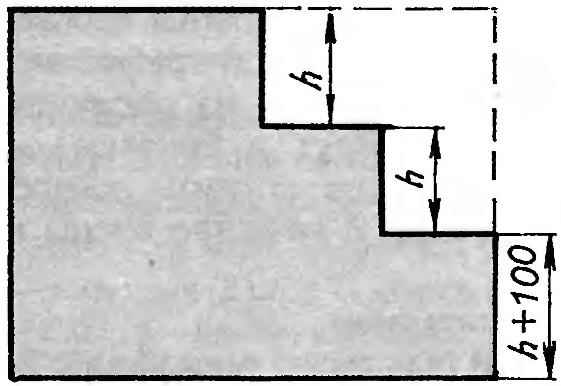 First you need to determine the size of the porch and its steps, taking into account the dimensions of available flat slate, suitable for formwork. Specifying, on two sheets of slate mark and draw the sides of the porch (Fig. 1). Attention! The bottom rung should be 100 mm above the rest (given the depth of the sheet).