ECONOMIC HOUSE

ECONOMIC HOUSE“Club home of the masters” not once have acquainted readers with the materials for the construction of garden houses. However on the site and outbuildings. Often, it is these simple structures begin construction concerns, and then, after completion of the work on the main house, hacks into sheds for storing garden tools or a summer kitchen.
Today we acquaint readers with the universal joblocom where you can place, for example, a kitchen-dining room with pantry or Studio with garage for bicycles or motor-plow.
 
You got a garden plot. Naturally, before undertaking the cultivation of land, it is necessary to build at least simple storage for tools and garden equipment. Of course, you can hastily put together out of boards a simple shed, in advance being reconciled with the fact that over time it will have to rebuild.
 
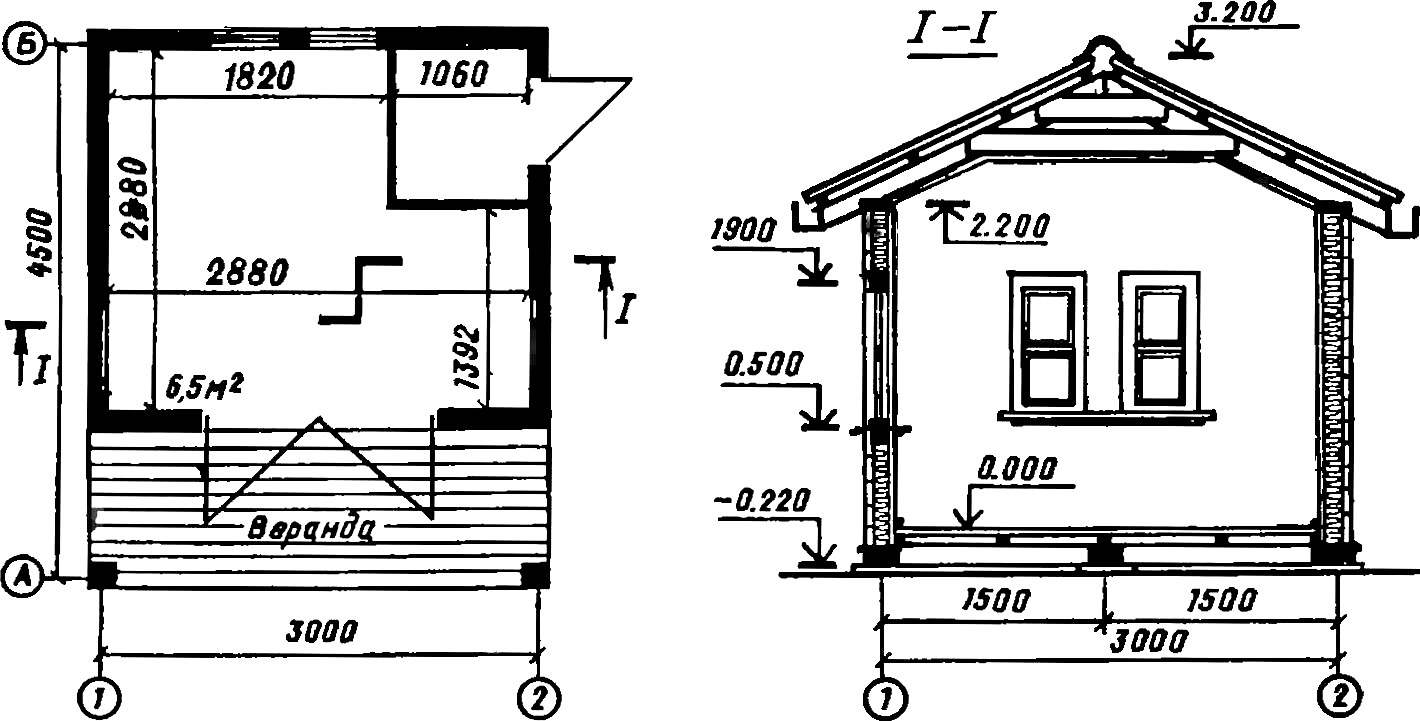
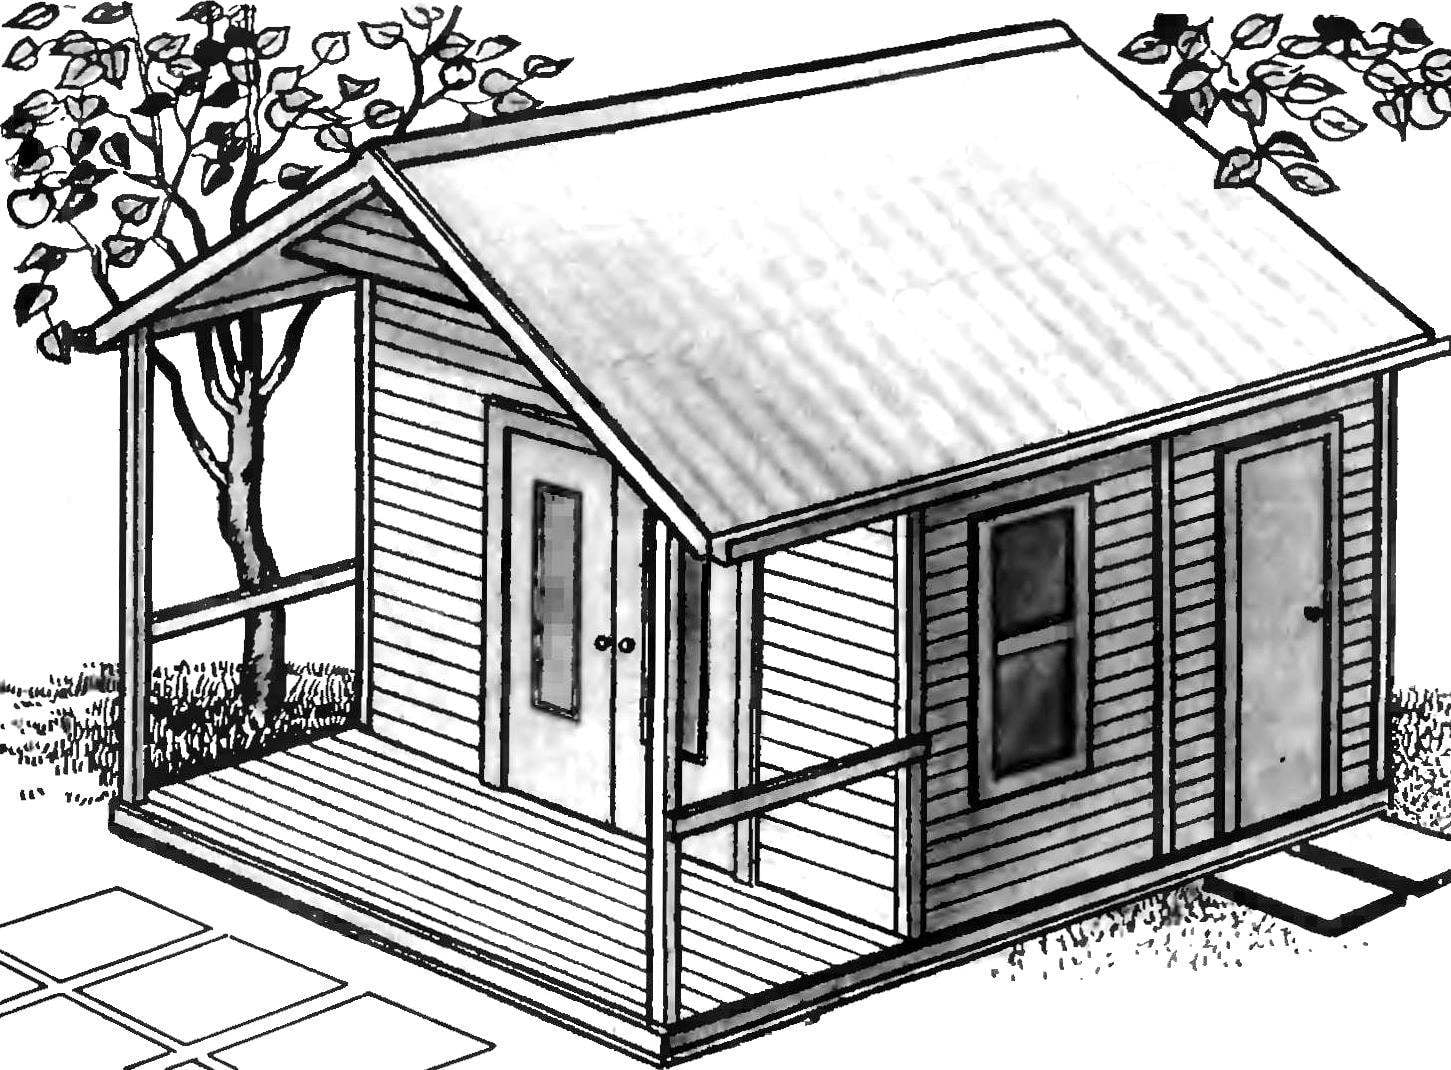
I suggest another, more economical way to do without these alterations. Its essence is that the area immediately built a small house — “outhouse”, where will be stored the garden tools and, if necessary, it is possible to spend the night. This outbuilding will be useful not only for novice gardeners, but also those who have a house already built. There will be any additional rooms: eat-in kitchen with small pantry, workshop with utility rooms or a garage (in Fig. 1 shows the first variant). Dimensions amenities do not depend on functional purposes, and in the axles they will be 3X4,5 m. Space area of 8m2 is easy to divide the partitions, obtaining additional storage for tools and garden equipment. The latter should have a separate door. In front of the main entrance is an open porch area of 4.2 m2.
 
Fig. 1. Layout amenities in the eat-in kitchen with pantry.
Construction hozbloka — frame or billboards. The Foundation for the amenities built for any scheme, — band, located around the perimeter of the house. Note that for the garage it is necessary to complement the intermediate columnar supports, so the floor load in this case increases. How to make a strip Foundation, described in “M-K” № 10 for 1988, “Garden house tent”. Now let us dwell on each individual design.
 
Frame option. The construction begin on the finished Foundation. On top of the waterproofing (two layers of roofing material) is laid timber of the waist and supporting girders connected “quarter”. Then set the upright walls. To the bottom rail they are mounted with steel “corners”. Fixing props stand upright, beat the rail. Next, install the rack door and window frames and sheathe the outside walls. To do this, use floorboards with a width of 150 mm. After the end of this work backup clean and lay the joists on top of them floor boards. And the flooring are both inside and outside on the veranda.
 
Fig. 2. Frame amenities.
Fig. 2. Frame amenities:
1 — strip Foundation, 2 — front wall, 3 — bottom rail, 4 — rail installation of window units, 5, 17 — window units, 6 — side cornice boards, 7 — in top rail, 8, 15 & eaves boards of the facade, 9 — rafters, 10 — blocks of crates, 11 — a ridge Board, 12 — diagonal wind communications, 13, 18 — front door units, 14 — coupling, 16 — front porch, 19 — lag and 20 waterproofing basement, 21 — roof, 22 is a steel strip 23, the drain 24 is the outer Board.
 
The roof is assembled from separately collected four truss frames. First install the front frame, fixing their props, connect the free style boards. The rest of the frame down under the ridge and fixed to the ridge Board and the top rail strapping. The backup is removed after the middle of the truss frames are connected by diagonal wind bracings. To the rafters sew the bars (of the Board) sheathing with a pitch of not less than 500 mm To the ends of the rafters are nailed side eaves Board and ridge boards and purlins — front cornice Board. Then the entire surface of the roof covered with a roofing material, it is placed wavy asbestotsementnye sheets. Horse close up or special patterns, or bent sheet metal. Overhangs rafter frames with bottom side sealed with boards.
 
Upon completion of the roofing works begin internal arrangement: establish window and door blocks and sew “paneling” the walls and ceiling. If you intend to use the amenities building in winter, the walls insulated. For this purpose between the outer and inner padding put the placeholder (e.g. mineral wool).
 
Shield option. This maintenance was for all dimensions, as well as on foundations and roof repeats the frame. It differs only by the design of the walls — they are collected from several pre-made boards, which significantly reduces installation time. The figure shows the standard boards consisting of a frame, outer and inner sheathing, insulation and planks for the installation of window and door units.
 
Fig. 3. Amenities building panel construction.
Fig. 3. Amenities building panel construction:
1 — strip Foundation, 2 — slip rail, 3 — insulation, 4 — curtain side-Board, 5 — crate, 6 — top rail, 7 — cornice boards of the facade, 8 — a ridge Board, 9 — window unit, 10 — diagonal wind communications, 11 — asbestos cement ridge pattern, 12 — roof, 13 — door pantry, 14 — front porch, 15 — the main entrance door, the 16 — floor verandas, 17 Laghi, 18 — ground Board. Letters denote the location of the shields.
Fig. 4. The shields on the walls.
 
Fig. 4. The shields on the walls.
Fig. 4. The shields on the walls And the façade right (left mirror), the B — side with window (right and left are identical), — lateral deaf, In’ — side with a doorway, G — right rear (left — mirror)/:
1 — plank exterior siding, 2 — frame, 3 — insulation 4 — inner lining of hardboard, 5 — Windows, 6 — door unit.
 
Each shield is installed on the beam bottom trim and fixed with nails of the so-called “oblique face”. In the joints of the boards lay scraps of foam or oakum, and the inside and outside of the crack closes with the overhead rails.
 
On top of all the panels connect the top rail, which is mounted on the roof.
 
Interior trim in Hosbach can be made from wooden slats covered with stain or varnish; the floor and walls clad in hardboard post-painted with oil enamels.
 
Suggest for exterior design of the house to apply the so-called supergravity or bright color that will greatly decorate outbuildings.
 
A. ERMILOV

Recommend to read

  • DIEHARD CHESS…DIEHARD CHESS…
    I love to play chess, and I imagine it is a shame, if the Board in the most interesting moment goes — well, for example, when you carry it from one table from another. I have had several...
  • RECUMBENT OPTIMISTSRECUMBENT OPTIMISTS
    There are many enthusiasts for whom the recumbent was the only passion and hobby. And there are people for whom the velomobile is literally life. More precisely, the ability to move...