As is well known, in the temperate climate zone farming is often associated with risks. Late spring frosts one moment, “acid” summer rains the next, or early autumn cold snaps… In short, you cannot do without a greenhouse on a homestead plot. Otherwise neither cucumbers nor tomatoes will ripen there.
Of course, if we are talking about a single bed under film, that is a small problem. Nowadays you can buy a kit of parts for a light metal frame in a shop, assemble it, stretch film over it — and the greenhouse is ready! It is another matter when you need a larger greenhouse — then you will have to erect a substantial metal or timber structure, and in the end the construction will cost the gardener a tidy sum.
However, to build a greenhouse you do not have to rely on conventional construction methods at all. We suggest that you apply the experience of building pavilion-type structures. Such buildings are extremely economical: in the simplest case, with a single upright and a dozen guy lines you can cover an area of hundreds of square metres.
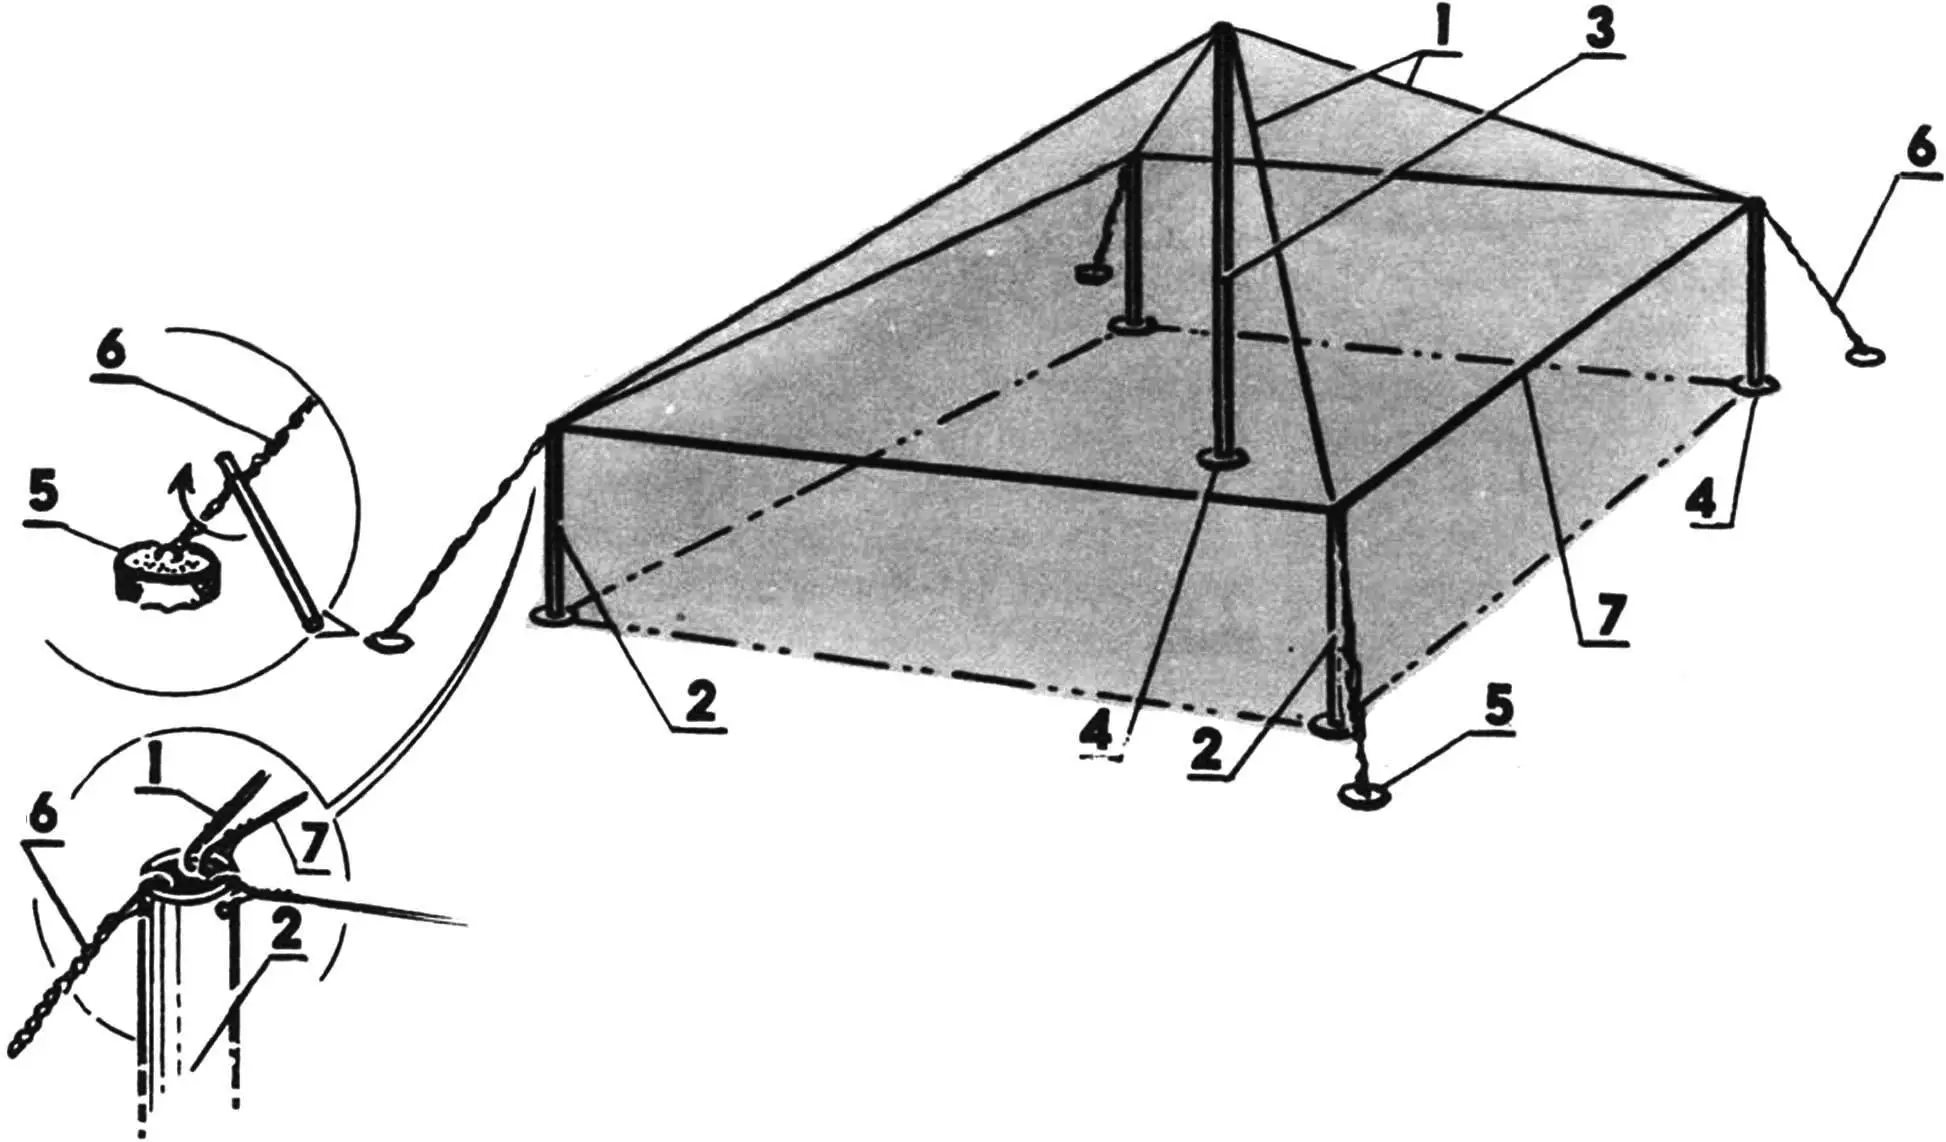
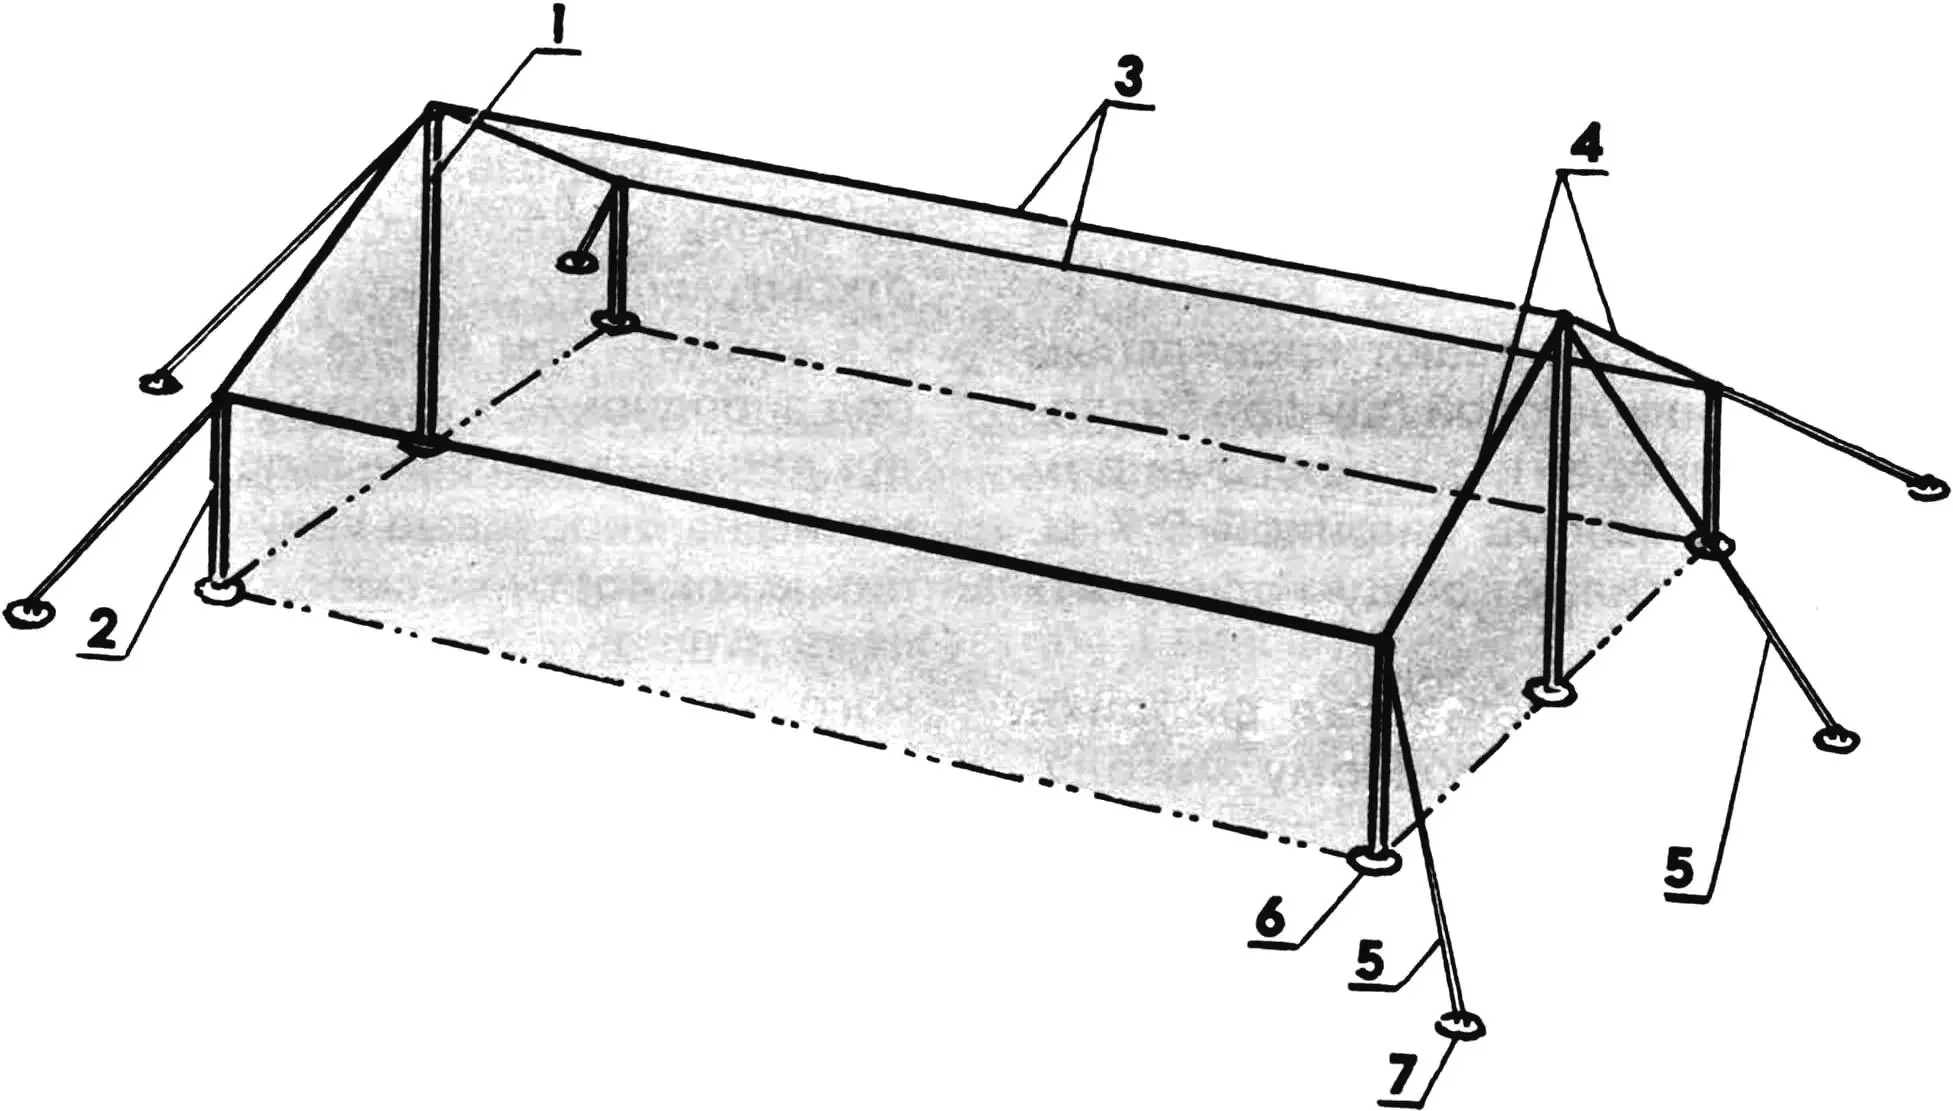
1 — diagonal frame members; 2 — peripheral uprights; 3 — central upright; 4 — foundation block; 5 — anchor; 6 — wire rope tensioner; 7 — peripheral frame members.
Here are two variants of pavilion-type greenhouses. The first has one central upright and four peripheral ones. They can be made from any suitable material — wooden poles or beams, steel or asbestos-cement pipes will do. You will need to build a simple foundation under each upright. For this it is enough to bore a pit 0.35 m in diameter and 0.7—0.8 m deep with a hand auger, lay rolled roofing felt into it like a tube, and fill this improvised formwork with concrete mix. While the concrete has not set, embed a reinforcing bar so that about 100 mm remains above the surface — this will be a locator when installing the uprights.
The same foundation pillars-anchors are cast where the guy lines of the pavilion greenhouse will be attached. The only difference is that instead of a reinforcing bar a loop of steel wire about 6 mm in diameter is embedded in the concrete.
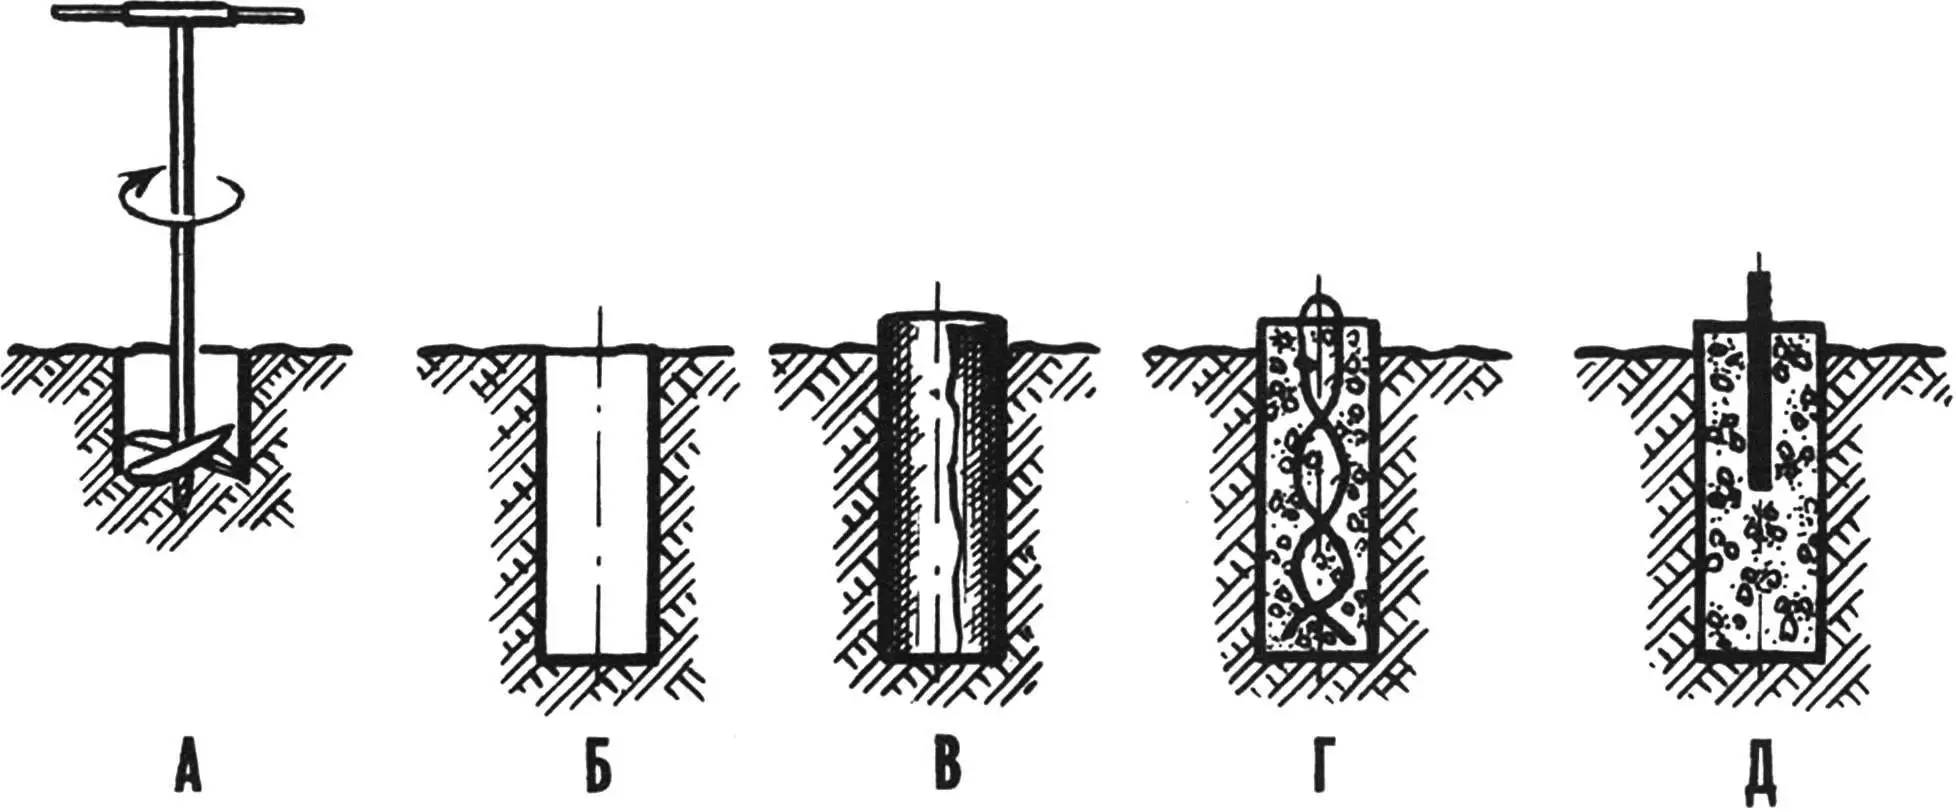
A — excavating soil with a hand auger; B — pit ready for concrete; C — installing roofing-felt formwork; D — filling the formwork with concrete and installing a wire loop (for an anchor block); E — filling the formwork with concrete and installing a steel pin (for a foundation block).
On the upper parts of the uprights you must provide lugs for attaching guy lines — on steel pipe uprights weld clamps made of 8 mm reinforcing bar or, more simply, drill several holes. For wooden or asbestos-cement uprights you will have to make a band clamp from a steel strip with reinforcing-bar clamps welded to it.
The finished uprights are placed on the foundation pillars, and the flexible parts of the frame (the covering) are fastened to them — you will need steel wire, cable, nylon rope, or even strong synthetic twine folded several times. Their attachment to the uprights must be very reliable because the loads on them are considerable.
The guy lines are made of the same material as the covering. You only need to provide a mechanism with which the “pavilion” is tensioned. Of course it is best to do this with tensioners — screw devices. In the simplest case such a tensioner is a bolt and nut with a pair of lugs bent from a steel strip attached to it. Even simpler is a tensioning device made of wire — at least four strands of wire are stretched between the upright and the anchor, then a suitable wrench is passed between them and used to twist an improvised tensioner. You can do the same with nylon rope or synthetic twine; after twisting you must secure the wrench reliably.
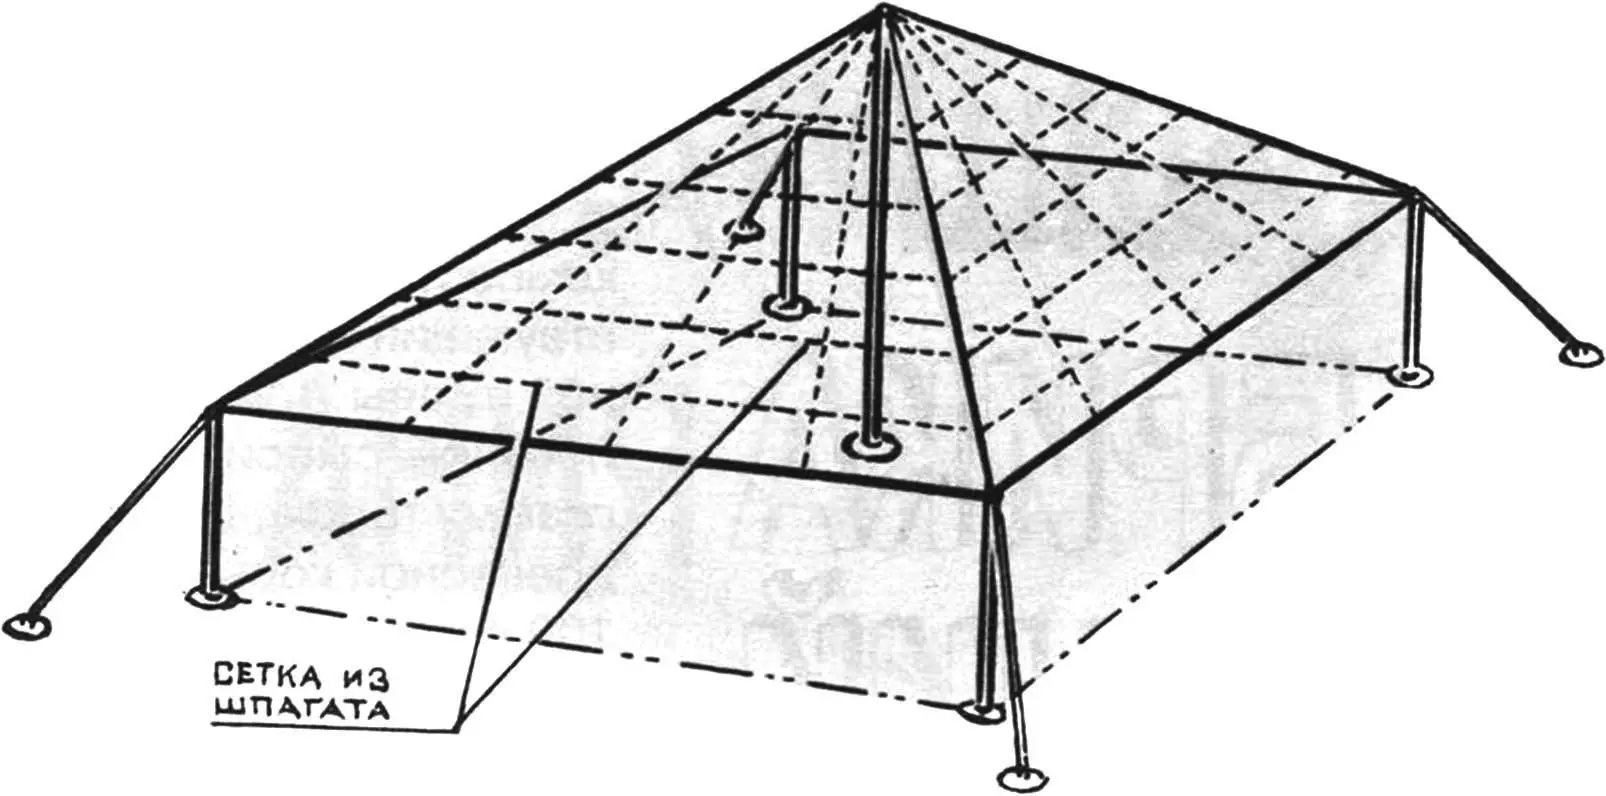
1 — central upright; 2 — peripheral upright; 3 — longitudinal frame members; 4 — transverse frame members; 5 — wire rope tensioners; 6 — foundation block; 7 — anchor block.
Now you need to take care of the “rafters” and “lathing” of the flexible roof. The best material for this is synthetic twine: with it a kind of mesh is stretched on the roof slopes, which the polyethylene film will rest on.
Film sheets are joined with wide adhesive tape, which not only binds them together but also greatly strengthens the transparent roofing.
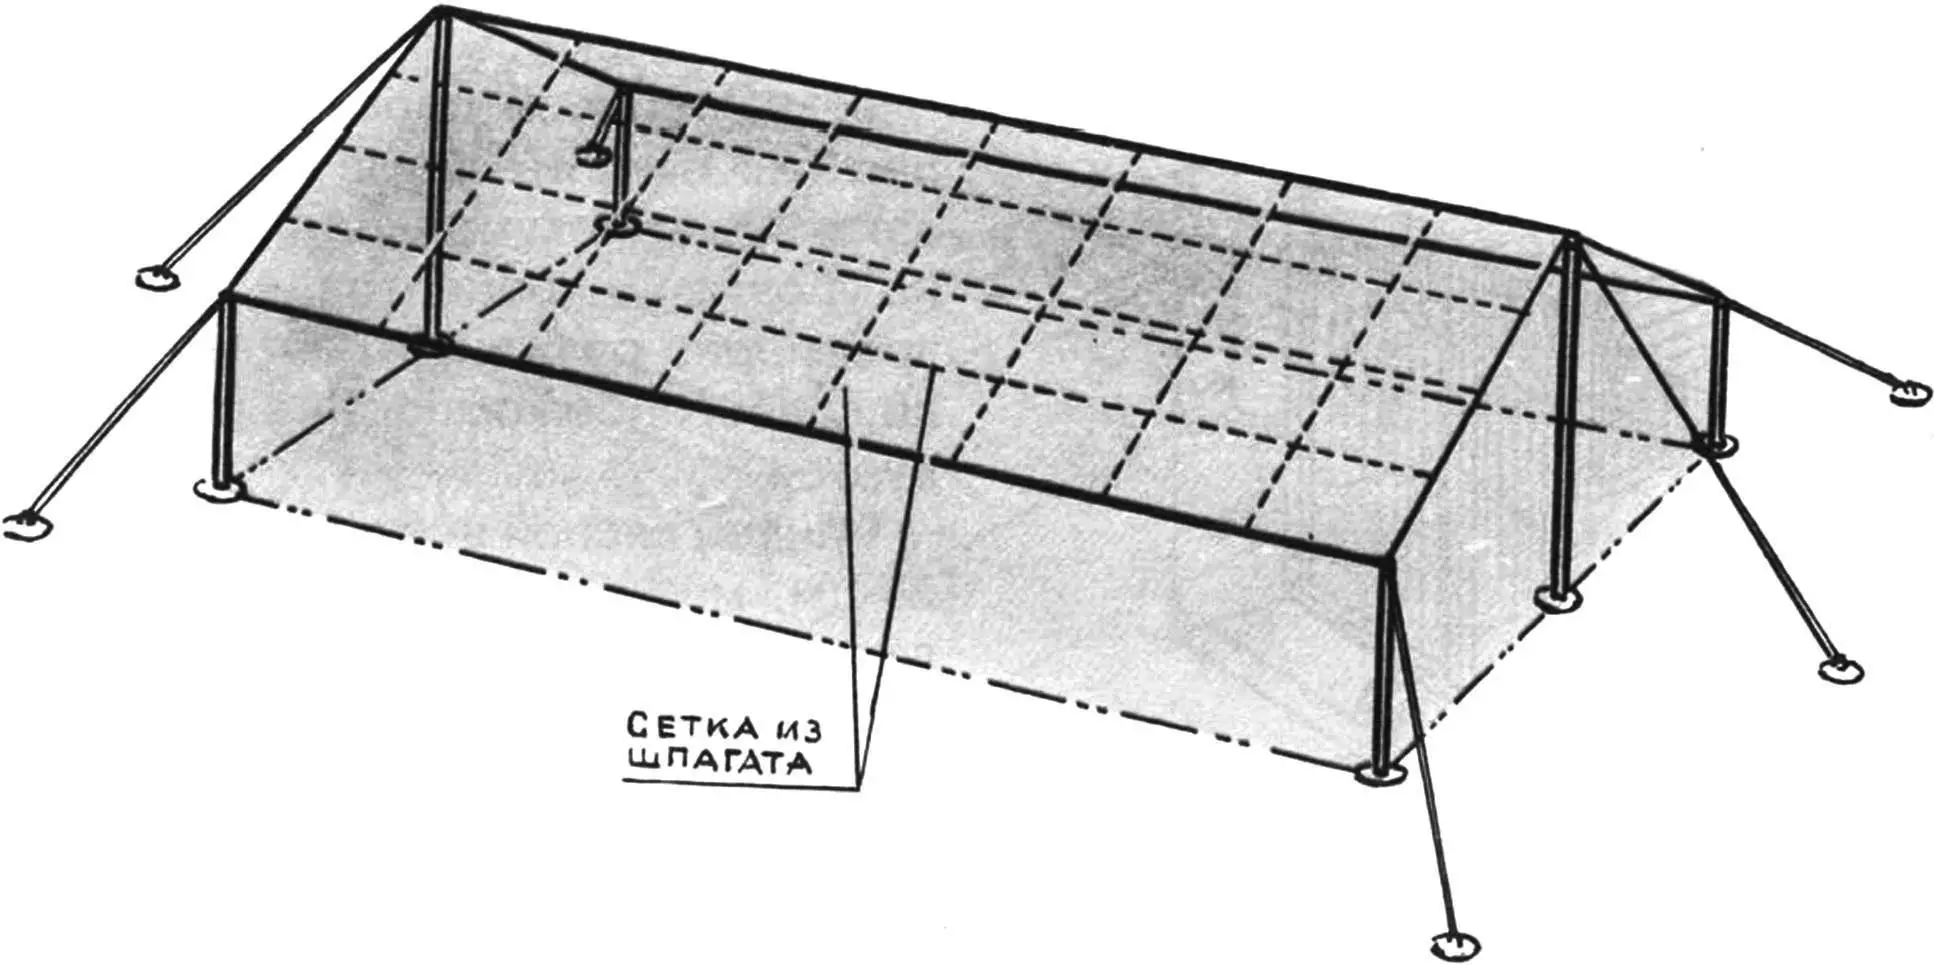
To finish construction, the polyethylene covering is secured with a twine mesh stretched over the film. By the way, the film will last quite a long time if you remove it at the end of summer. That will not be difficult because the film is held on the frame only by a cord mesh.
If you need a larger greenhouse for your plot, you can use the second design, which differs from the first not only in size but also in having no central upright. All structural elements of this greenhouse, as well as the assembly method, are the same as described above.

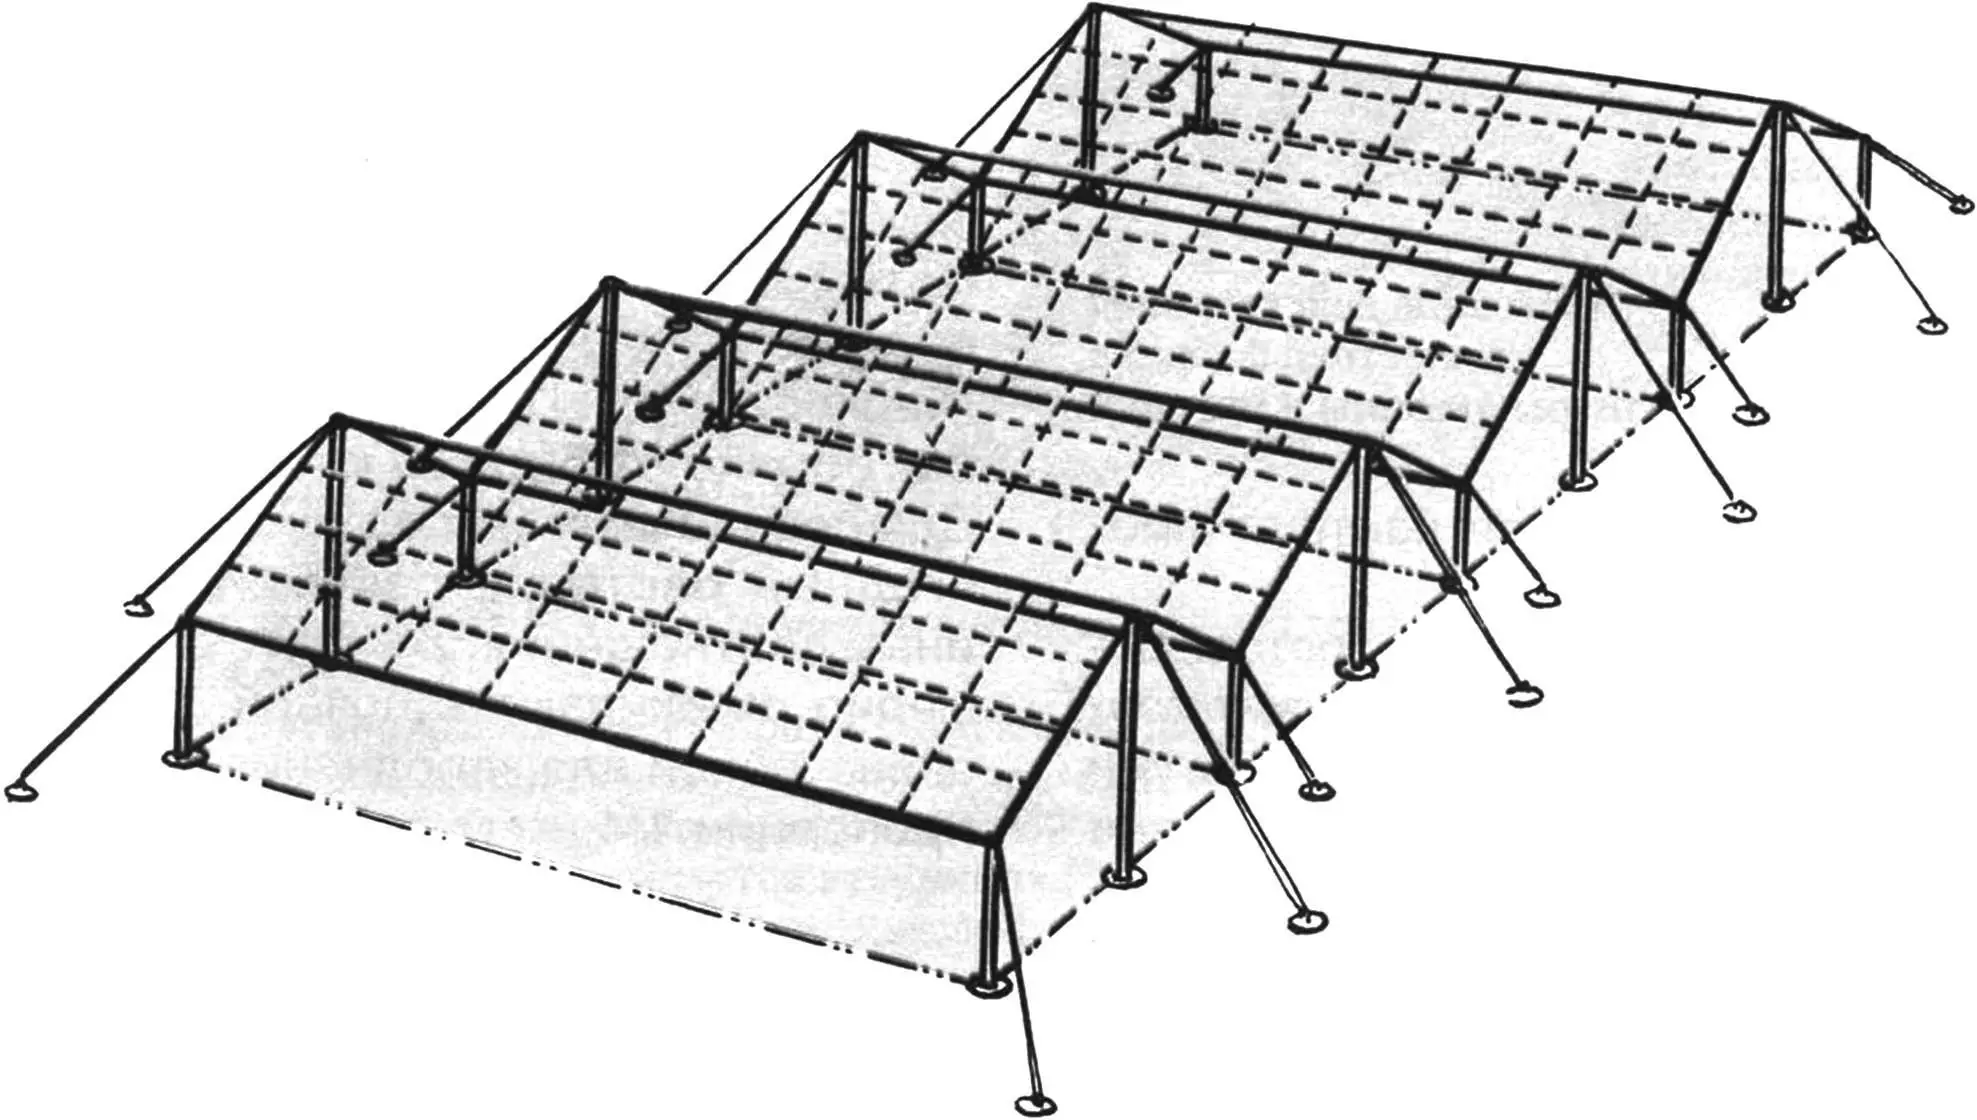
It should be noted that pavilion greenhouses can easily be joined to form whole fields under a single transparent roof. This quality will be invaluable for greenhouse farms growing flowers and vegetables. The layout of a greenhouse field is shown in the figure.
“Modelist-Konstruktor” No. 5’99, I. KARAMYSHEV
Recommend to read
 IF IN TOW – GIVING
With the beginning of the summer season a long string of cars, "tired", like their owners, in crowded cities during the long winter, at maximum speed mchu their owners to Sunny resorts.... REFRESH… FLASHLIGHT
If the flashlight is to strengthen the tin bracket with a motor from a child's toy, the axis of which is planted miniature celluloid propeller, and connect the motor to the battery of a...
