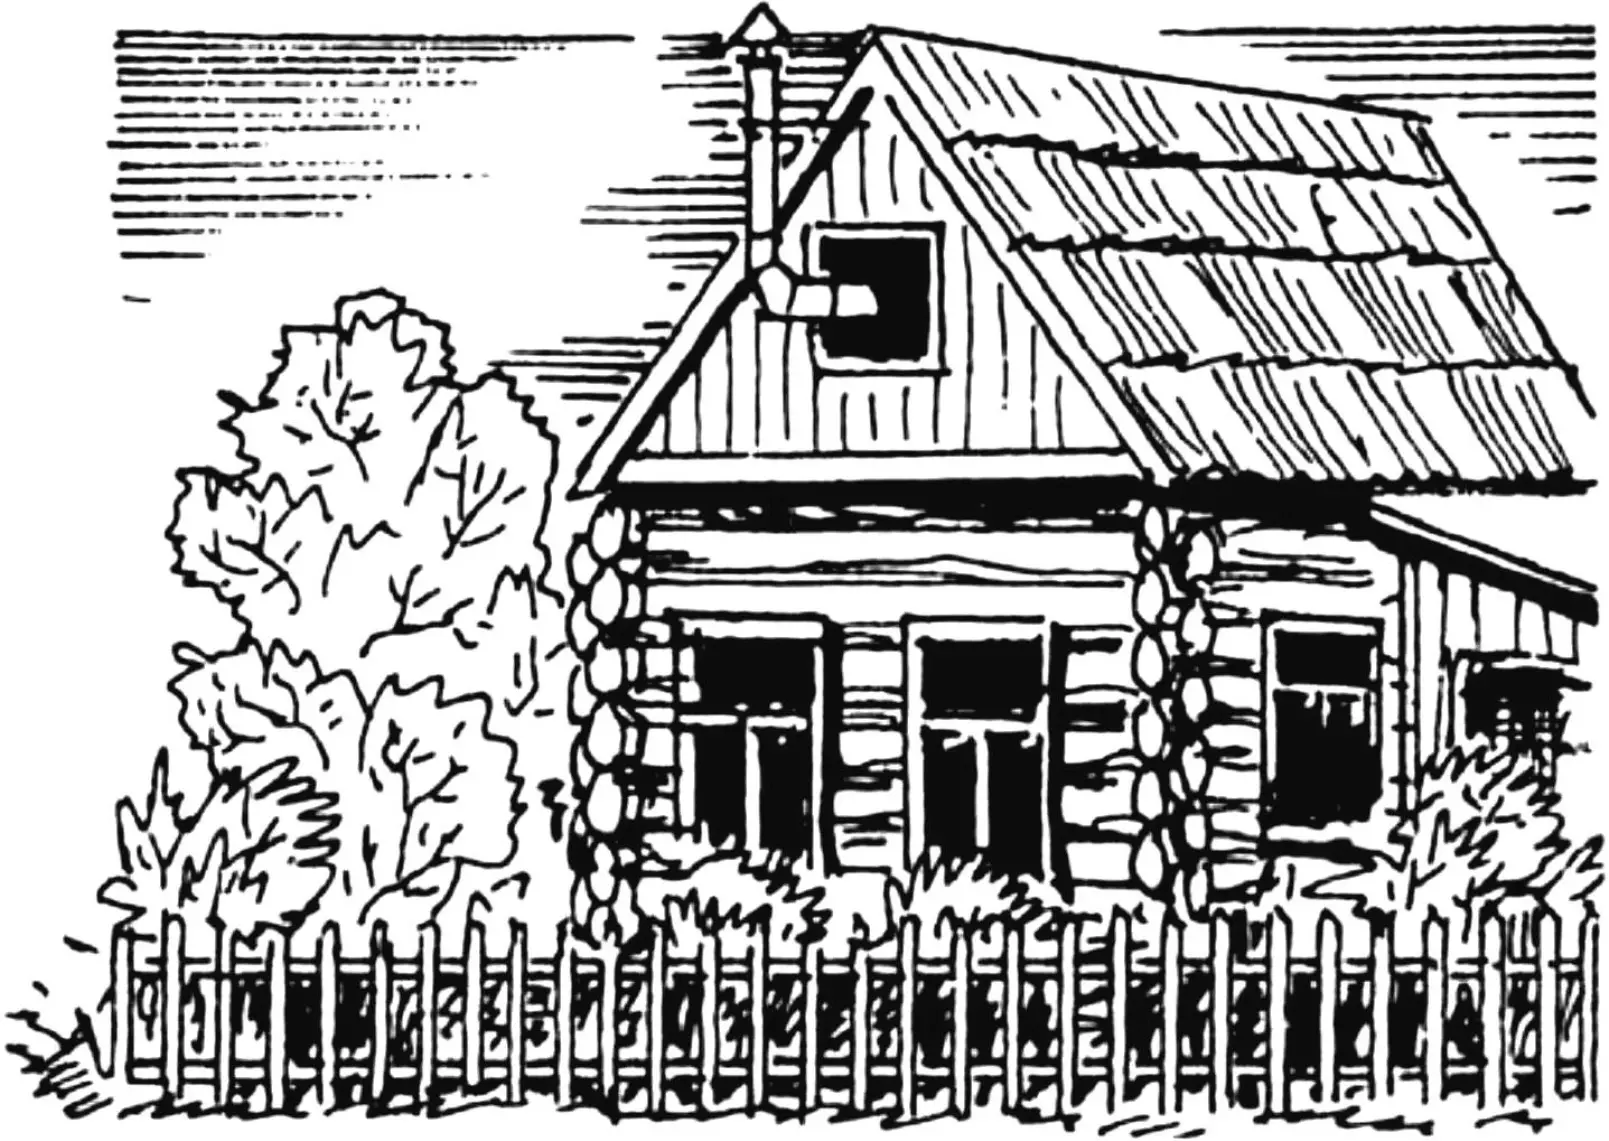
The early nineties were marked by particular unpredictability — prices for everything rose not by the day, but by the hour. Of the buildings ordered for my country plot, the builders erected only the walls of a log bathhouse measuring 5×3 m without a roof, and then disappeared. There was nothing left but to finish the construction myself — not as a bathhouse, but as a small house with a stove, in which one could live tolerably until better times.
There was nothing special about the finishing work. It was decided to use the existing log frame: cover it with a roof and line it from the inside with inexpensive insulation according to material means.
Rafters were fastened to the log frame, which stood on twelve concrete blocks measuring 500×500 mm; battens were nailed to them, and the roof was covered with roofing felt. So some kind of dwelling was ready. Its main drawback was the small living area — only 15 m2. Fitting even the bare essentials for three people — a table, chairs, a sofa, beds, a refrigerator, a stove — into such an area is quite problematic.
As usually happens, the solution came almost by itself: what if the ceiling over the room were covered not completely, but only partially — over a length of 3.3 m, along the upper beams already installed (Fig. 1). In this way a second tier was formed, and about 10 m2 of additional space appeared in the room. The total living area thus increased by more than half and now amounted to 25 m2. And that is already quite acceptable for a normal dwelling. Upstairs a sleeping area for two people was arranged, and space was set aside for household belongings. The second tier is easy to reach for sleep and rest by a compact stepladder; upstairs it is always warmer, and one sleeps better.
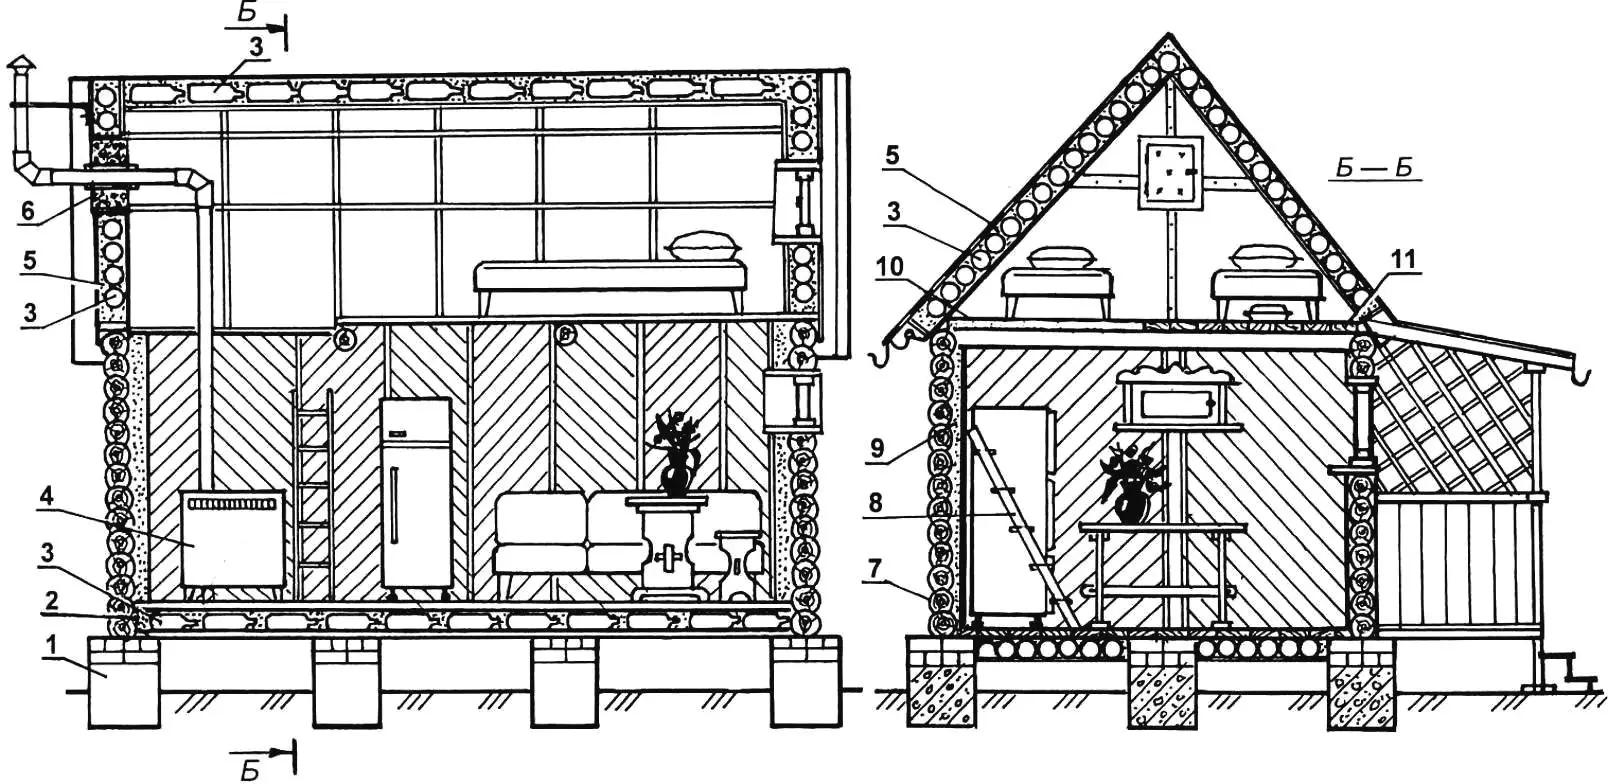
1 — concrete foundation blocks; 2 — floor insulation; 3 — plastic bottles; 4 — stove; 5 — second-tier insulation; 6 — thermal insulation of the stove pipe outlet; 7 — 5×3 m log frame; 8 — stepladder; 9 — log wall insulation; 10 — ceiling opening; 11 — floor slab
Where the ceiling was not closed, free space remained overhead up to the roof itself, creating a special sense of spaciousness in the room, which of course is absent with a continuous ceiling.
Down below we placed a wood-burning stove whose pipe almost reached the roof. Thanks to greater heat transfer from the pipe, heating of the whole room is significantly improved.
To live in such a house in winter, it must be properly insulated — both the roof and the walls.
To keep costs to a minimum, I decided to use my own special insulation. As is well known, the best thermal insulation is air. Why not use plastic bottles for this purpose (from water, beer, etc.), filling the insulating layer with them? But how to prevent air from passing between the bottles? No roll or slab insulation is suitable for this — no matter how hard you try, the winds will blow through. What is needed here is a thermal insulating fill, such as cellulose insulation (ecowool), sawdust, wood shavings, or perlite.
I believe that the best and most universal insulation in every respect is ecowool. It is a loose, light, free-flowing ecological material with high thermal performance. It has been made from ordinary waste paper in Canada for more than 60 years and only recently began to be produced by Canadian technology in Russia.
The shredded waste paper is impregnated with special antiseptics and fire retardants based on boron compounds, which also protect the insulated surface from rotting, fungi, and insects. Mice and rats do not live in ecowool either. The bulk density of the insulation ranges from 35 kg/m3 for the ceiling to 65 kg/m3 when filling floors and walls. A 50 mm layer of ecowool provides the same thermal insulation as walls 1.5 bricks thick. When insulating country buildings clad with lining boards with ecowool, glassine and roofing felt are not required. And the main advantage is the low cost of ecowool compared with any other domestic or foreign insulation.
With such a unique and still little-known everyday insulation, everything else is done very simply and quickly. We pour ecowool into the zone to be insulated and at the same time lay plastic bottles as filler (pieces of foam plastic, juice and milk cartons, cardboard boxes, etc. can also be used), packing everything as tightly as possible, then pour ecowool on top again. Then we lay filler again, pour ecowool, and so on until the entire space under the floor, under the roof, and along the walls has been filled.
It is essential to make a hole in the plastic bottles or leave the caps slightly open. This is necessary so that when the ambient air temperature fluctuates the bottles do not “pop.”
This method of insulating a dwelling uses only a small share of purchased insulation, while about 70 percent of the volume is occupied by free material. And since plastic bottles themselves are light, loads on the load-bearing structures need not be taken into account in calculations, and a total insulation layer thickness of 10 cm is quite sufficient.
After filling in the insulation, I covered the floor with thick boards. To insulate the under-roof area or the gable, the fill zone must first be prepared in sections. This can be done in different ways. You can nail a horizontal row of boards and pour insulation, then another row, and so on. I nailed a row of plywood sheets to the rafters, then poured insulation inside, then another row…
To save money when insulating the walls, I used a mixture of wood sawdust and shavings with ecowool in a ratio of about 10:1.
Later, for insulating a large house, I successfully used this mixture to fill the floor, ceiling, and walls. And as years of experience have shown, in such buildings the interior heats up quickly and heat is retained well even in hard frosts. The windows, of course, should be fitted with double glazing.
Special attention should be paid to arranging the zone where the stove pipe passes through the wooden structures covering the house, since improper execution can lead to the building catching fire.
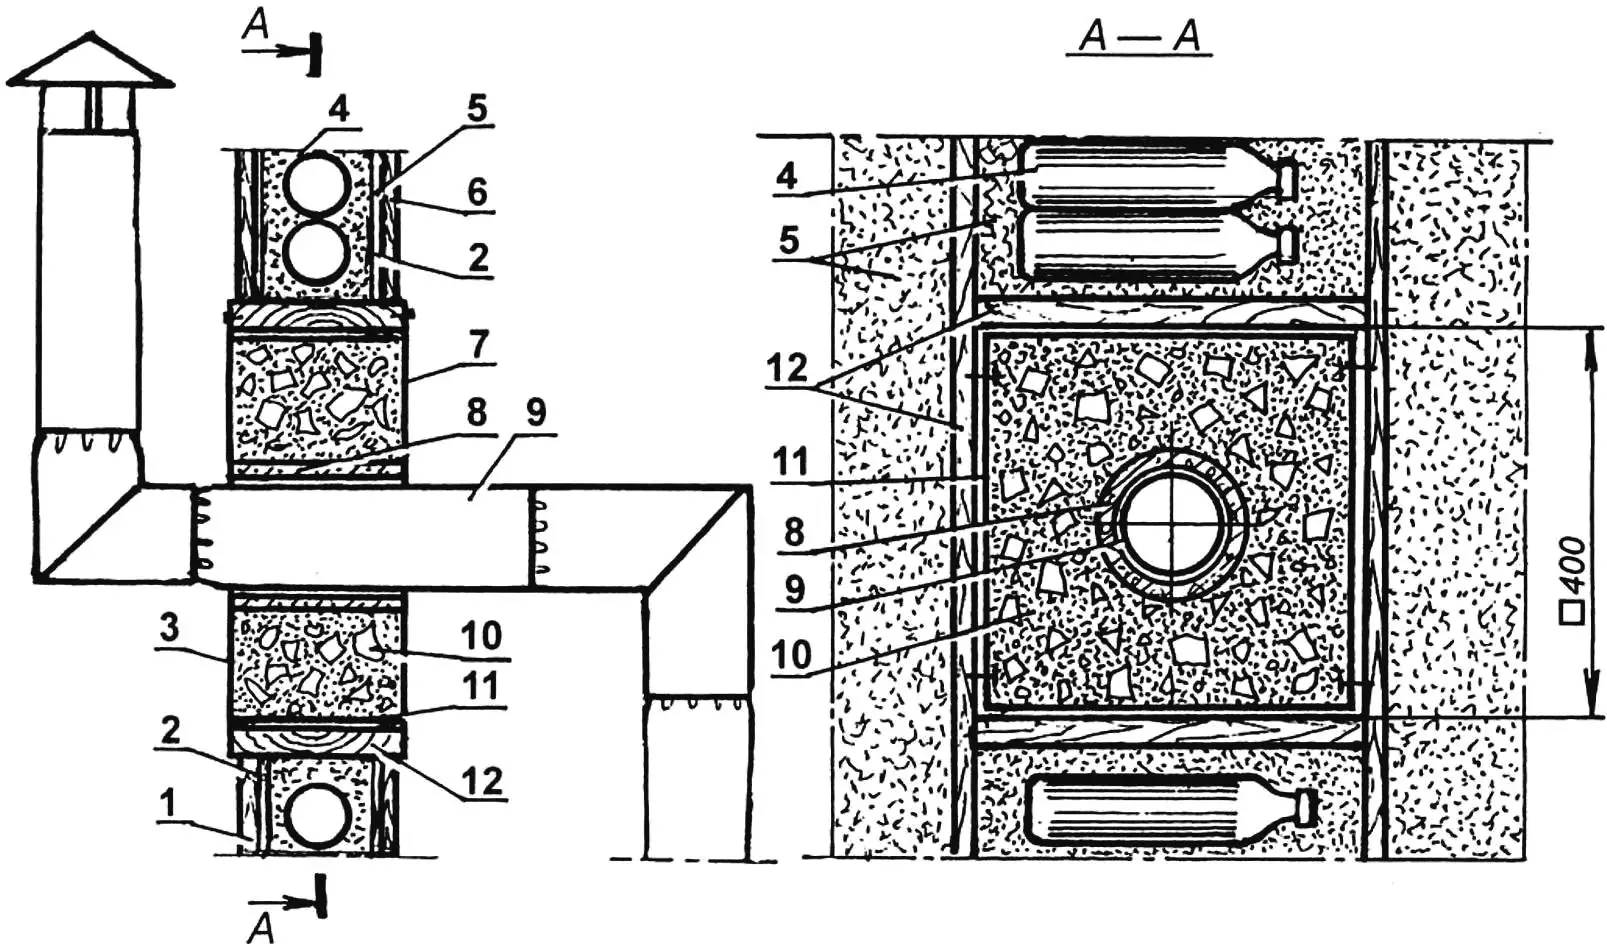
1 — exterior house cladding; 2 — glassine; 3,7 — end plates (steel sheet s0.8-1); 4 — plastic bottles; 5 — wall insulation; 6 — interior house cladding; 8 — insulator (asbestos-cement pipe); 9 — stove pipe; 10 — fill (broken brick, expanded clay, etc.); 11 — box (steel sheet s0.8-1); 12 — window opening 400×400 mm
That is why I would like to share my solution to this problem, the correctness of which has been verified by several years of using the stove to heat the house (Fig. 2). In the wall where the metal elbow of the stove pipe 120 mm in diameter was to exit, I first made a square opening of 400×400 mm from boards. I lined its inner surface with scraps of sheet iron (it is better if the sheets do not fit tightly against the boards of the opening). Onto the stove pipe I fitted a piece of asbestos-cement pipe of suitable diameter and length. Then I nailed steel end plates to the ends, with holes previously cut in them for the stove pipe. One plate is fastened firmly, and the second only partially, so that it can be bent up from above to fill the inner volume with expanded clay, broken brick, and pieces of aerated silicate blocks.
Such multilayer protection of the building’s wooden structures from the heated stove pipe can guarantee that a fire will be avoided.
We lived in such a house for several years until we built a large house.
For those who intend to build a house or have begun to develop their country plot, our experience will be very useful.
«Modelist-Konstruktor» No. 6’2004, V. AKIMOV, engineer, pensioner
Recommend to read
 BRUSH FOR FIVE MINUTES
You urgently needed a thin brush and matching hand was not — immediately make themselves needed. Take the vacant core of a ballpoint pen, pass through a long loop of thin perevoloki or... “Shield” against lightning
After building a country house, we try to protect it from the destructive effects of fire: we use heat-resistant finishing materials, buy fire extinguishers, and install a fire alarm...
