
 The development of the garden associations, the construction of houses and cottages caused an increased interest in structures designed to preserve the generous gifts of autumn.
In recent years, many gardeners prefer to store their harvest directly on the site. However, this often leads to inevitable disappointment, as it is performed sometimes without the necessary experience. Not taken into account, for example, to store potatoes you need a dark room with a temperature of 2-8 degrees Celsius, at a relative humidity of 85 – 95 %. The room should be well ventilated to prevent the accumulation of carbon dioxide, but before the new tab is necessary to disinfect.
It is clear that not everyone is available to create and maintain the necessary conditions. How to be and what to do to safely preserve the harvest?
It is no accident in the past master craftsmen, able to build reliable storage and cellar, used in the village of great respect along with the potters and kolodeznoye. Today, however, the abundance of relevant literature and modern materials motivate many to solve problems of preservation of the harvested crop on their own. And depending on your personal study, characteristics of the terrain and natural conditions, as well as labor skills and available materials, each chooses his solution to these problems. And the options can be very different – from the simplest to the highly skilled.
The most preferable among them, of course-the construction of the cellar. In such a structure with good waterproofing and skillfully selected ventilation remain constant temperature and humidity conditions and favourable conditions of food storage: they long do not spoil, do not shrink and do not lose their inherent taste and smell.
However, the construction of the present cellar requires a lot of time. But what if the season had ended, and the harvest happened suddenly rich, and it is something I would like to keep?
Express store
From time immemorial in the rural area to preserve agricultural products were used not only capital, but also the simplest, but no less effective ways. Among them to the present day remain popular so-called burty (Fig.1). This is because the technology is readily available to many owners of gardens and orchards do not require capital costs, and therefore allows to solve the problem quickly, and most importantly – suitable for any crop.
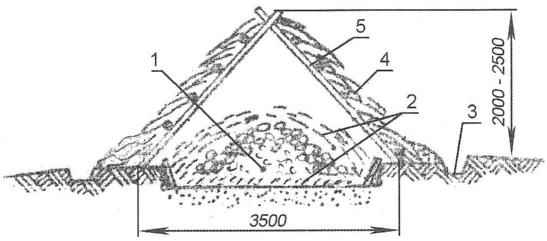
Fig. 1. The simplest shelter for potatoes and root crops:
1 — the tubers (roots);
2 — insulation (straw);
3 — the drainage ditch;
4 — tops (straw);
5 — the roof frame (poles)
Typically, the collar is just artificial hill, for example, of potato on the surface of the earth, covered with dry leaves, pine legs, or other suitable materials to protect from low temperatures. The site of the collar is chosen in a convenient area of the site; it should be dry in the fall and nepotoplyaemogo in thaw and in the spring, in this connection, preferably with a slight slope to the shoulder is not flooded nor melt or rain water.
The selected plot of land is cleared, leveled slightly, its surface is compacted. Then on top of him laying a good layer of straw, on which is placed the potatoes or other root vegetables, and fruits so as to form a local or an oblong hill, which is also draped on all sides with a thick layer of straw. This is actually Burt. He carefully covered with straw and dry earth, but to the sides, the bottom and the top of the heap protruded tufts of straw. This is necessary in order that through them as if through a kind of ventilation tubes was carried out the exchange of air.
The shelter is formed in layers, two methods: immediately after the laying of the products – thin layers of straw and earth (to make it faster removed excessive moisture and evaporation), and with the onset of sustained cold weather, the main thick layer of straw and earth. Surface snow will also play the role of additional thermal protection, but with the onset of spring melting it should be removed first.
If the heap is large, elongated, the tab to provide more complete ventilation on bottom layer of straw placed further triangular lattice box, and if necessary – and even wood vertical at the ends. Laid on top of the shoulder to strengthen the earth embankment impose a branch or a specially made rack panels.
The area in which the mortgaged shoulder, digging a shallow groove (to 0.4 m), so during large rain or snowmelt water did not get inside the storage.
Umbrella for rim
Surface, the tab collar is particularly popular in areas with neurolyme winters. In terms of black earth piles should be laid in a shallow excavation excavation – this option better protects from frost.
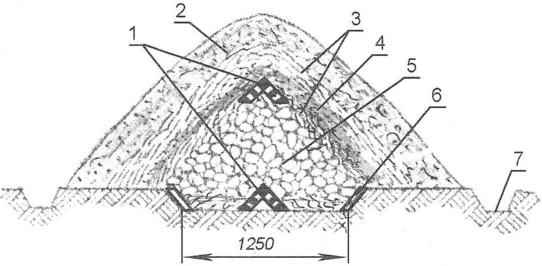
Fig. 2. Burt:
1 — ventilation grill;
2 — the external embankment (soil 300 mm);
3 —insulation (layers of straw 200 mm);
4— internal bunding (soil 100 mm);
5 — a heap of potatoes;
6 — wooden flare pits;
7 — drainage ditch
The design of this shelter (Fig.2) is an earthen “bath” with a depth of about 0.3 m, with a sloping (inside) walls, reinforced by poles or firewood. On top of this heap can have two coatings: earthen and straw directly on grocery mounds, as well as a simplified gable roof over the whole store – for greater protection from harsh winter conditions.
This roof runs glinosolomennogo or Pletnev, crate of cundy peeled poles. A similar repository is being built quickly; it is not only reliable but also inexpensive, because it is their own, besides from local materials.
Not just a pit
Where the terrain is dry and the ground water does not rise into the upper layers of the earth, even during the spring floods, much easier to provide a product deposited in a shallow pit, limited to concrete, brick or cinder block wall, and the top covered with a light sheathing, covered with roofing felt or tar paper and sprinkled on top of the ground (Fig.Z).
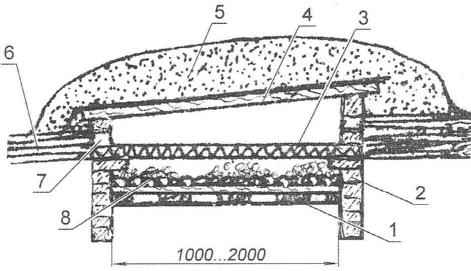
Fig. 3. Pit storage:
1 — diagrid;
2 — brick wall of the pit;
3 — door (particleboard, wooden Board);
4 — crate-roof;
5 — earthen embankment;
6 — ventilation layer of straw;
7 — ventilation hole;
8-the roots
The options for strengthening the walls can be the most unexpected. For example, many gardeners are satisfied on the plot miniature cellar from the old end his life in city apartments,… cast iron tubs (Fig.4) displaced by the modern acrylic and other plastic and metal versions.
Fig. 4. The cellar of the bath:
1 — body bath;
2 — cover (wooden shield);
3 — hatch;
4 — bed (sand bags);
5 — a wooden lattice;
6 — packaging products
Very convenient these bars to organize under a summer house, a summer kitchen, a shelter, any shelter. Essentially it is a kind of coolers through which the products of summer is always what is called a hand in the recreation. The old tub is installed in a corresponding recess on the sand cushion thickness 8-10 cm Being embedded in the ground at the sides, it is served in two layers: the upper cover there is still another hatch. Both of them should not hinder the ventilation, and the walls will provide protection from rodents.
In “bath storage” can be placed not only pickles and preserves, but also vegetables in plastic bags or plastic boxes and containers.
Cellar
Much more durable, but harder and more expensive the manufacture of fixed vegetable storage – cellars; however, the costs of time, labor and funds in the end more than compensated. Of course, all the recommendations on the device they serve only as a basis for their own creativity in each specific case. Main thing is to follow three important conditions: waterproofing, insulation and ventilation. And a mandatory requirement for the construction of cellars – high-quality performance of construction works, which is a reliable guarantee of preservation of the products.
In the garden cellar is constructed usually with a size of up to 8 m3, and in the garden there are several more – about 15 m3.
The important economic value of persistent storage is determined not only by its design but also the placement on the site. If earlier the most common was free-standing cellar, today I try to combine it with the main buildings – directly under the house, a summer kitchen, joblocom or garage. Regardless of location reliable and long-term operation of such buildings will mainly depend on careful construction and waterproofing works. The latter condition is particularly important for the protection of the storage from the devastating impacts of surface water and groundwater.
The choice of design
Carefully and correctly done cellar has a great operational and economic value. Its design features can be selected depending on specific purposes, local conditions, their own skill of the manufacturer and available building materials.
Figure 5 shows the main types and designs cellars. The level of their location relative to the earth they are divided generally into three types: terrestrial, polusekretnye and earth (fully recessed). Which one to prefer depends mainly on the characteristics of the hydrological convenient location, needs in useful area of the storage and availability of construction materials.
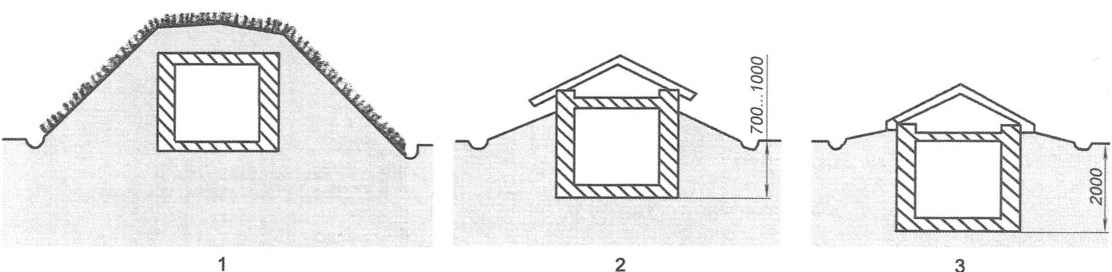
Fig. 5. The main types of cellars are:
1 — ground (earth embankment);
2 — polusekretnye;
3 — excavation (fully recessed)
Since the construction of the cellar requires a lot of time, it times usually by mid-summer – very dry period of the season. Getting to the construction, should be prepared in advance the necessary material and tools, so you don’t have to stop and lose precious time.
Ground cellar
Terrestrial storage (Fig.6) a lot of advantages and they are obvious. Most importantly – they can be built even on very wet soils or wet soils. Moreover, their production does not require special professional skills, and construction will cost no scarce or expensive materials enough available local options.
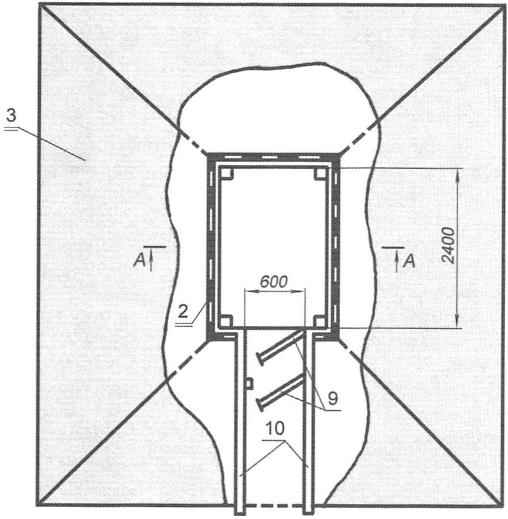
Fig. 6. Ground cellar with bunding:
1 — sand-gravel cushion;
2 — wall of the slab;
3 — earthen embankment;
4 — hidrolipoclasia (pinacolone);
5 — waterproofing of the walls (asphalt);
6 — clay lock;
7 — floor (brick “on edge”);
8 — vent pipe;
9 — interior and exterior doors;
10 — the entrance
If the groundwater rises close to the surface of the earth, this “outside” cellar is placed on simple waterproofing and sandy-gravel filling.
The walls are made from coarse cracked slabs (waste lumber in the form of long plates) or not thick logs, and carefully caulk the cracks with moss or oakum. The entire wooden part before assembling it is necessary to disinfect or to handle special fluids of type “Senezh” and “Teks”. The outer surface coat twice with hot asphalt cement or molten bitumen, and allowing it to cool, – paste over roofing material to protect from moisture.
The ceiling is draped with a layer of gynecology thickness of 50 mm, and the top is covered with plastic or roofing material.
Floor spread from a brick on an edge in a herringbone pattern, over a layer of clay for waterproofing. As shown, per square meter of floor takes about 64 bricks.
To ensure a constant temperature and humidity conditions in the cellar on top of it is recommended to make an earthen hill (dike), which should be impose with turf or sow lawn grass. You can use the hill as Alpine slide, planting ornamental plants and shrubs, which will also serve to strengthen the embankment.
Inside the vault is equipped with bins, shelves, and lighting; installing a vent pipe, two doors – inner and outer, between which in extreme cold have a thermal insulating filling.
Mini-cellar
Among gardeners and truckers, widespread small-sized ground cellar in the form of insulated wooden houses-boxes (Fig.7) about human growth. Under the special area – the size of the mini cellars are dictated by the needs of the family and the amount of cultivated products. And maybe just build it from available scrap materials.
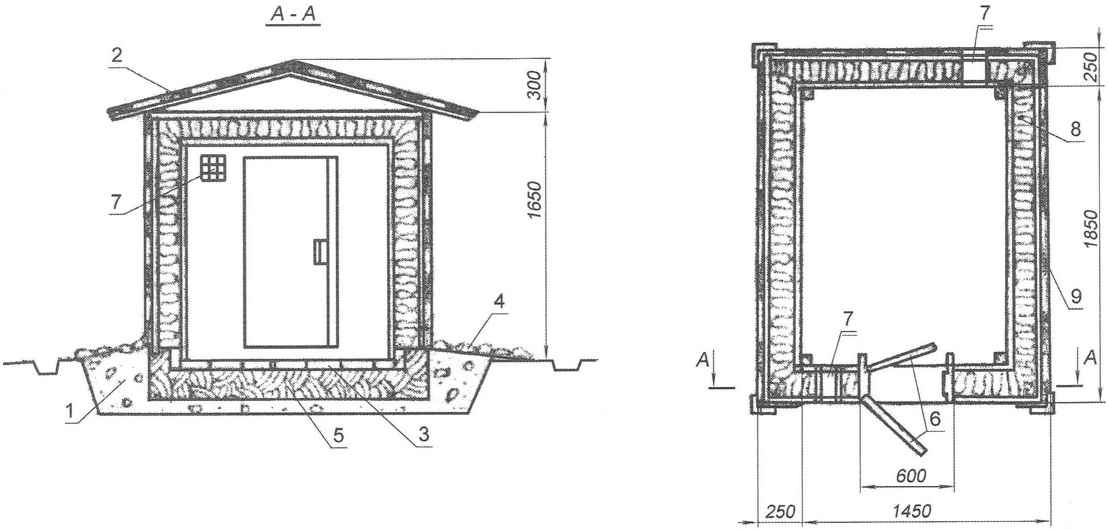
Fig. 7. Ground mini-cellar:
1 — sand-gravel cushion base;
2 — a gable roof;
3 — brick floor;
4 — blind area;
5 — clay lock;
6 — interior and exterior doors;
7 — ventilation hole;
8 — insulation (moss, straw, oak leaves);
9 — waterproofing (asphalt)
The construction is performed in the following sequence. On the selected location, prepare the ground – make a shallow excavation dredging (0.3 – 0.5 m), level it, tamp lightly and prepare drainage: covered with layer of 0.08 – 0.1 m coarse sand, fine gravel, gravel, crushed brick or expanded clay. Typically, 1 m2 excavation enough polkubometra the filling material. Next, prepare the floor: put a layer of soft clay with a thickness of 0.15-0.2 m and consistently pressed him flat red burnt brick (per square metre floor will require approximately 32 bricks).
The aboveground part is a structure in the form of a box with tightly knitted together by double walls of thick boards (40 – 50 mm). In the gap between the walls is laid insulating material: the dry forest moss, oak leaves, concrete block, treated with sulphate and the dried sawdust with lime-pushonkoj. Mineral wool experienced builders do not use: over time, she sits down and loses its insulating properties.
Wooden surfaces are best treated with antiseptic. Below the wall was not insufflated, they should be lined with glassine, ruberoid, tar paper. The end of the cellar arrange entrance with two doors, between which in the winter also lay the insulation. On this same wall, make a vent-type window with a size of 0,12×0,12 m, which tighten chicken wire mesh. On the same wall should make the visor of any suitable material.
Top cellar is available single or gable roof made of slabs, covered with wavy roofing material or slate. Perimeter walls genomebiology arrange otmostku width of 1 m with a slope. And at a distance of 0.5 m from the walls of a drainage groove to a depth of 50 cm, filled with brick fight or gravel.
Earthen cellar
If the site soil is dense and dry and sublime, it is possible to build a simple earthen cellar. At the time, these cellars were widespread in the Yaroslavl province, where he received the name – Yaroslavl. They are convenient because they do not require large expenditures and are constructed from local materials.
The pit (excavation) digging with a small inclination of the walls to the ground less crumbled (Fig.8).

Fig. 8. Earthen cellar:
1 – Hutch 1 for potatoes;
2 – drainage ditch;
3 – the slope of the roof;
4 – shelves;
5 – Adobe floor
The wall of the pit sheathe Croaker, boards, fence. The covering is especially required if the cellar is dug into the sandy soil. It makes the cellar more durable, and the conditions of storage of vegetables and potatoes is more favorable. Lining better to make collapsible to the summer part of the structure can be disassembled and stand up to dry.
The floor of the cellar is made of clay, with a thickness of 80-100 mm, with the addition of fine sifted brick rubble. In the ground floor is laid compacted gravel layer of 50 mm by pouring the hot bitumen, which prevents the capillary wetting.
The ceiling is made of poles or podtovarnikom, glinosolomennogo cover the top with grease and covered with earth. The thickness of the insulating backfill ceiling is 300 – 400 mm.
The roof over the cellar – saddle, lowered to the ground, cover the pit with overhangs of not less than 500 mm on each side, running from pricecanada slabs or any other local material such as gynecology, reeds or branches (pletn’ove). The ridge of the roof is better to make a thick edging boards lined under it strips of rolled material – roofing or roofing material.
The height of the cellar of 1.8 m. If the ground water table does not allow to dig to such a depth, the height of the cellar is possible to reduce or make the filling of the pad to lift the floor of the cellar. Ground water should not reach the base of the cellar to 1 m. groundwater Level determined in the spring when it is highest.
Inside the cellar is divided into bins (of the fence). The bins are provided with a height of about 1 m with slatted floor for ventilation. The distance between the shelves according to the height of 500 – 600 mm.
To avoid freezing cellar in winter during severe frosts the overlap is additionally insulated dry oak leaves, moss, peat, or simply straw.
Around the cellar arrange drainage ditch with a depth of 500 – 600 mm, designed to ensure rapid removal of atmospheric water.
If the cellar is arranged on the slope, on top, at a distance of 3 – 5 m carried out and the drainage (trapping) ditch depth of not less than 700 – 800 mm (Fig.9).
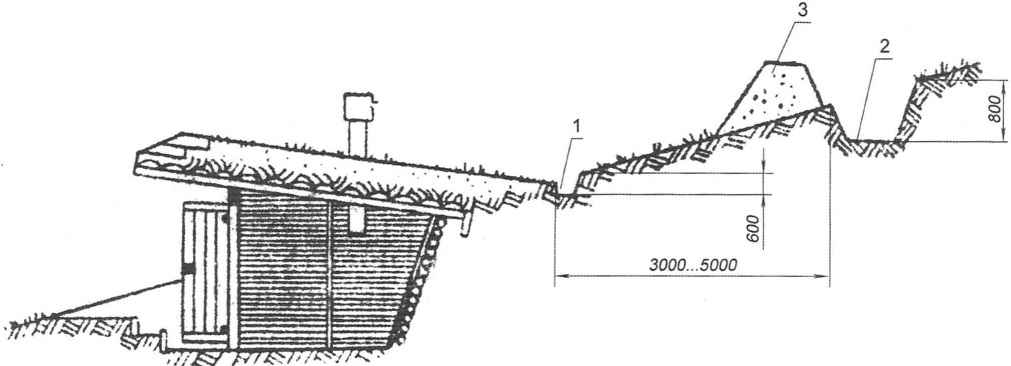
Fig. 9. Cellar on the hillside:
1 – drainage ditch;
2 – sermon on the defensive ditch;
3 – a shaft excavated in the digging of the ditch of the earth
A ditch is better to arrange not across the slope, and at some angle (diagonally), then even at very strong downpours it does not burst and does not flood the shelter.
Obligatory attribute of any cellar – vent pipe. Thanks to her, the vault provides the required freshness of the air and temperature are two key aspects of quality storage of vegetables and fruits.
In the cellar it is necessary to hang a regular thermometer, or better yet a psychrometer to control not only the temperature but also relative humidity.
In the summer the hatch cellar leave open for drying and airing. All modular construction stand up, carefully wash with hot water with soda and deep fried in the sun.
The space under the roof above the main ceiling of the cellar is called pogrebnitse. Despite the relatively small volume, this space is also used for commercial purposes. Pogrebnitsu can be used as a room for storage vegetables before the frost, and also for storing garden tools. If necessary, this part of the store can have not only the roof but the walls.
Pogrebnitse
Cellar with pogrebnitsy popular in many areas of Russia. It consists of two parts: the lower buried in the ground about 2 m, which is actually the cellar, and the top – the so-called pogrebnitsy. In a cellar in hot weather is cool, and in winter much warmer than outside (Fig.10, 11).
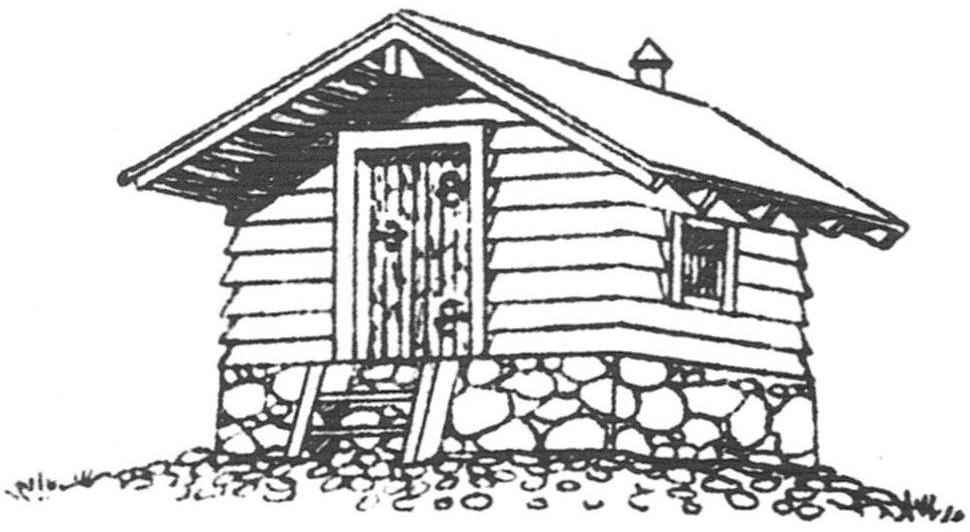
Fig. 10. Pogrebnitse: add-on recessed (ground) cellar
Pogrebnitse from the surface, buried cellar protects from rain, cooling in winter or heating in summer. It can be used as an auxiliary room. The cellar walls constructed of durable materials: concrete (thickness 200 – 300 mm), stone and red brick (thickness 250 – 380 mm) of the slab (60 – 80 mm) or logs (with a diameter of 120 – 180 mm) and securely isolated. Type of waterproofing chosen depends on the specific conditions of the construction site. Wall pogrebnitsy erected of thick cracked slabs or plates. Sloped roof with wide overhangs, solid sheathing, with roofing of asbestos cement sheets or roofing material.
From the walls of pogrebnitsy satisfied genomebiology blind area with a minimum width of 1 – 1.2 m with a slope of 1:10.
The entrance to pogrebnitsu is best done from the North side, and the door – from thick (40 – 50 mm) with tight-fitting boards. The door you can make decorative hardware – hinges, handles, latches.
In wet soils in the excavation around the perimeter it is possible to dig a small pit – a pit for collecting water. Water from sumps should be periodically bail out.
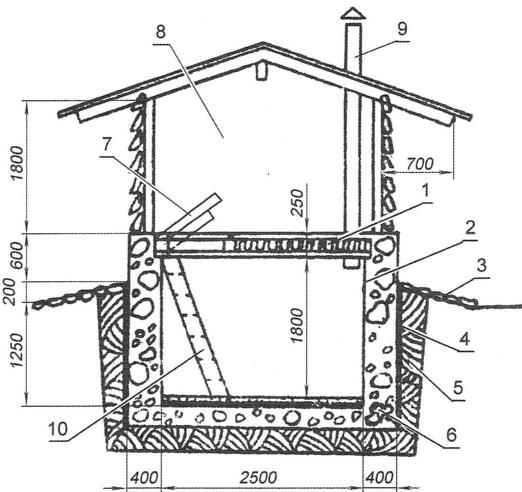
Fig. 11. Ground cellar with pogrebnitsy:
1 – overlapping with a heater;
2 – lime wall cellar with a whitewash;
3 – blind area;
4 – coating with hot bitumen (2 mm);
5 – clay lock;
6 – rubble concrete;
7 – Luc;
8 – pogrebnitse;
9 – the vent pipe;
10 – stairs into the cellar
The bottom of the pit leveled, tamped and covered drainage material – gravel layer thickness 80 – 100 mm of gravel is placed a layer of crushed clay (20 – 30 mm). Clay is better to take a fat, it level and tamp, then stack the concrete preparation of the solution a layer of 100 mm. After shvatyvanija concrete 10-15 days on it and laid cement-sand screed thickness of 50 mm, which, in turn, carefully smoothing steel trowel – zheleznjat.
Space between the feet of cellars and soil, the so-called sinuses clog with clay, stacking and compacting it with a layer of 200 – 300 mm, that is, arranging the side of a clay castle.
The cellar ceiling is insulated. As insulation recommend expanded clay, sifted brick rubble, moss, are placed on a clay grease (30 mm). The ceiling may be arched, depending on the design of the cellar. The flooring slab of the cellar provide a hatch the size of 70×70 cm, under which the set inclined ladder.
To maintain temperature and humidity cellar equip the ventilation pipe (see Fig.11, 12). To improve the efficiency of air vent pipe can be divided into two channels: the output and supply. First will remove the air from the cellar, the second to enter fresh air outside. Interestingly, two branches are possible not only in the ventilation pipes, but also… at the store.
Double cellar
The need for storage, which is a double cellar with separate entrances to separate units, may be caused by different reasons. For example, such blocked cellar can work together to make the neighbors on the boundary line of their land plots (Fig.12, 13).
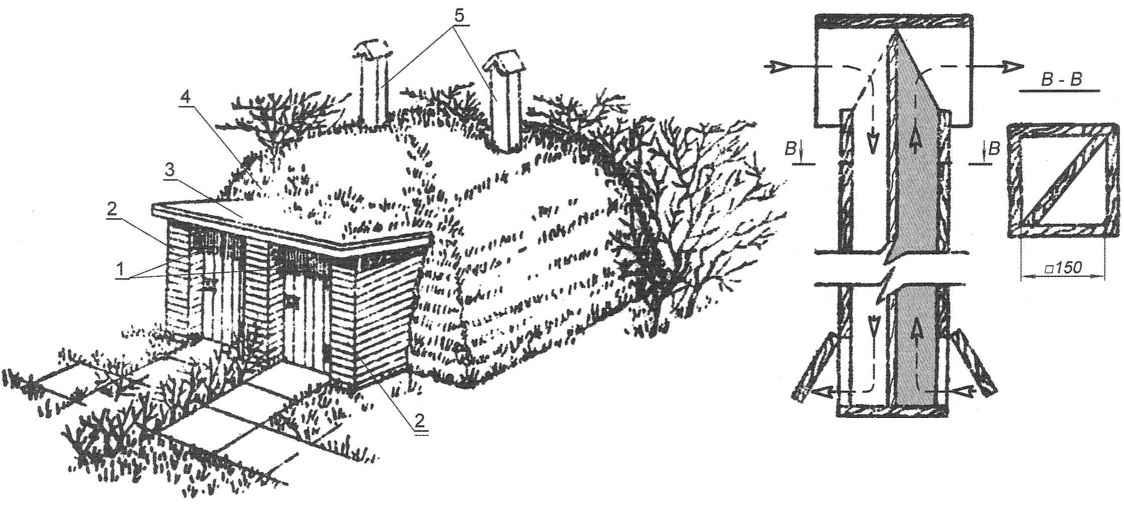
Fig. 12. Unit-cellar:
1 – two separate cellars;
2 – brick cellar wall;
3 – General visor block;
4 – earthen embankment;
5 – ventilation pipe each cellar unit
The advantages of this cellar are obvious: first, on average 20 – 25% reduction in overall construction costs and saves materials due to the presence of the common area structures (inside wall, roof, etc.), and secondly, a cellar, located on the border of two adjacent parcels, allows for more efficient use of land. Earth, incidentally, is used directly for the facility: the ground excavated with a small penetration of the base of the vault, then goes to the embankment walls of the cellar.
Blocked cellar ideal for a same family in separate bins, you can provide a product at different storage time, or to hold separately the potatoes and vegetables that are in the joint possession can acquire unusual odor.
After the pit dug, cleaned and planned place poured a layer of gravel or brick battle thickness 80 – 100 mm (0.1 m3 1 m2 Foundation), which rams and shed hot bitumen.
Then put a monolithic base made of dense concrete composed of 1 part cement, 2 parts sand and 4 parts crushed stone or gravel.
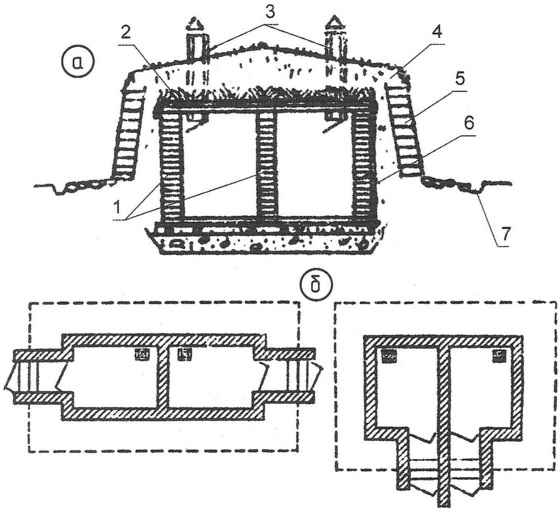
Fig. 13. Device is blocked cellar (a – section 5 – plan options: opposite inputs and joint):
1 – brick wall;
2 – roofing material overlapping blocks;
3 – vent pipe;
4 – earthen embankment;
5 – sod reinforcement embankment;
6 – walls waterproofing (bitumen);
7 – drainage ditch
A week later (after drying), erect brick walls, then cover them on both sides with a layer tsementnopeschany plaster thickness of 20 mm. at the same time of cement-sand mortar to make the floor thickness 40 – 50 mm and smooth down a steel trowel.
The overlay of thick pricecanada slabs or planks of 50 mm thickness. the ends of the boards in places of intersection with masonry pre-coat with hot bitumen, which gives them durability. Ceiling insulated with a layer of gynecology thickness of 200 mm, and then land with a minimum thickness of 500 mm, which are sown in grass. The slopes of the walls strengthen the turf.
Outside the walls of the cellar gidroizolirovat hot bitumen mastic (bitumen with filler) or pre-applied bitumen primer with a thickness of 0.1 mm melt hot bitumen in 2 layers with a thickness of 2 mm (flow of bitumen 2 kg/m2). If necessary, include a clay castle.
Y. PROSKURIN, L. KOROTKEVICH
Recommend to read
 THE TRAILER FOR “JUPITER”
The creation of various devices to facilitate work in the garden I have been doing for many years. However, to the readers of their developments have not yet ruled, this is my first... SOAP VS DRAFTS
A lot of any tips on winterizing the Windows in the winter. I decide all problems, zakieva them to the linen strips, soaked in soapy water. Such strips after soaping become impermeable to...
