 In rural homesteads, and in ordinary suburban houses, which in mother Russia today Nemer-unread, without any stove — Russian, Dutch or a simple “stove” — is hardly a cost, even if “we have gas in the apartment”. Only still far not everywhere and not all have the “blue fuel”. But even if the gas is supplied, in the heat of summer to stand at the stove in the kitchen and prepare food — a handful. But have to do it, as you know, not once a day.
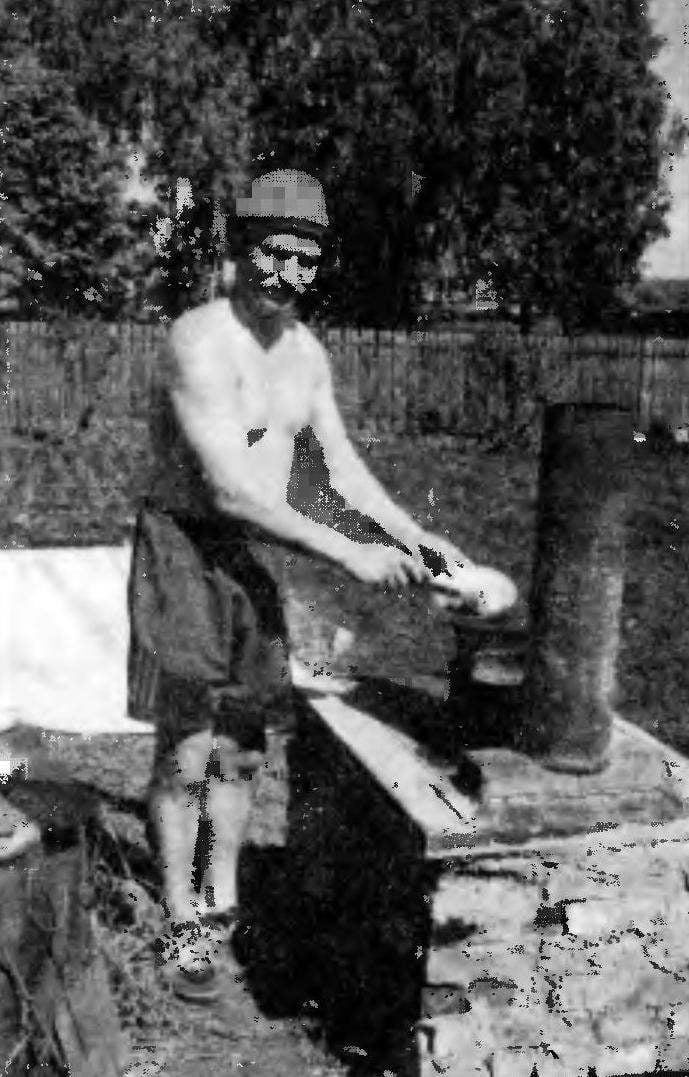
Therefore, keeping in mind the design and in choosing the shed suitable of the available materials, has started the construction of the exterior of the stove (or rather, the cooking plate in the garden).
First things first has identified the most suitable place for future boards. He was chosen not only from the point of view of approaches, but in view of the prevailing summer wind on the leeward side from the house and away from the wooden outbuildings.
Although the plate structure is small, but massive, I decided to make the Foundation slab. Removed topsoil to a depth of about 150 mm (to the indigenous clay soil), slipped to the bottom of the sand layer with a thickness of 7 cm — 8 and filled with concrete slightly above the surface of the earth. The filler used battle red (ceramic) bricks.
Then gave the Foundation a couple of days to get stronger and started laying. It was made from a ceramic corpulent brick sizes 250x125x65 mm (but used and three-quarter parts of them, and even halves) on lime-clay mortar thickness of about 10 mm. Approximate composition of the mortar mix: 1 part clay + 1 part lime + 2 parts sand.
The first row formed in the bottom plate. It laid almost entire area of the Foundation, carefully close up the joints with mortar. The second series is laid according to the square of the first ligation (overlap) seam, leaving only the front recess (shoulder) for the grate. In this case, as in the clutch of the bottom in the course were as whole bricks and three quarters and even halves.
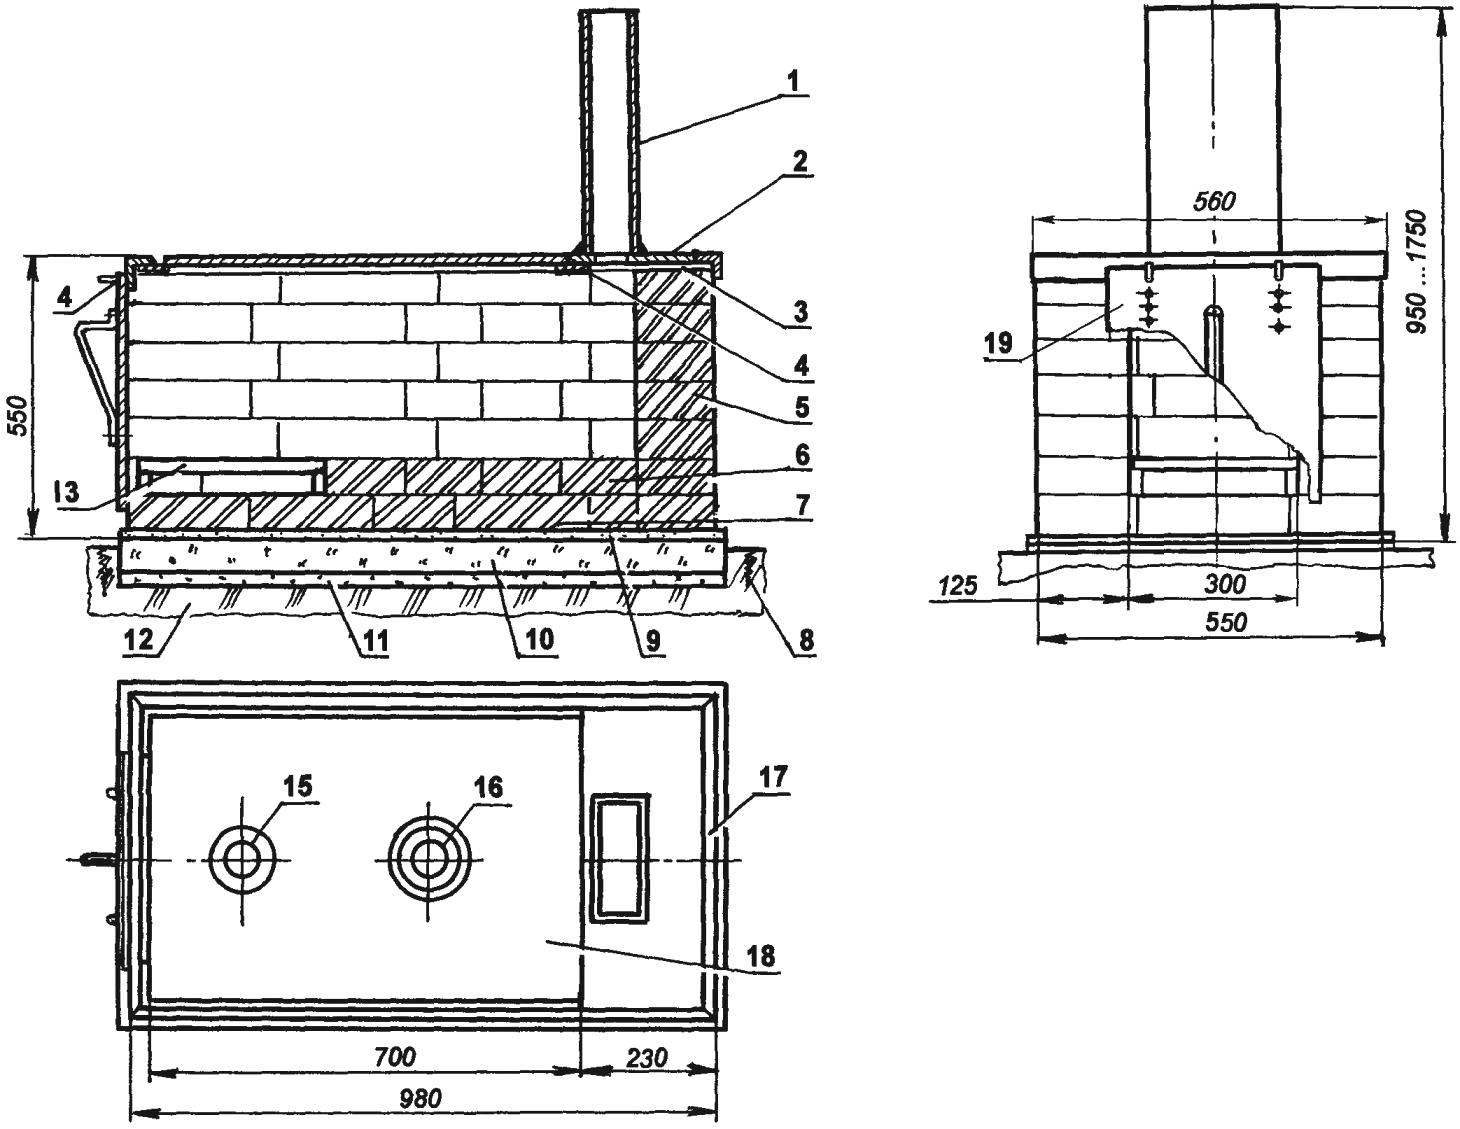
Garden hob:
1 — chimney; 2 — support plate of the flue pipe; 3 — coupler (solution); 4 — cradle (2 PCs); 5 — wall furnace (ceramic brick, on demand); 6 — under (ceramic brick, on demand); 7 — base (ceramic brick, according to needs); 8 — vegetable layer; 9 — levelling layer (solution); 10 — the Foundation (concrete); 11 — underlying layer (sand); 12 native soil (mud); 13 — burner; 14 — hook for hanging the flap (2); 15 — small burner; 16 — high burner; 17 — rail; 18 — overlying plate (steel, sheet s4); 19 — damper

Tying with the chimney:
1 — hooks for hanging the flap (steel wire Ø6); 2 — cross strapping (area 35×35, 2); 3 — lodgements overlying plate (steel strip 290x50x3); 4 — run strapping (area 35×35, 2); 5 — chimney (sheet s2), 6 — the base plate of the chimney (sheet s4)
Further, the masonry walls of the furnace produced around the perimeter of the thickness of the whole polkirpicha — because of thermal inertia from the garden plate is not required. The clutch was again conducted with ligation sutures, using, where necessary, three-quarter part of the bricks. Holding up the wall in five rows, making the height of the furnace is sufficient. The flames of the burning fuel was, according to my calculations, should be somewhere just below overlying the furnace plate.
Leaving dry mortar masonry, started the fabrication (cutting and welding) of steel parts: strapping, plate, tube, grate and damper.
Piping welded from the corner of 35×35 mm, privaris to its front support strip — tool tray for overlying the plate. Piping to the masonry put on the tie — layer solution. From the same area 35×35 mm welded the skeleton of a grate, its bars made of rods with a diameter of 16 mm.
Overlying plate cut from a sheet of 4 mm thickness, and the flap and the base plate of the chimney from a 3 mm sheet.
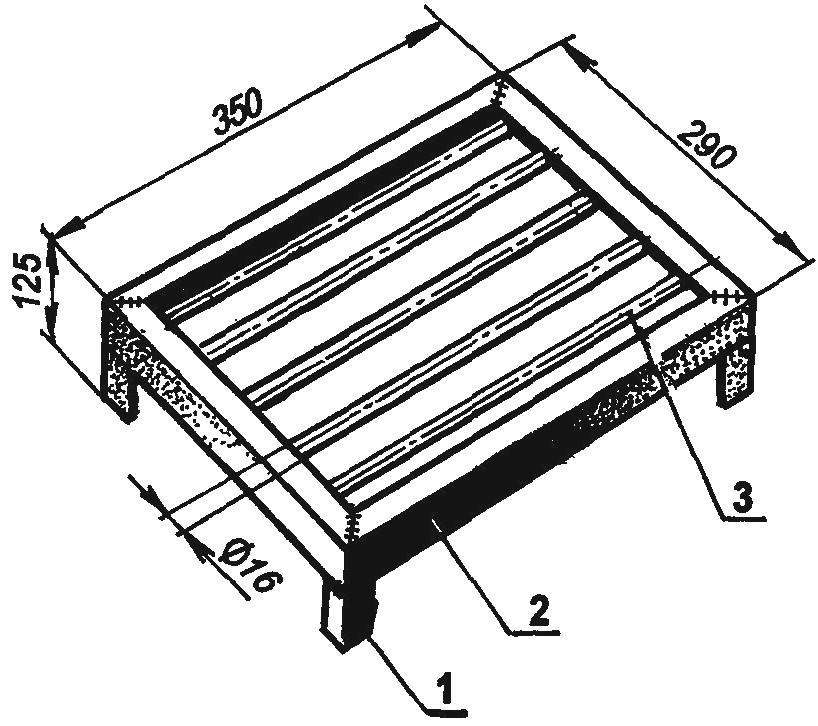
Grate (detail POS. 1,2 is made of 35×35 area):
1 — leg (4 PCs); 2 — frame; 3 — burner rod (rod Ø16, on demand)
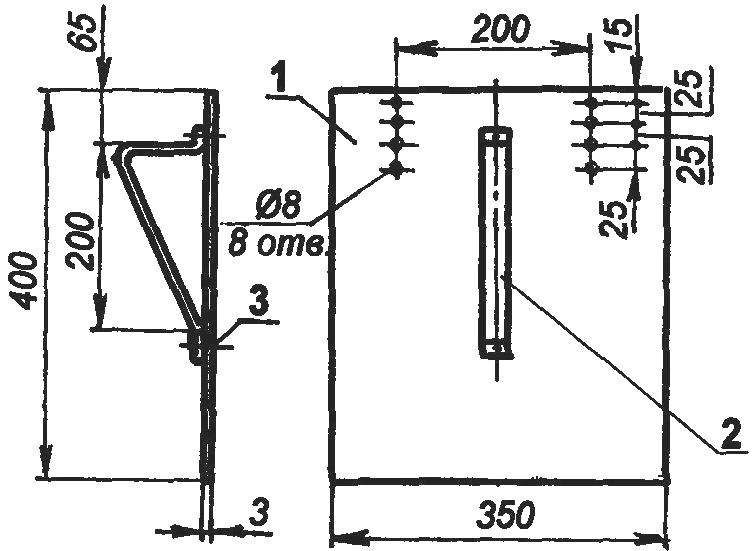
Valve:
1 — valve (steel sheet s3) 2 — handle (steel strip 300x25x3); 3 — rivet (2 PCs)
In the overlying plate made two holes-burners. Cut out the circles used for the manufacture of caps of the burners. I’ll tell you that the overlying plate is removable. If desired, meals can be prepared with “smoke” on an open fire (e.g., soup) or use the stove as a grill (for example, to fry a shish kebab)
The flap is also made removable. But this is more out of despair — was not available and was not able to acquire either the fire door or ash pit. It (the throttle)a few pairs of drilled holes.
Now, outweighing the flap on the hooks welded to the piping, with one pair of holes to another — regulate (increase, reduce or entirely block) the hole kind of blew, thus changing the draft in the furnace.
But the base plate of the chimney, pre-privaris to it as to the harness, the frame overlying the plate and the tube, tightly connected by welding with the parts of the strapping.
Chimney at first wanted to make welded, rectangular cross-section, even cut the appropriate hole it in the base plate (and cite in the drawing). But then I found a cylindrical (diameter 200 mm) pipe and welded it to the base plate through a rectangular adapter.
To protect from rain and winter cover oven top with a sheet of flat slate with a cut-out for pipe hole and the pipe — carved piece.
For fire safety near the stove built out of old tractor tires small pool.
A. MATVEICHUK, Zavodoukovsk, Tyumen region.
Recommend to read
 BUILD-MODELS
-Models of missiles doesn't need to be. Do them and run interesting. Special, with nothing comparable to the excitement you experience the designers of such models, participating with... THE JAGUAR XJ.8
Introduced in 2003, the new JAGUAR XJ.8 is a rare combination of external conservatism inherent in machines of this brand, with ultra-modern filling, which is equally state of the art...
