You can then proceed to the roof.
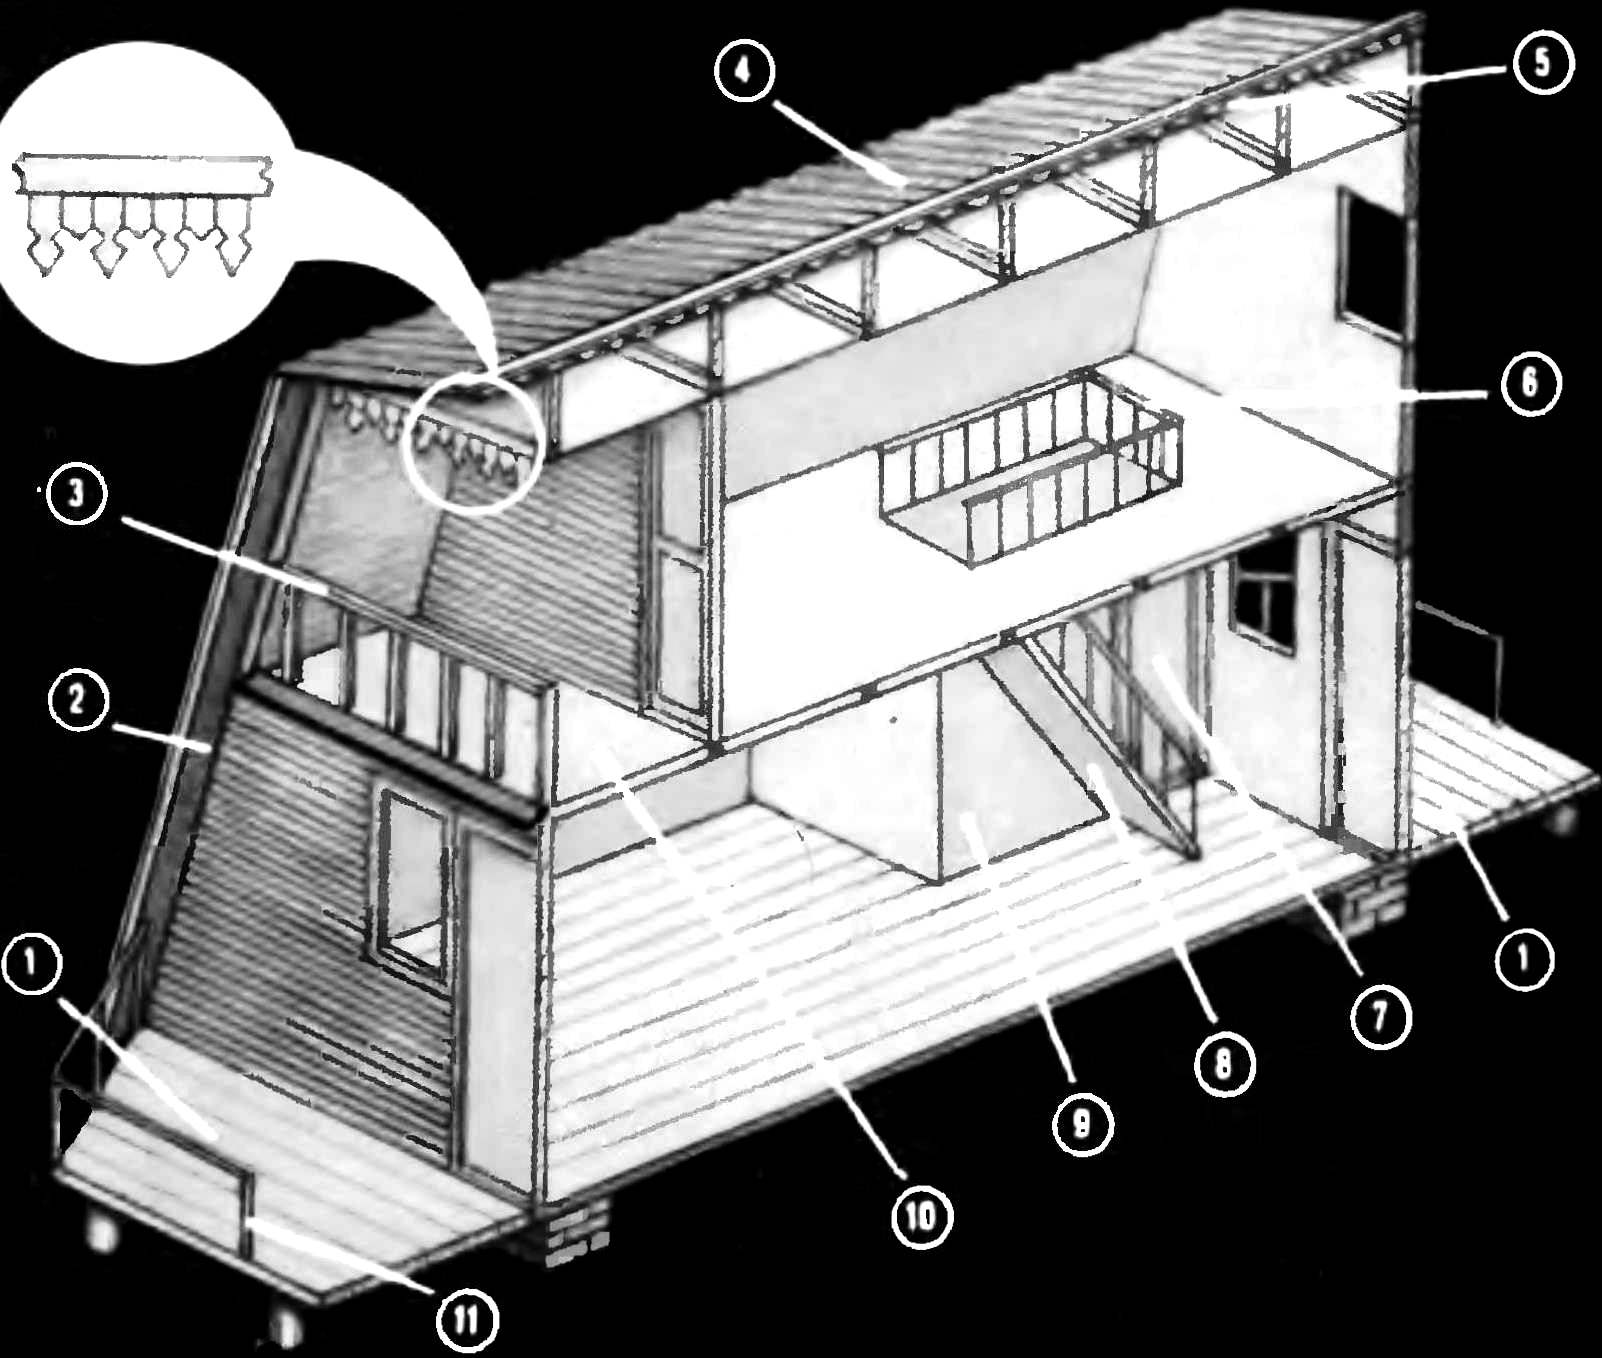
Roof. The roof and walls of the villas in our case, covered with slate, but can be applied with a variety of roofing material: black or galvanized steel sheets, tiles, planks etc.
Slate has a number of advantages — they are durable, cheap, not too hot in the sun, it can be easily obtained. Each slope of the roof of the house covered with slate in a row.
Below the junction of roof and wall in winter, blew snow, the upper part of the house covered by plastic film for greenhouses. The tape can be mounted ordinary stationery buttons. On top of the film and fit the slate. Slate is attached with nails with big heads (slate nails) if there are none, then you can ordinary, washers and rubber gaskets.
Wall. Their slate veneer can be produced in two ways — vrazbezhku, when the longitudinal edges are in different places, or overlapping edges along the entire length. The last coating is considered to be more beautiful.
When covered vrazbezhku sheets are placed in the following sequence. At a distance of 60-70 mm below sheathing laid horizontally strengthen the Board, allowing you to style the first row. The sheets are placed with an overlap of one wave and then attach the slate nails, pre-drilled in the slate under them apertures. Similarly fit the remaining rows. You must calculate the layout of the roof, in this case, the gap junction will be minimal.
Coating with a combination of longitudinal edges requires the mandatory preparation of the sheets, consisting in cutting off angles. Depending on the magnitude of overlap sheets is determined, and the dimensions of the shear angles. A specific example of stacking overlapping longitudinal edges shown in the figure. The prepared sheets are placed in the following sequence. Exactly the cord, put a sheet marked with the number 1, and beat it with the left hand; then it successively stacked sheets, labeled number 2. These leaves should overlap the edge of the underlying sheet with all your cut angle. Next, stack the second row, starting from worksheet 3, etc.
Preparation and layout of corrugated asbestos-cement sheets for covering (A preparation of leaves with cut corners, the B order of stacking):
1 horizontal direction 2 vertical direction.
The Windows and doors. After the house covered, proceed to mounting and fitting Windows and doors. They can be ordered in the carpentry shop for you have prepared sketches or, if you have skills in carpentry work, to make yourself. The size of the Windows and doors shown on the drawings.
Floor and from drevesnostruzhechnoj plates (DSP) first grade. To do this, pre-manufactured subfloor made of boards of equal thickness, which attaches to the bases of the frames. Black floor boards are placed with a gap of 100-150 mm. Then it stacked chipboard (pre-prooliflennye) and are attached to the black carpet nails.
It is possible to make floors from shpuntovannyh boards or planks sexual. The floor planks can be coated hardboard fiberboard that gives it after painting the solidity.
Stairs to the loft . Then proceed to the manufacturing steps. Methods of manufacture and design many times were published in the journal “modelist-Konstruktor” (see # 5 in 1987).
The ladder rests on the beam overlap of the fourth frame. In a beam overlap of the third frame to cut part of the timber to the width of the stairs and nail the two beams of the same section between the middle beams of the second and fourth frame; they also fasten the cut ends of the third beams of the frame forming the hatch on the second floor.
The top floor is made similarly to the floor of the first floor. The loggia floor is spreading from TES. It needs to be executed with a slight slope outwards to drain rain water. On top of the boards in our case made the cover of the loggia galvanized roofing iron. The edges of roofing iron are folded for 50 mm and nailed to the walls of the loggia.
Now you need to make it a fence. It can be as wood and metal. After that, customized boards, sew up the side walls and ceiling of the loggia.
The ceiling first and second floor are made of sheets of plywood or fiberboard. The leaves sweep across the ceiling so that their joints were in I-beam frame.
Finish . Partitions made of particleboard second grade. At the junction of sheets delivered bruski section 50X50 mm. the Septum can be performed from boards, but it is more time consuming.
Padding the walls . Here you can apply different materials: chipboard, fiberboard, plywood, boards, drywall, etc. Fit and trim these materials, but in this case it will be necessary to additionally install bars 50X50 mm and by them to mount the trimming of the cladding material.
Before painting the walls pre-shpaklyuyut. If you want to use Wallpaper, all of the surface before paste over with paper.
The floor and ceiling at the perimeter of the upholstered skirting boards, and door and window frames.
Interior finish and painting may be performed for every taste. But if the floor is made of particle Board or fiberboard upholstered, it is better to use for painting oil paint, previously well proolifiv leaves the floor.
A porch can be both stationary and in the form of the lift platform. The latter is made in the form of a trapezoid, the shape of the facade to the second floor. Fastening to the wall of the house hinged on large hinges. The fence and stairs in this case are removable.
A. and B. GRYAZNOVA, M. KOROBKOV, I. BLATOV, Kstovo, Gorky region.

 Houses of this design are popular with gardeners, they are simple and affordable to build; a set of materials required for each, cheap enough; moreover, this two-storey cottage has a very original and attractive appearance.