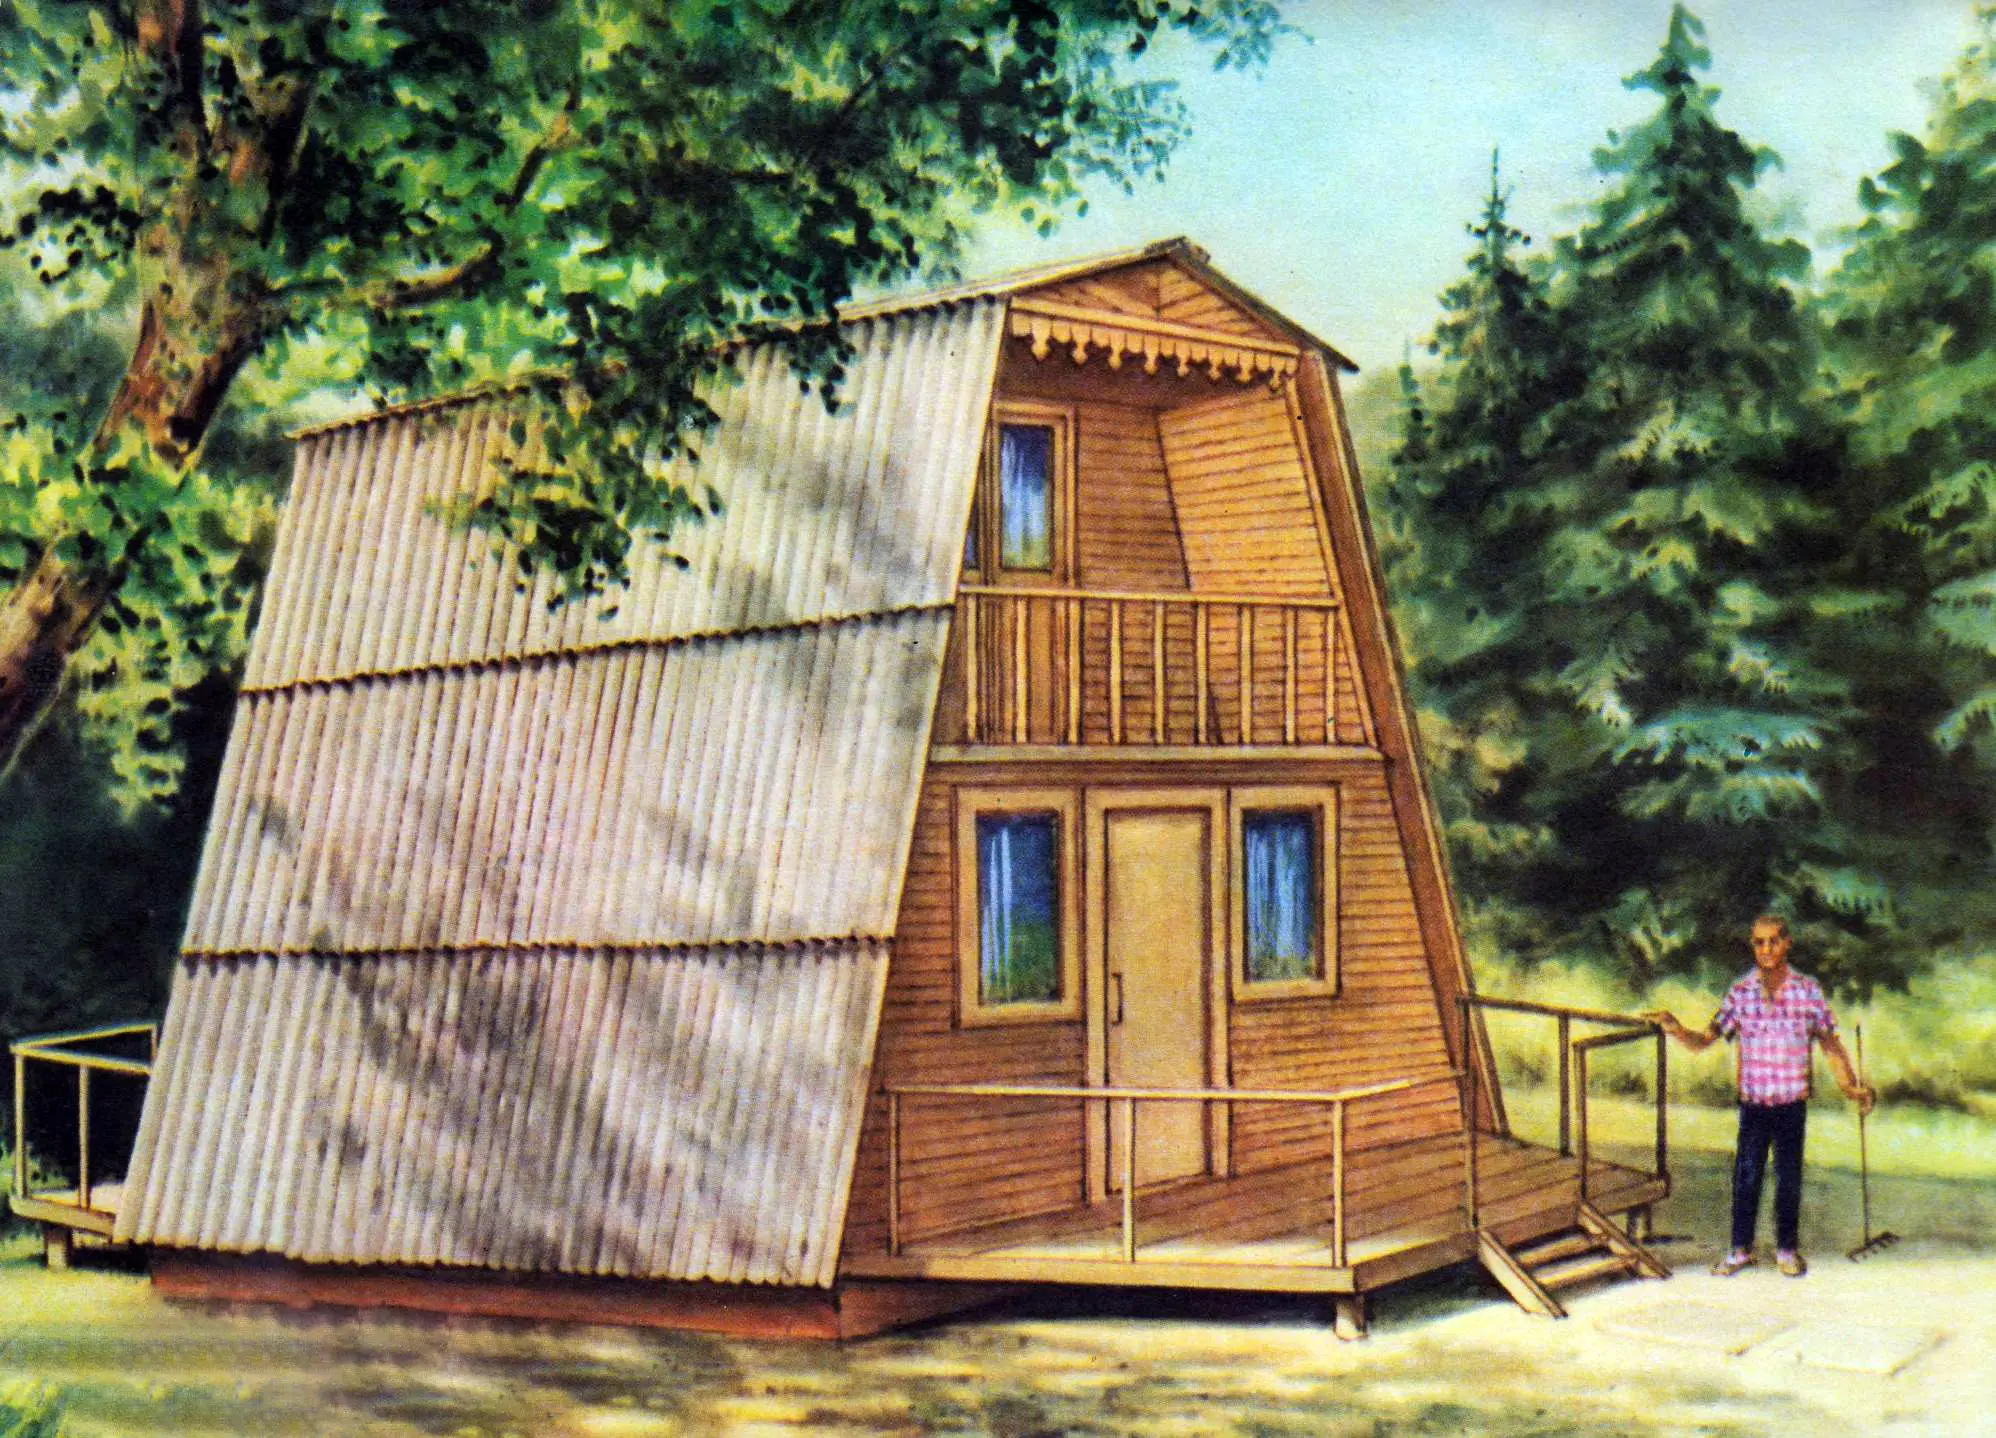
SUCH GARDEN HOUSES ARE POPULAR AMONG AMATEUR GARDENERS: THEY ARE SIMPLE AND AFFORDABLE TO BUILD; THE SET OF MATERIALS NEEDED FOR EACH IS QUITE CHEAP; BESIDES, SUCH A TWO-STORY COTTAGE HAS A VERY ORIGINAL AND ATTRACTIVE APPEARANCE.
The «Teremok» garden house consists of two rooms and a kitchen; in addition, there is a veranda, a loggia, and a storage room. It is built from readily available building materials. The windows in the rooms are wide, let in plenty of light and provide a good view of the garden area.
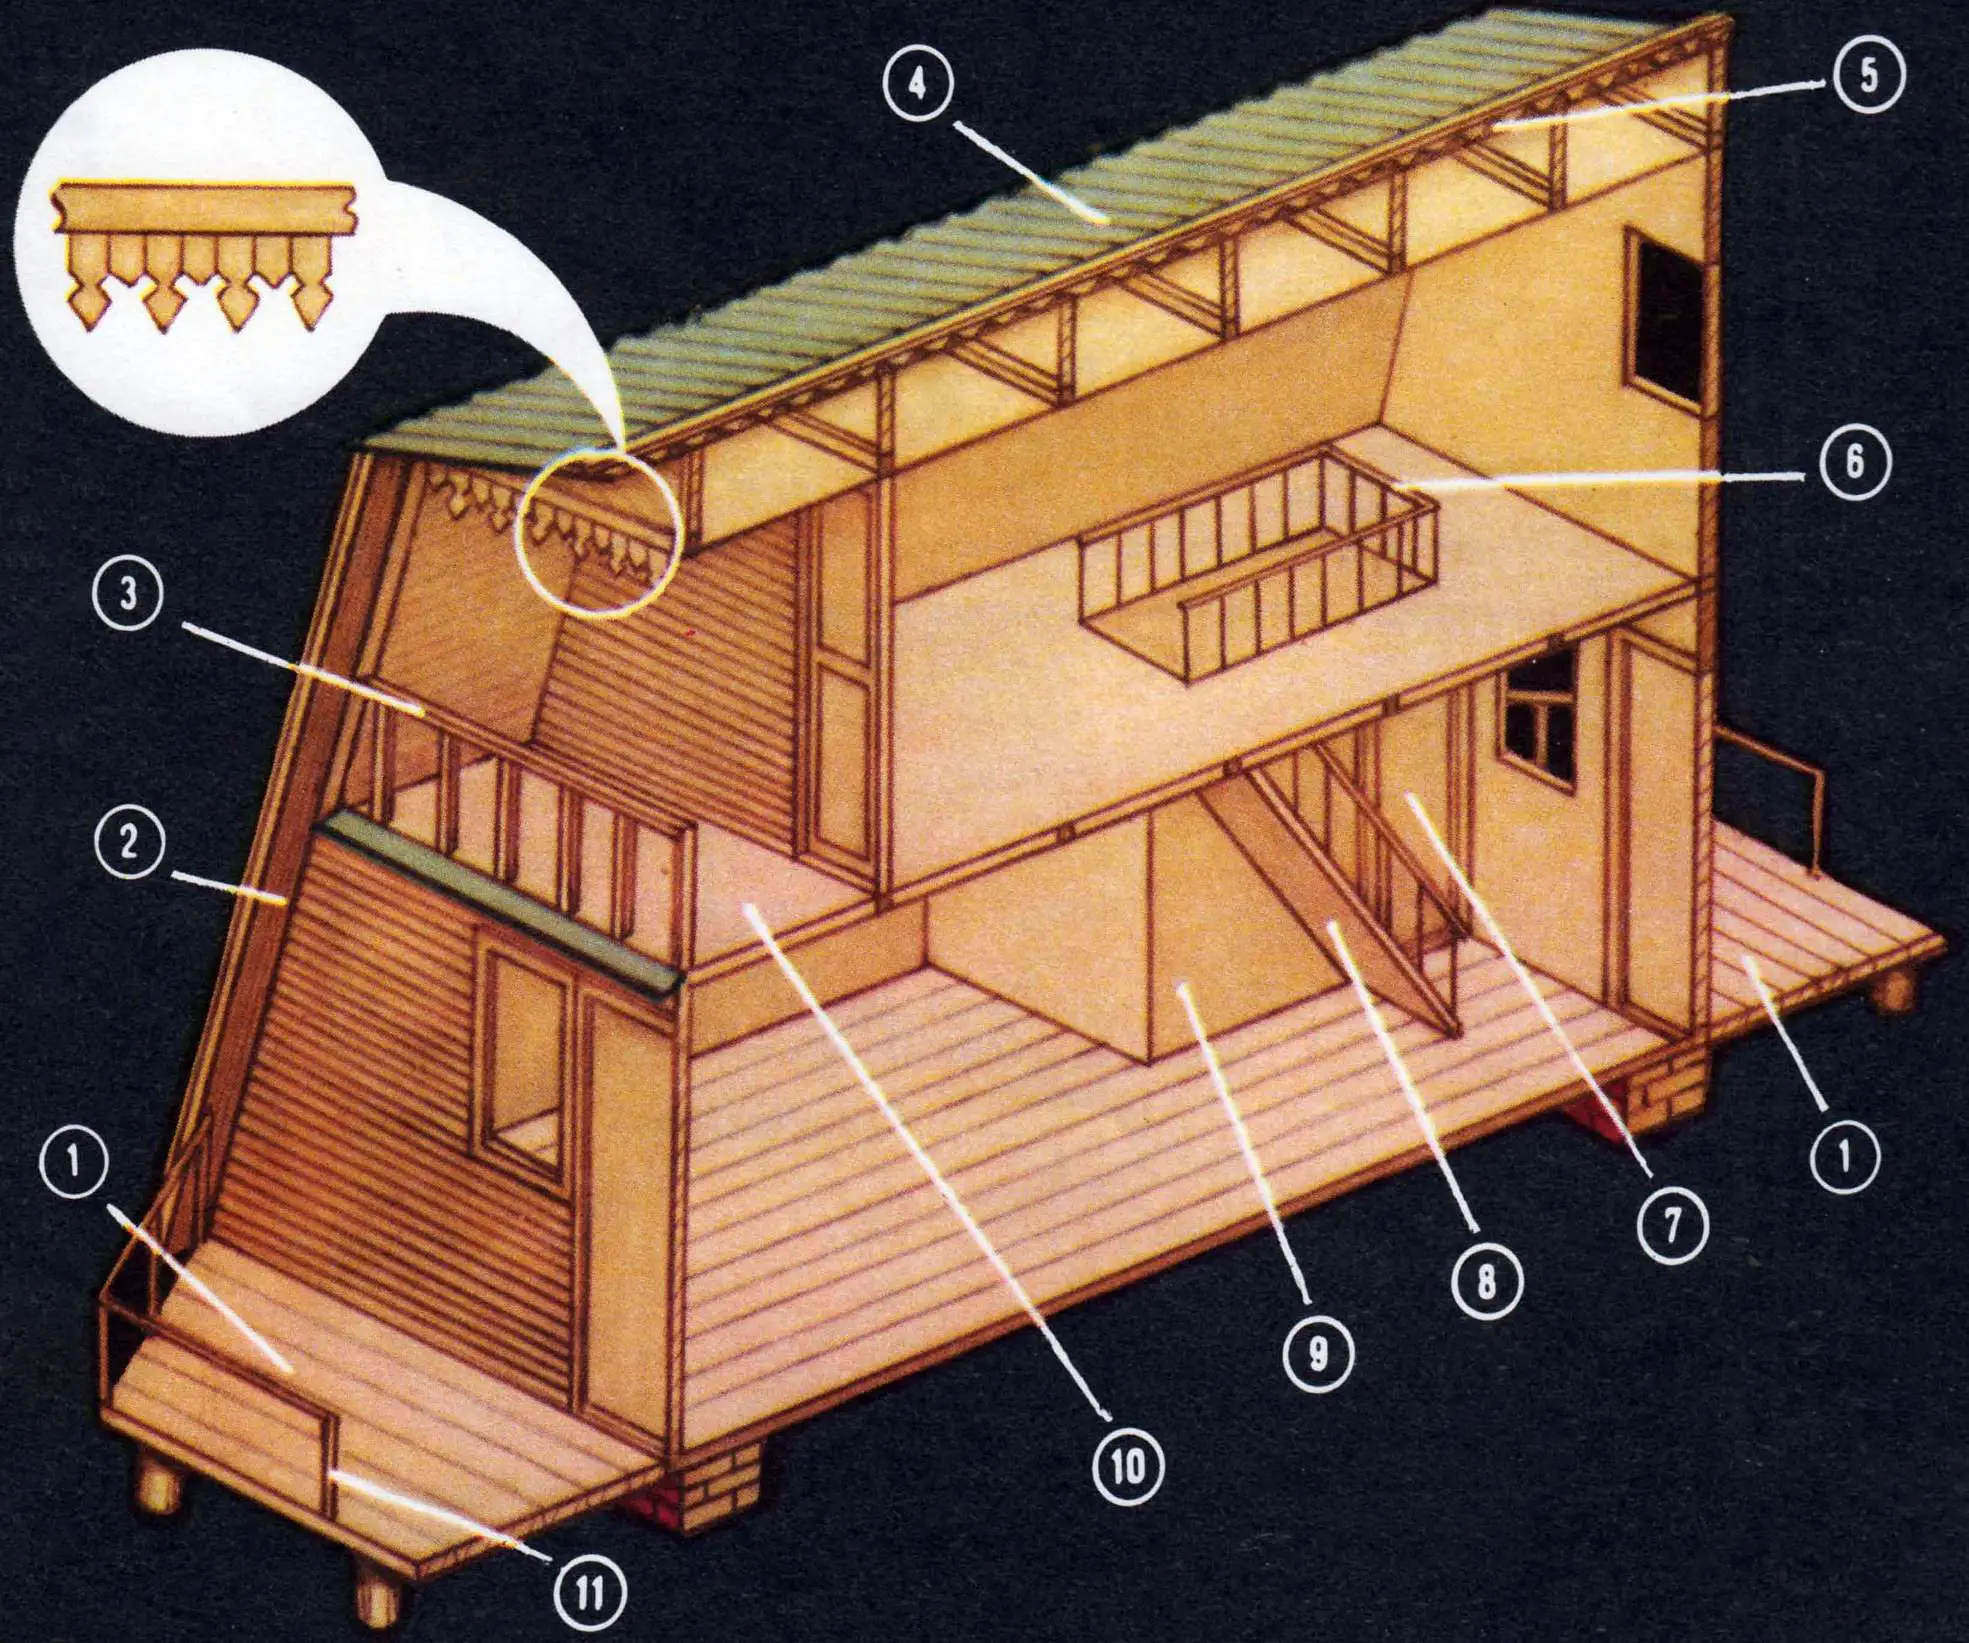
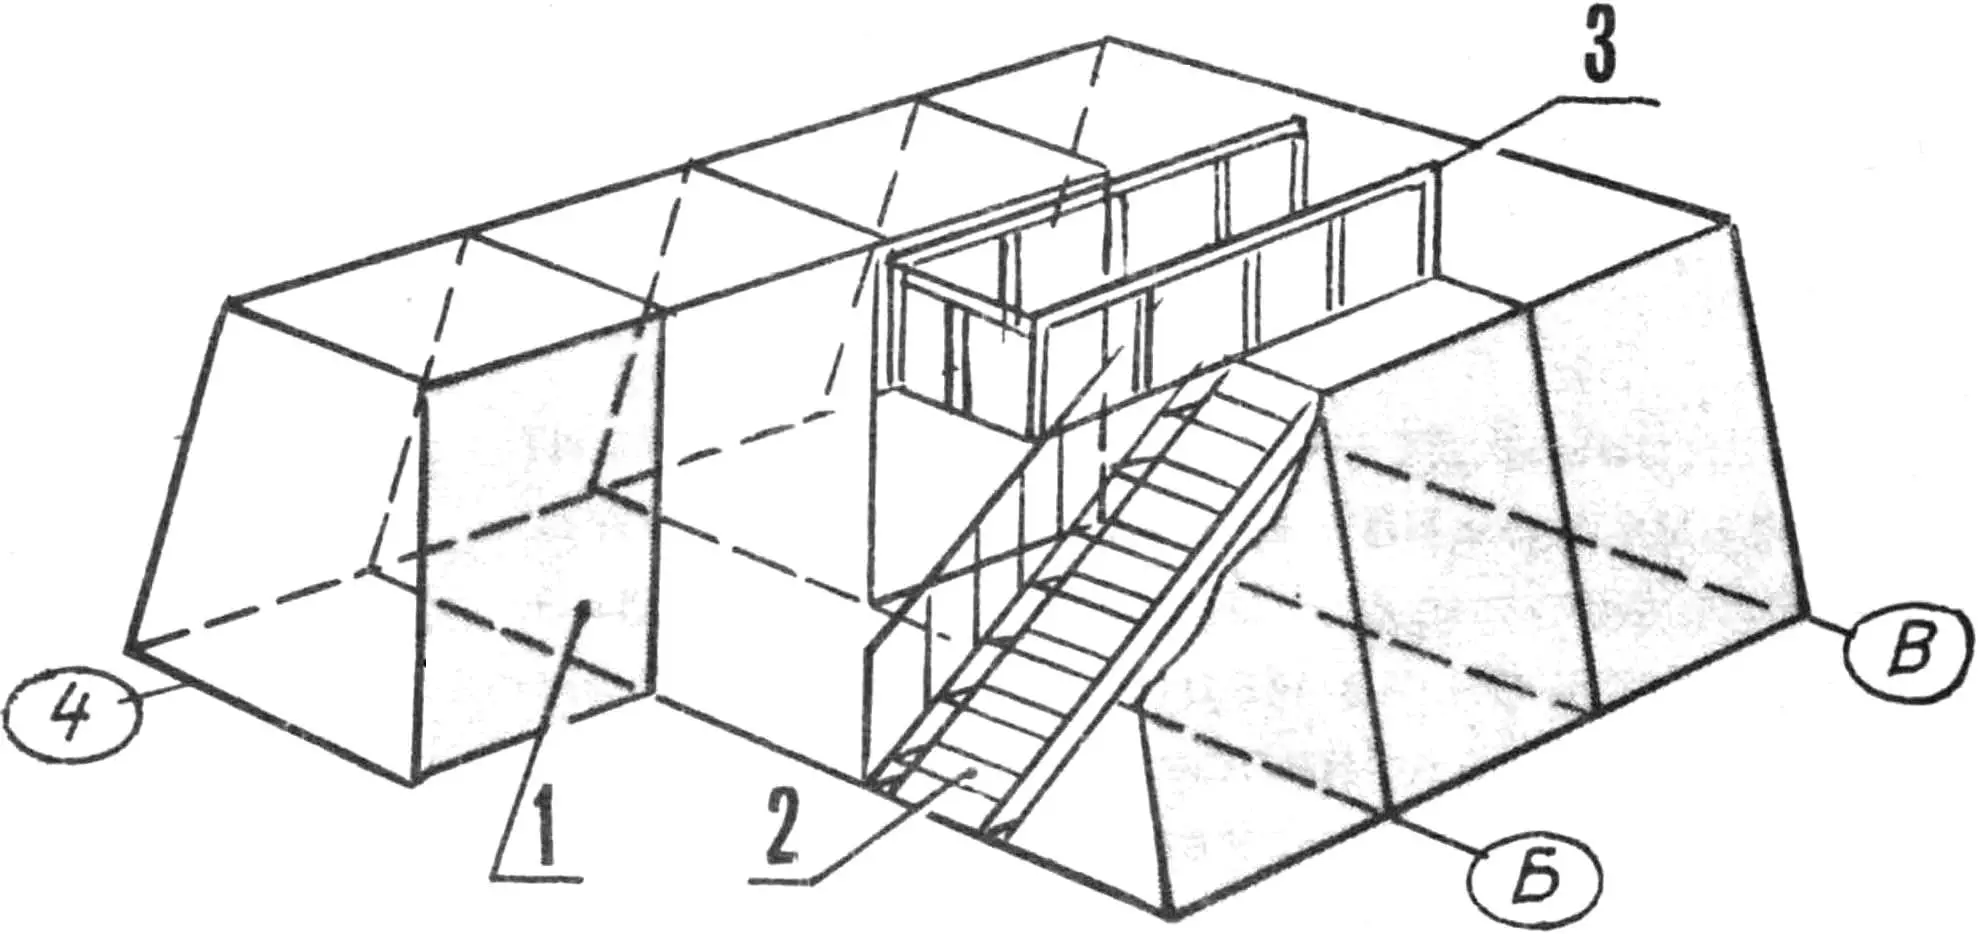
1 — lift-up veranda, 2 — overhang, 3 — loggia railing, 4 — roof, 5 — ridge board, 6 — attic floor hatch railing, 7 — door, 8 — stairs, 9 — storage wall, 10 — loggia, 11 — veranda railing
The first floor has a 15 m2 room, a 4 m2 kitchen, and stairs to the 12 m2 attic; there is also a small storage room (2 m2) formed by the hallway wall and the roof slope. The entrance to it can be made either from the hallway or from outside, from the veranda.
FOUNDATION. Its design depends on the terrain and soil properties. The «Teremok» has a column-type foundation. Various materials can be used for it: charred or tarred wooden posts, brick, concrete, rubble stone, metal pipes, asbestos-cement pipes with filler, etc.
In our version we used old sewer pipes Ø 100 mm and 1200–1500 mm long.
The site chosen for the foundation is marked according to figure 1. Holes are drilled at the marked support points to a depth of 700–800 mm (a hand auger Ø 100 mm can be bought at hardware stores).
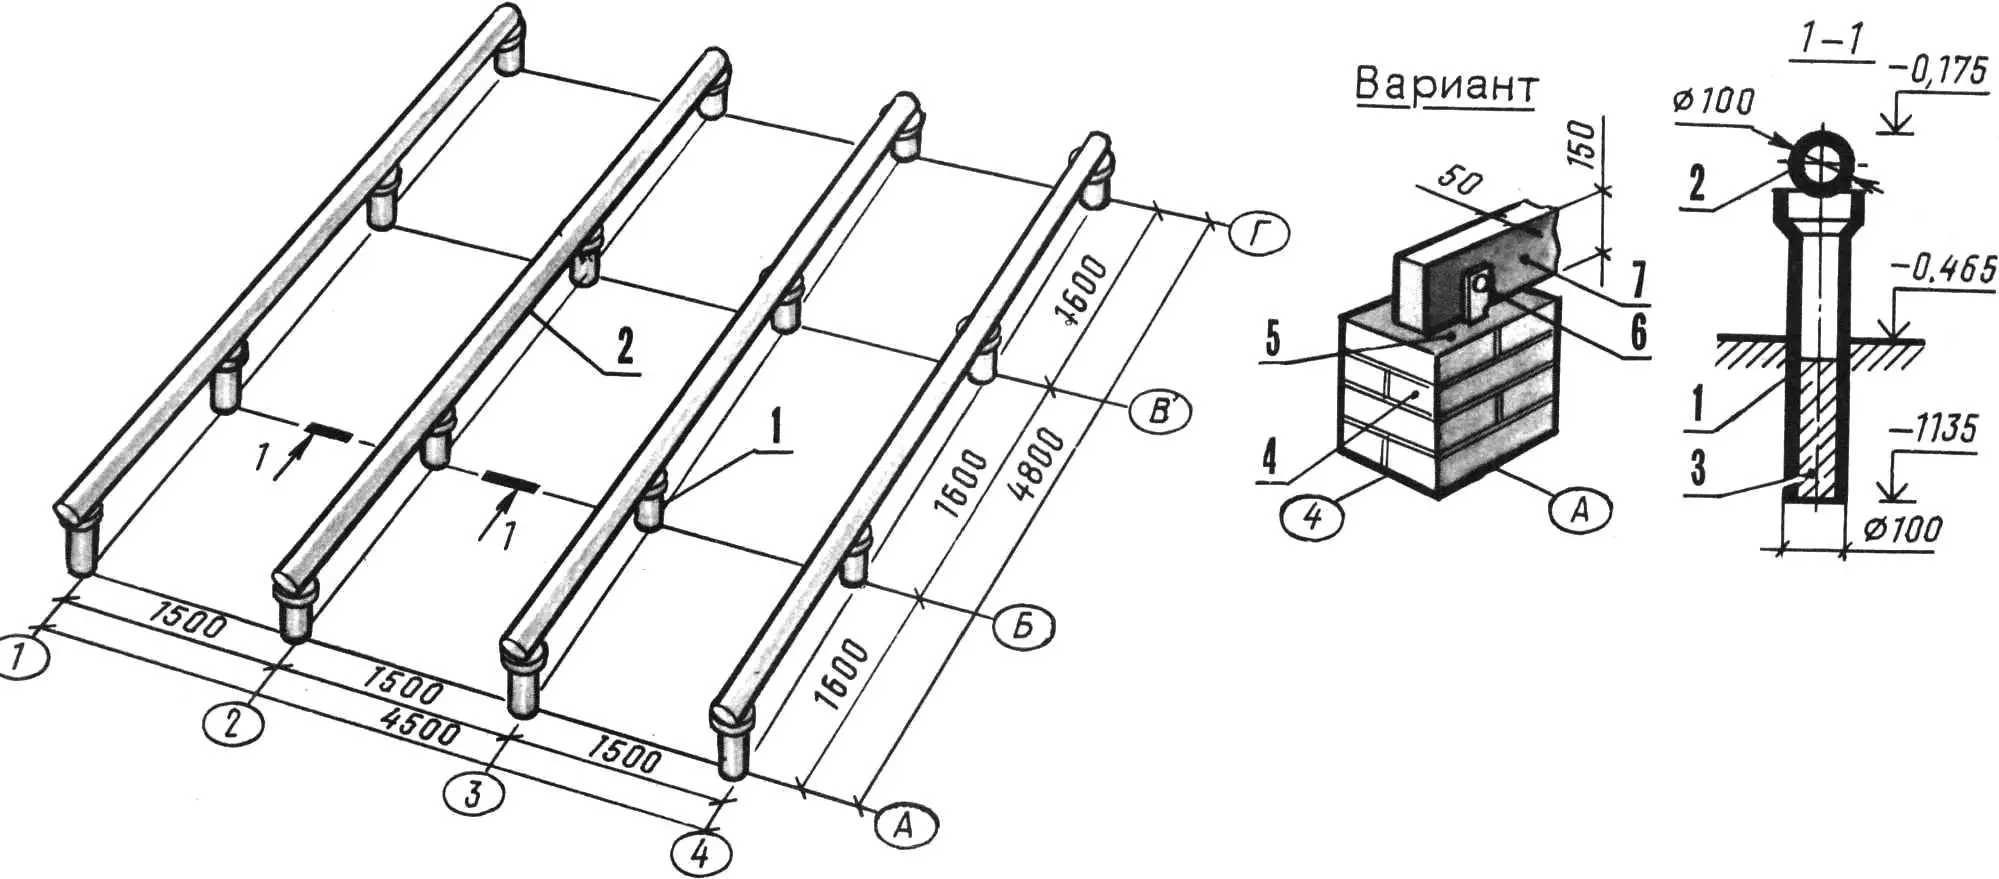
1 — posts (pipes Ø 100 mm), 2 — load-bearing beams (steel pipes Ø 100 mm), 3 — M100 concrete, 4 — brickwork, 5 — waterproofing (two layers of roofing felt), 6 — embedded part, 7 — load-bearing beam (wooden beam 50×150 mm).
Stakes are driven along the foundation perimeter and a cord is stretched level at 300 mm above ground (if the site is on a slope, measure from the highest point). Pipes are lowered into the prepared holes and leveled horizontally with gravel backfill.
After leveling all pipes, concrete is prepared and poured into them to a depth of 300–400 mm (3–4 shovels of concrete per pipe) to increase the bearing area.
In our case, pipes Ø 100 mm were used as load-bearing beams, fastened to the posts with 3 mm annealed steel wire.
If the foundation is made of concrete pads, brick pillars are laid on them, then two layers of roofing felt for waterproofing, and on top — antiseptic-treated load-bearing beams 150 mm high — the house frame will rest here.
FRAME is made of 150×50 mm beams up to 4.5 m long. Seven frames forming the load-bearing frame of the house are assembled from them. In the three frames that form the facades, beams are fixed to which window and door units are attached. The other four have the same design. Each frame is assembled on the ground using a template.
The next step is assembling the house. After preparing the material for the side wall sheathing and choosing calm weather (which matters), the first frame is set upright on the load-bearing beams and temporarily fixed with props. Then the rest are installed the same way at equal spacing; they are aligned and connected with a ridge board.
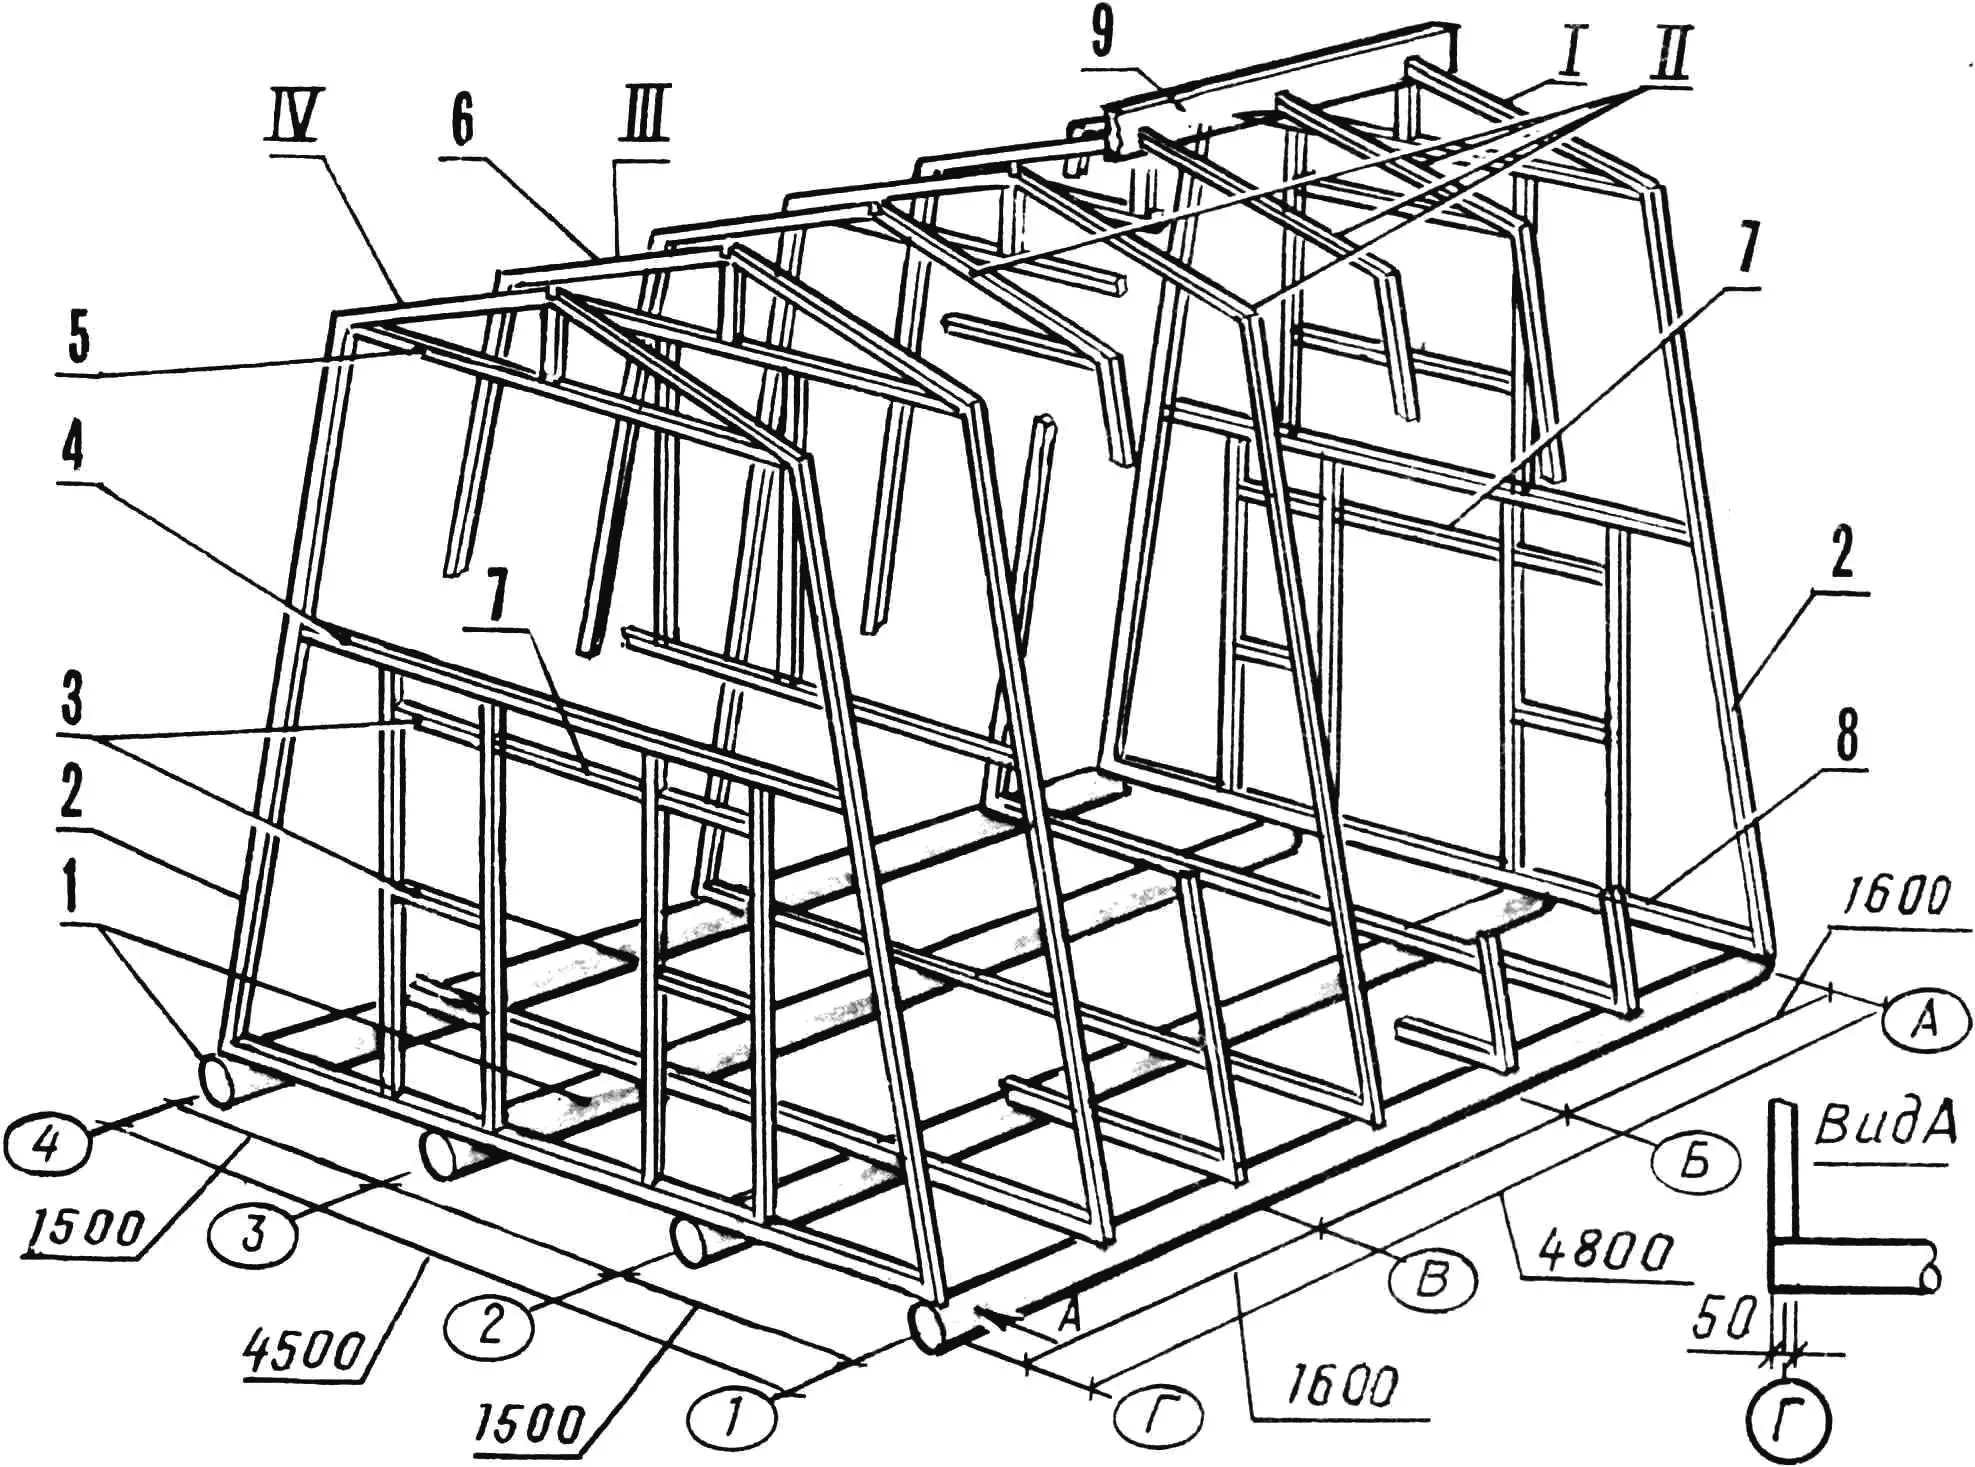
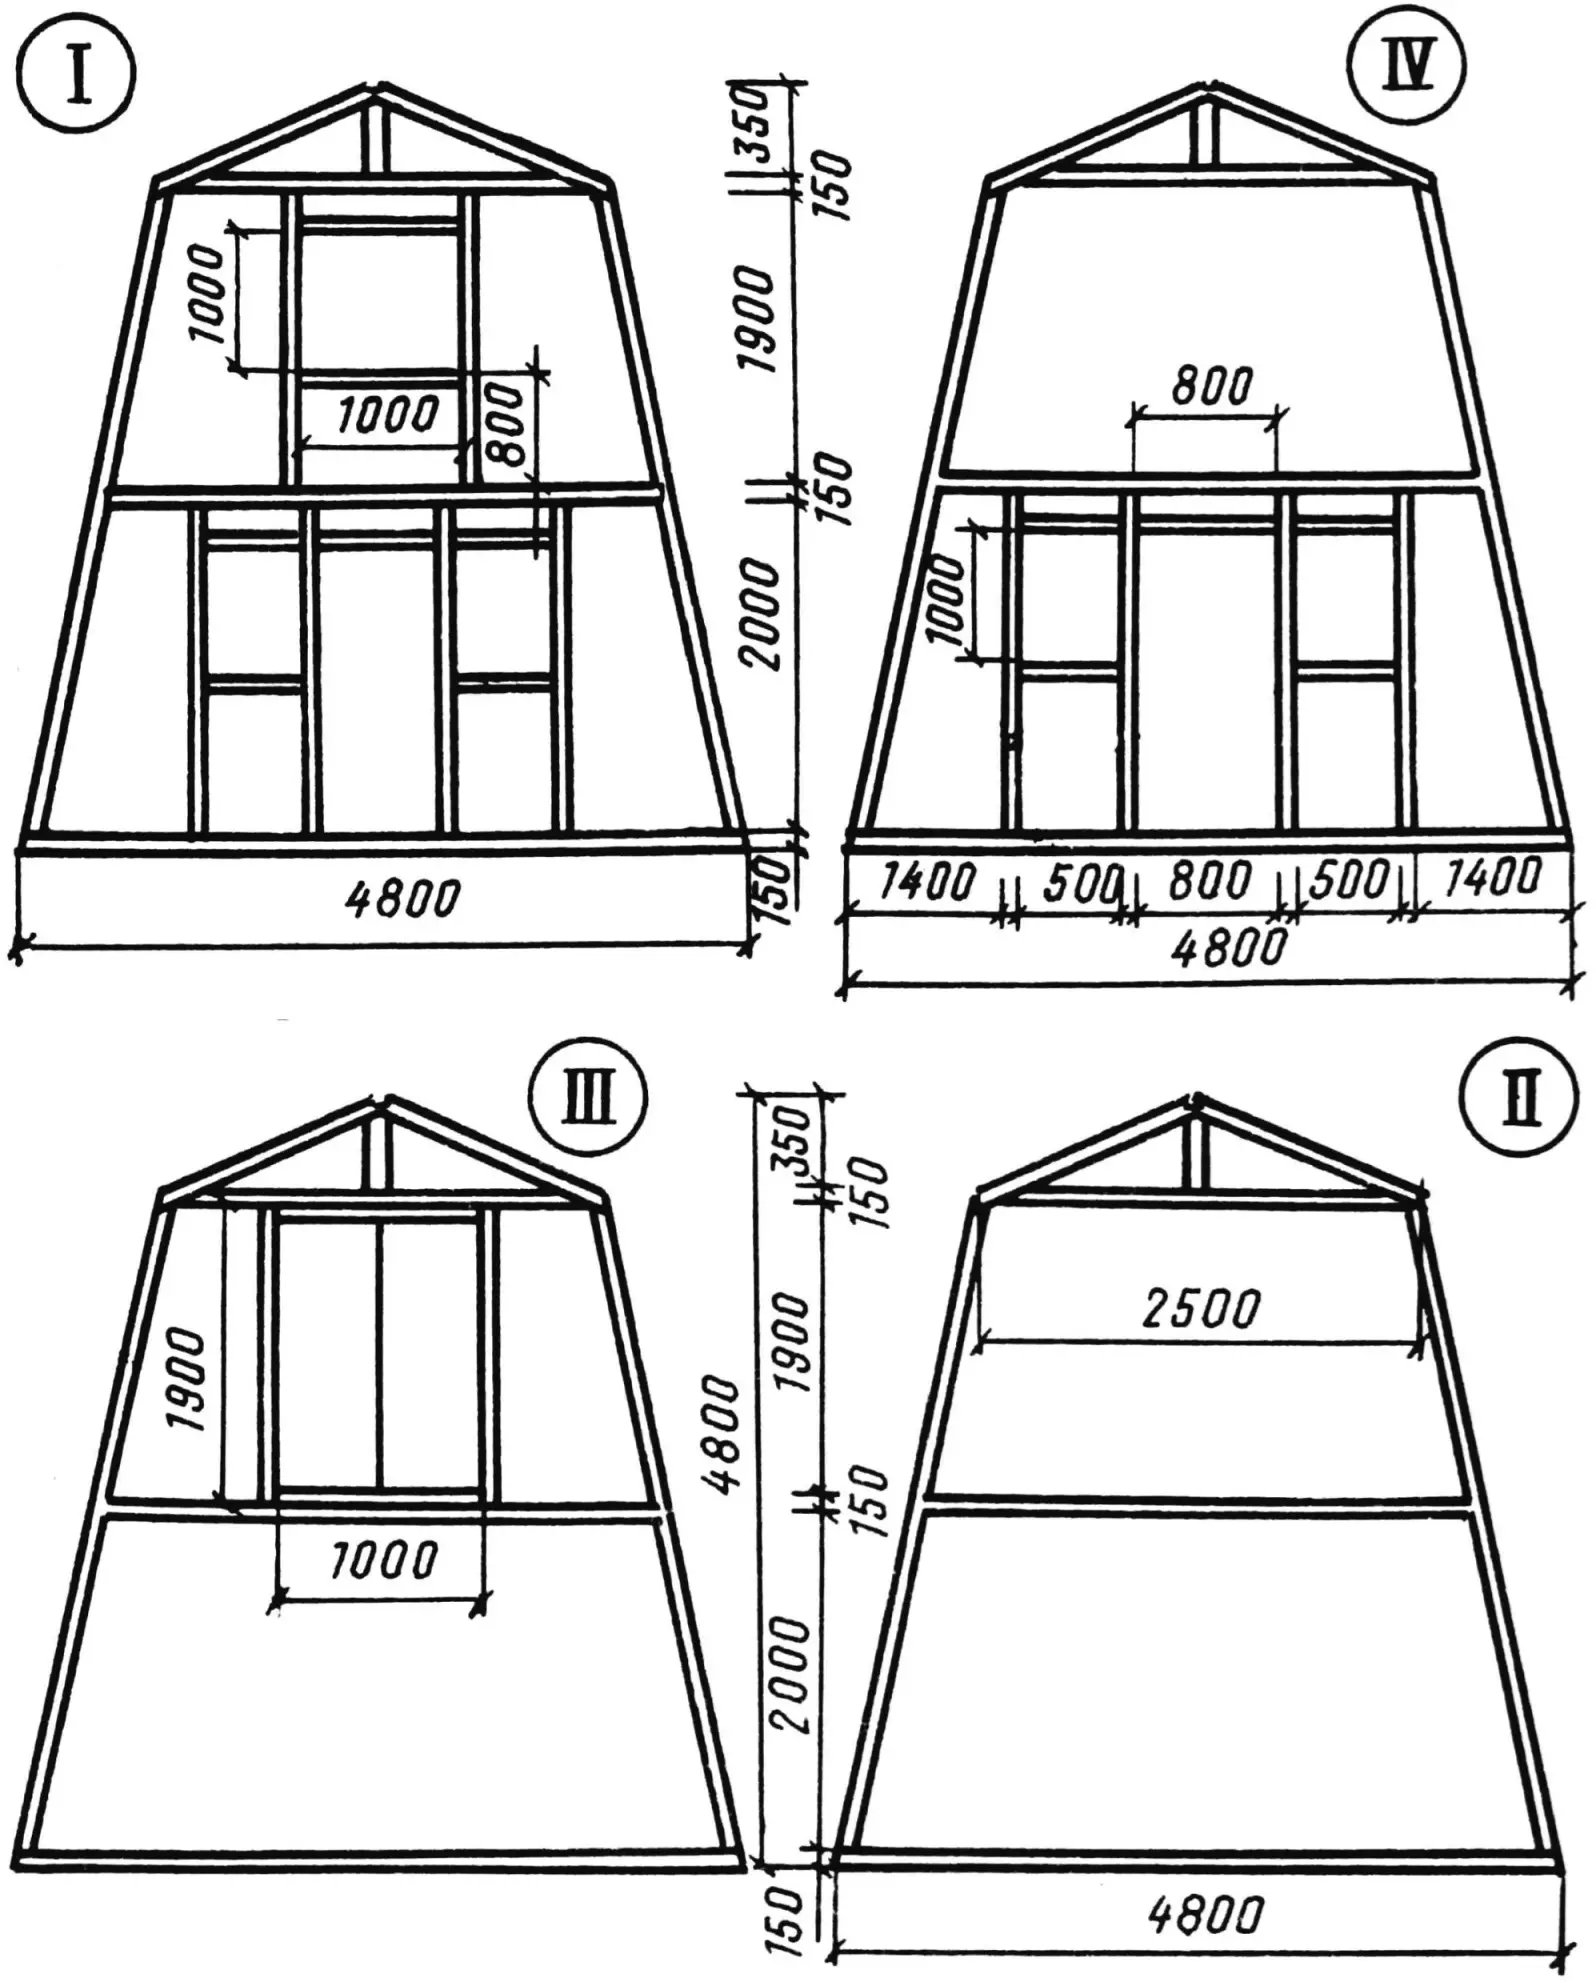
1 — load-bearing beams, 2 — wall inclined beams, 3 — window block beams, 4 — first floor joist, 5 — attic joist, 6 — rafters, 7 — door block beams, 8 — frame bottom beam, 9 — ridge board.
I — main facade frame, II — standard intermediate frames, III — loggia facade frame, IV — rear facade frame.
The next step is sheathing the cottage frame. Unedged boards can be used for sheathing, nailed to the frame beams. Boards are nailed with 200–300 mm spacing, which does not affect strength and is convenient when working, as the sheathing serves as a ladder.
Sheathing boards extend beyond the outer frames by at least 300 mm. Then beams of the same thickness are nailed to the sheathing overhangs for attaching the decorative cladding; it will cover the sheathing boards on the lower (visible) side. The cladding should be made of fitted tongue-and-groove boards or battens.
After that, the roof can be covered.
ROOF. The roof and walls of our cottage are covered with slate, but a wide range of roofing materials can be used: black or galvanized steel sheets, tiles, boards, etc.
Slate has several advantages — durable, cheap, does not heat up too much in the sun, and is readily available. Each roof slope of the house is covered with slate in a single row.
1 — horizontal direction, 2 — vertical direction.
To prevent snow from blowing into the roof-to-wall joint in winter, the upper part of the house is covered with greenhouse polyethylene film. The film can be fixed with ordinary thumbtacks. Slate is laid over the film. Slate is fastened with special nails with large heads (slate nails); if unavailable, ordinary nails with washers and rubber gaskets can be used.
WALLS. Slate cladding can be done in two ways — staggered, with longitudinal edges at different positions, or with edges aligned along the full length. The latter is considered neater.
For staggered laying, sheets are placed as follows. A board is fixed strictly horizontally 60–70 mm below the installed sheathing to support the first row. Sheets are laid with one wave overlap and fastened with slate nails after pre-drilling holes. The remaining rows are laid the same way. Roof layout must be calculated so that the joint gap is minimal.
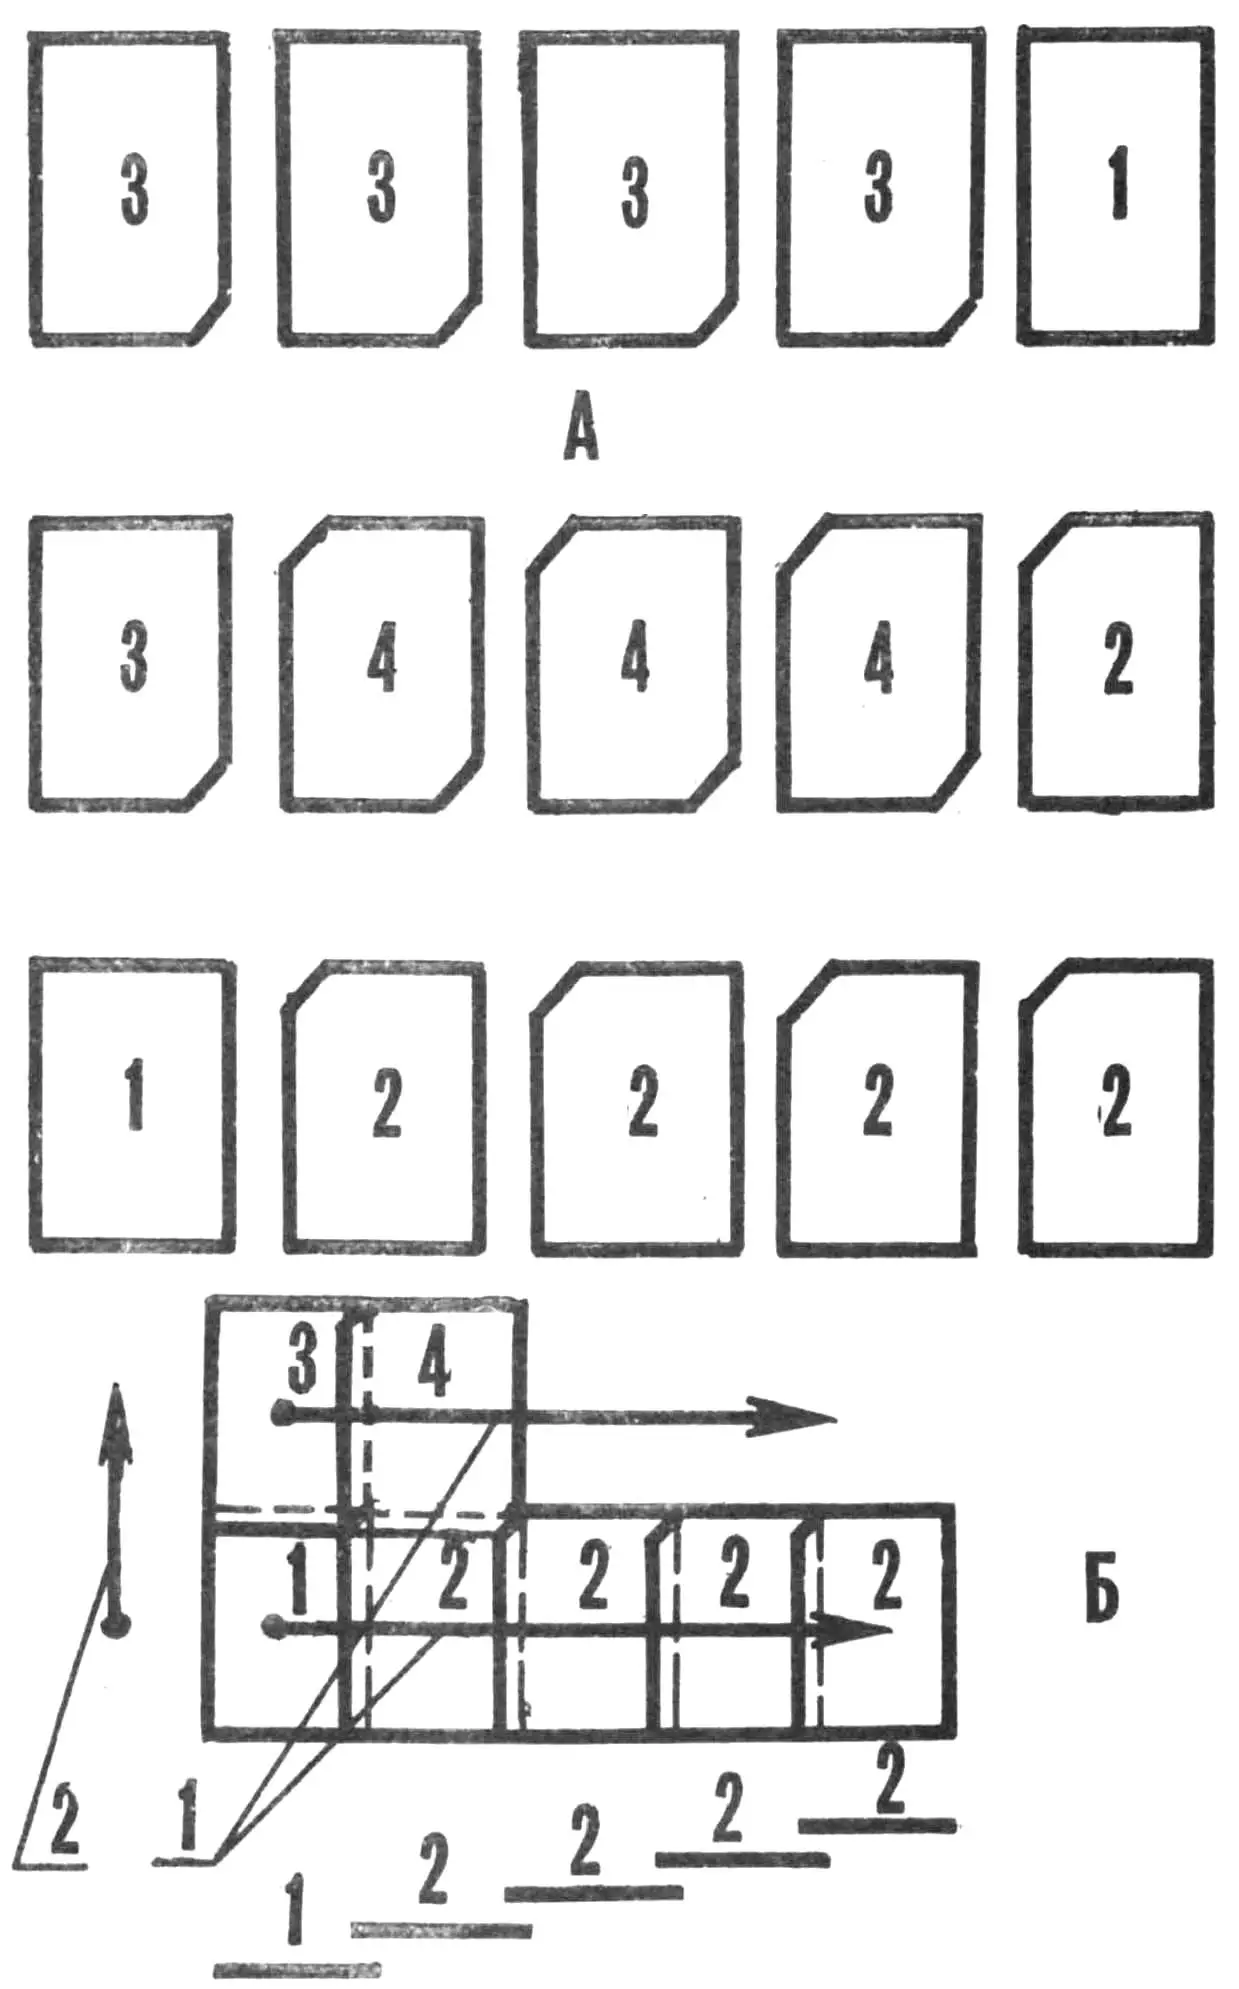
Laying with aligned longitudinal edges requires preparing the sheets by cutting the corners. The size of the cut corners depends on the sheet overlap. A specific example is shown in the figure. Prepared sheets are laid in sequence. Sheet marked 1 is placed exactly along the cord and nailed on the left side; then sheets marked 2 are laid on it in sequence. These sheets must overlap the edge of the lower sheet with their entire cut corner. Then the second row is laid starting with sheet 3, etc.
WINDOWS AND DOORS. After the house is covered, windows and doors are hung and fitted. They can be ordered from a joinery shop from sketches you provide, or made yourself if you have carpentry skills. Window and door dimensions are shown in the figures.
FLOOR is laid with first-grade chipboard (particle board). For this, a subfloor of boards of equal thickness is first made and fixed to the frame bases. Subfloor boards are laid with 100–150 mm gaps. Then chipboard (pre-oiled) is laid on it and nailed to the subfloor.
The floor can also be made of tongue-and-groove boards or floor boards. A board floor can be covered with fiberboard (hardboard) for a monolithic look after painting.
STAIRS TO THE ATTIC. Next we make the stairs. Methods for making and finishing them have been published many times in «Modelist-Konstruktor» magazine (see No. 5, 1987).
The stairs rest on the fourth frame joist. Part of the beam is cut out in the third frame joist to the width of the stairs and two beams of the same section are nailed between the middle joists of the second and fourth frames; the cut ends of the third frame joist forming the second-floor hatch are also fixed to them.
The upper floor is made like the first floor. The loggia floor is laid with boards. It should have a slight slope outward for rainwater runoff. In our case, the loggia is covered with galvanized roofing iron over the boards. The edges of the roofing iron are bent 50 mm and nailed to the loggia walls.
1 — kitchen partition, 2 — stairs, 3 — hatch railing.
Now the railing must be made. It can be wood or metal. Then the side walls and ceiling of the loggia are covered with fitted boards.
The first and second floor ceilings are made of plywood or hardboard sheets. Ceiling sheets are cut so that their joints fall on the frame beams.
FINISHING. Partitions are made of second-grade chipboard. Beams 50×50 mm are placed at sheet joints. Partitions can also be made of boards, but that is more labor-intensive.
WALL COVERING. Various materials can be used: chipboard, hardboard, plywood, boards, drywall, etc. Offcuts of these materials work too, but then 50×50 mm beams must be added and the cladding offcuts fastened to them.
Before painting, walls are first puttied. If wallpaper is planned, all surfaces are first covered with paper.
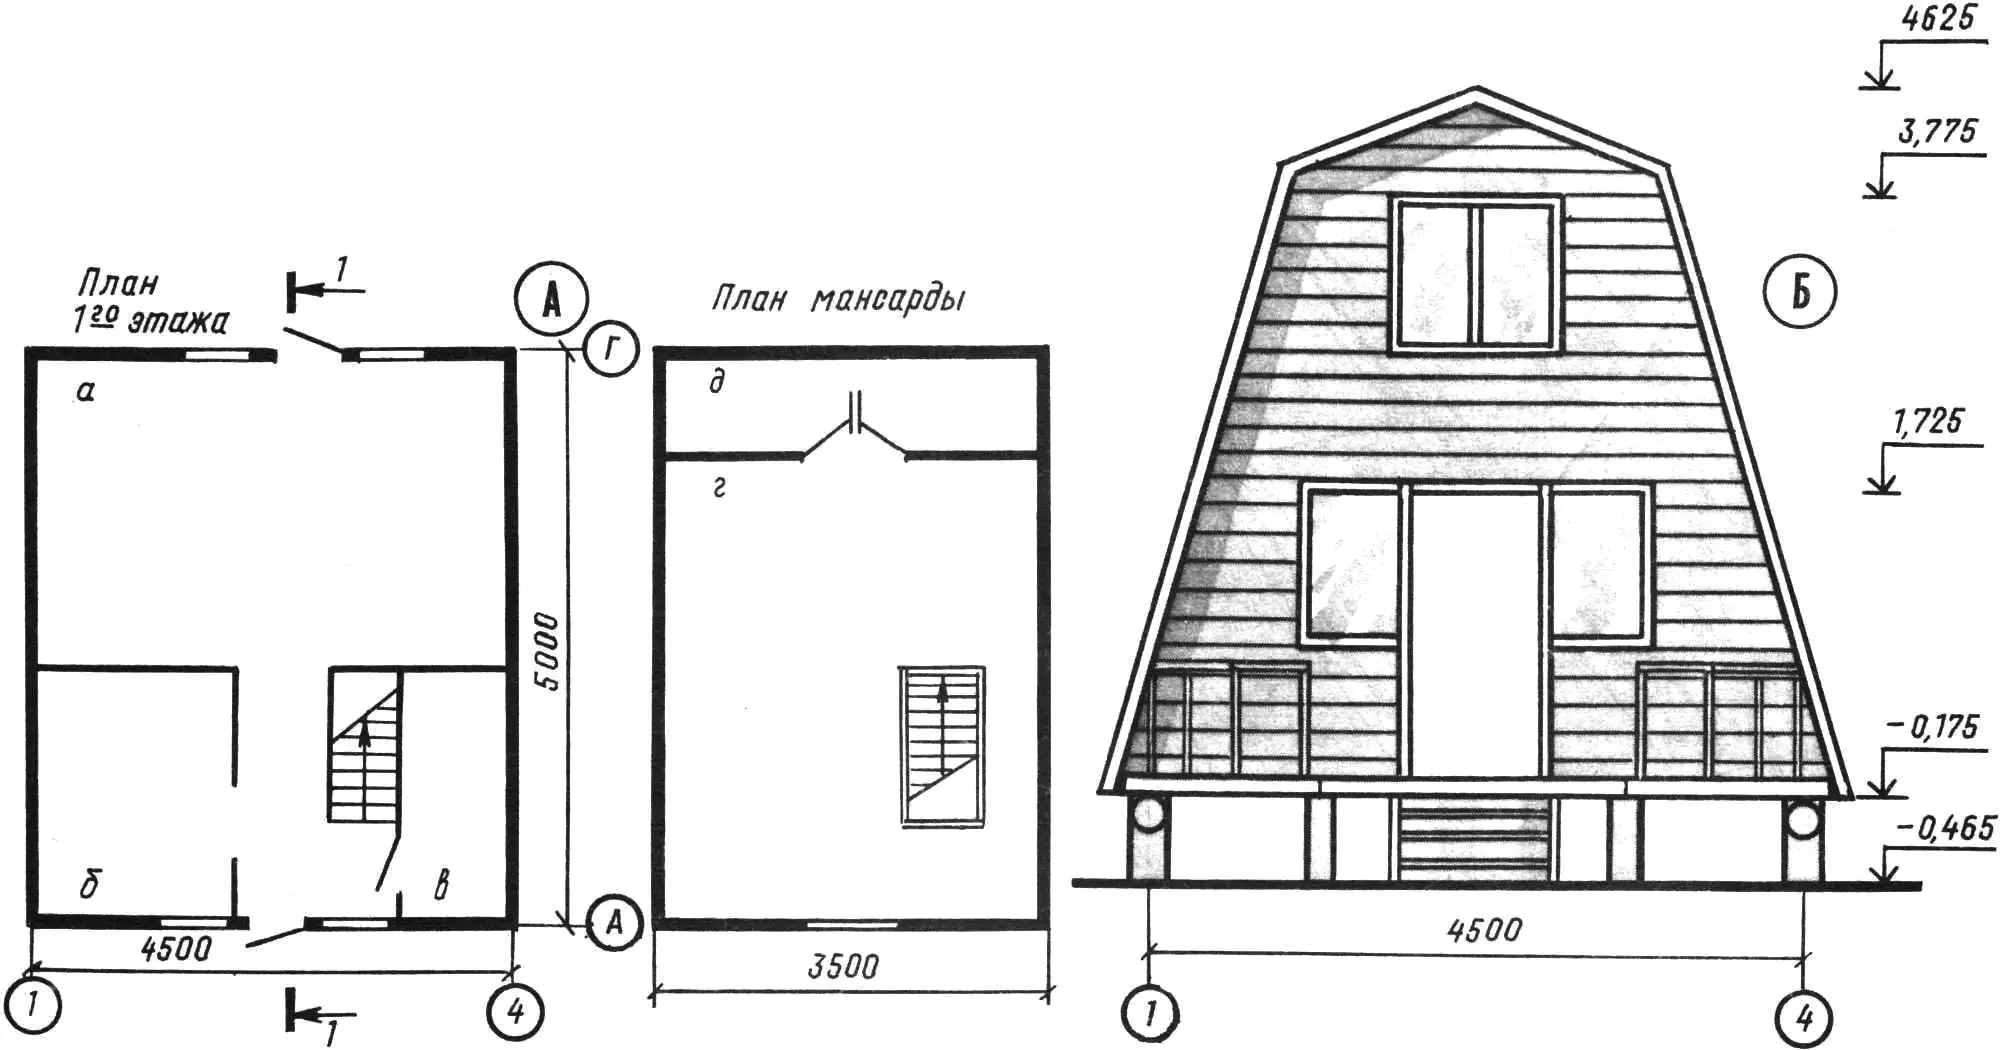
a — living room, b — kitchen, c — storage, d — attic room, e — loggia (2 m²).
Floor and ceiling are finished with baseboards around the perimeter, doors and windows with trim.
Interior finishing and painting can be done to taste. But if the floor is chipboard or covered with hardboard, oil paint is preferable, after well oiling the floor sheets first.
VERANDA can be fixed or a lift-up platform. The latter is made in the shape of a trapezoid matching the facade outline up to the second floor level. It is hinged to the house wall on large hinges. The railing and stairs are then removable.
«M-K» 9’89, A. and V. GRYAZNOV, M. KOROBKOV, I. BLATOV
Recommend to read
 LIGHT SEMICONDUCTORS
In 1907, English engineer Round, who worked at the world famous Marconi laboratory, accidentally noticed that running the detector around a point of contact there is a glow. Also... A TRAP FOR RAIN
In newly developed suburban area where not yet solved the problem of providing water, and some suburban garden or vegetable plots tested persistent difficulties with irrigation of...
