THE GAZEBO OF THE SLAB

GAZEBO OF THE SLAB
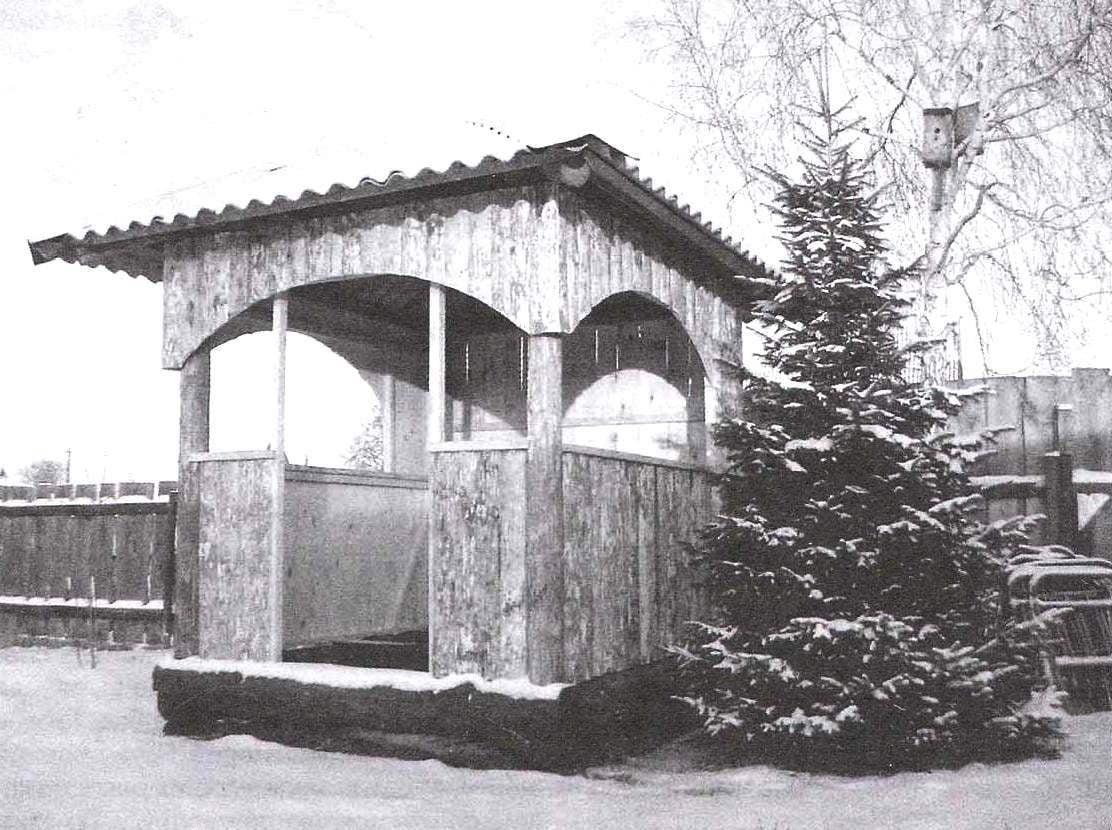
In a quiet corner of the garden of his manor house planted Douglas fir. Three years have passed. The tree grew, grew. And then came the idea to build a small gazebo that over time, the fir in a hot summer day will cover the shadow of its branches. At leisure even made a sketch of the structure. But, as is often the case, the embodiment of the idea was hampered by lack of materials, but rather the allocation of the family budget for their purchase, as the case was not so urgent. But the idea to give is not wanted. Began to ponder how to carry out the construction, so it was not expensive, but beautiful: the house — building rather for the soul, and finding it should be fun.

 
Collected all suitable material available: a few pine logs, timber, boards, slate.
 
The first of the four thick logs (diameter approximately 300 mm) cut down the tying, but to seal its details has not yet become. Near the fir-tree, in the intended for the construction of arbor place, the corners of the strapping spaced and dug pits of size 300×300 mm and a depth of the dense clay (about 600 mm). The pit was filled with sand to the surface of the earth with layer-by-layer compaction with watering water by hand with a tamper. On the sand cushion is laid four brick columns (height in two rows), the top lined with mortar to the same level, covered with roofing material and backing boards, impregnated with an antiseptic solution.
 
After that gathered the straps on the posts, cementing its logs with staples, made of steel reinforcing bar thickness of 10 mm. Timber is also treated with an antiseptic.
Next on the corners of the strapping put vertically to plumb the four corner log rack, securing temporary braces and then put them together the upper ends of the beams, spaced X-shaped (diagonally). Of logs thinner built of rafters in the form of a pyramid hip roof, propped them short center stand, turn it on with the cross beams.
 
Device frame (strapping, corner pillars, beams), roof and roof
 
The device frame (strapping, corner pillars, beams), roof and roof:
 
1—the Foundation soil (dense clay); 2—cushion (sand); 3—Foundation-column (ceramic brick); 4—waterproofing (roofing felt, 2 layers); 5—lining (Board s35,4-piece); 6—longitudinal link obaseki (beam Ø300,2); 7—cross-link binding (log Ø350, 2); 8—lag floor (timber 150×150); 9—corner stand (beam Ø150, 4 PCs.); 10—diagonal beams (beam Ø150,2); 11 —stropilnaja a foot (beam Ø120,4 pieces); 12—the back of the roof (beam Ø120); 13—crate overhang (Board s20 4 pieces); 14—median crate (Board s20 4 pieces); 15—ridge sheathing (Board s20 4 pieces); 16—roofing (the wavy slate, as required); 17—leg panel (Board, s15, 8); 18—connection of structural elements of the frame (bracket, steel, circle 10, if required)

 
The walls and floor of the slab
 
The walls and floor of the slab:
 
1—crate side cladding (timber 50×50); 2—crate rear wall (timber 50×50); 3—crate front wall (timber 50×50); 4—lateral upper cladding (wooden slab, the needs); 5—side lower valance (wooden slab, on demand); 6—side railing (birch timber 50×50, 2); 7—front upper facade cladding (wooden slab, according to needs); 8—rear valance (wooden slab, the needs); 9—facade front lower valance (wooden slab, as required); 10—front handrail (birch timber 50×50, 2); 11—side plate of the floor (close-knit lumber slab as required); 12—average (extended) shield floor (cohesive lumber slabs, if required); 13—step porch (Board s35,); 14—stand porch (log column, Ø300,2); 15—backing plate (concrete, 2 PCs.)

 
For a more tight and reliable connection of wooden elements in places of their joints do various small cutting.
 
The rafters put sparse crate of unedged boards. At the end of the construction phase of the gazebo sawed from a broken slate sheets suitable pieces and spread them on the roof.
 
After some time I bought “firewood” the machine drum and most of a flat Board. After debarking, the alignment of edges and finishing obstrugivaniya with the inner side turned out great and even stylish cladding material! But just to beat the already prepared the planks did not, and put in a pile to dry. In late autumn, in frost, my son “presumably” trim. Jigsaw sawed the arch over open gates that gave the gazebo right after some classicism. Only the railings and entrance jambs made of high-quality Board-fifties, sawn into lumber.
Since most of slabs destined for firewood, has been used for the cladding of the gazebo, then had to buy another. However, this time the slab was not “wooden”, but rather “Brusova” (more one-dimensional in cross-section). But then, scrolling in the head options, I decided that it would be possible to make a floor in the gazebo.
 
In the winter of newly acquired seatrout have chosen the most appropriate Board. Folded neatly in a pile, it was dry until mid-summer, and then started making him a sex. Same floor for convenience, and decided to do a composite of the three shields.
 
Structural elements of the tent roof of the gazebo (inside view)
 
Structural elements of the tent roof of the gazebo (inside view)
 
Finish of the frame of the gazebo slab
 
Finish the frame of the gazebo slab
 
Production shield
 
Manufacturer of shield “deck flooring” floor
 
The walls of the gazebo of the slab (inside view)
 
The walls of the gazebo of the slab (inside view)
 
Projection medium shield sex
 
The ledge in the middle of the shield sex
 
For a set of floor boards from the “lumber” slabs on a level clearing near the house he built the easiest slipway: put parallel to one another a couple of boards. Them smooth (sawn) surface, laid the first two bars and made them into the ends of the nails. In the same way, nailed the third rail, fourth, fifth … by Typing the desired width, ax trimmed to the same level places will have to lie on the timber strapping and the average beam-lag of the gazebo to a thickness of 50 mm.
 
The shield turned “face to the sun” and astragali completely hand planer. After that first shield was taken on a cart to the gazebo and put him on the spot.
 
In the same way gathered and rallied two shields. The middle shield has the width of the access opening and is slightly longer side to the ledge size-threshold, but it does not go beyond the projection of the overhang of the front edge of the roof.
 
After proshivki boards in place with nails came the final step: impregnation toned wall painting and brown floor, stacked. It should be noted that although the floor was also made from waste, but it looks like the deck flooring.
 
 
“Bowline” table:
 
1 —leg (from the old table, 4 PCs); 2—side-bar (from the old table, 4 PCs); 3—tabletop (Board inboard s30); 4—screw coupler (“euroserum”, 1 set).

 
As it turned out, the floor of the gazebo was quite high above the ground, so I had to build a simple porch-step.
 
When the floor has dried up, the gazebo was made previously stood on the street garden sofa (material about him was published in the “Modeller-designer” No. 2 in 2010) and a small old factory production table. And if the sofa quite fit into the bare interior of the gazebo, the table looked to her like a foreign body. Had to take the upgrade.
 
This table was originally more of the fifties of the last century: plywood sliding top, wooden frame with legs, covered with beech veneer…
 
In summer, the table is often carried to the garden and put beside the couch for a celebratory dinner or just a family dinner, leaving sometimes at night.
As a result of the sudden rains and morning mists and abundant ROS, the whole “beauty” of the old table swelled and peeled off!
 
Disassembly of the table showed that his reference frame (rails and legs) are quite sturdy and can still serve if you shorten him rotten bottom legs of inches. But the countertop was better to make a new one and not plywood, as before, and natural wood. Trimming the butt birch planks 25 mm thick and width up to 500 mm was the most suitable material for it!
 
Original klinoobrazno blanks led to an unexpected solution: saw them at the line of symmetry into two equal parts, and then to carve out of them wedge-shaped slats for the table top of the table. After processing the surface and edges with a hand planer, I put them “Jack” on the frame of the table. This proved more successful than trying to spread out like a fan: by shifting the strips toward each other to adjust the width of the countertop.
 
Updated table
 
Updated table
 
GAZEBO OF THE SLAB
 
 
Next step is fixing the details of the countertop on the frame by means of “eurosuros” (screw couplers flat-head), after drilling holes for them right place. In this case, it was asking for a solution to their fastening — two screws with wide edge and a narrow flush with the smooth surface of the countertop, which already shone svezheokrashennym tree. It was easily marked oval shape of the countertop and cut with jigsaw at the scribed line.
 
After the numbering (from the backside) Board details table tops unscrewed, sanded and varnished.. Same old varnished the frame of the table (side-bar with cut legs).
 
The dried wedge-shaped plank using the drill again attracted to the frame.
 
The finished table here, the workshop moved to the gazebo at the hands of a master, which had moved to garden sofa. And in the evening the family had dinner at the table, sitting on the sofa in the gazebo.
 
A. MATVEICHUK, Zavodoukovsk, Tyumen region.

Recommend to read

  • … BROAD-SHOULDERED WARDROBE… BROAD-SHOULDERED WARDROBE
    Many of the usual glazed bookshelves wardrobe full of them. The capacity of such constructions can be extended, if the installation of the shelves one by one to lay between them a thick...
  • STYLISH TABLESTYLISH TABLE
    Skilled craftsmen-lovers will take great pleasure in having made this table with folding additional counter tops. We are talking about the French magazine "System D" model in "Royal"...