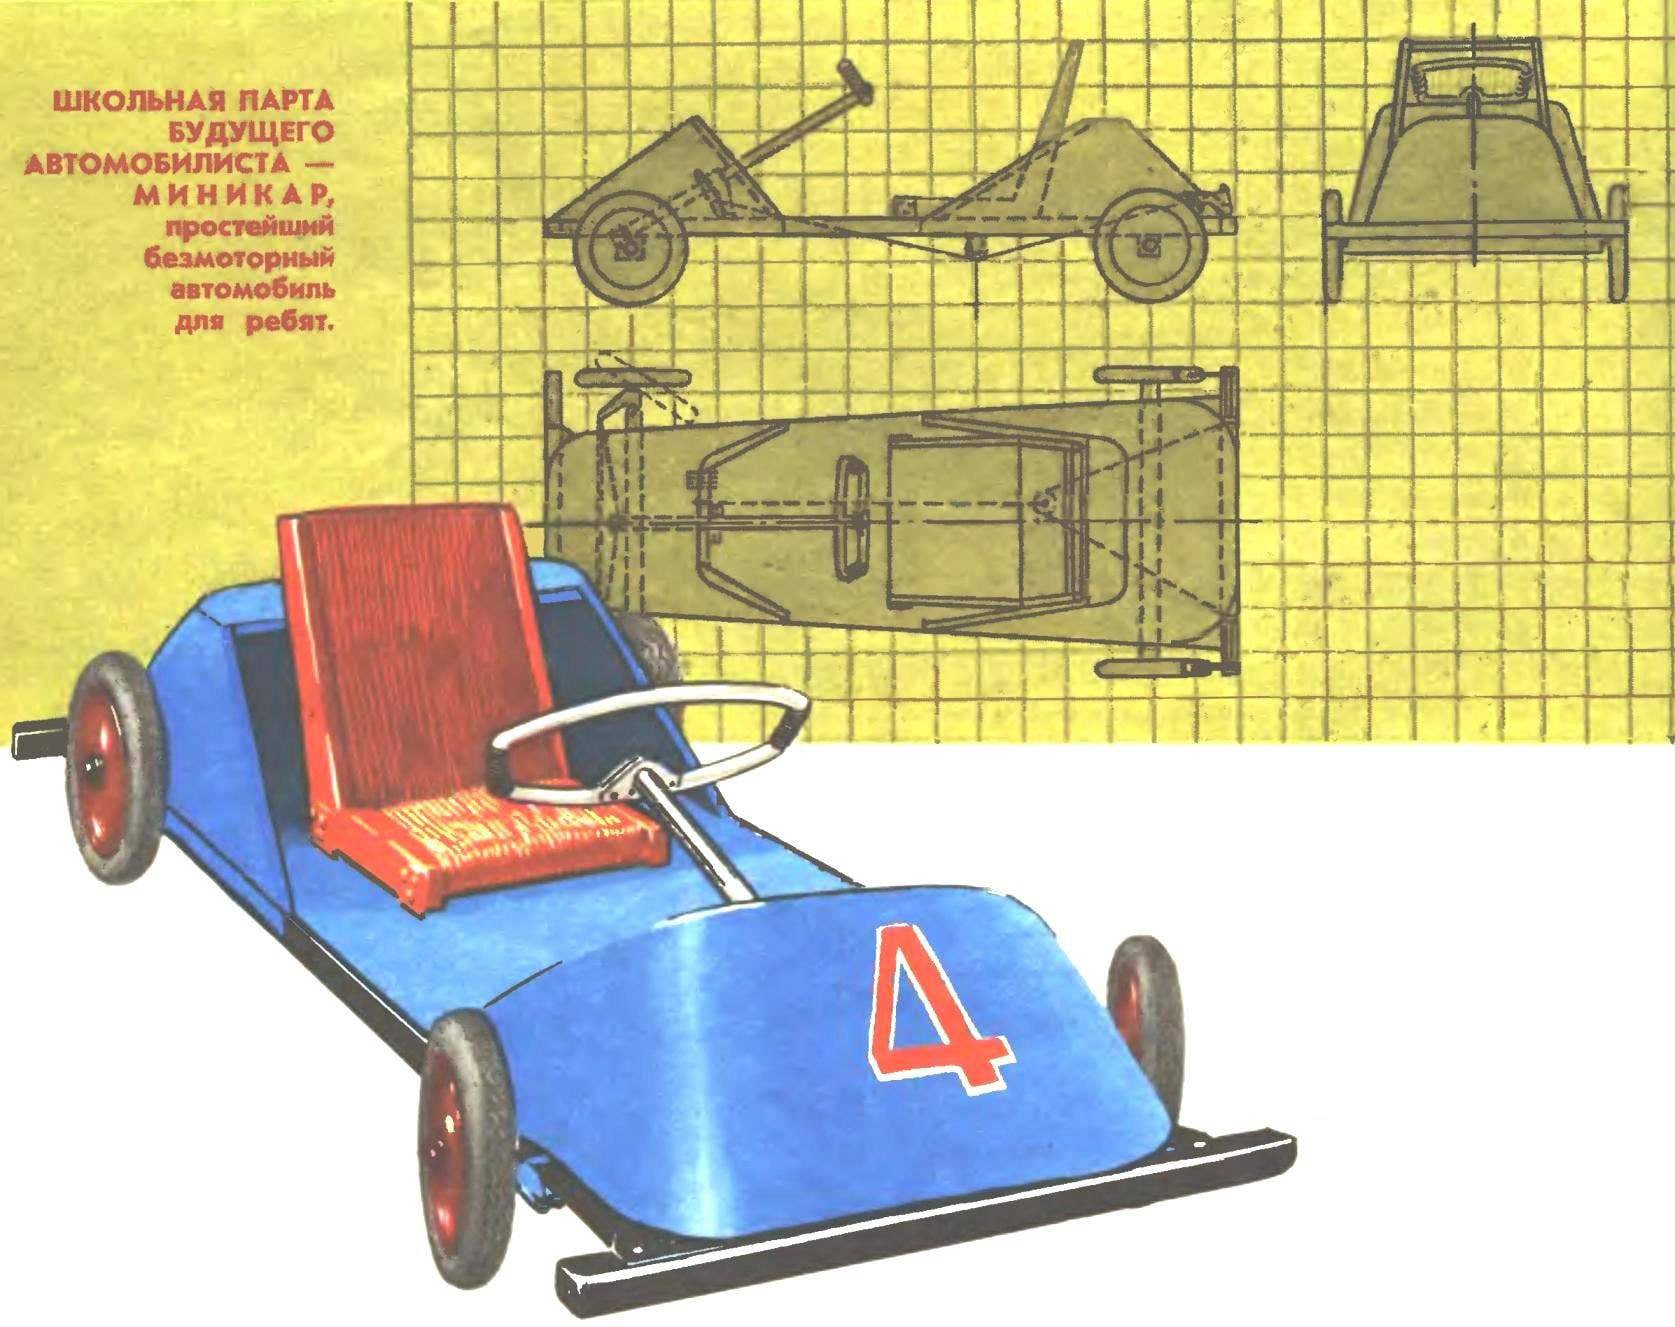
 In every town and village there is a quiet side street with a slope, where you can organize exciting competitions manicurists. But for this first you need to build the minicar. Here, everyone takes the opportunity to demonstrate the ability of the designer and designer. I hope that the published projections minicar and its appearance will help you in the design and manufacture of this most affordable car for Teens.
This sport originated long ago, almost simultaneously with the appearance of motor racing. But still attracts boys as simplicity of manufacturing sports equipment — minicar and the ability to ride it even at a very early age, and quite “adult” issue tracker — challenging trails, with a technical Committee that checks the reliability of steering and brakes, with hundreds of spectators.
Minicare is a small racing cars without engine. The tracks on them can serve as any street having a natural bias.
Competition for Minicard held in Poland, Czechoslovakia, Yugoslavia, the USA and many other countries. Gaining popularity of car-kid in the USSR.
Today we will tell you about the design of a simple minicar. Ahead of the publication of more complex machines of this type.
The FRAME is assembled from oak or beech bars section 30X30 mm on glue, strengthening joints with metal gussets and bolts with thread M5.
WHEELS are used ready, is better from the stroller or from three – and two-wheeled bike: the diameter of the wheel 270 mm, tire width 40 mm.
STEERING — cable type. “Wheel” minicar can bend of duralumin tubes with a diameter of 16-20 mm, or cut from plywood of suitable thickness. Mount wheel to steering column with two metal rails (aluminum S-H) and lock screw with M6 thread. The steering column rotates in two bearings, one of them is a bracket, bent steel three-millimeter strips with a width of 30 mm, and the other curved
dural plate thickness of 3 mm.

Fig. 1. Front axle minicar.

Fig. 2 the Braking device minicar.

Fig. 3. Frame:
1—front bumper 2 — Klondike solitaire (D16T 5-2,5), 3 — spar 4 — front axle, 5, 7 — cross, 6 — floor (plywood S-5), 8 — rear axle, 9, 10 — bolt M5 nut 11 rear bumper.

Fig. 4. The driver’s seat:
1, 3, 4, 6, 7, 8 — frame elements, 2 — plastic wire or nylon rope, 5 — square scarf (plywood S-4 mm).

Fig. 5. The steering axle.

Fig. 6. Plate.

Fig. 7. Steering wheel:
1—tube PVC, 2 — pipe (AMC — Т18Х1.5), 3 — bookmark (D16, S-2,5), 4 — rivet 5 — wooden bougie.
Drum for wire rope is formed by two metal washers, fitted on the pipe of the steering column. The working surface of the drum is wrapped two or three layers of textile tape. Sharp edges of the washers are rounded in order to prevent damage to the cable.
SWIVEL pin is made of steel sheet thickness 2.5—3 mm. are recommended to make the model from cardboard and to Refine the shape of the part. To bend the axle should be in the plumbing grip on a mandrel of suitable size.
FRONT AXLE — parting steel rod Ø 11 mm on both sides which is threaded M10. Axle fixed in the axle by two nuts and two washers. To prevent spontaneous loosening thread sakaryada in three or four points.
TRANSVERSE TRACTIONconnecting the axle, the angled profile or box-section, bent from two-millimeter steel sheet.
CABLES steering sealed in the thimble, or with soft copper or brass tube, as shown in the figure. To adjust cable tension set tenders. In the middle of each shoulder cable runs are spring-expansion joints.
REAR AXLE is a wooden block with a section of 30X30 mm (beech or oak) drilled in its end faces to a depth of 120-150 mm holes Ø11 mm. the last inserted epoxy resin or glue BF-2 rear axle (steel bar Ø11 mm) having on the outer ends of the threads of the M10.
BRAKES drum type, with drive to both rear wheels. Each of the brakes is a two odobleja lever (steel S-5), planted on the same axle (steel rod Ø 16 mm). To fix the levers on the ends of the shaft cut down two flats, and the holes in the levers are made non-circular. The ends of the shaft rasklepyvajut, but before that it is worn on the sleeve (cut duralumin or steel tubes with inner Ø 16 mm) and return spring. Block brake force distribution it is better to choose ready-made, for example of children’s designer. The holder of the block is folded from two-millimeter steel. Requirements to cable wiring are the same as the wiring to the steering cables.
The BRAKE PEDAL is cut from steel sheet of thickness 1.5—2 mm. of Its working surface is glued corrugated ski rubber. To adjust the pedal travel and tension of cables it is recommended to use the tender.

Fig. 8. Patterns bonnet:
A — rear cowl B — front hood.

Fig. 9. Return spring.

Fig. 10. Brake shaft (steel).

Fig. 11. Brake pad:
1 — strip, 2 — strip (rubber), 3 — lever 4 — washer 5 — screw.

Fig. 12. The sequence of sealing of the cable in the copper tube.

Fig. 13. Brake lever (steel).

Fig. 14. Rear axle:
1 — wheel, 2 — wire, 3 — Shoe, 4 — return spring, 5 — sleeve, 6 — clamp (wire Ø 5 mm), 7 — brake lever, 8 — elements, ramie, 9 — nuts of the wheel.
All split bolt connections required to lock the. For this pair of screw-bolt — nut is drilled a through hole in which to insert the cotter pin. One-piece threaded connection should be secernate or rashlebyvat.
The CHAIR is assembled from oak or beech slats epoxy resin or casein glue. Seat and back color braided vinyl chloride pipe. You can use this nylon clothesline. A method of braiding shown in the figure. The chair is designed so you, can adjust its position along the length of the car. This will allow to use to children of all ages.

HOODS for minicar optional. But make them quite easily, and the car will become the “car” view, the constructive perfection and some added safety for the driver, not excessive for any vehicle. The hoods are cut from a sheet of cellular plywood, bent in place and are installed with wooden frame and dural corners.
COLOURING — bright enamels.
That’s all. The get ready for the trials.


