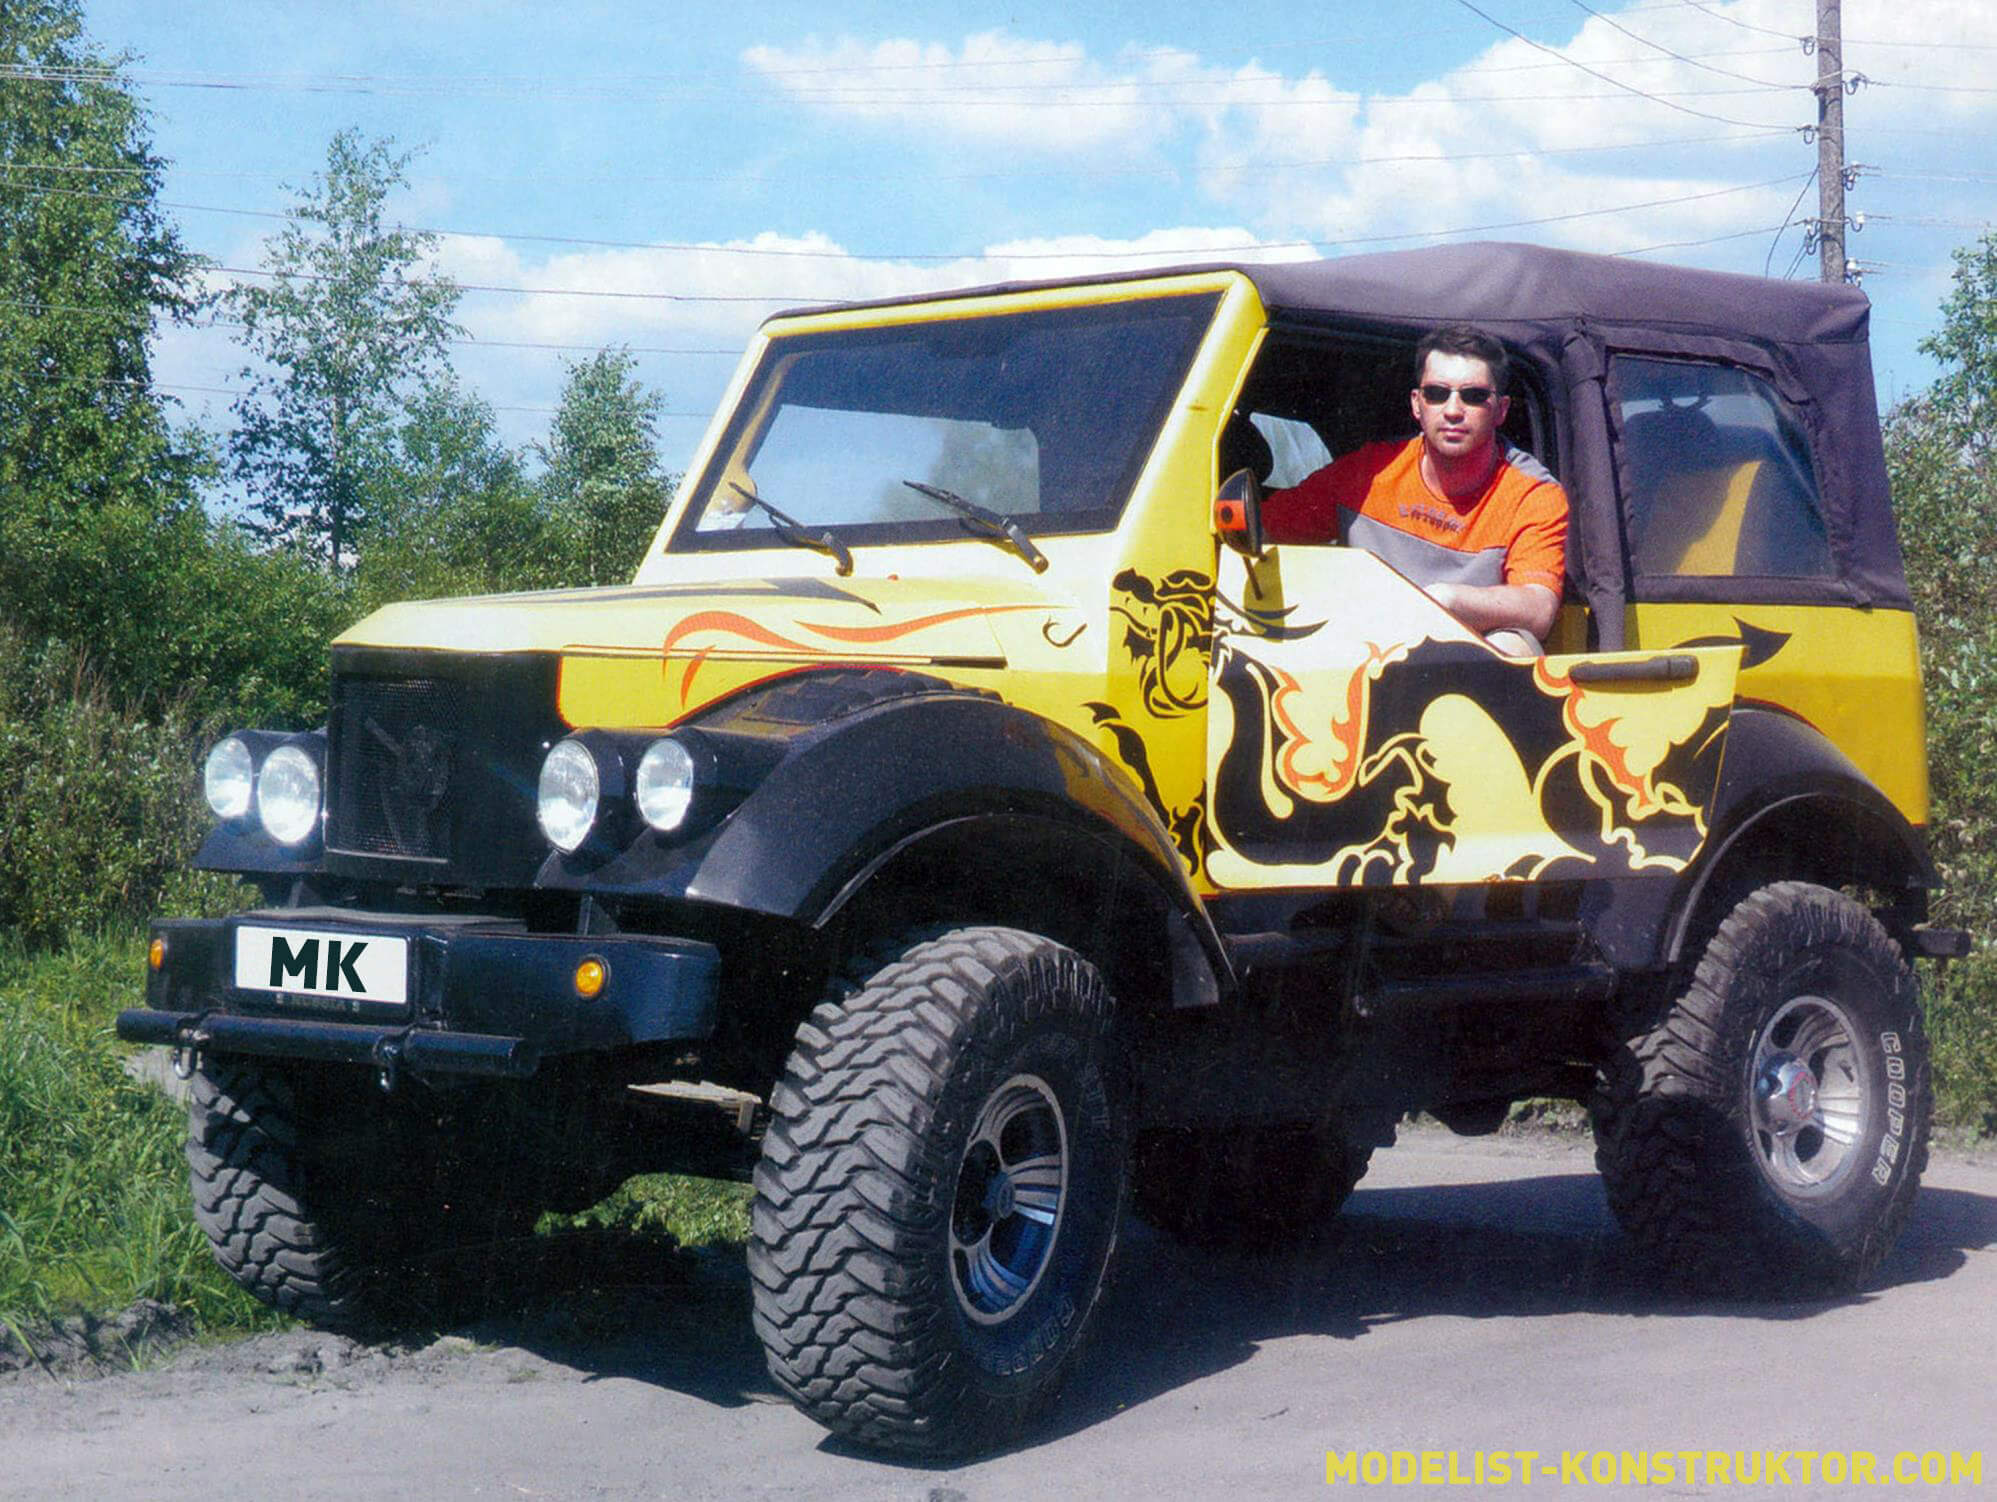
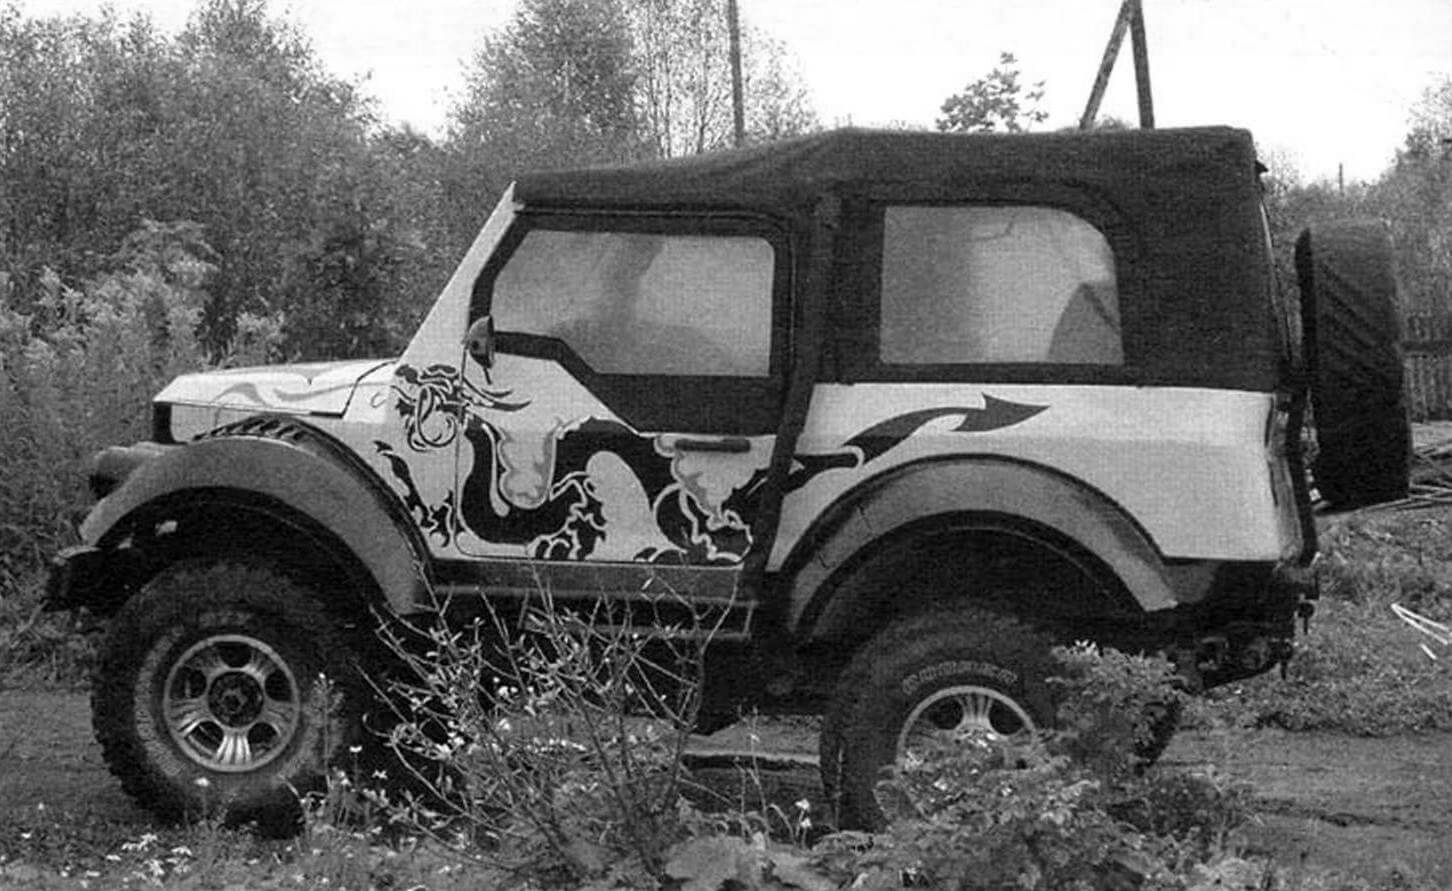
The idea to build this car came about because my family and I really love active recreation and traveling to our native places. And not only where there are roads, but more often where there are none.
The basis was the legendary Soviet SUV GAZ-69, or rather UAZ-69 – the car was developed in Gorky (now Nizhny Novgorod), but was not produced there for long, and then its production was transferred to Ulyanovsk. The 1969 car was purchased by me in 1983. But, after driving it for several years, I realized that the car did not meet modern requirements, and therefore decided to modernize it!
At first there were thoughts: replace the engine with a more powerful one, equip the interior with comfortable seats and leave it at that. But as soon as we got down to business, everything was reworked.
It was planned that the new car would have to overcome not only “steep” off-road conditions, but also considerable distances. According to my ideas, the new car had to have good cross-country ability, reliability, be easy to use and repair, comfortable, and, of course, original. Therefore, I began work with sketches and drawings, as a result of which the design of the car (its appearance) was outlined and even the name appeared – “Ryzhik”. Having drawn up a project for the “future machine” using a computer program, I got down to business!
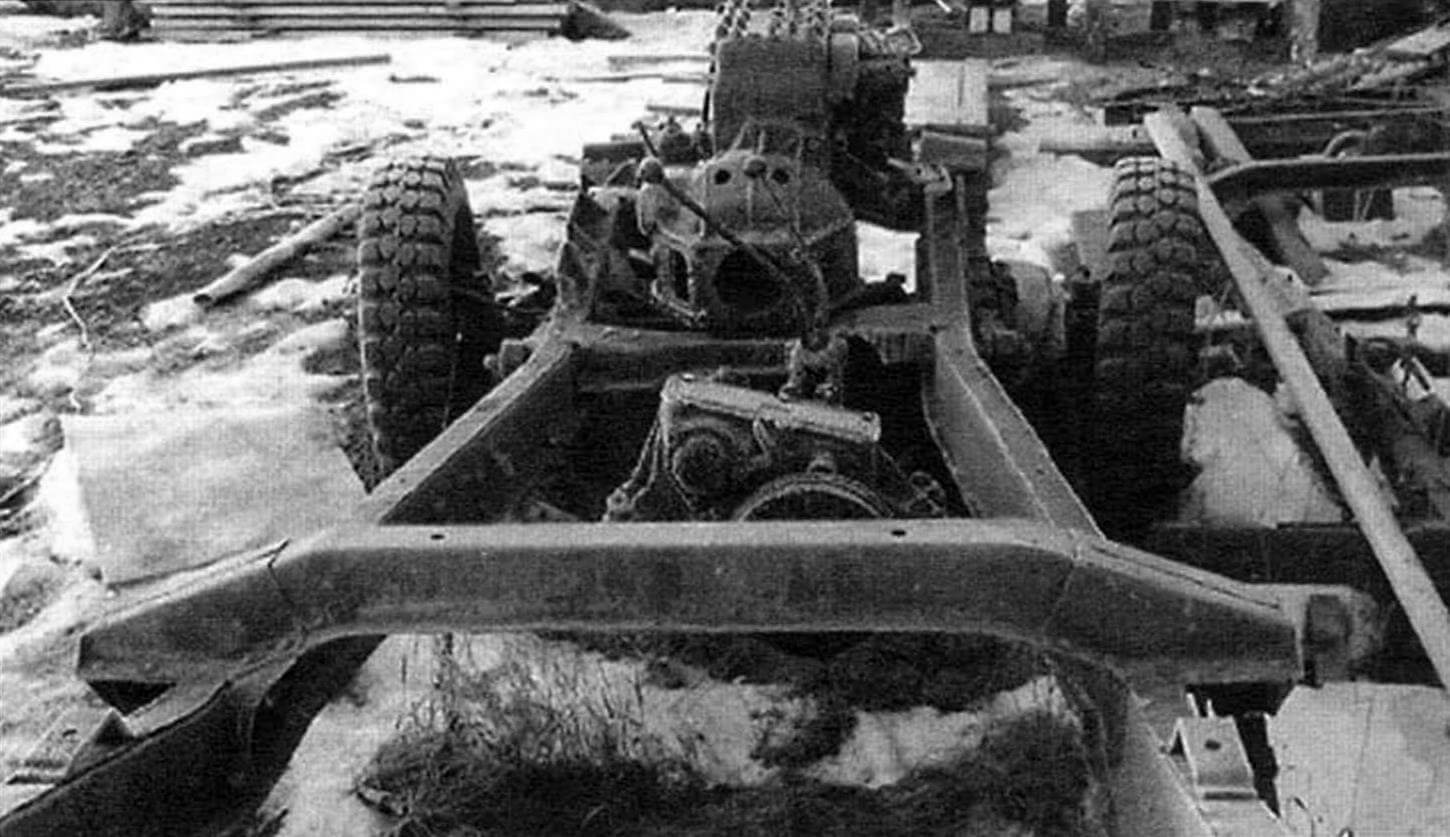
And I must say: I had to work hard on “69.” But first, it was disassembled almost to the last bolt: it went through the axles and transfer case, so as not to climb there anymore, and replaced all the bearings and seals of the main gear and axle shafts.
First of all, I cleaned the frame from rust. On it, I redid the engine mounting brackets, moved the transfer case mounting cross member back, installed UAZ shock absorbers (instead of the standard lever ones), replaced many components of the brake system (pads, master brake and wheel cylinders, pipes), and inspected the remaining ones. All rubber seals were replaced with polyurethane ones. Installed a new fuel and exhaust system, installed electric engine heating.
The standard engine was replaced with a ZMZ-402 with a volume of 2.7 liters and a power of 100 hp. — it is unpretentious (runs on AI-92 gasoline), is quite reliable and has good traction characteristics at low speeds. The engine was no longer new, but in good working order (it was possible to purchase a more powerful “406”, but its maximum torque occurs at higher speeds than that of the “402”). At first there were problems with high fuel consumption. To reduce the “appetite” of the engine, I installed a more advanced Solex carburetor. The engine has become easier to start in any weather, fuel consumption has decreased, and traction at low engine speeds has improved. Instead of two standard tanks, I installed one new one with a capacity of 75 liters under the rear passenger sofa.
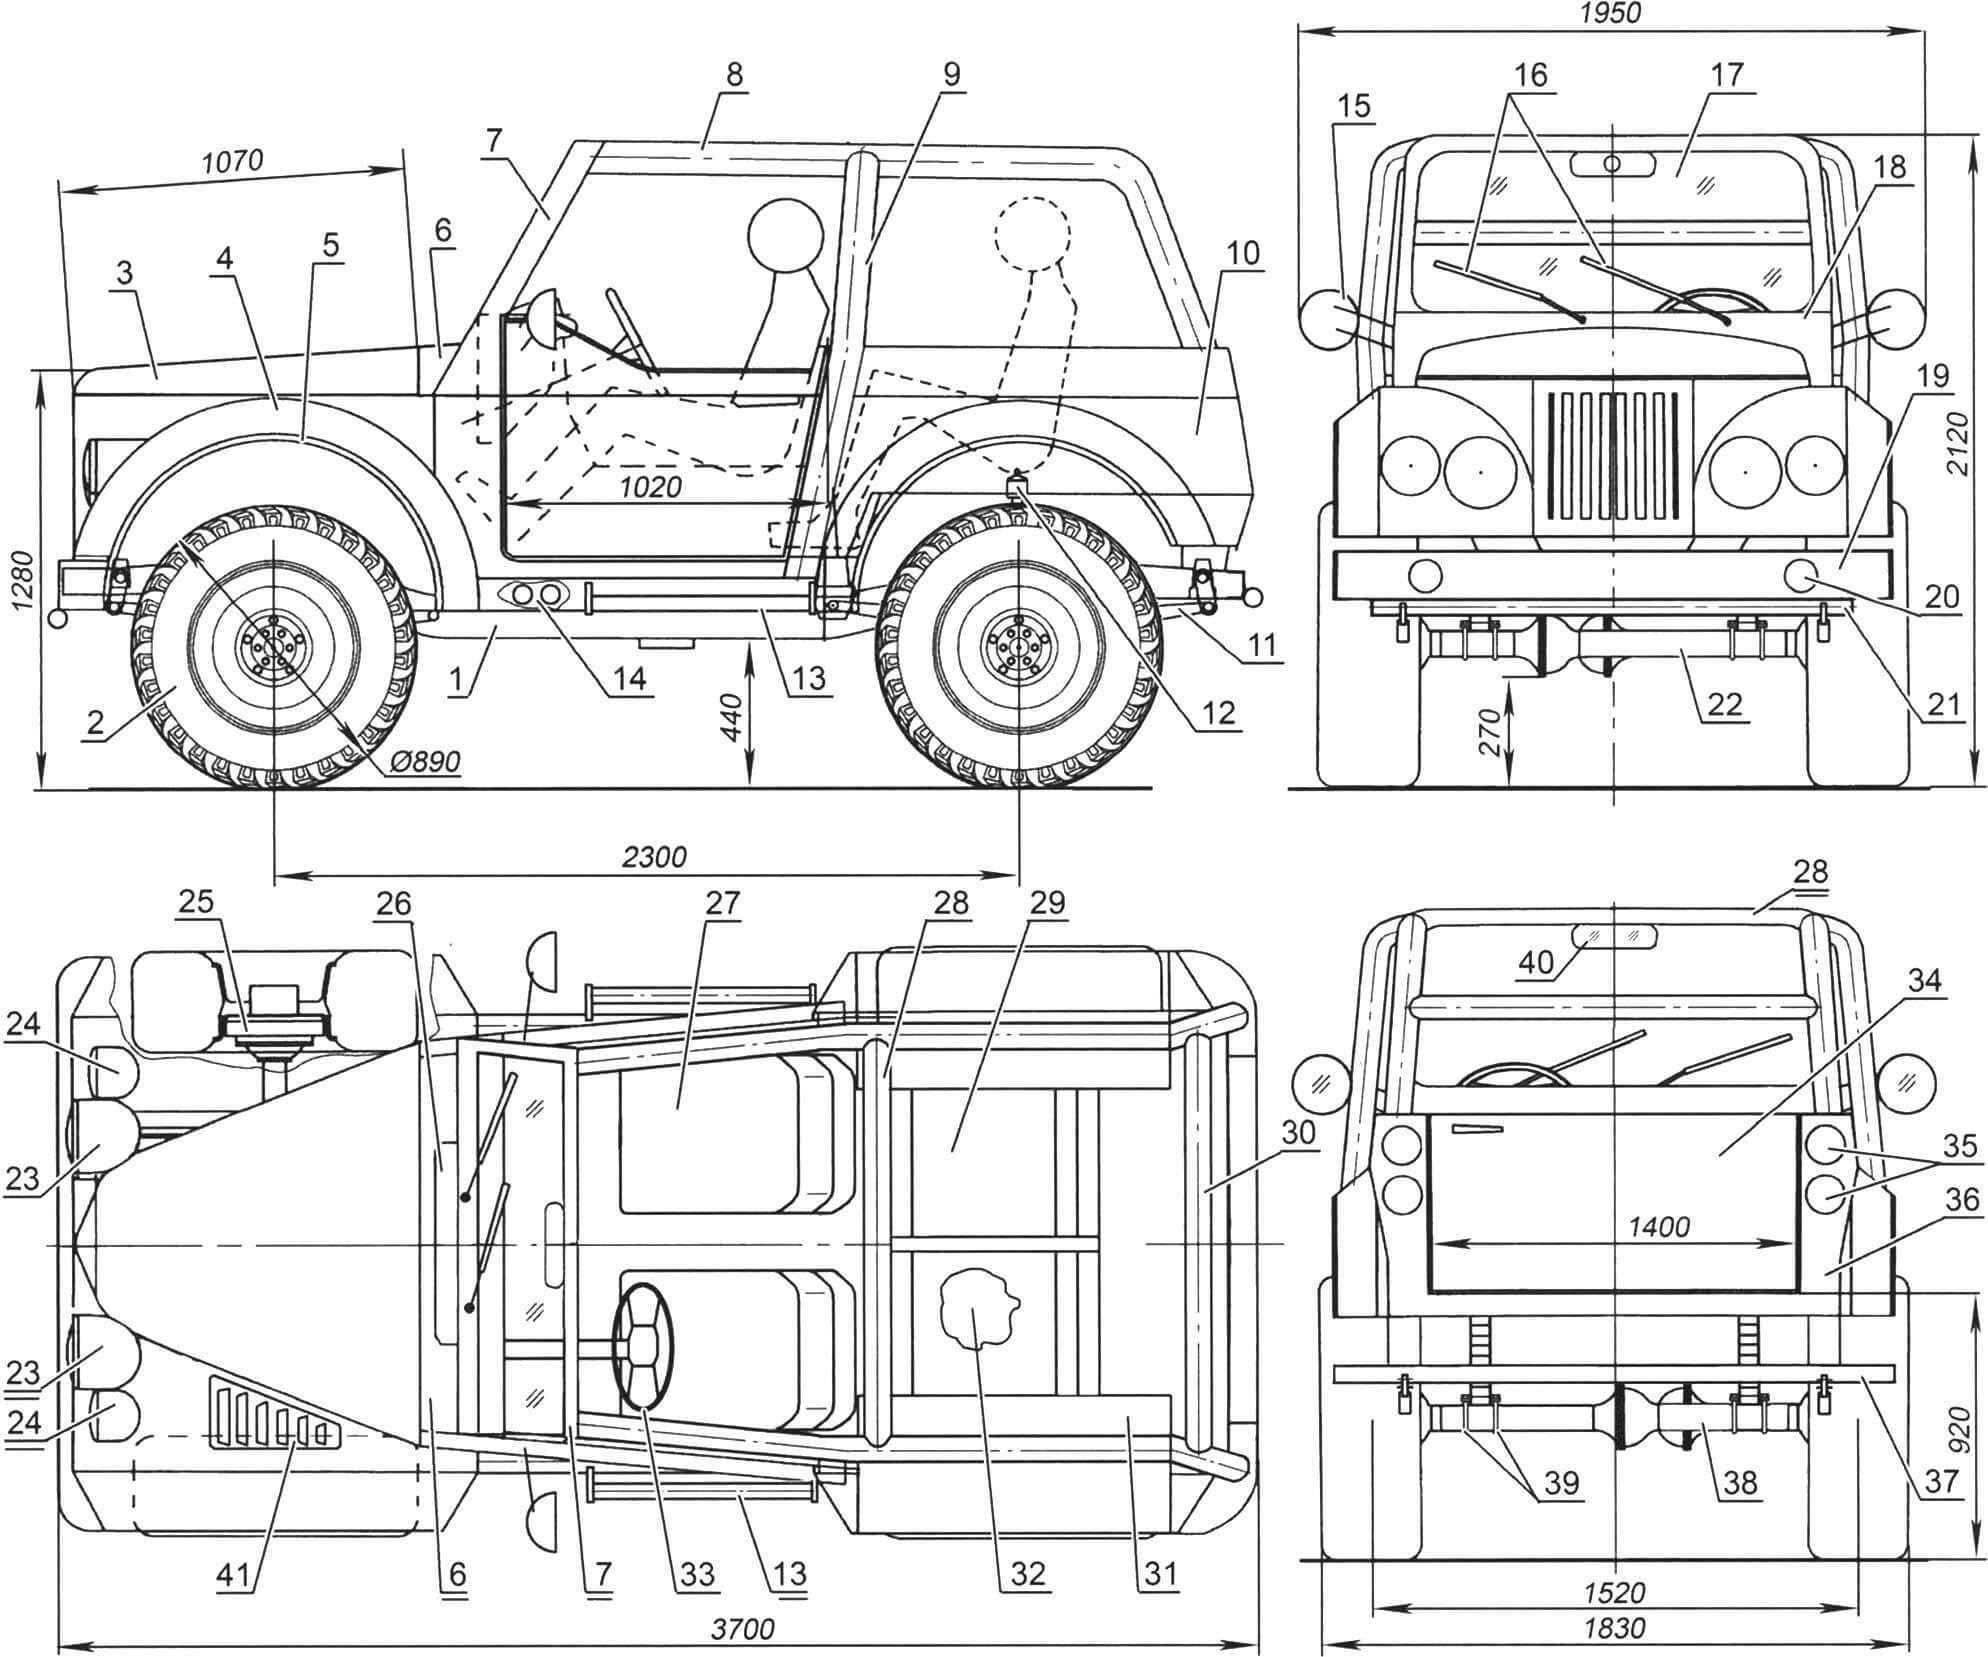
1 — frame (from UAZ-69); 2 — R15″ wheel with Cooper Discovery sst tires (4 pcs.); 3 — hood; 4 — wing side; 5 — wing side edging (4 pcs.); 6 — hood panel; 7 — windshield frame; 8 — longitudinal arc of the safety cage (steel pipe Ø62×2.5, 2 pcs.); 9 — side pillar of the safety cage (steel pipe Ø62×2.5, 2 pcs.); 10 — body side (left, right — mirror image); 11 — spring (from UAZ-69, 4 pcs.); 12 — shock absorber (“Plaza” from UAZ-469, 4 pcs.); 13 — footrest (steel pipe Ø62×2.5, 2 pcs.); 14 — threshold amplifier (2 pcs.); 15 — side rear view mirror (2 pcs.); 16 — windshield wipers (2 pcs.); 17 — front windshield (custom part); 18 — front panel of the cab body; 19 — front bumper (from UAZ-69); 20 — fog lamp (2 pcs.); 21 — front bumper reinforcement (steel pipe Ø62×2.5); 22 — front axle (from UAZ-69); 23 — high beam headlight (from UAZ-69, 2 pcs.); 24 — low beam headlight (from VAZ-2106, 2 pcs.); 25 — spacer between the brake drum and the wheel disk (4 pcs.); 26 — air intake; 27 — front seat (2 pcs.); 28 — central arc of the safety cage (steel pipe Ø62×2.5, 2 pcs.); 29 — sofa for rear passengers; 30 — rear roll bar (steel pipe Ø62×2.5, 2 pcs.); 31 — rear wheel niche (2 pcs); 32 — fuel tank 75 l; 33 — steering wheel; 34 — rear door; 35 — rear signal lights (from the Inter truck, 2 pairs); 36 — rear side of the body; 37 — rear bumper reinforcement (steel pipe Ø62×2.5, 2 pcs.); 38 — rear axle; 39 — attachment point for the spring to the bridge (4 pcs.); 40 — interior rear view mirror; 41 — deflector pad (2 pcs.)
I also selected more efficient attachments: a powerful generator from Audi, a power steering pump from Ford Transit, an electric cooling fan from GAZ-3110. The clutch mechanism and gearbox were installed from a GAZ-3102.
The engine no longer fit under the hood of the “69” and its mounting locations also did not match. I had to make new brackets to install the engine on the frame and move them back 150 mm. This “pulled” a change in the appearance of the car. For more optimal engine operating conditions, I installed an electric fan from a Volga GAZ-3110 and mounted “gills” deflectors on the front wings, which communicate with the engine compartment and draw out heated air.
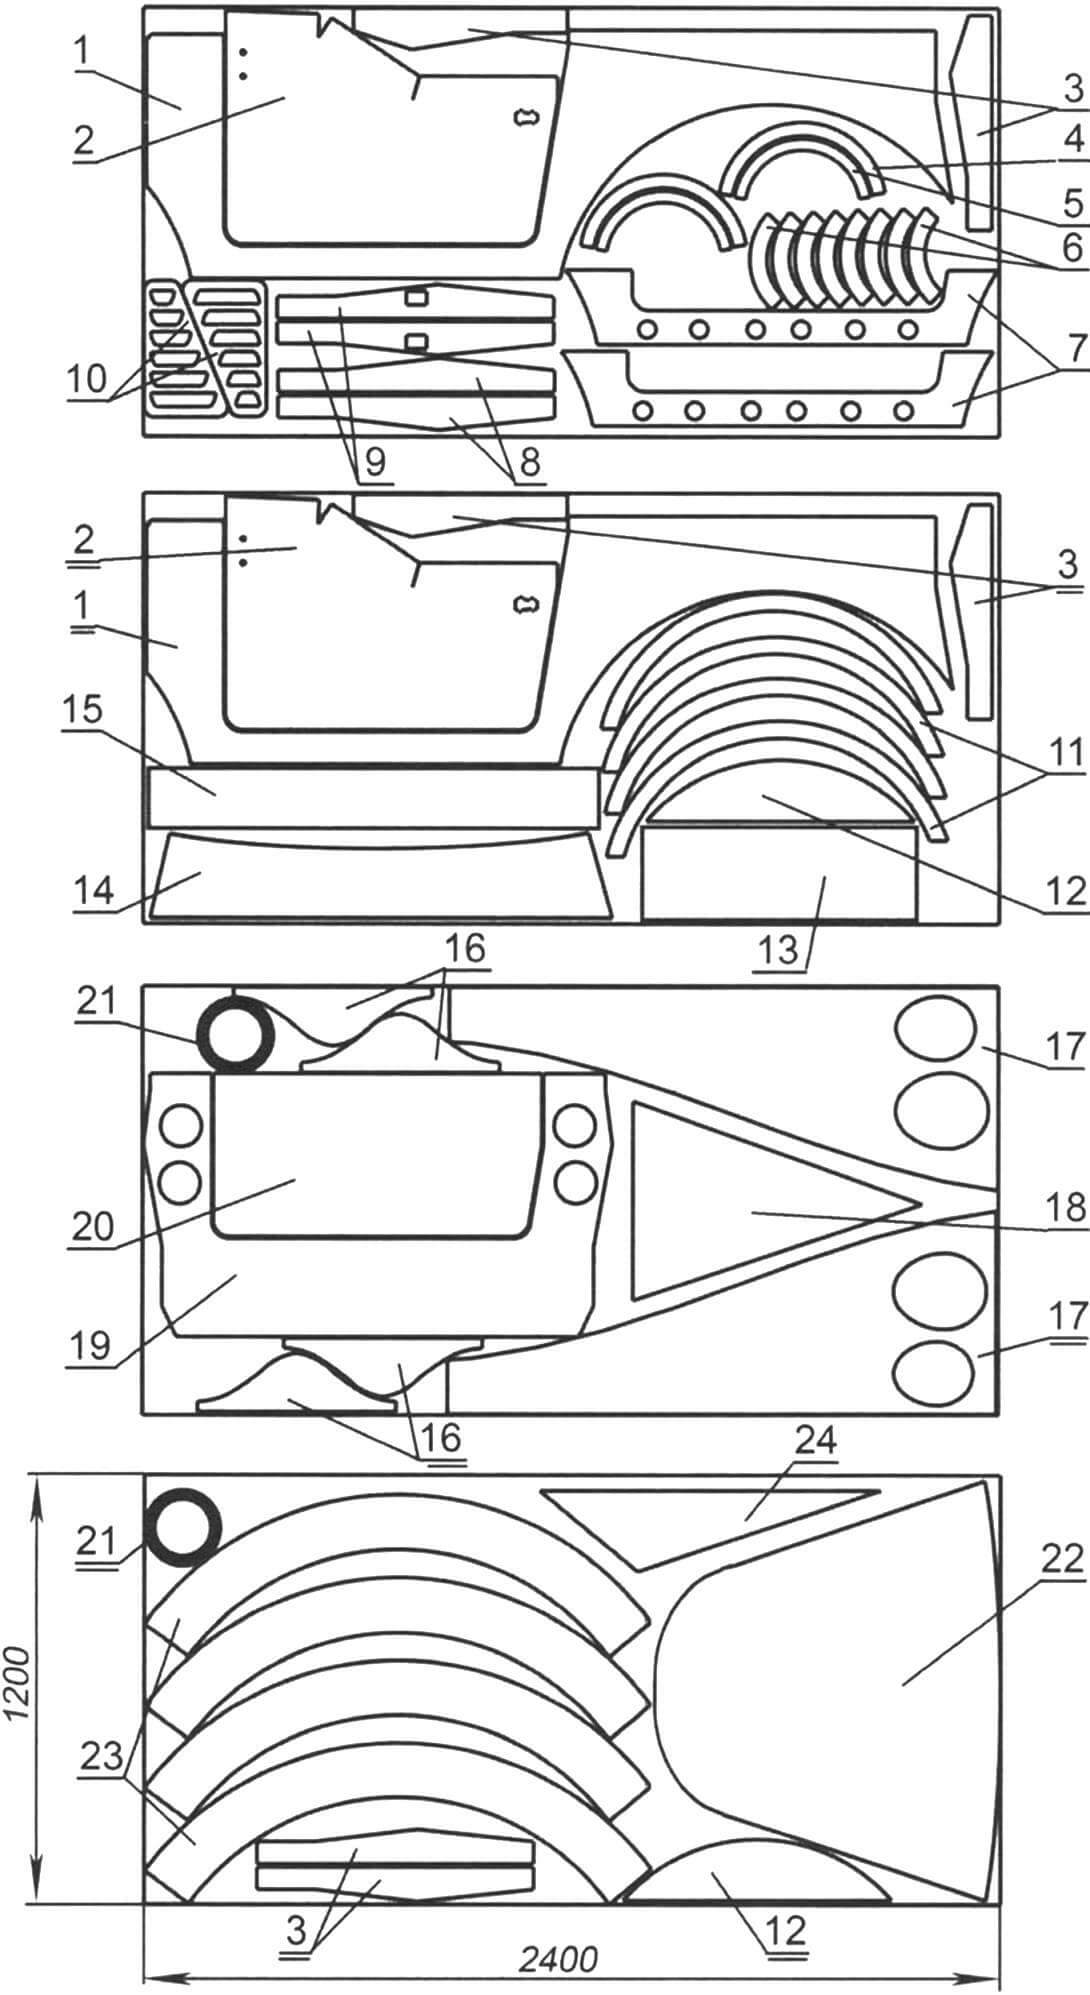
1 — sidewall of the cab body (2 pcs.); 2 — side door (2 pcs.); 3 — stiffening rib of the cab body (6 pcs.); 4 — large visor for high beam headlights (2 pcs.); 5 — small visor for low beam headlights (12 pcs.); 6 — instrument visors (8 pieces, planned, but not in the car); 7 — threshold amplifiers; 8 — front end of the side door (2 pcs.); 9 — counter end of the body pillar (2 pcs.); 10 — deflector linings of the front wings; 11 — wing side flanges (4 pcs.); 12 — sidewall of the wing niche (2 pcs.); 13 — front facing panel; 14 — hood panel; 15 — front panel of the cab body; 16 — housings for high beam headlights; 17 — front wing (left, right — mirror image); 18 — low beam headlight housings; 19 – rear panel of the cab body; 20 — rear door; 21 — high beam headlight rim (2 pcs.); 22 — hood; 23 — sidewalls of the wings (4 pcs.); 24 – empty blank
Due to the installation of a new and longer gearbox from the Volga GAZ-3102, it was necessary to move the standard transfer case closer to the rear axle and even change its angle. This led to the reworking of all cardans: intermediate and bridge ones. The rear axle cardan turned out to be quite short, as a result of which the angles of operation of the crosspieces increased. To reduce them, I installed corner spacers between the bridge and the spring. The front cardan had to be increased. The intermediate cardan was made composite: one part (the one closer to the gearbox) is from the GAZ-3102 cardan, and the other (“distributing”) is from the GAZ-69 with an adapter washer between them.

To make the car easier to control (or rather, to have almost no influence on the steering wheel during straight-line movement), I changed the “caster” – the angle of inclination of the kingpin axis (or the axis between the centers of the ball joints of the steering knuckle in modern cars) to the vertical by drilling other mounting holes steering knuckles to the bridge stocking. Between them I now placed a spacer turned on a lathe. Steering damper installed. The track has been widened to increase stability. And in order not to strain my legs too much, I installed a vacuum brake booster (VUT) from Audi.
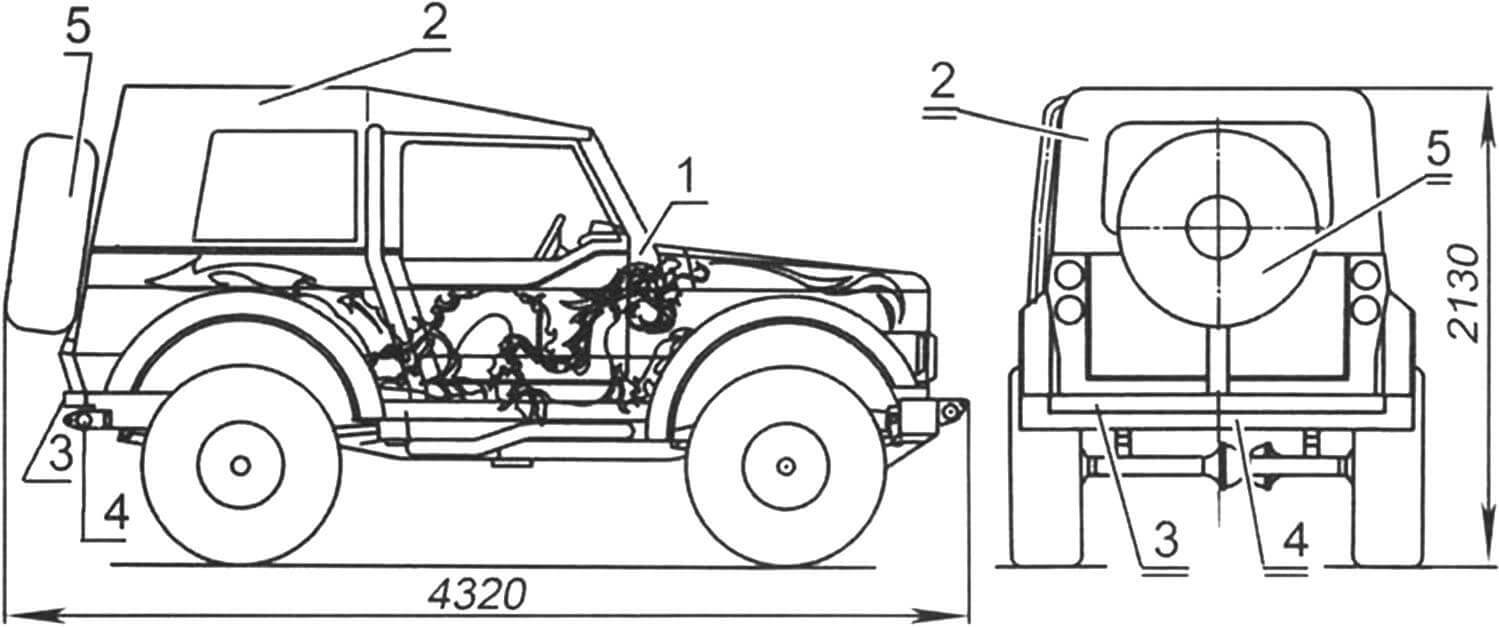
1 – car; 2 — awning (Oxword material, insulated); 3 — swing gate (“gate”); 4 — rear bumper reinforcement; 5 – spare wheel
Due to the rearrangement of the vehicle (movement of units), the weight distribution along the axes became more uniform than that of the 69th. In order not to move the RC control handles back from their usual place, we had to make scenes between them. RK left the standard one, since it has the largest gear ratio in low gear, which is important off-road. All rubber suspension products were replaced with polyurethane ones. Since the caster was changed and tires with a running diameter of 35 inches “Cooper Discovery STT” were installed, the effort when rotating the steering wheel increased. I “cured” this by installing a power steering (power steering) from a BMW E36, it is optimally suited to the GAZ-69. True, we had to change the shape of the steering shaft bipod in the forge, and also mount the adapter plate for fastening the power steering to the frame and strengthen the latter, and make adapters for the pump hoses from the Ford to the power steering from the BMW. I also installed a steering damper. The fuel tank with a volume of 80 liters is homemade, made of sheet steel and installed under the sofa of the rear passengers. The brake system is dual-circuit, with a vacuum booster from Audi. Since the car turned out to be quite high, I increased the track due to wheel rims with a minus offset (-20 mm) and 40 mm thick ring spacers between the brake drum and the wheel rim. Mechanical hubs were installed on the front axle. The lever shock absorbers were removed and shock absorber brackets from the UAZ-469 were welded in their places. In order for the car to behave adequately on the road, I installed Plaza gas-oil shock absorbers from UAZ-469. The steering wheel (from Audi) was connected to the power steering via two cardan shafts in a bearing intermediate support.
When the preparatory work was done, I took up the body.
As mentioned earlier, I wanted to make the car original and at the same time recognizable, so to speak, today’s vision of the old GAZ-69. Since it didn’t make sense to remake the standard body to fit the planned modern image, I decided to make a completely new body. It required steel sheets with a thickness of 1.2 mm and 2 mm. “Two” – for the floor, 1.2 mm – for all other body parts. And on the long winter evenings “the process began”: cutting, bending, beating out. The body was welded in two months. Then the puttying, preparation for painting and painting itself began. I remember how it was all done like a nightmare, but when everything fell into place, it turned out to be quite good.
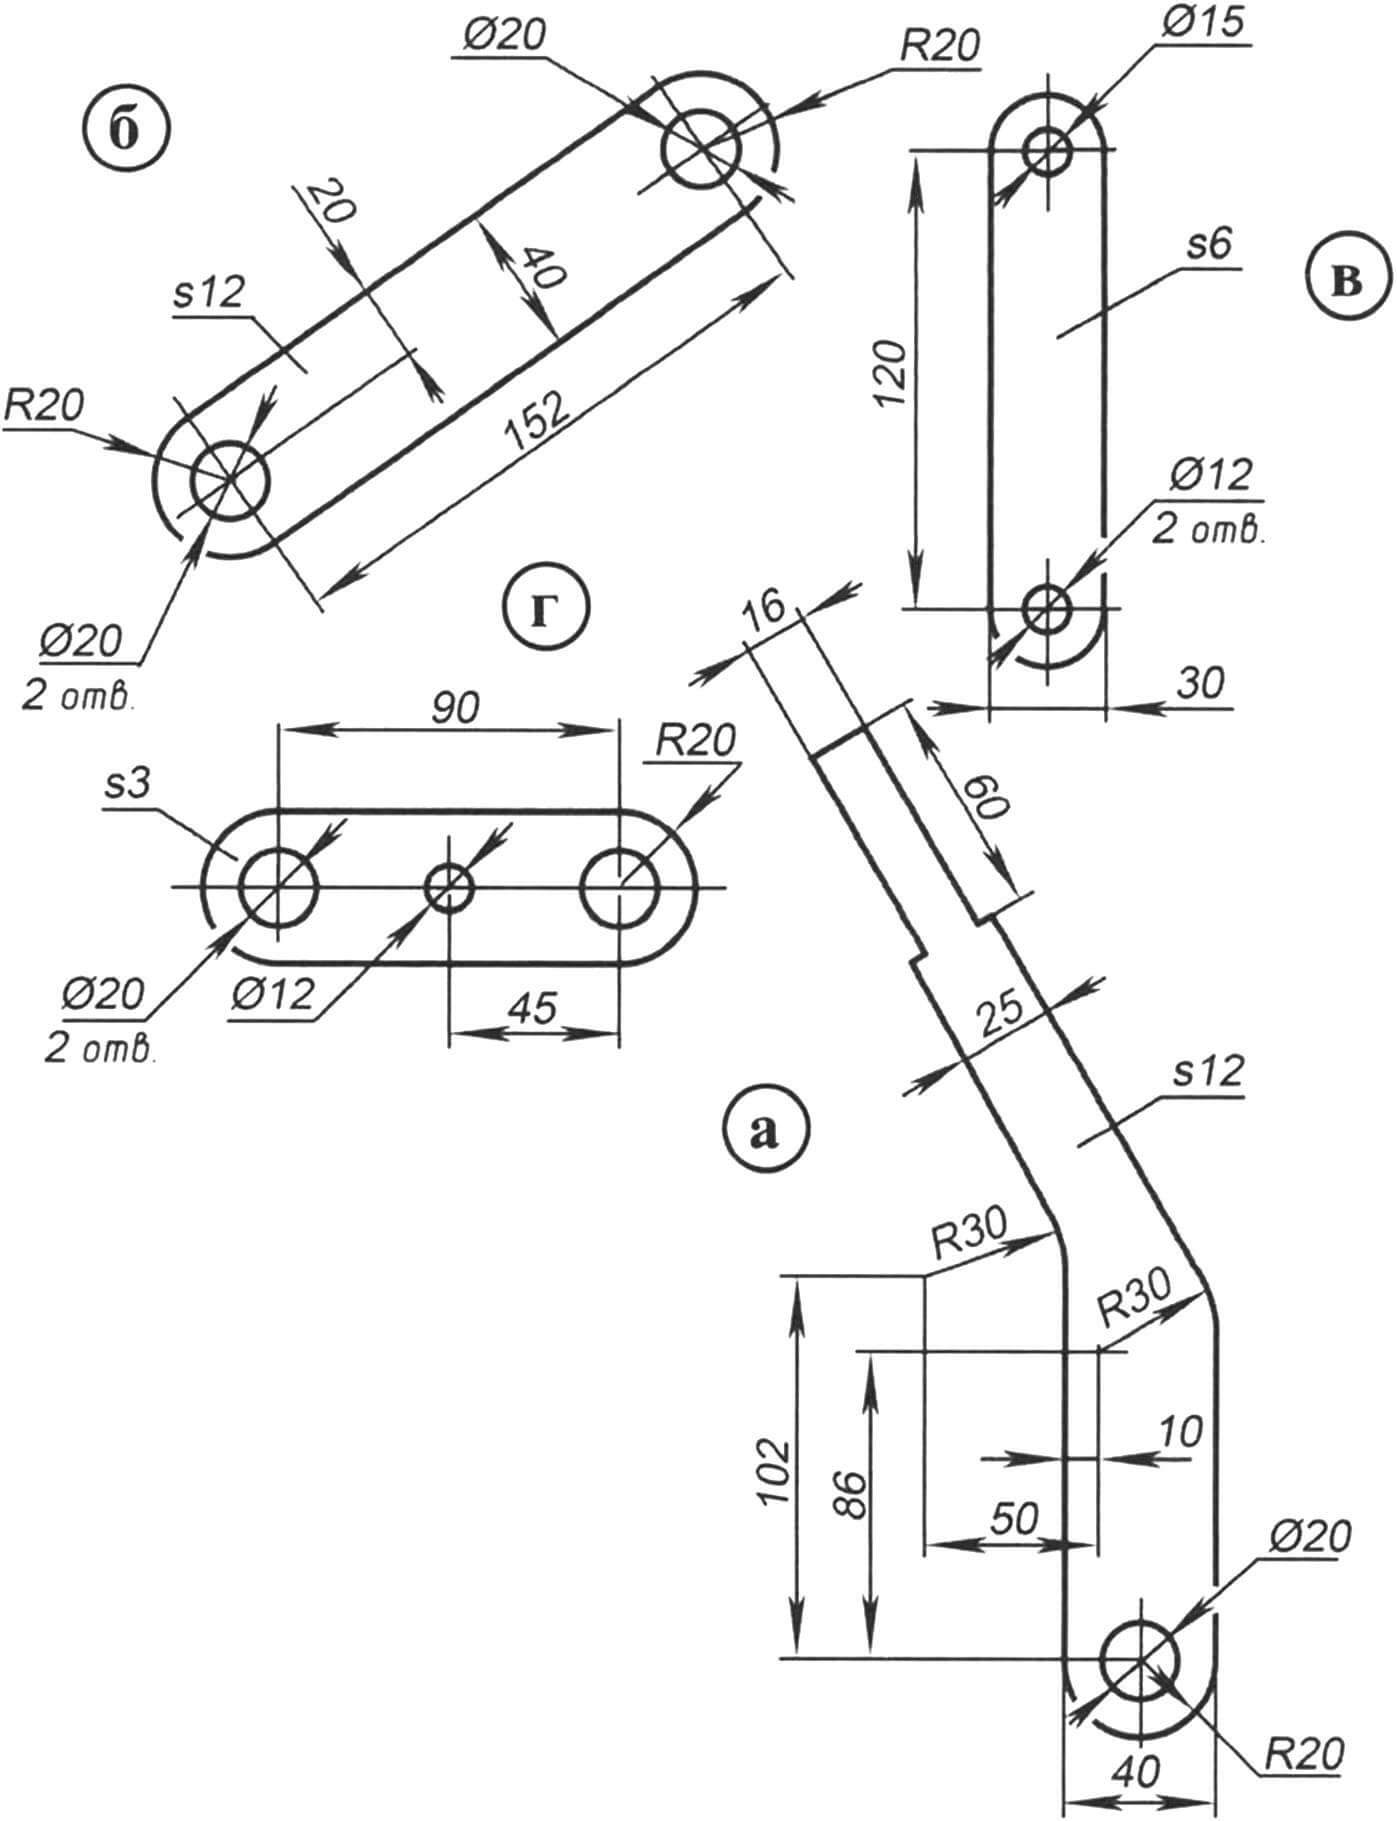
a — lever (2 pcs.); b — inclined rod (2 pcs.); c — vertical rod (2 pcs.); g – horizontal rod (2 pcs.)
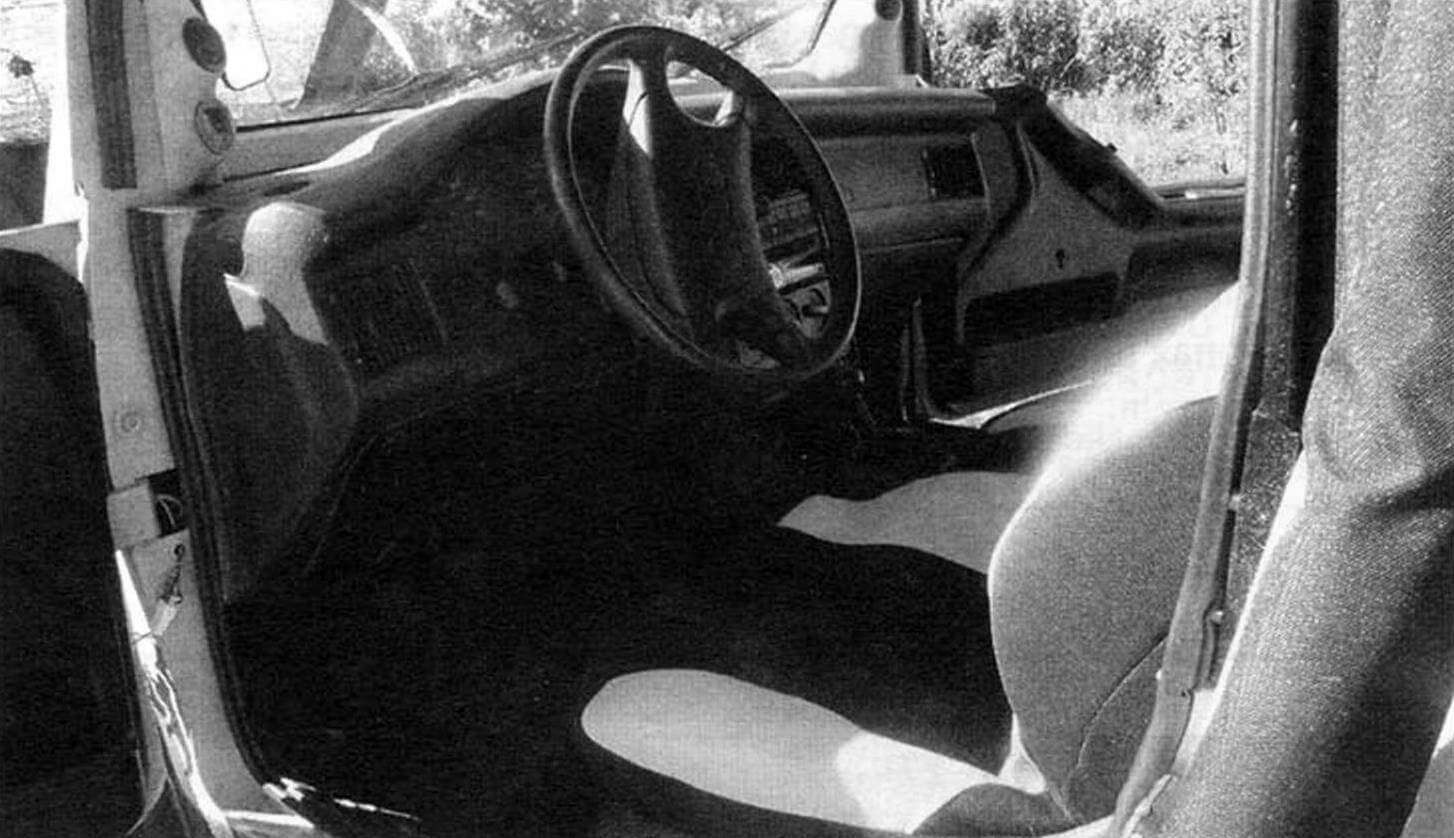
The GAZ-69 has very narrow side doors (especially the driver’s side), so for ease of entry, both doors were widened and hung on the front body pillars on a bearing “mono-hinge”; the door locks are equipped with an electric drive. The dashboard and tunnel are from an Audi 80, the front seats are from an Audi A8 with electric drive, the rear sofa is from a Mitsubishi Pajero. A powerful heater from Audi was also installed, now even in severe frosts the car is warm. All wiring was also taken from Audi. The front large headlights (high beam) are from the GAZ-69, the small ones (low beam) are from the VAZ-2106. Signal lights, turn signals and side lights are from the American Inter truck. There is a recess in the rear part of the body, in the floor. At first I kept a spare tire in it, and then a tent (I sewed it only a year later). Tools are stored in the side compartments. The awning is made of Oxford material, insulated and lined with jacquard fabric on the inside. The floor is covered with car carpet. Well, for the comfort of the driver and passengers, a powerful heater from Audi was installed – now the cabin is warm even in winter!
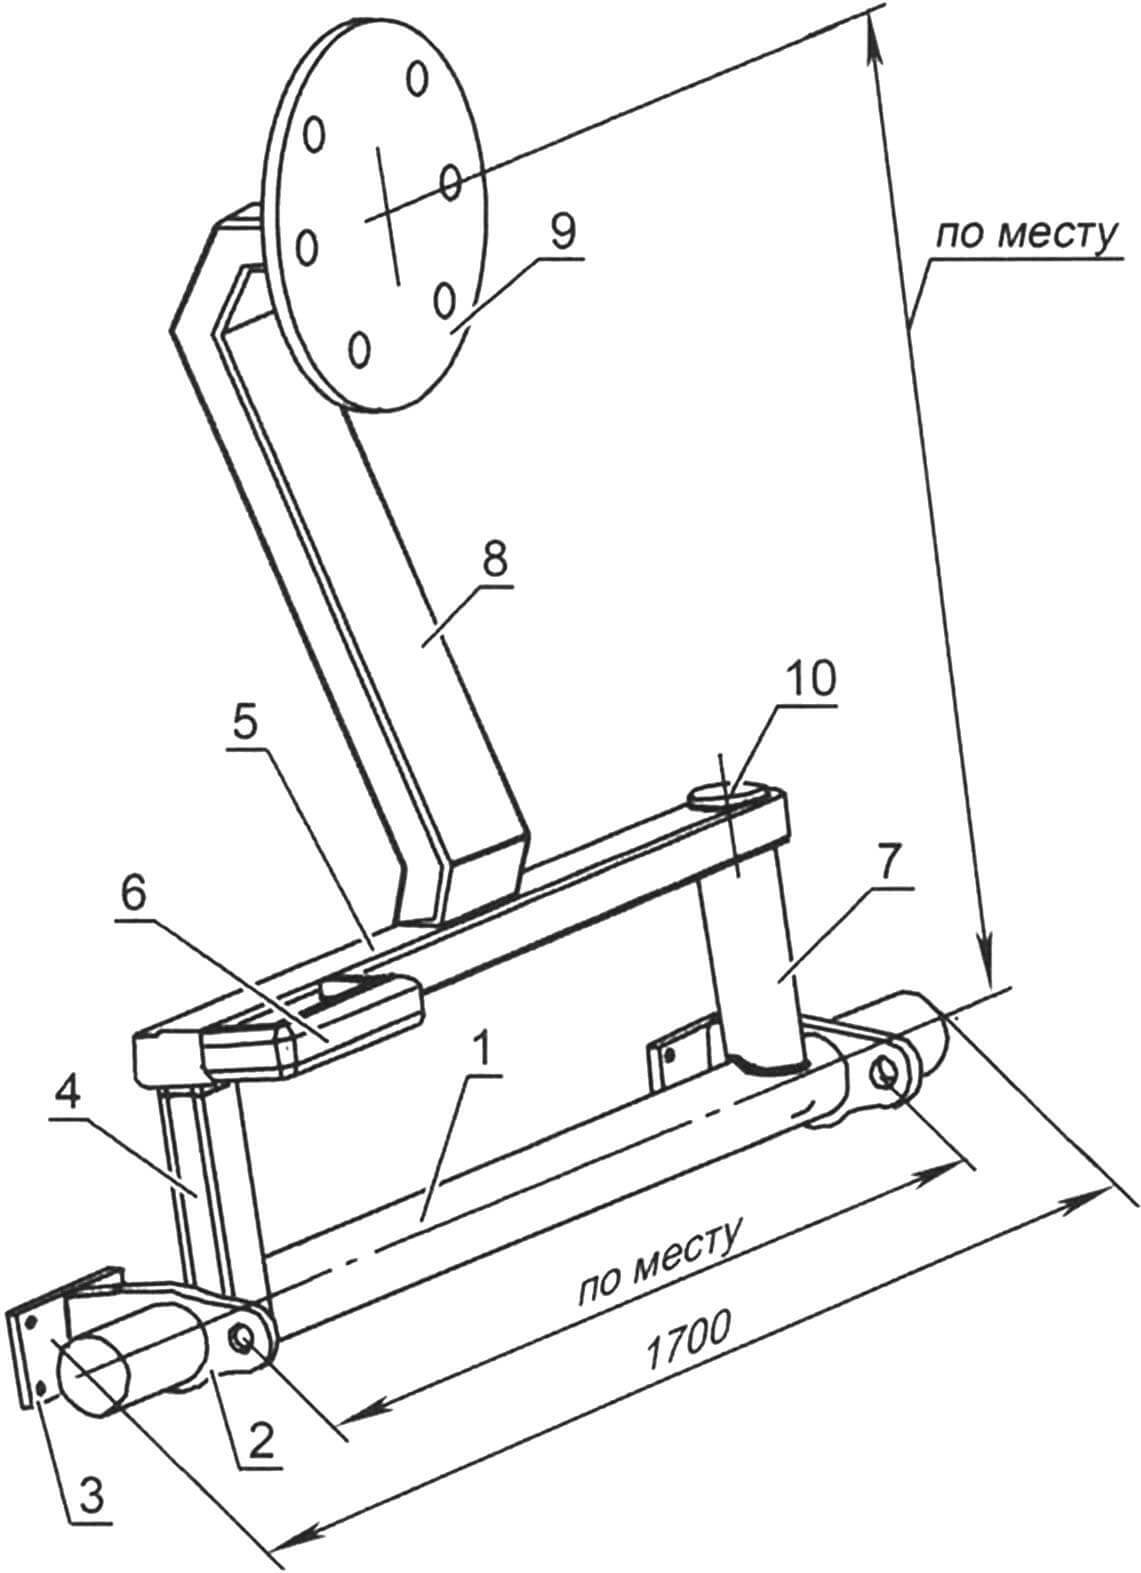
1 — rear bumper reinforcement (steel pipe Ø62×2.5); 2 — bracket (2 pcs., see drawing of the rear bumper amplifier); 3 — trim (2 pcs., see drawing of the rear bumper amplifier); 4 — support post (steel pipe 40×40); 5 — traverse (channel No. 6); 6 — handle (steel pipe 20×20); 7 — hinge bushing (steel pipe Ø30×2); 8 — figured central post (steel pipe 60×30); 9 — washer for fastening the spare wheel (steel, sheet s6); 10 – hinge axis

1 — amplifier (steel pipe Ø62×2.5); 2 — bracket (steel, sheet s25, 2 pcs.); 3—overlay
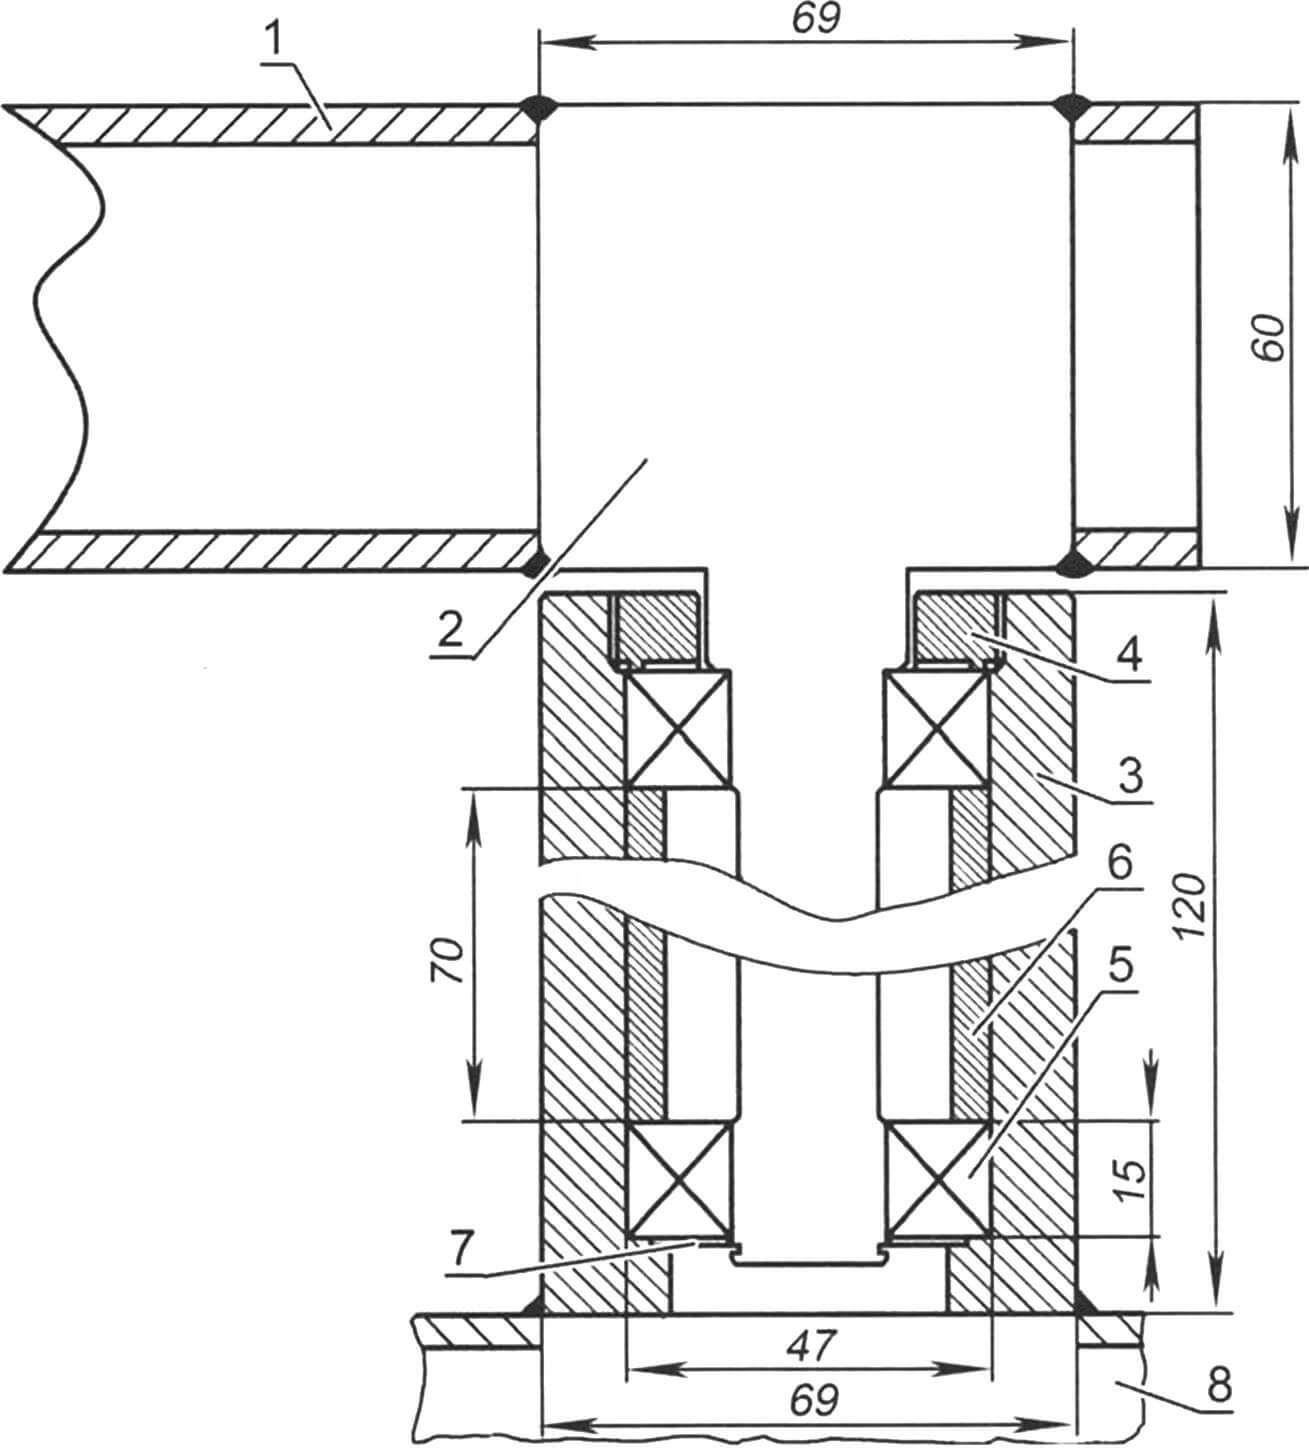
1 – traverse; 2 – axis; 3 – bushing; 4 – ring; 5 — bearing (80204, 2 pcs.); 6 — spacer sleeve; 7 — thrust washer; 8 — rear bumper amplifier
The rear door is also swinging, suspended on a bearing “mono-hinge” with an electric lock. For the spare wheel I made a “gate” (rotating console) with a lock, and hung a pouch for fishing gear here.
A 1 kW low-frequency amplifier is mounted in the rear door. Good audio preparation has also been done. An mp3 head unit with USB, a 4-channel 2-component speaker system are installed – 4 midbass, 4 tweeters on podiums on the sides of the body and a subwoofer with a bass reflex. Windshield (triplex), made to order in St. Petersburg, is glued into the frame.
The safety frame, consisting of racks, longitudinal elements and cross members, is made of pipes with an outer diameter of 50 mm. The frame pipes are covered with artificial leather. Reinforced bumpers and sills installed; The engine sump, the bottom of the fuel tank and the muffler are equipped with protection made of 2 mm thick steel sheet.
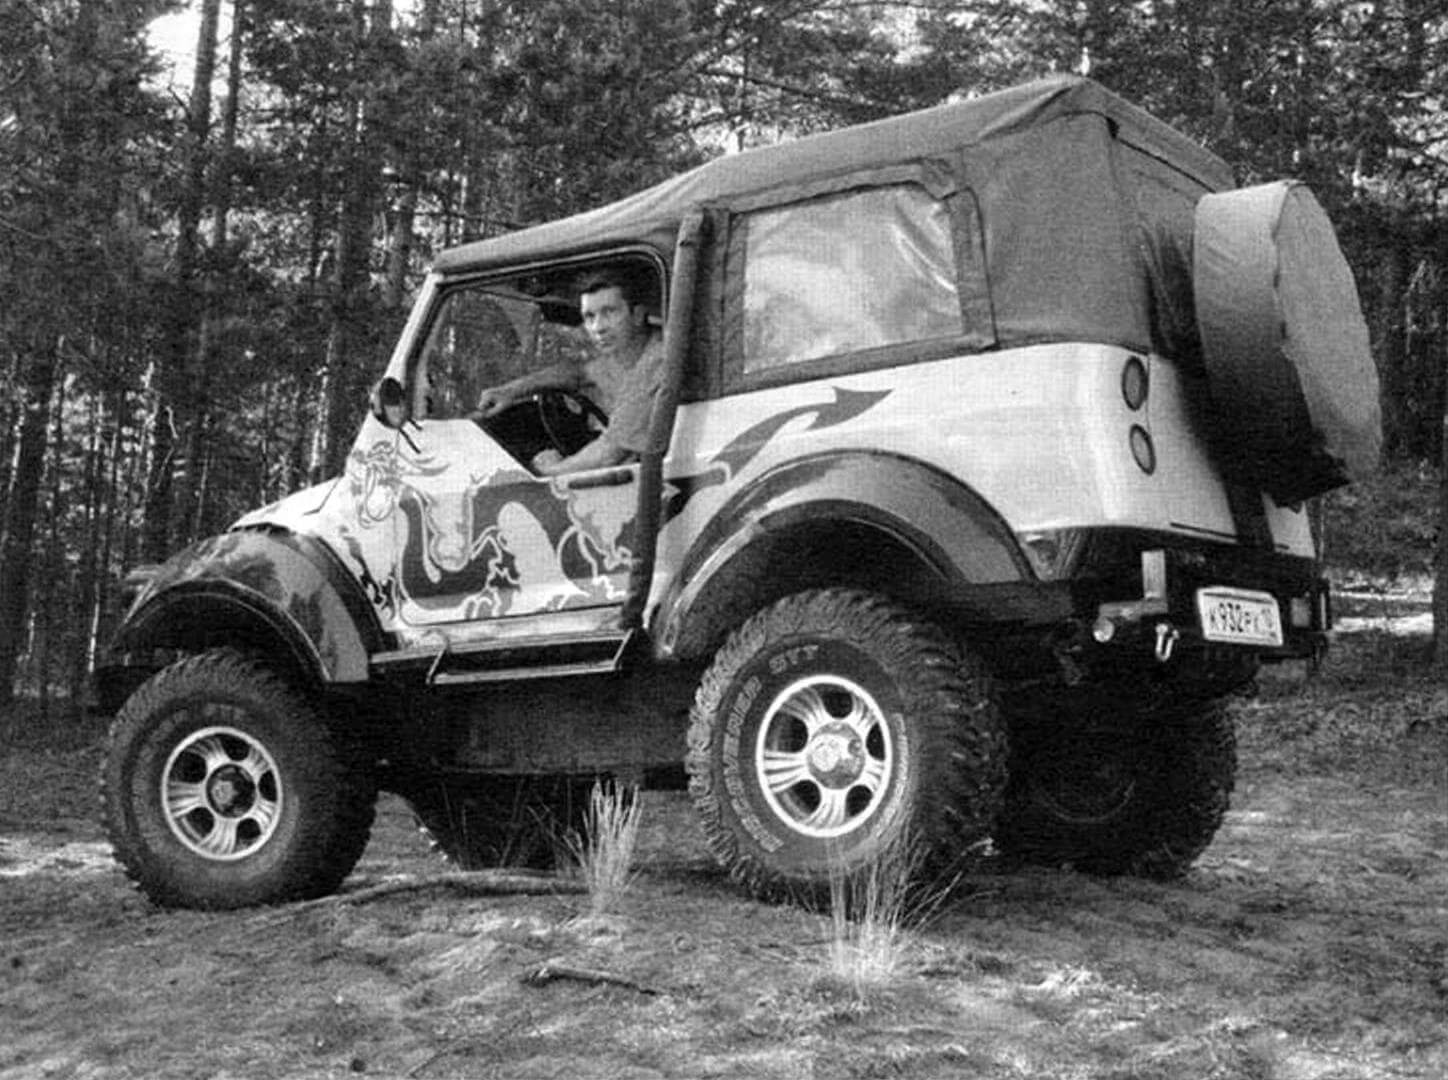
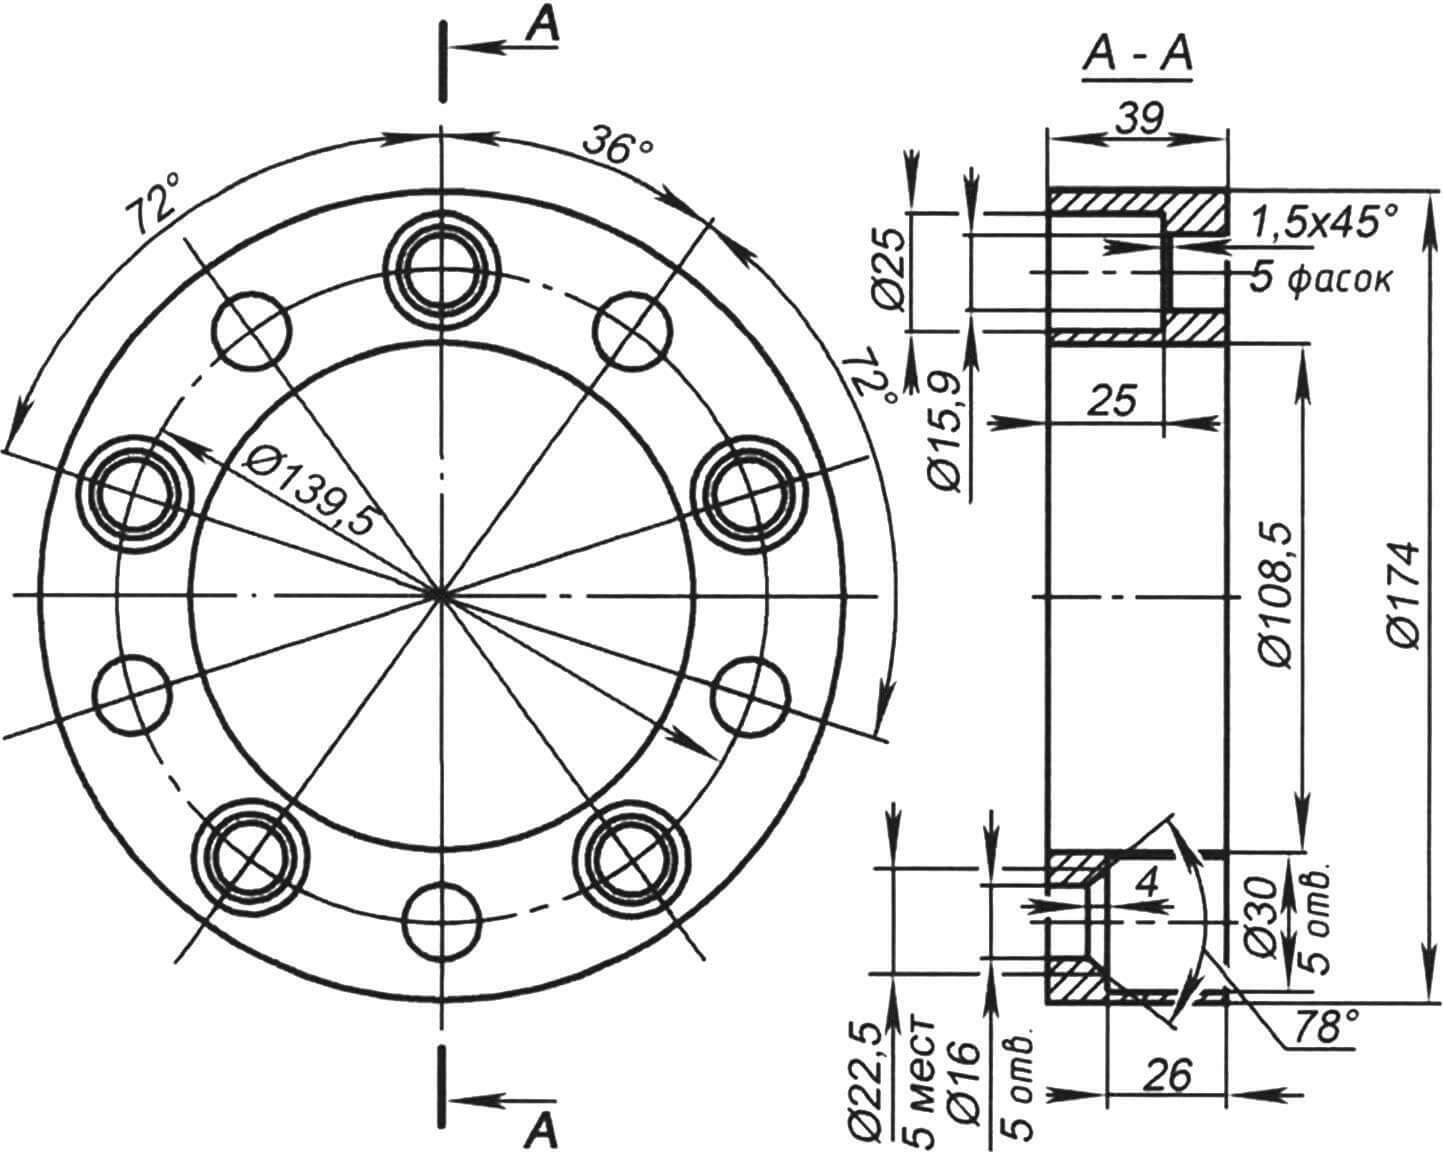
Construction of the car was completed in December 2010. The car turned out to be comfortable and very passable. Thanks to the engine, which pulls very well at the bottom, you drive almost like an automatic machine (you don’t have to pull the “stick” of changing gears often). The suspension turned out to be successful too – it walks on broken dirt roads as if it were on asphalt.
All design changes have been made to the vehicle passport (PTS).
Now people often ask us to transport weddings, just to take a photo next to the car or behind the wheel. But basically the car is used for its intended purpose – travel and active recreation!
Yu. Myaki, Solonets, Karelia
Recommend to read
 BOMBER B-18 “BOLO”
Passenger aircraft DC-2 and DC-3, developed by the designers of the American company "Douglas" in the middle 1930s was extremely successful, was built in large numbers and spread... HOW MANY IN THE TANK?
This question continues to torment motorcyclists — and this despite the fact that the "modelist-Konstruktor" on their pages several times already talked about the interesting enough the...
