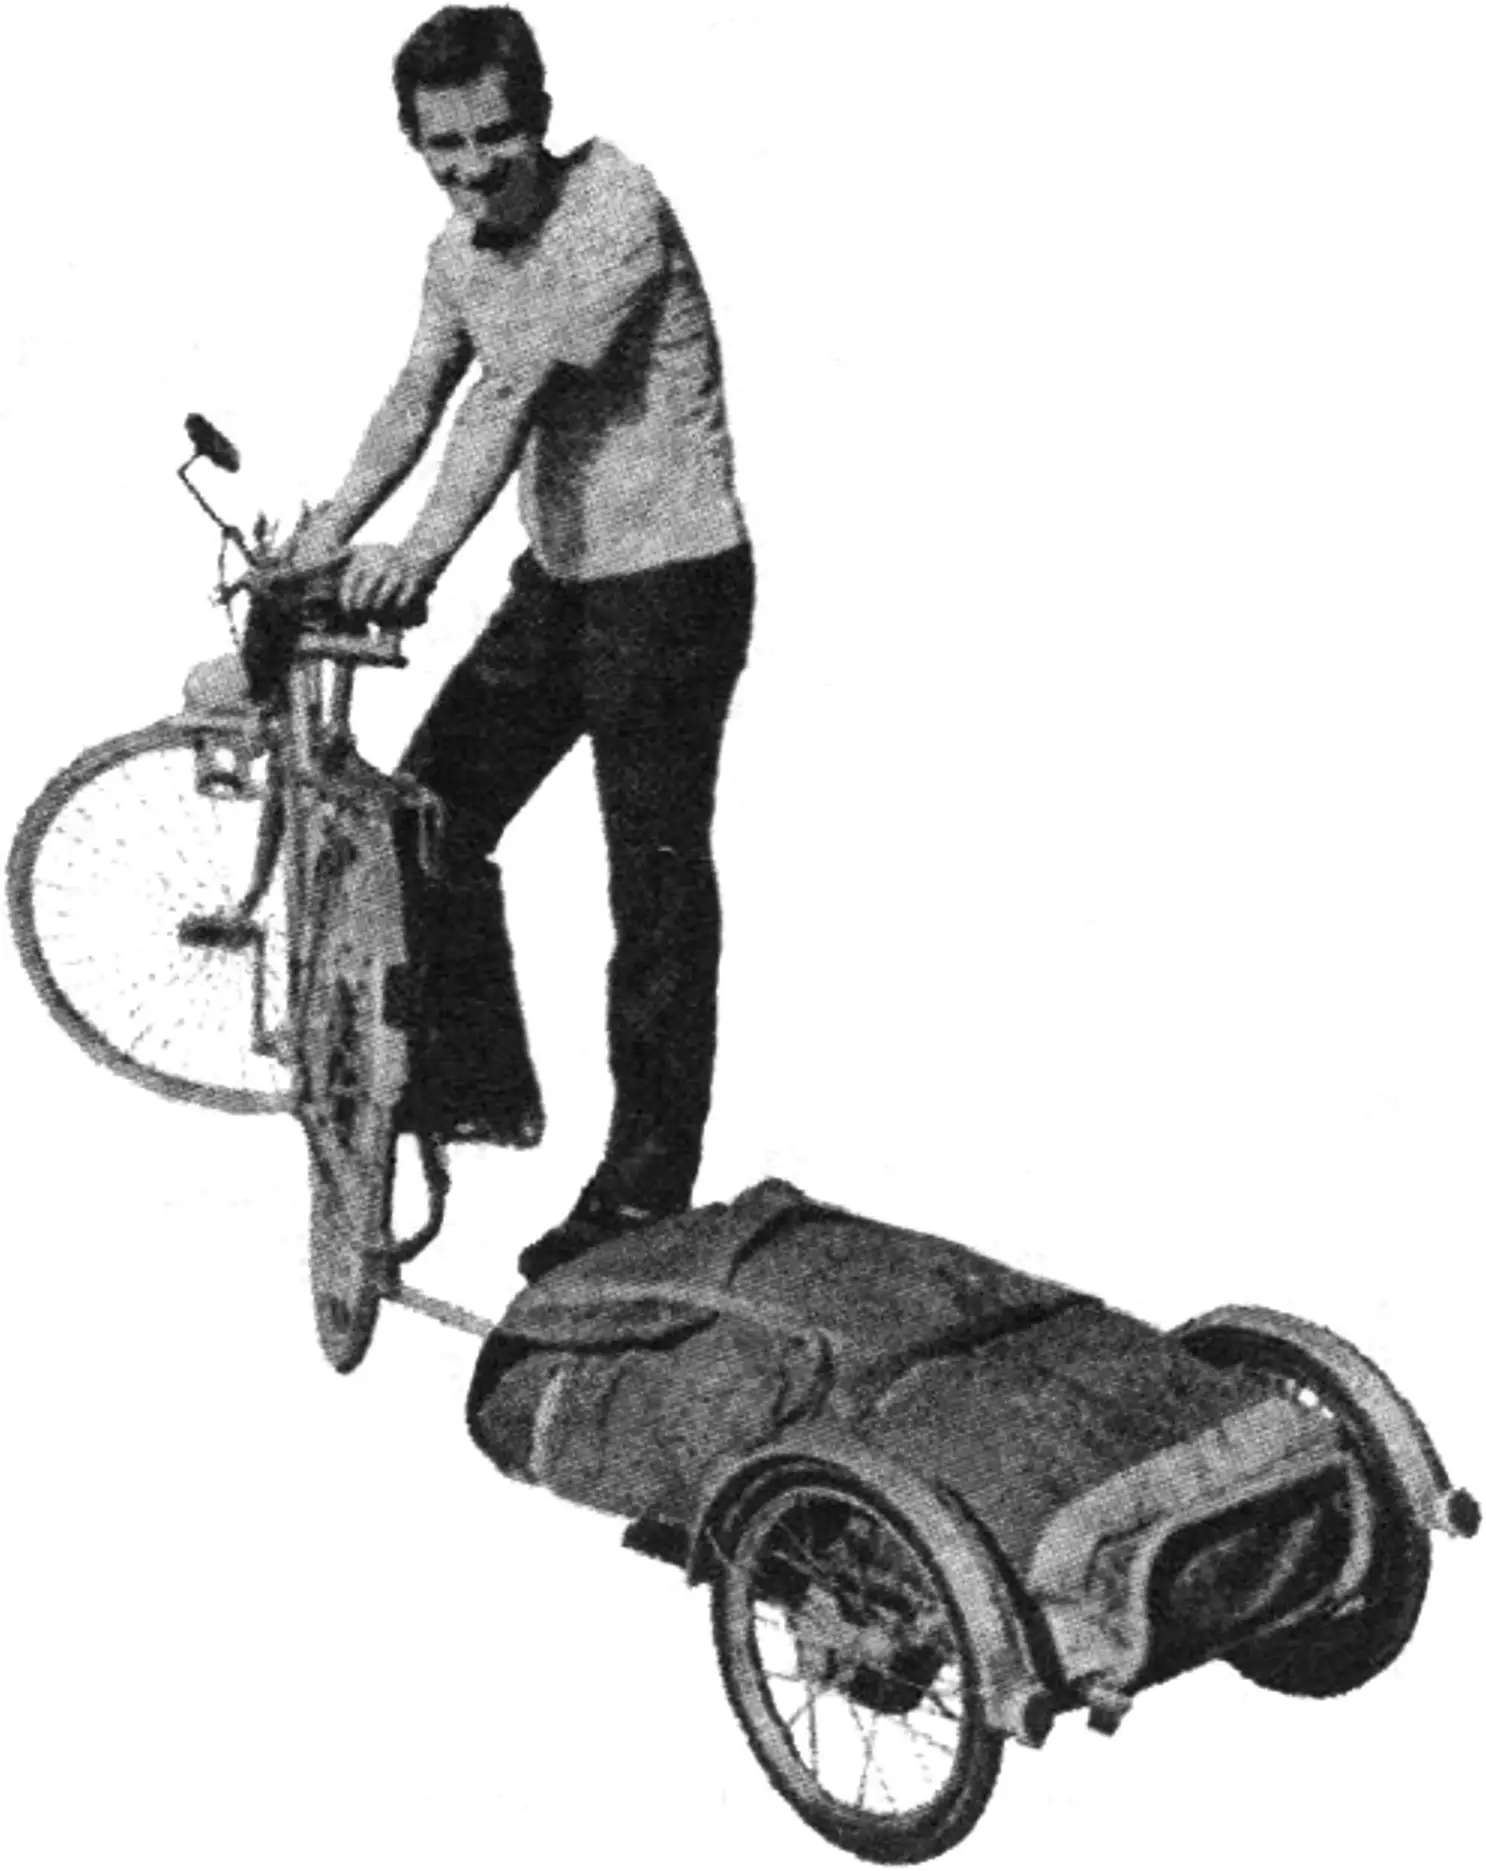
You can’t carry much cargo on an ordinary two-wheeled bicycle, even if it has a luggage rack. Meanwhile, bicycle owners often need to do just that. So it is a good idea to make a trailer for the bicycle. The design of such a two-wheeled trailer was described by Zbigniew Hennel and Andrzej Fedoruk in the Polish magazine “Mlody TECHNIK”, and this publication is based on their article.
This light and neat trailer is also attractive because it can be made on a workbench in a home workshop: the structural parts are made without any machine-tool work (turning, milling) and without welding, using ordinary tools that even a beginner DIY maker has. True, the wheels and the hitch will have to be ready-made. But the wheels can be taken from discarded children’s bicycles (preferably the front ones — without brake hubs). As a hitch, a steering-rod joint from any passenger car will do. This part (or rather, a whole unit) can be found at any service station: these joints are not repaired and are replaced entirely when even a slight play appears. But as a bicycle-trailer hitch, even worn-out parts are quite suitable — and they are even better than new ones because they move more freely.
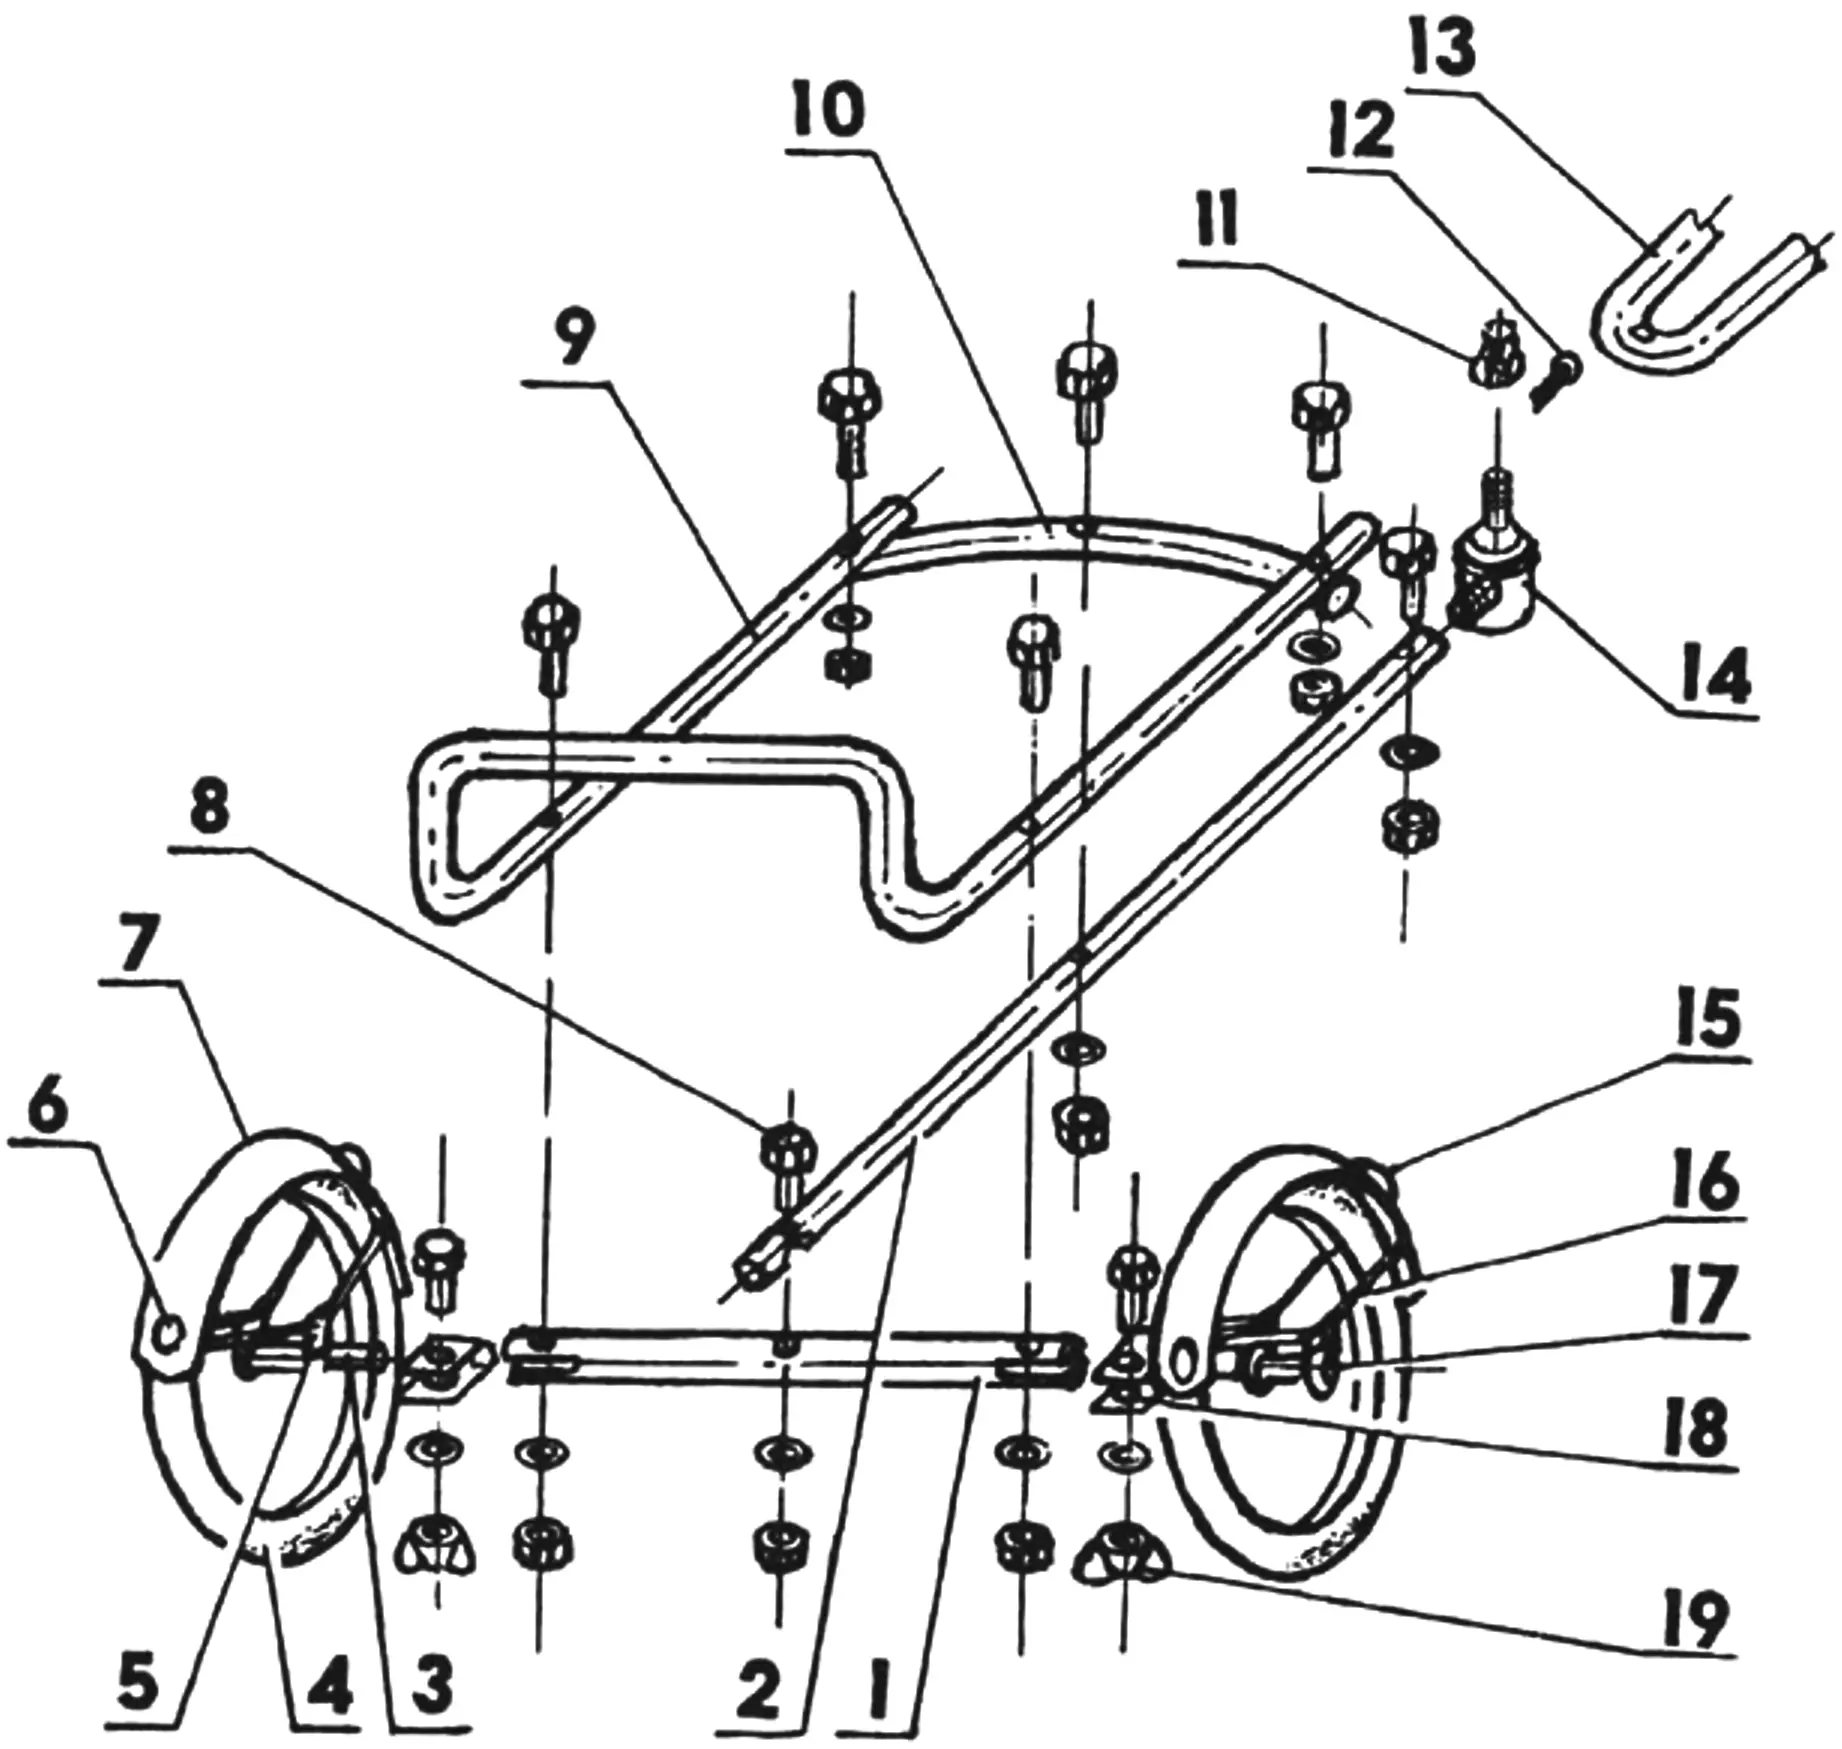
1 — crossmember; 2 — drawbar; 3 — adapter bushing (2 pcs.); 4 — wheel (from a children’s bicycle, 2 pcs.); 5 — fender stay mounting brackets (4 pcs.); 6 — red reflector (2 pcs.); 7 — fender (2 pcs.); 8 — M6 bolt (9 pcs.); 9 — body frame; 10 — body crossmember; 11 — castellated nut; 12 — cotter pin; 13 — towing arch; 14 — hitch tip; 15 — white reflector (2 pcs.); 16 — fender stays (4 pcs.); 17 — axle (2 pcs.); 18 — clamping bracket; 19 — M6 wing nut (2 pcs.)
The base of the trailer is a frame made of two lengths of duralumin tube (a tube from an old folding cot frame will do fine), joined in a T shape. The joint is made as follows. A round plug of hardwood is driven into one end of the longitudinal drawbar tube, and a semicircular saddle notch is cut there to half the diameter. The same kind of plug is driven into the crossmember — to the middle of its length. From above, the drawbar is placed with its saddle onto this spot on the crossmember; a through diametral hole is drilled at the center of the joint, and the parts are fastened with an M6 bolt with a washer under the nut.
The hitch tip is screwed into the other end of the drawbar. A diametral hole for an M6 bolt is also drilled in both parts, and they are joined with it. Incidentally, it should be noted right away that all structural elements are assembled with the same bolts, except where otherwise stated.
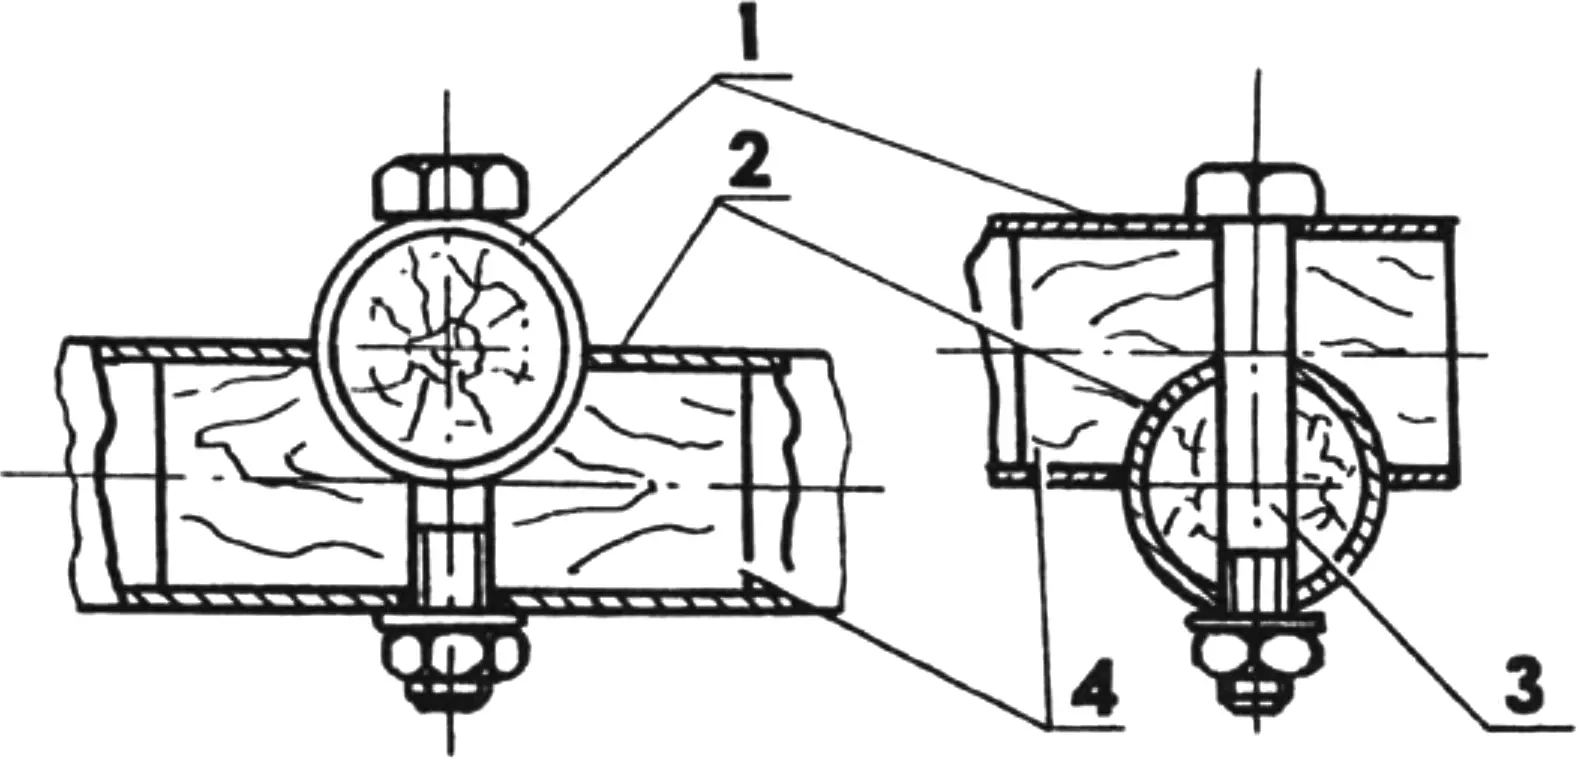
1 — drawbar; 2 — crossmember; 3 — M6 bolt; 4 — wooden inserts
Wheels are mounted at both ends of the crossmember. As already said, ready-made wheels are used. Only the axles have to be made differently — from a suitable rod, 30—40 mm longer, with a thread on the extension. Slots of the same length must be cut in the walls at the ends of the crossmember. Since the axle diameter is much smaller than the inside diameter of the crossmember, adapter bushings are screwed onto the axles. You can also make them yourself from suitable tube offcuts, or use a pair of wheel-bearing lock cones as bushings on each axle. The bushings on the axles are locked with pins to keep them from unscrewing. If cones are used, pins can be omitted — the outer cone will serve as a locknut for the inner one. The ends of the crossmember are slipped onto the bushings, and the joints are clamped with bolts using brackets made beforehand from 2-mm steel sheet. For faster wheel mounting, a wing nut is used on the bolt.
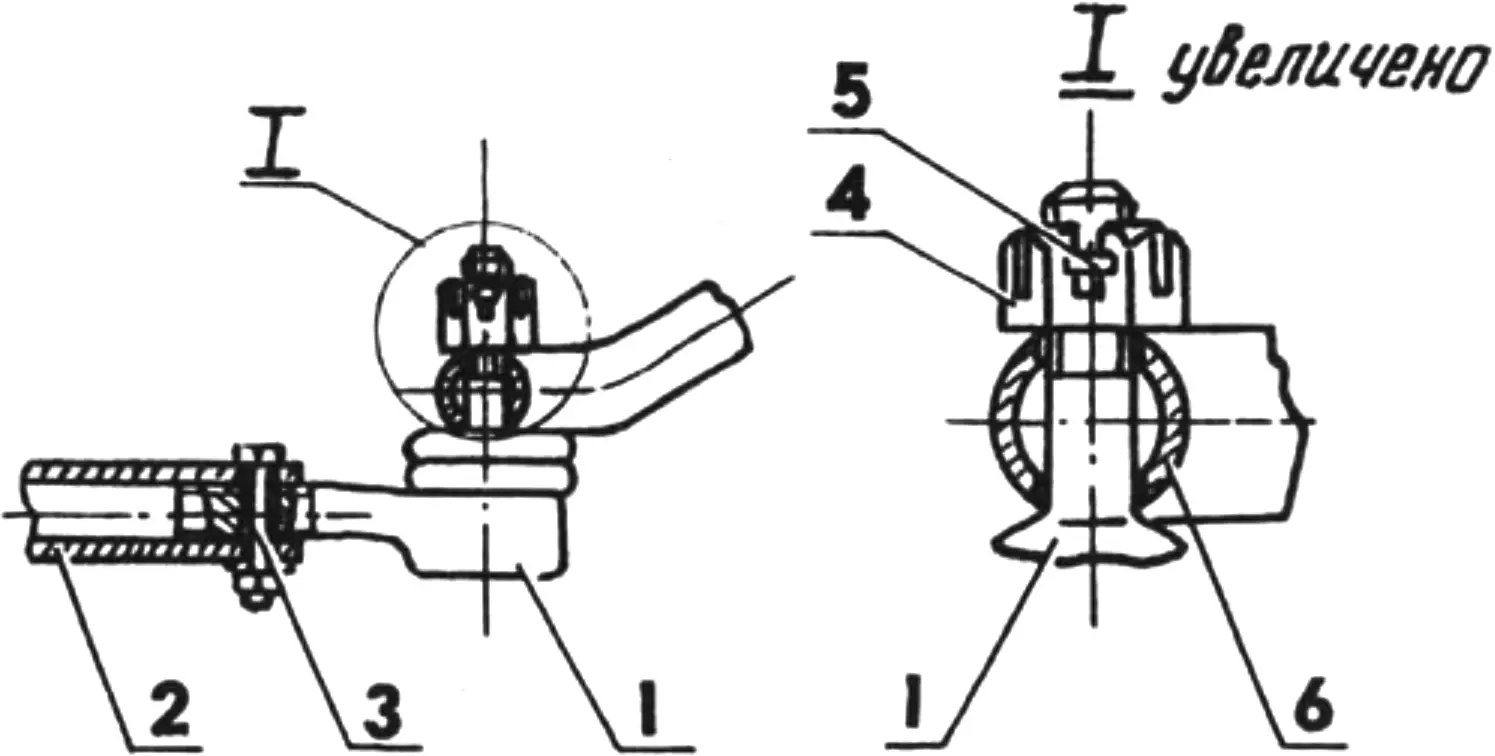
1 — tip (passenger-car steering-rod joint); 2 — drawbar; 3 — M6 bolt; 4 — castellated nut; 5 — cotter pin; 6 — towing arch
After that, the body frame is fastened to the trailer frame at three points — two on the crossmember and one on the drawbar. The frame increases the rigidity of the chassis and, together with it, forms a lattice floor for the body. If needed, the floor can also be made solid from light sheet material, fastened at the same three points on the body frame.
If desired, mudguard fenders from the same bicycle as the wheels can be fitted over the wheels using simple axle brackets and stays. They will give the trailer a finished, factory-like look.
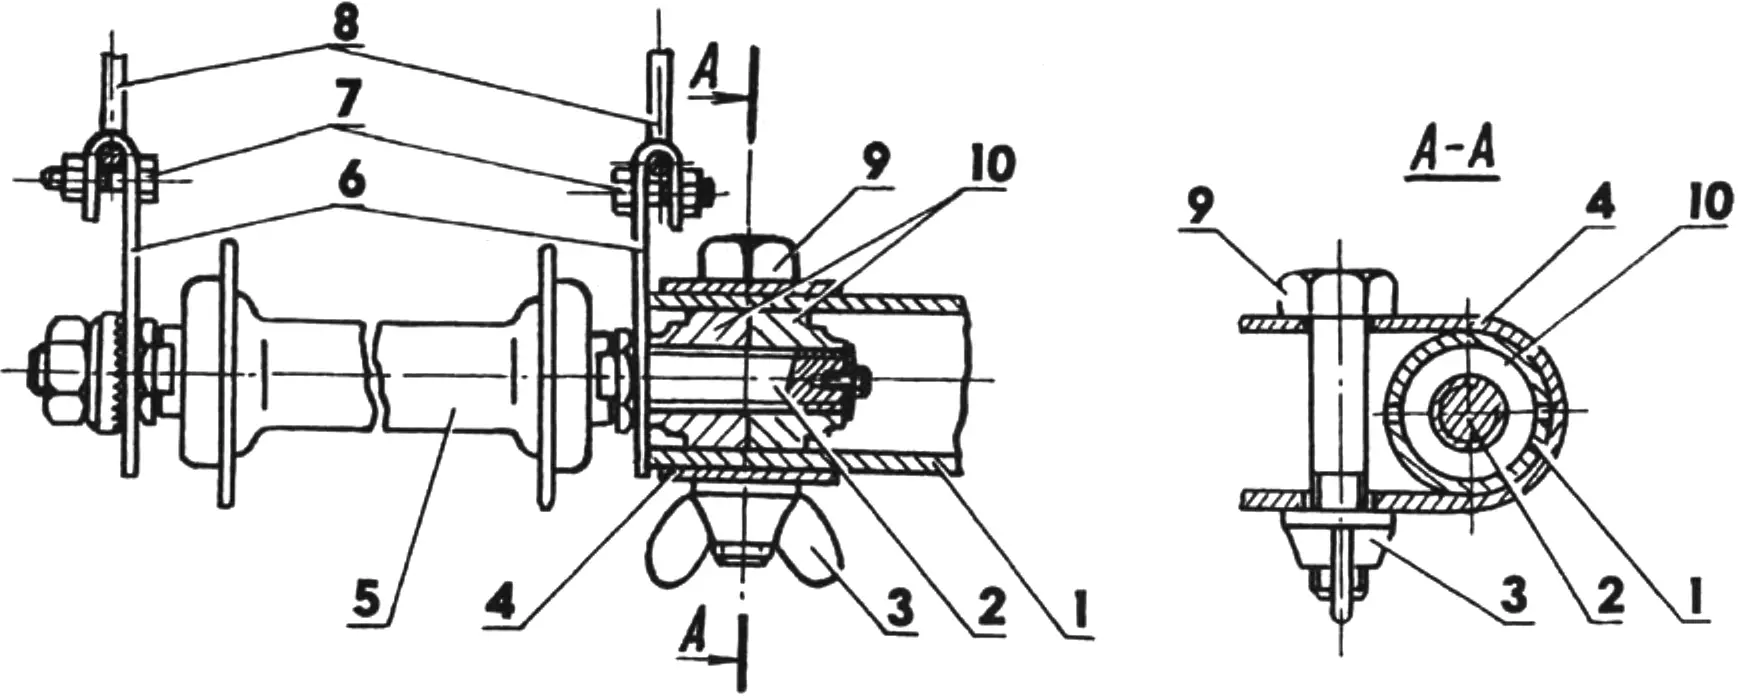
1 — crossmember; 2 — extended wheel axle; 3 — M6 wing nut; 4 — clamping bracket; 5 — wheel hub; 6 — fender stay mounting brackets (steel, sheet s2); 7 — M4 bolts for stay fastening (2 pcs.); 8 — stays (steel wire Ø5); 9 — M8 clamping bolt; 10 — adapter bushing (bearing cone, 2 pcs.)
Since the trailer is wider than the bicycle tractor, white reflectors are fitted on the fenders at the front and red ones at the rear.
For towing the trailer with a bicycle, a simple towing device is mounted on the latter. It can be made from the same tube as the frame, in the form of an arch. The tube ends are flattened, holes matching the rear-wheel axle diameter are drilled in them, and they are slipped onto that axle under the stock nuts. To hold the arch in position, it is connected to the luggage rack with wire stays.
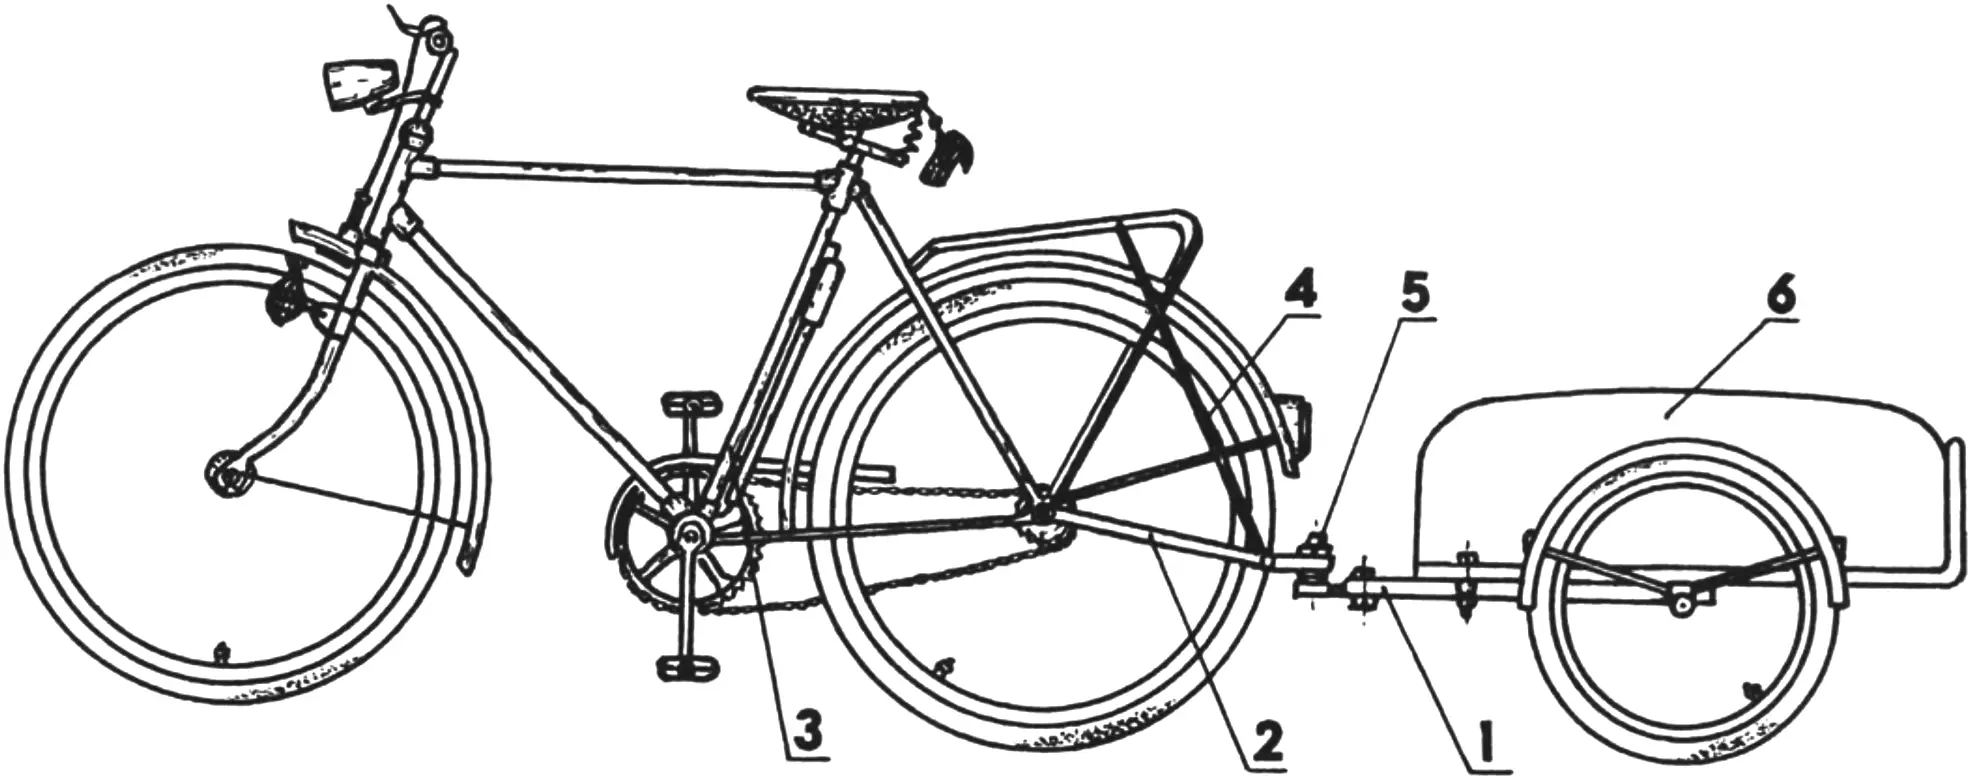
1 — trailer; 2 — towing arch; 3 — bicycle tractor; 4 — stay; 5 — hitch; 6 — cargo under a cover
If the arch ends cannot be fastened on the axle under the stock nuts, make the arch longer, bend it into an L shape, and clamp its ends to the seat-stay and chain-stay tubes of the bicycle with clamps or wire twists. In that case, stays are unnecessary.
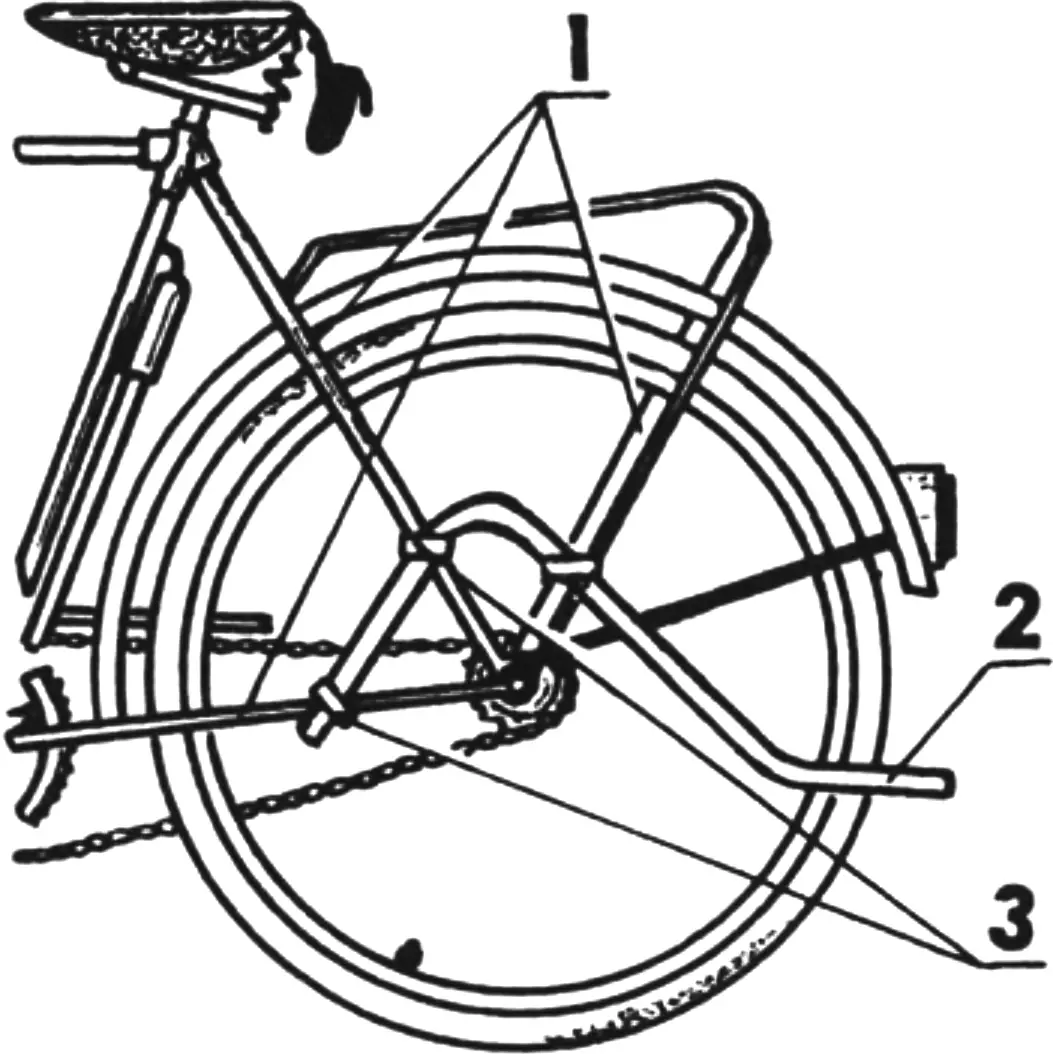
1 — bicycle tractor parts; 2 — towing arch; 3 — clamps (6 pcs.)
For riding on wet roads and to protect the cargo from rain, make a cover from waterproof, easy-to-wash nonwoven material.
Part dimensions are not given, because anyone who wants to repeat the design based on this idea will depend on their own options when choosing materials and parts.
«Modelist-Konstruktor» No. 8’2002
Recommend to read
 “NIKE KEYGEN” IN MINIATURE
With the introduction of new technical requirements to models-copies category S5 most preferred as a prototype steel two-stage rocket with large differences in diameters of the housings... SHOE COMBINE
Four boards and four brushes is all that is required in order to in the hall of the rural house or cottage has a very convenient fixture for shoes. Thanks to him, easy to remove even...
