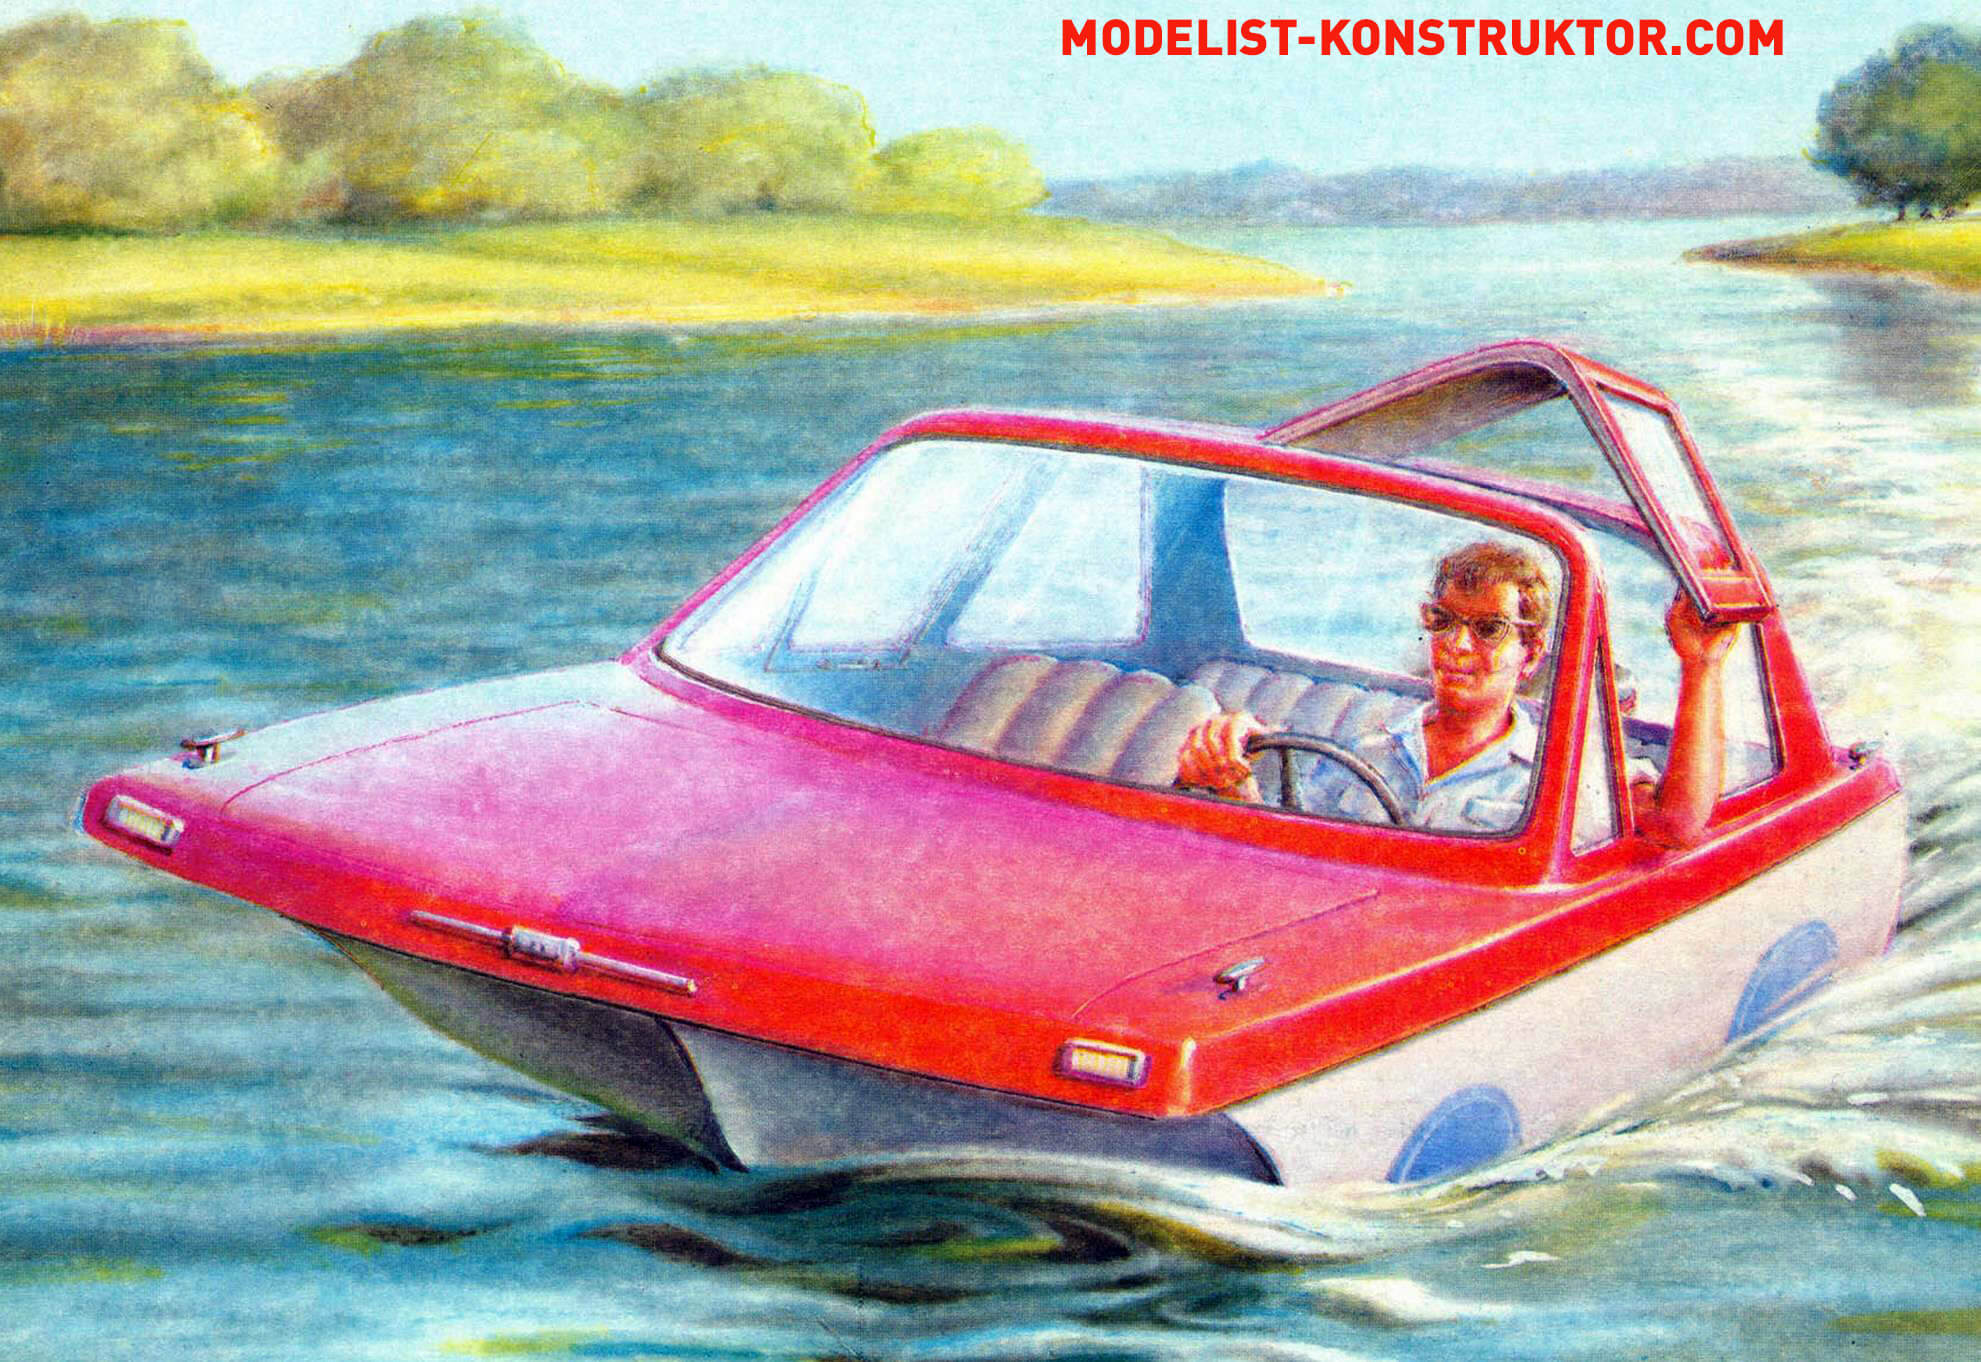
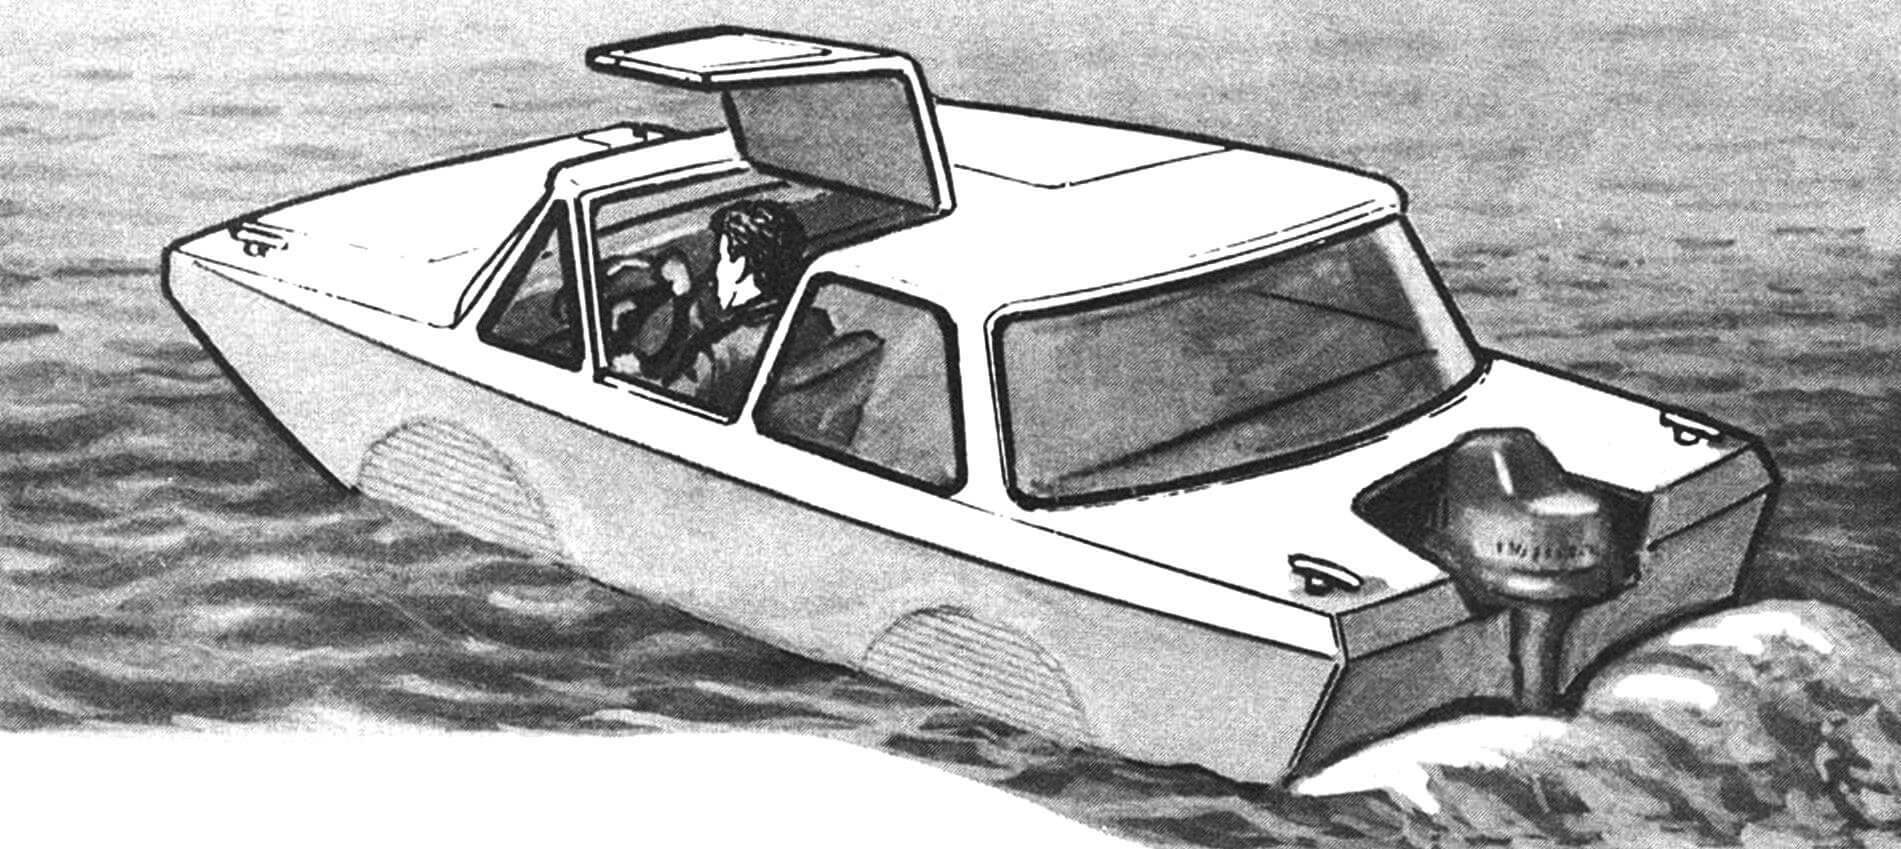
The boat, called “Quasi,” always caused a sensation on reservoirs. Initially, attention was drawn to its purely automotive appearance, emphasized by wheels painted on the sides. Upon closer acquaintance, the comfort in the cabin, good speed characteristics, maneuverability, and controllability were enchanting. And enthusiasts of handcrafting were more attracted to the technology of hull manufacturing, which was excellently suited for work in home workshops.
The quasi-car boat has very successful outlines, copied from widely spread boats like the “Boston whaleboat.” Experience shows that a boat of this shape easily reaches planing mode with a single “Vortex-30” type engine, and its stability is such that even two people standing on board are unable not only to overturn the vessel but even to significantly tilt it.
The “Quasi” has a closed cabin, practically indistinguishable from a car’s. Access to it is through two doors, opening for entry and exit, the sides and ceiling of the body.
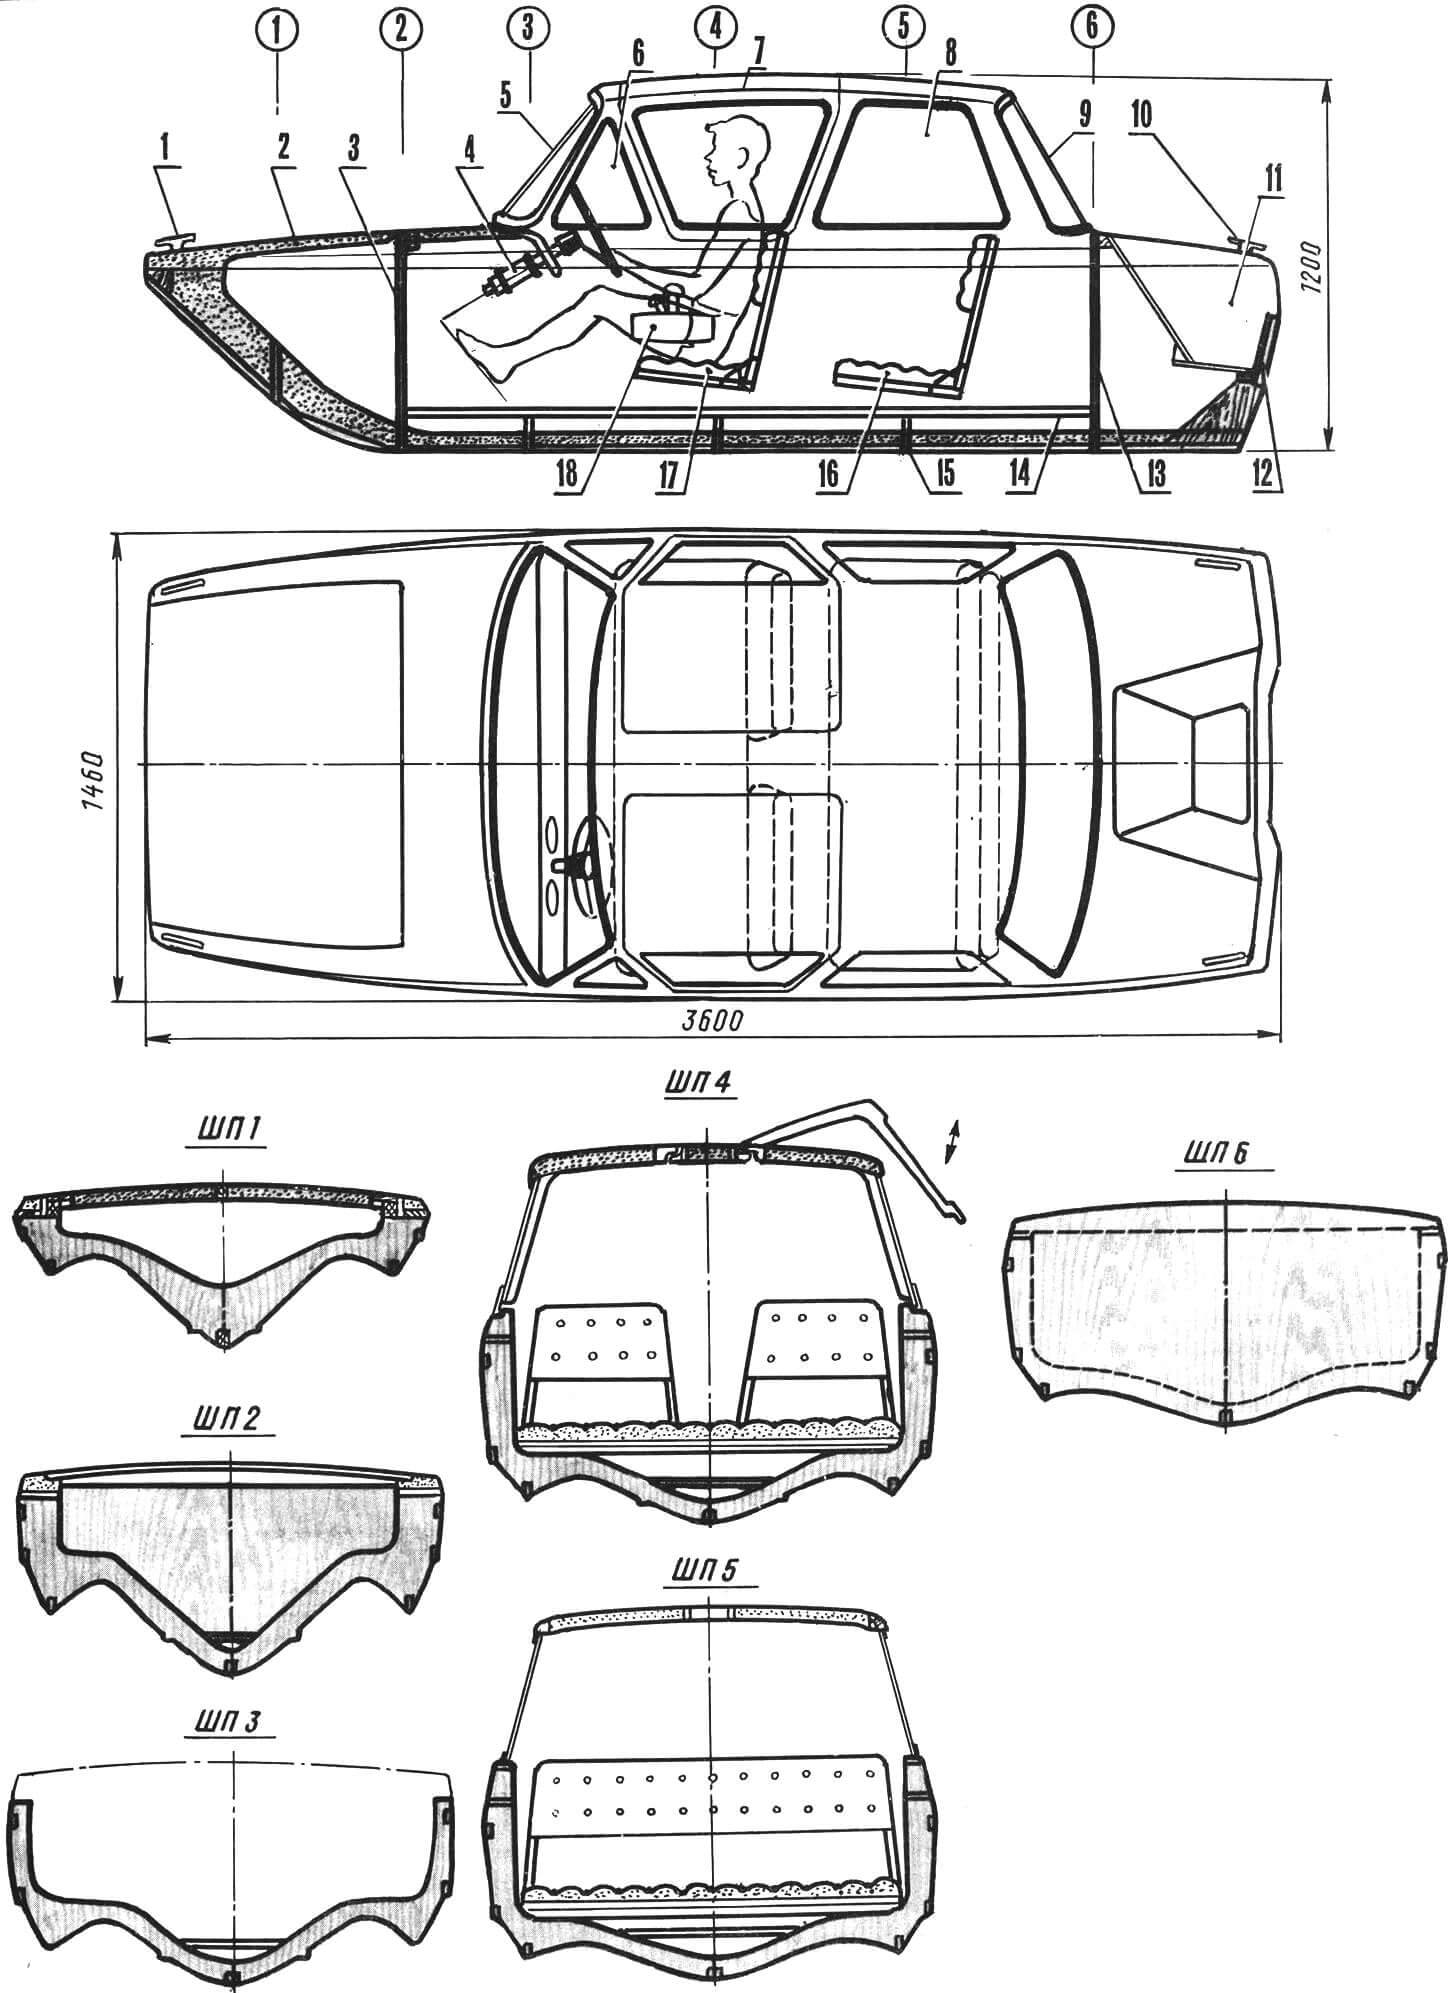
1 — mooring bow chock, 2 — front trunk lid, 3 — waterproof bulkhead-stringer, 4 — steering device, 5 — front windshield, 6 — side front windshield, 7 — lifting door, 8 — rear side window, 9 — rear window, 10 — mooring stern chock, 11 — under-motor niche box, 12 — transom board, 13 — rear waterproof bulkhead-stringer, 14 — keel, 15 — stringer, 16 — rear passenger seat, 17 — front seat, 18 — remote engine control panel.
The technology of hull manufacturing is not complicated. However, it requires a fairly large amount of polystyrene of any brand — including packaging or construction.
The boat’s hull has a technological joint — it consists of two parts, upper and lower. But in principle, it can be molded in one piece. It is best to start with the lower part. Stringers for it are cut from 12 mm plywood according to the theoretical drawing. The second and sixth stringers are closed: after cutting, they are veneered on both sides with 3-4 mm plywood, with the inner part filled with polystyrene.
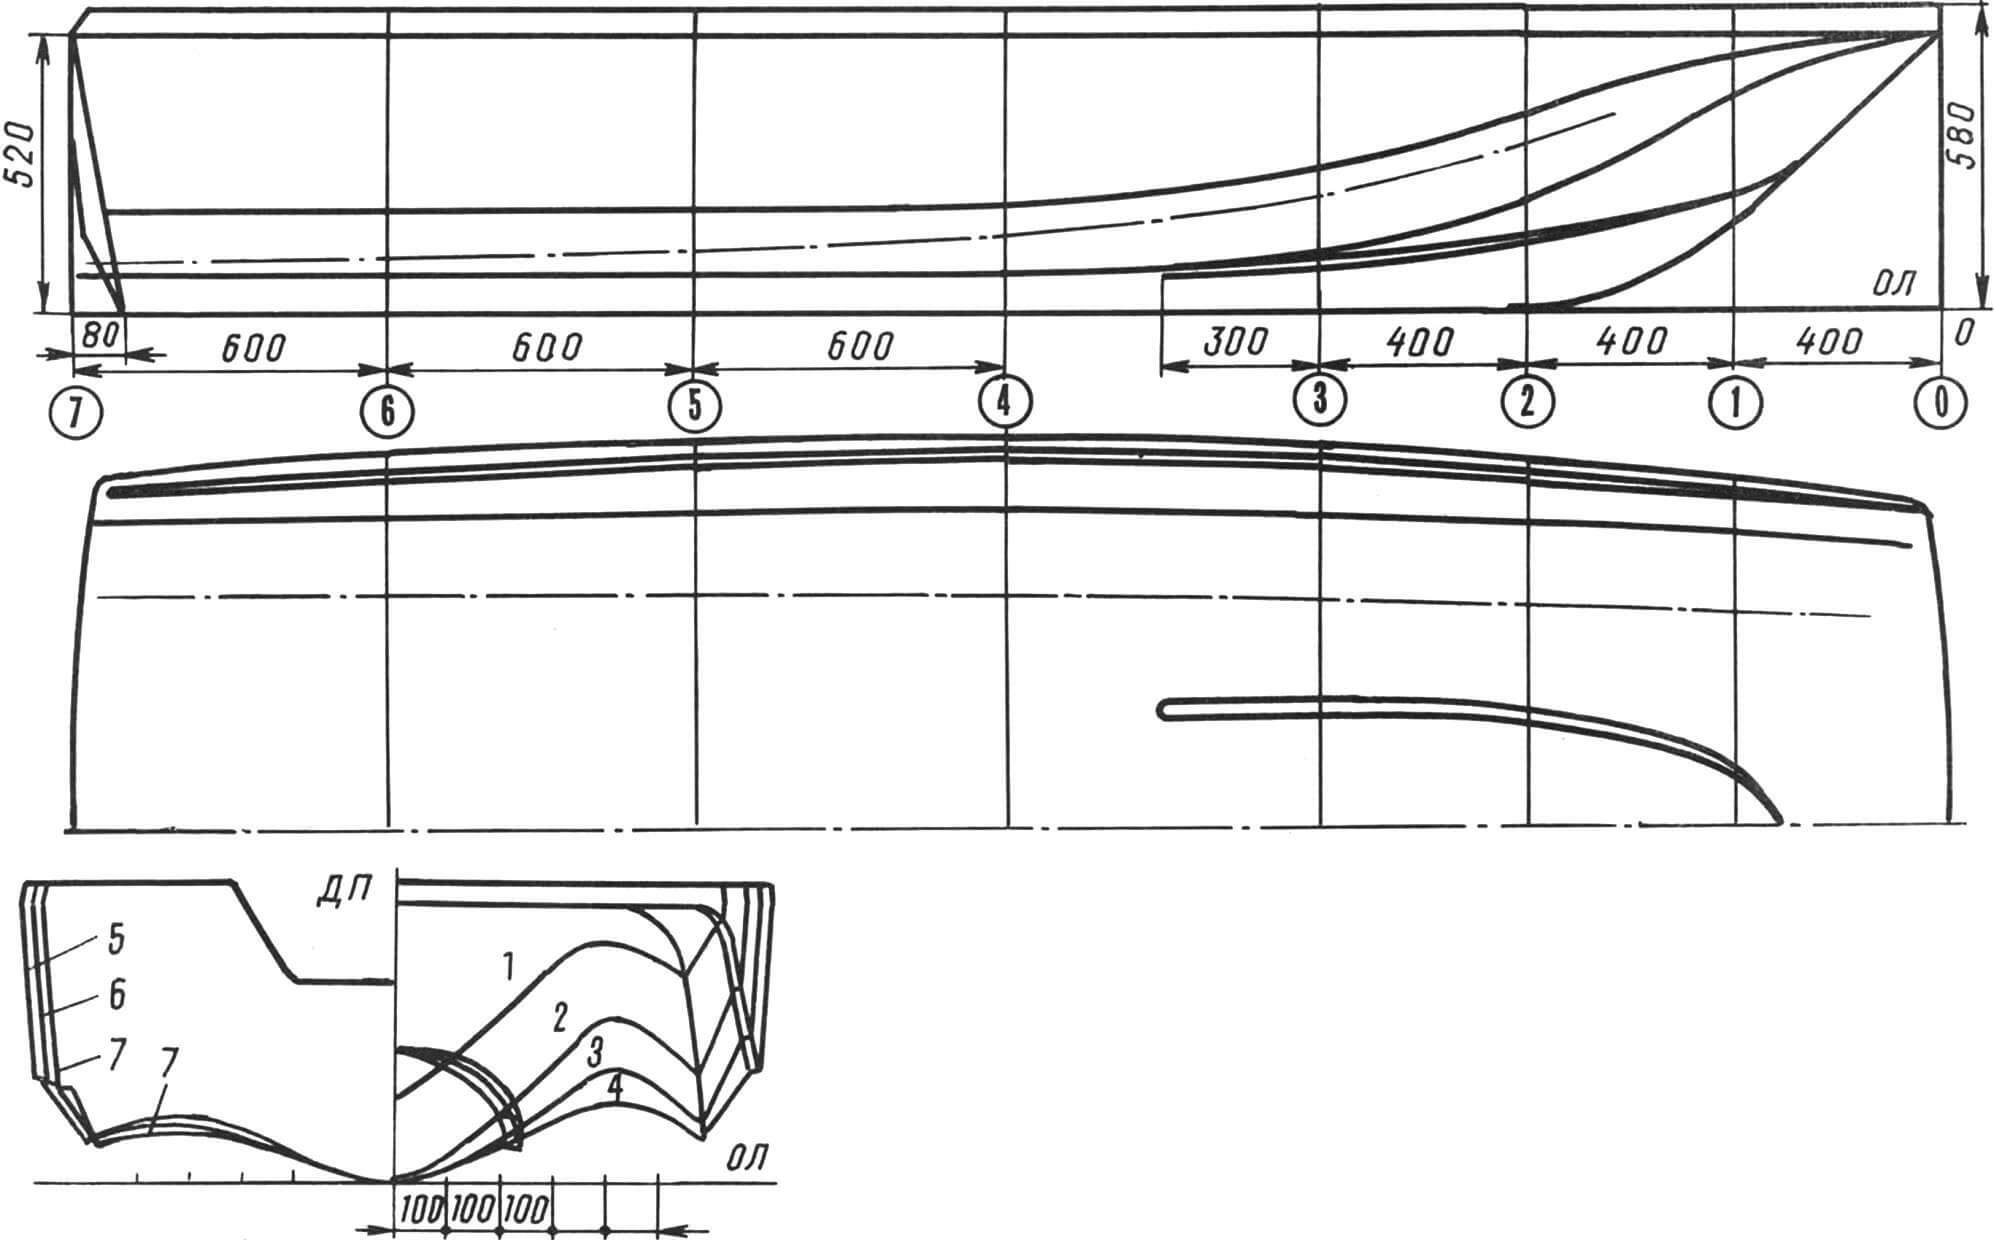
The frame is assembled upside down on a flat floor. To do this, DP and lines of stringer placement are drawn on it. Then stringers are fastened to the floor: from below — with wooden beams fixed with small nails, and from above — with several rails and soft contour wire. It is necessary to try to set the stringers as accurately as possible, for this, you should use, for example, a plumb line.
Now prepare the longitudinal set of the hull — rails with a section of 20X20 mm, 20X30 mm, and for the keels — 30X30 mm. The fitting of the rails is done in place; their attachment to the stringers is with epoxy glue; temporary fixation until the glue polymerizes — with contour wire. To obtain curved rails (in the bow part), use a simple stake in which a steamed rail can be fixed: drying, it will take the shape of this stake.
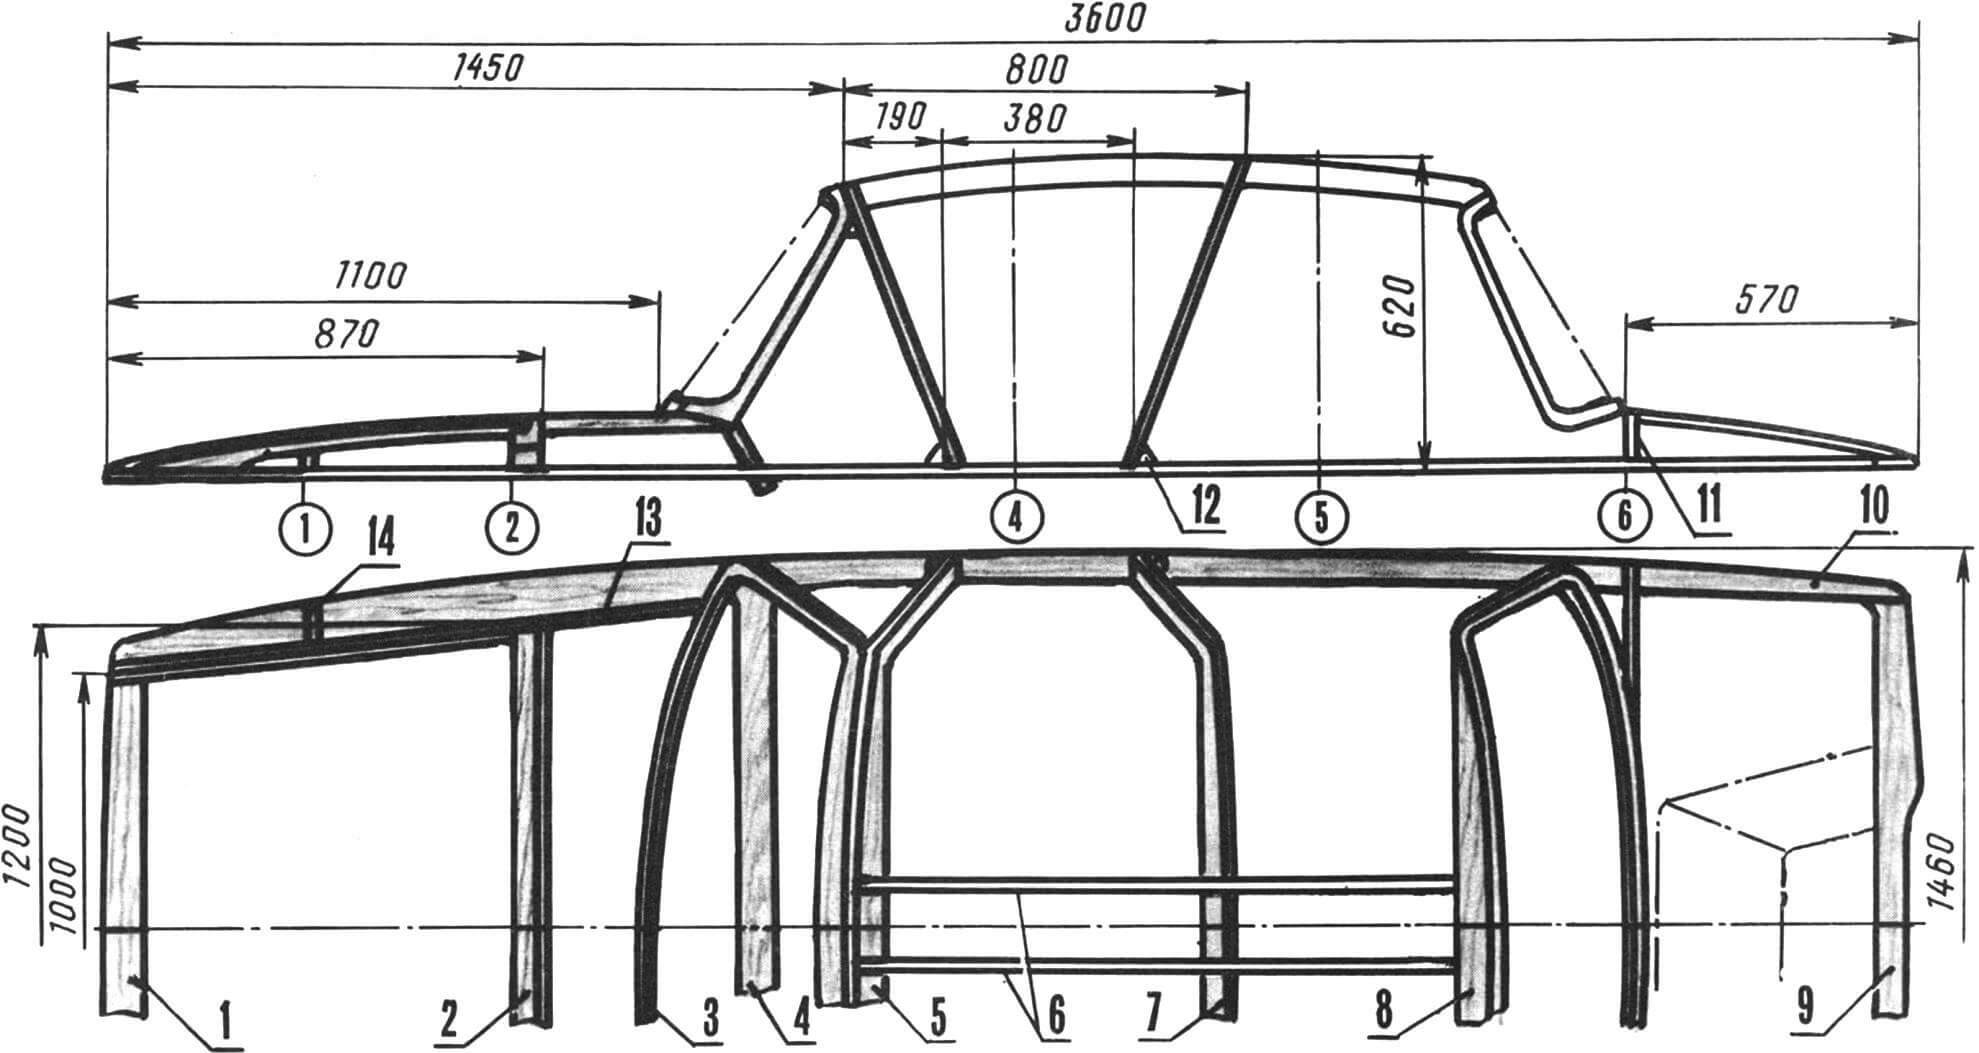
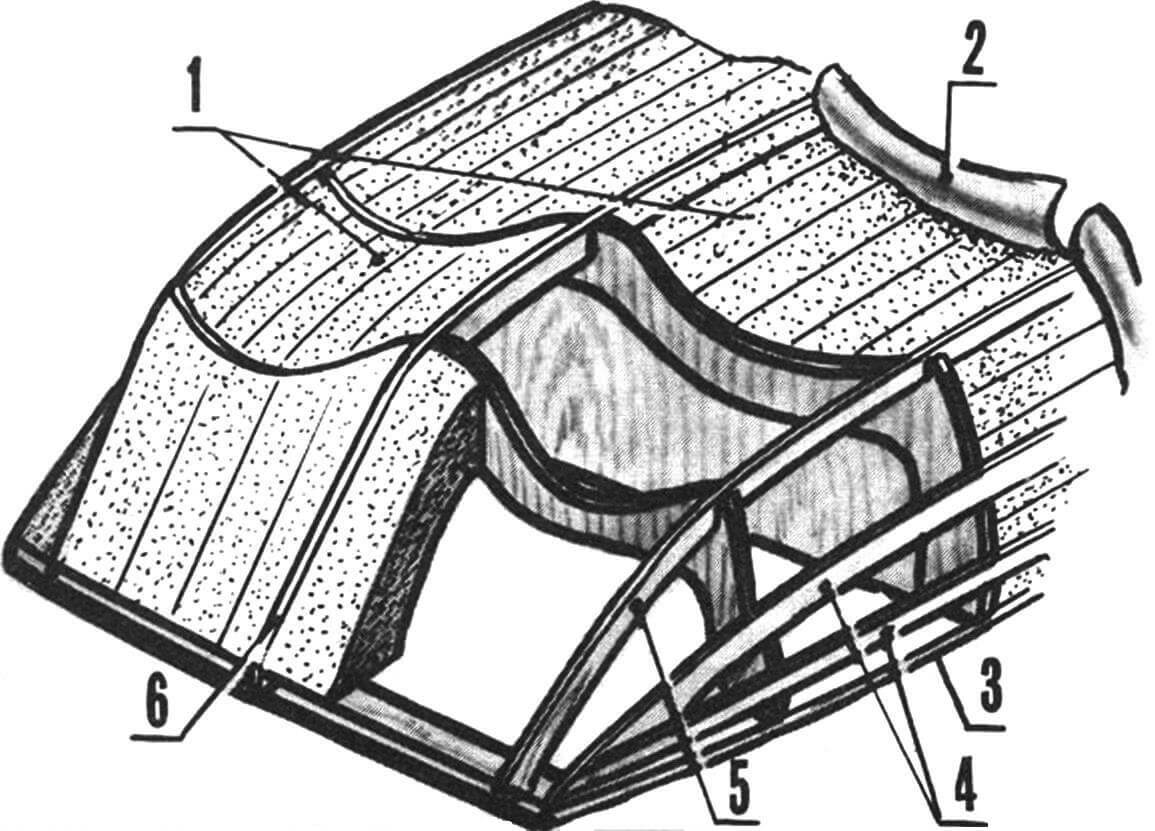
1, 9, 10 — elements of the frame base, 2 — crossbar, 3 — front windshield frame (plywood splice), 4 — instrument panel, 5, 7 — door box stringers (12 mm plywood), 6 — roof rafters, 8 — rear windshield frame, 11 — rear crossbar, 12 — knee, 13 — stringer forming the trunk lid box, 14 — reinforcing knee.
After aligning the frame, the spaces between the stringers are filled with polystyrene inserts. It is best to make a simple machine for cutting them, in which the working tool is a nichrome wire heated by current (powering this heating element — through a step-down transformer).
Do not rush to cover the entire hull with polystyrene at once. It is more convenient to carry out its cutting and preliminary processing sequentially. For example, glue two or three longitudinal belts of polystyrene, after the glue has cured, treat them from the outside and inside, orienting yourself to the elements of the longitudinal and transverse sets, and only then glue the next belts. The processing of blanks made of such a specific material as polystyrene should be carried out using sharpened to razor sharpness cutters of various shapes. You will need long flat knives similar to kitchen ones, boot-type chisels, long blades curved like a bow. Some types of polystyrene can also be processed with a plane, the iron of which is located at an angle of 45° to its longitudinal axis. Of course, the cutting edge of this tool must be sharpened as well as a razor.
After processing the hull and, if necessary, filling with putty, its outer surface is covered with fiberglass. For this, it is best to use fiberglass cloth (two or three layers) with subsequent finishing covering in two layers of satin weave fiberglass cloth. It is recommended to finally level the surface of the hull with epoxy putty before the final covering. It is worth laying several strips of fiberglass cloth along all three keels — these areas are particularly intensively worn during operation.
The final finishing of the hull can be significantly simplified by using the following method. After covering with fiberglass cloth, without waiting for the binder to cure, the hull is leveled with putty (also epoxy), and then a polyethylene film is applied over it. This should be done so that there are no air bubbles between it and the surface of the hull. After that, the hull is “smoothed” — by hands or rubber “smoothers” resembling large spatulas. After polymerization in this case, a practically finished polished hull is obtained, requiring only minimal processing. It is especially good to smooth out concave and saddle surfaces of the hull in this way, for example, the areas between the keels. The film is first stretched strongly in the longitudinal direction and fixed in the front and rear parts of the hull, and then to a lesser extent — in the transverse direction.
1 — polystyrene filling, 2 — fiberglass, 3 — elements of the frame base, 4 — longitudinal frame set, 5 — side keel, 6 — central keel.
The final finishing includes priming the hull, leveling with nitro putty, sanding, and applying a “reveal” layer of paint, which helps to identify surface defects.
The next stage of work is the manufacture of the upper part of the boat. It should be noted that its dimensions and shape largely depend on what ready-made components can be selected for decorating the cabin. In particular, on the size of the glass used. Of course, the use of organic glass will allow you to build a cabin of any size and shape, however, it is more rational to use car ones — for example, rear windows of cars (they are cheaper) of suitable brands. That is why the construction of the upper part of the hull should begin with the manufacture of frames for the front and rear windows. It is easiest to glue them from three-millimeter plywood. For this, strips of the required width are cut, and a frame is laid out of them directly along the glass. The strips are clamped to the glass with clamps resembling laundry clips or small clamps. The total thickness of the glue-up is about 20 mm.
The assembly of the upper part of the hull is carried out on a frame made of 15 mm thick slats. Of course, its contour must repeat the shape in plan of the boat itself. To begin with, frames of the front and rear windows are installed, two inclined stringers forming the door frame box (made of 12 mm plywood), and two longitudinal roof beams (rails with a thickness of 20 mm). After checking the correctness of the installation of these elements, they are connected with epoxy resin and screws. Frames of the front and rear side windows are also glued from plywood.
The doors are assembled from plywood and polystyrene. The frame of each consists of two stringers made of 12 mm plywood and three crossbars — pine bars with a thickness of 20-25 mm. Diagonal elements are glued to the upper part of each frame for rigidity. The space between the elements is filled with polystyrene, its surface inside and outside is leveled and covered with fiberglass cloth.
The surface of the upper part of the hull is formed exactly the same way as its lower part: the space between the stringers is filled with polystyrene blocks, processed and covered with fabric in the same way.

In the rear part of the hull, a motor well box is glued in. It can be made by shaping fiberglass over a blank, however, it is easier to cut out its elements from hardboard or plywood, “sew” them with contour wire, and glue the joint areas with strips of fiberglass cloth. The inner surface of the box is also covered with it.
Before joining the upper and lower parts of the hull, they should be processed from the inside and covered with two layers of fiberglass cloth. The connection is made with glue and screws, with subsequent laying of strips of fiberglass cloth on the outside and inside.
The cover of the front luggage compartment and the doors are hung using regular hinges used for hanging frames. A spring-loaded latch is used to fix the doors in the open position. Both the doors and the trunk lid have rubber seals to prevent water from entering the hull.
In the boat’s cabin, there are two semi-soft sofas designed for the driver and three passengers. The front sofa has separate backs, hinged so that both can fold forward, allowing passengers sitting on the rear sofa to exit the cabin. The backrest of the rear seat is single, it also folds forward, providing access to the rear trunk.
The seat and back frames are made of wooden slats covered with 4 mm plywood. The cushions are made of foam and artificial leather.
The remote control is standard, one that can be purchased at sports stores. It consists of a “wheel”, cable drive, and engine control unit.
The cabin is lined with artificial leather from the inside, equipped with a ceiling lamp. The hull is painted with air-dried alkyd automotive enamels.
On the sides of the “Quasi”, dark gray or black paint depicts “wheel arches” and “wheels”, at the rear — automotive “taillights”, at the front — “headlights” and a “radiator grille”. Of course, you can do without these details, however, a certain amount of humor in the design of a quasi-automobile will not hurt at all.
On the deck — at the front and rear — four cleats are attached for mooring lines.
If the boat is intended for night navigation, it is necessary to install navigation lights on it. It will also be useful to have a searchlight mounted on the roof.
(Based on materials from foreign publications)
Recommend to read
 THE KEY IS IN THE IGNITION
When working with a power drill often lost the key to her patron. He will always be on hand if you tape it with electrical tape to the cord at a distance of 0.5...0.6 m from the arm. ... HILLER-“PODRUCHNIK”
Tell us about your garden "helper" - a self-propelled motorcyce-cultivator with gauge device the Main purpose of this soil-cultivating Assembly is in the care of plantings of potatoes:...
