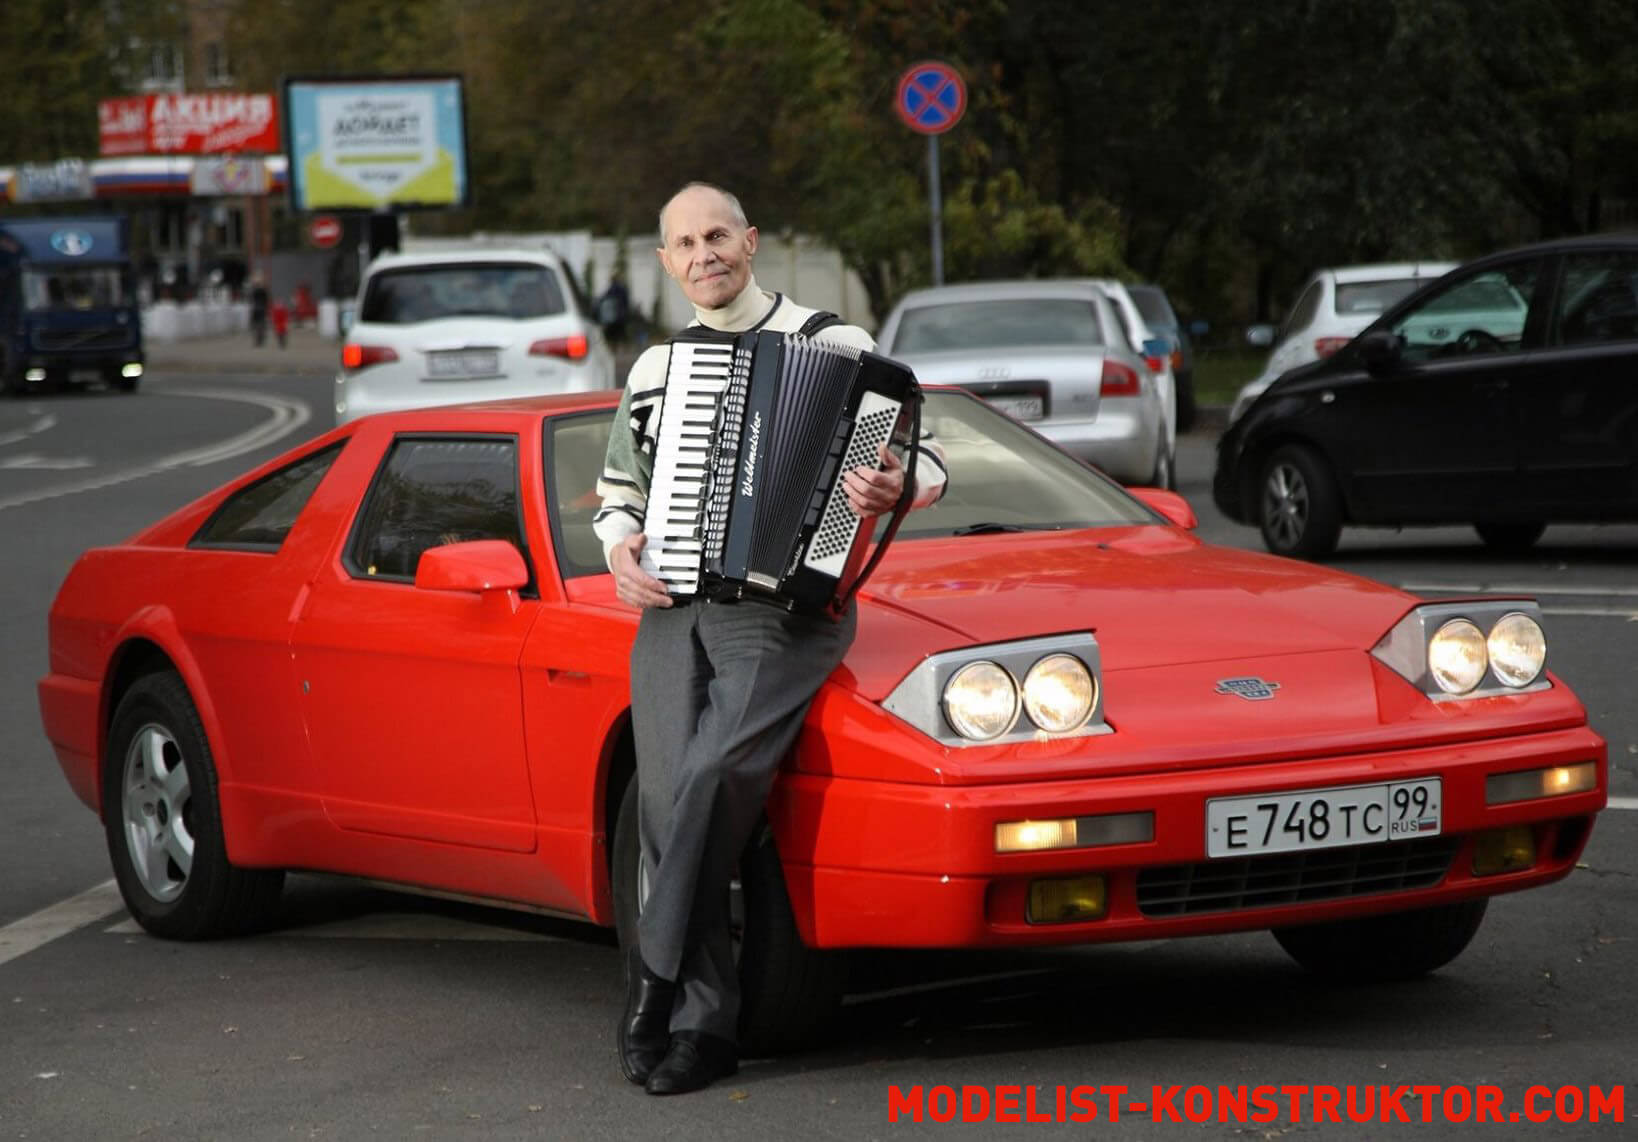
Before we start talking about the machine, let’s introduce its creator and author of the article, Yuri Ivanovich Algebraistov. His entire adult life is connected with technology, and most of it with home-made automobile construction – “Samavto”, as this movement is popularly called. He and his car in many ways personify this movement and have become its legend, classic and pride.
It must be admitted that most car enthusiasts have a generally one-sided relationship with cars: some people prefer to turn the nuts, while others love to turn the steering wheel. For Yuri Ivanovich, both of these activities are equally pleasant, and therefore it turns out that he gets double pleasure from communicating with the car.
Yuri Ivanovich’s love for technology dates back to his childhood, which occurred during the harsh war and difficult post-war years. There were few cars in the small town of Sasovo in the Ryazan region, where he was born, and if one appeared in sight, Yuri and his friends ran towards it as fast as they could. And when the driver allowed me to sit in the car, and even behind the steering wheel, there was enough joy and impressions for more than one day. Yuri loved even more to help the driver repair the car. At that time, the elder brother Stanislav, and, following his example, Yuri, were, in fact, raving about aviation. While studying at school, they built model airplanes together in a physics group. And who to become: a designer or a pilot – they didn’t even think about it – they thought that it was the same thing: whoever made the plane, flies it.

Over time (this was already in the 1970s) this happened. Only the brothers made not an airplane, but a sports car. Then they began to make a second similar machine. But now the functions have been divided. Yuri was directly involved in production (he was better at it, because he was more persistent in achieving the goal, more careful in his work), Stanislav – in material support – he had more opportunities for this.
Yuri Ivanovich still drives this (second) car. Although, generally speaking, only the layout remained unchanged from the previous design. In recent years, the car has been radically redesigned, and now it looks more respectable than sporty. But, despite its presentable appearance, the car is still a workhorse and fully serves its creator. The speedometer now shows about 500 thousand km.
My brother Stanislav and I had a great desire to have a car. But at that time (at the end of the 1960s), in order to get it, ordinary people, in addition to a considerable amount of money, had to stand in line for many years. When we heard rumors that some craftsmen were making cars with their own hands, we also decided to do it!

We learned how to tinker in childhood, and we were also, one might say, familiar with technology, at least we knew the structure of a car quite well – my brother was already a civil aviation pilot, and I worked as a driver. But in practice it turned out: knowing a car and designing it, as they say, are two big differences. Even deciding on the type of machine planned for production was not easy. My brother and I began looking for home-made workers to consult and learn from experience. We were lucky. We met with twin brothers Anatoly and Vladimir Shcherbinin, graphic artists by profession and excellent designers by vocation. By that time they had already made a car with a fiberglass body, the shape of which my brother and I really liked. But the Shcherbinins offered to develop a design for us for another car and did so.
Work on the new car began back in 1969 with sketches, determining its size and shape. This part of the work was undertaken by the Shcherbinin brothers. But the body type was chosen together: a sports coupe, two-door, with 2×2 seats (two full-size in front and two children in the back). Stanislav and I were involved in the technical part. For a long time we could not decide on the power unit. Motorcycle engines or “Zaporozhye” engines, which were allowed at that time by technical conditions for use in home-made vehicles, did not fit into the concept of the car that we wanted to build at all. Even a small car engine was unsuitable for it. In the end, they decided, at their own peril and risk, to use the engine from the GAZ-24 Volga car as the base power unit. All these searches took a whole year.

To accommodate the Volga power unit and transmission, the Shcherbinins finalized the car’s sketches and adjusted the dimensions. Professionals from the Moscow Small Car Plant helped us calculate and design the frame.
The frame chosen is spatial, peripheral type (expanded in the middle part). But in the horizontal and vertical planes, only the side members, both front and rear, are oriented (curved). This was necessary to lower the center of gravity of the vehicle and its overall height. As a result, the ground clearance (clearance) turned out to be the same as that of the Zhiguli, and the overall height of the car was even 146 mm less.
The front spars are used from the GAZ-24 Volga, only their front ends are further elongated. The rear spars and sills are welded from steel channels into box-section parts, while the sills are simple, straight, and the spars have a rather complex shaped shape – it was obtained by welding each spar from sections. To increase the frame’s resistance to torsion, its transverse elements – traverses – are made of round one-and-a-half-inch pipes. The remaining connecting parts are made of rectangular steel pipes.
Thus, the frame of the car is not much different from the strength set of the bottom of a conventional passenger car with a monocoque body, only its elements are connected not by the floor, but by auxiliary parts: jumpers, brackets, amplifiers.
The frame was welded in our “workshop” – a semi-basement room of a house intended for demolition. Then she was transported and raised to the seventh floor, to the Shcherbinins’ workshop. Wheels, axles, suspensions (from GAZ-24) were also brought there and the chassis was assembled.


at the top – “YUNA” in its original version; below is the car of the Shcherbinin brothers
The Shcherbinin brothers began developing a full-size model of the body. It took another year. But, as time has shown, such a long and difficult search for the form was not in vain – the subsequently manufactured car remained modern for more than two decades. And at that time, this model was highly appreciated by other home-made people; five cars were made based on it, including by the Shcherbinin brothers. And this is already a series, albeit small for industrial production, but significant for self-production.
Using the outer surfaces of the master model (mock-up), fiberglass matrices were made for individual body elements. The matrices were reinforced with hardboard sheets (fibreboards). Small voids between the fiberglass matrices and the hardboard slabs were previously filled with sculpted plasticine. The matrix was reinforced with a frame made of wooden blocks. After that we started gluing the car body. The material for it, as well as for the matrix, was fiberglass with an epoxy binder. The thickness of the body walls is from 3 to 6 mm.

1 — front traverse (pipe 1 1/2″); 2 — front spar (from a GAZ-24 car, modified, 2 pcs.); 3 — side jumper (pipe 60×30, 2 pcs.); 4 — threshold (pipe 100×60, 2 pcs.); 5 — transverse floor reinforcement (pipe 60×30, 2 pcs.); 6 — jumper (pipe 35×25); 7 — longitudinal floor reinforcement (pipe 60×30, 2 pcs.); 8 — middle traverse (pipe 1 1/2″); 9 — central beam (pipe 60×30); 10 — rear spar (welded profile, 2 pcs.); 11 — rear traverse (pipe 1 1/2″); 12 — rear beam (channel No. 10)
In the middle part of the frame, from threshold to threshold, the floor is about 5 mm thick, with a convex tunnel for the gearbox and transmission, glued from fiberglass on epoxy binder ED-5. The trunk floor, also made of fiberglass and laid on the rear side members, is a little thinner – about 4 mm.
After manufacturing the fiberglass shell of the body, to strengthen it, a frame was installed inside, welded from steel pipes of rectangular (35×25 mm) and square (25×25 mm) sections. Only the longitudinal roof beams are made from half-inch pipe. The frame elements were glued to the body panels with strips of fiberglass using epoxy glue.

1 — steering wheel (sports); 2 — control pedals; 3 — wheel (4 pcs.); 4 – battery; 5 – radiator; 6 – engine; 7 — front axle; 8 — steering linkage; 9 — clutch basket; 10 — gearbox; 11 – frame; 12 — cardan shaft; 13 — rear axle; 14 — muffler (from a fire extinguisher); 15 — gas tank (homemade from carbon fabric)
The hood and trunk lid were also reinforced with steel lattice elements (also glued with fiberglass with epoxy glue).

On the outer surfaces of the body elements, all the chips were carefully puttied and all the nicks were sanded off, and then their (and at the same time the inner) surfaces were primed and painted. Since drying was done in air, they were painted with the appropriate nitro enamel.

1 — rib of the rear part of the front wing (pipe 25×25, 2 pcs.); 2 — gusset (steel, sheet s4, 2 pcs.); 3 — front pillar thrust bearing (steel, sheet s4, 2 pcs.); 4 — front pillar (pipe 60×30, 2 pcs.); 5 — center pillar thrust bearing (steel, sheet s4, 2 pcs.); 6 — middle rack (pipe 35×25, 4 pcs.); 7 — connection of the middle racks (pipe 20×20, 2 pcs.); 8 — rear pillar thrust bearing (steel, sheet s4, 2 pcs.); 9 — rear pillar (pipe 60×30, 2 pcs.); 10 — lower window crossbar (angle 50×50); 11 — window stand (pipe 35×25, 2 pcs.); 12 — upper window crossbar (pipe 35×25); 13 — longitudinal jumper (pipe 25×25, 2 pcs.); 14 — roof beam (1″ pipe, 2 pcs.); 15 — transverse jumper (pipe 25×25, 2 pcs.); 16 — rib of the upper rack (pipe 25×25, 2 pcs.); 17 — rear wing rib (pipe 25×25, 2 pcs.); 18 — trunk cross member
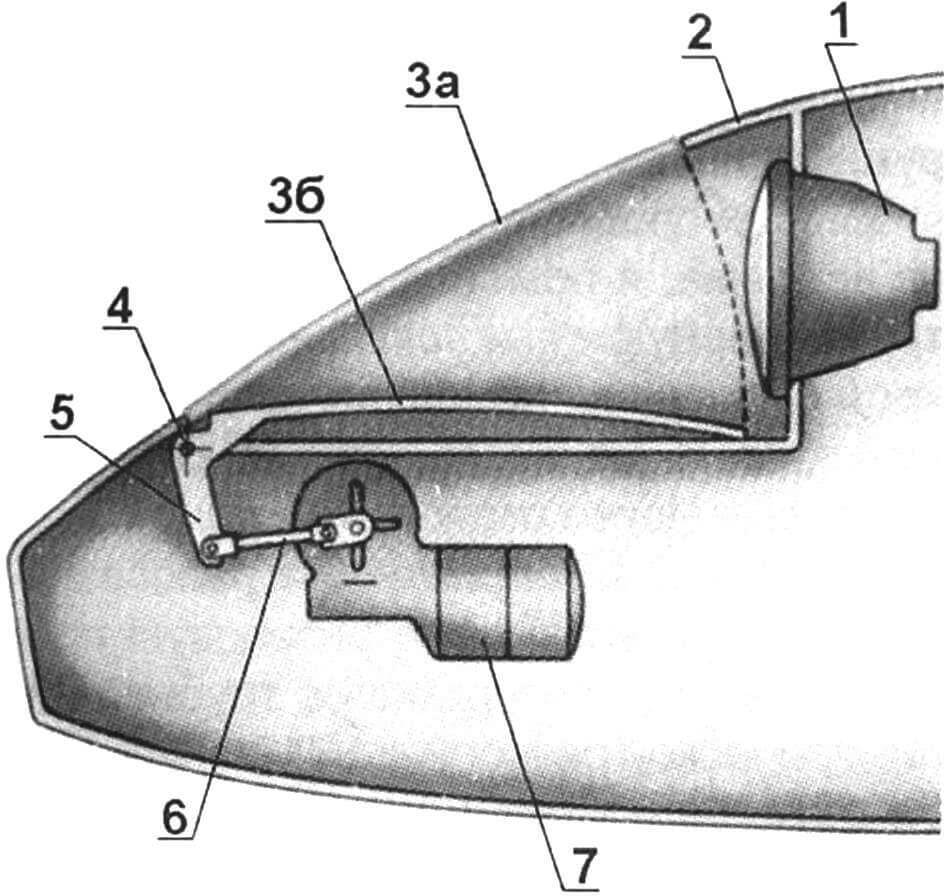
The car body had several characteristic features. For example, the hood was made as one piece with the front parts of the wings. Raising the hood provided access not only to the power unit, but also to the main components of the front suspension. The headlights, hidden quite deep under the hood, were covered with shields during the daytime, which also reduced drag.

Decorative upper ribs give the rear end a hatchback-like appearance (with a sloping backrest), although it is designed like a sedan (with a rather steeply mounted glass and a horizontal trunk lid).
Doors – without external handles. To open them, only small recesses are made in the body pillars – for gripping the side edge of the door with your fingers.

After the car was manufactured, in the summer of 1977 we set off with other amateur car designers on the all-Union race Moscow – Sevastopol. The car passed road tests, as well as subsequent runs. The only thing missing from the car was state license plates. And the main obstacle to obtaining them was the Volga engine. But we also traveled without license plates. Inevitable meetings with traffic police inspectors, due to the fact that the car’s design stood out sharply in the flow of vehicles, always followed the same scenario: a careful inspection and… favorable reviews; then they were released in peace. Still, for the most part, the employees of this “punishing” body are technically knowledgeable and simply friendly people. They also suggested how to legalize the car. On their advice, we submitted the car for testing at NAMI (Research Automobile and Automotive Engine Institute) – it passed them; a positive conclusion was issued, and according to it the traffic police received state registration plates.

1 — direction indicator (2 pcs.); 2 — radiator grille (2 pcs.); 3 — fog lamp (2 pcs.); 4 — headlight shield (2 pcs.); 5 — block of high and low beam headlights (from VAZ-2106, 2 pcs.); 6 — turn signal repeater (2 pcs.); 7 — spoiler; 8 – battery; 9 — front axle; 10 — wheel (4 pcs.); 11 – radiator; 12 — electronic unit; 13 — windshield tank; 14 — air filter; 15 — engine; 16 — hood with front parts of the wings; 17 — windshield wiper; 18 — rear view mirror (2 pcs.); 19 — rear seat; 20 — front seat (2 pcs.); 21 — body; 22 — trunk lid; 23 — door (2 pcs.); 24 — rear axle; 25 — fuel tank; 26 — fuel tank filler flap; 27 – rear bumper
Finally, all the formalities with the car were over, it was registered in Stanislav’s name. Now we decided to start making the next car – for me.
They decided to leave the body shape the same, especially since the matrices of the body parts were preserved. And although seven years have passed since the design of the car was developed, its appearance is not at all outdated, and therefore there was no need to change anything about it, much less radically. They only increased the distance between the outer pillars to install wider glass here for better visibility through the central rear-view mirror.

They also decided to leave the chassis, power unit and transmission unchanged – the industry still did not offer anything better, and we saw foreign cars only in magazines.
The manufacturing process was repeated: although the design stage was now excluded from it, it took no less time – I wanted to make a better car than the first, and therefore all body parts were processed especially carefully. In addition, now my brother and I have divided responsibilities: Stanislav was involved in material support, and I was directly involved in the manufacture of the structure. My wife provided great support (both moral and material) (she even had to work overtime). Therefore, her name is rightfully included in the name of the machine “YUNA”, made up of the first letters of our first and last names: Yuri and Natalya Algebraistov.

I made the front adjustable seats of an anatomical type, also glued from fiberglass with epoxy glue. The rear seats are molded as one panel along with the rear wall (between the passenger compartment and the trunk). Then I put foam rubber on all the seats and covered them with leatherette.
The instrument panels from other cars did not fit well with the interior of the cabin, and therefore I glued it myself, placing instruments and knobs on it in a way that was convenient for me.
A few years later (at the end of spring 1982), the second car was ready and, like the first, almost immediately went to the All-Union automobile rally, which became its first test. “YUNA” passed it successfully.

Despite the fact that the path to legalizing the car was already known, this procedure again took about two years. And again, the traffic police helped me from people who knew a lot about technology and were able to appreciate my work and my car.
Actually, her fate is quite happy. She later participated in several Samavto car rallies, including the international one – Moscow – Prague – Moscow in 1988. A foreign press wrote about it, she starred in the film “Testers”, at exhibitions of homemade cars invariably received prizes and awards.

During the existence of “Yuna”, of course, was improved. But this was more related to increasing comfort and security. Since the design of the car in its type was predicted for many years to come, the body of the body, so that the car looked more modern, for a long time, in general, was not required, and corrosion of fiberglass was simply not tough.
But years, and automobile fashion began to change rapidly. Or maybe my tastes began to change? Somewhere in the mid-1990s began to notice that I still like not everything in the appearance of the car; And he began to think about what and how could be corrected. The nasal part and a body kit were subjected to the most significant alteration in the “exterior” of the machine: rather voluminous front and rear bums and lining on the thresholds.

1 – headlight; 2 – hood; 3a – a protective shield in a closed position; 3b – a protective shield in an open position; 4 – axis of turning the shield; 5 – lever; 6 – traction; 7 – electric motor
He took up the pencil and paper (now himself) and began to paint “fresh” features to the contours of the car. The difficulty was that the new lines of the front and back parts of the car had to be linked with the previous central part of the body, the shape of which I did not want to change. In the end, he received the contours that he wanted, and began to make boobs (master models) and matrices. There were a lot of details on them, of which there were many: the front and rear bumpers, a spoiler and apron, hood, front parts of the wings, thresholds, rear signal lights and fairings of lateral mirrors.
To attach the front bumper and spoiler in the new version, it had to be lengthened by another half a meter of the spaces. He connected the front parts of the wings to the rear parts according to the old connector, fired with self -tapping screws and additionally glued fiberglass on an epoxy jet. The rear bumper and apron attached to the frame without any of its alterations.
The rear -view mirrors mounted panoramic, in large fairings, which allowed to install not only electric heating inside, but also a servo drive of the position of the mirrors.
The hood was executed separately from the wings; He began to open forward now, as usual in classic “Lada”. Since its shape has become more smooth, and not “diving”, the blocks of paired headlights (separately far and near light) made advanced. The servo drives remained the same that they had previously lifted the shields.
The Volgovsky alloy 14-inch old wheels replaced with new 15-inch, and diagonal chamber tires-with radial unwell broad-profile. Since the “departure” of the knitting needles at the new wheels is not so large, “pancakes” —theralumine distance discs had to be installed between them and brake drums. Although the track of the wheels remained the same, thanks to the wide -profile tires, the stability of the car in corners increased significantly.

After the modernization of the exterior, I also began updating the salon. Friends for one of the birthdays presented branded seats – comfortable, adjustable, layered. Of course, they installed them in return for the former. The rear seats have left the old ones so far; Although they are small, but comfortable. But the dashboard replaced again with a home -made, but updated, with an elongated central console for radio equipment.
The steering wheel also made a new, with a large red key of the sound signal – to the color of the car.

On the ceiling, in the interval between the heads of the driver and the passenger, he arranged two flat pencil cases dropping at 20 – 25 degrees: it is convenient to store documents and other papers in them, which should always be at hand. The panels of the doors upholstery were also excited with pockets and handles-and-knobs “for itself”.
Modernization lasted more than one year. But since he did everything in parts and stages, the car did not linger for a long time in the garage, but still drove, served.
Even more thorough modernization (or rather, complete replacement) was subjected to a power unit. The Volgovsky 402nd engine had practically exhausted his resource by that time. And here, on occasion, relatively inexpensive, I was able to purchase a six-cylinder in a row 2.8-liter engine with 180 hp. and gearbox from the BMW 528th model. The new power unit is quite successfully (albeit tightly) in the old motor niche. Only the brackets of the engine mount on the spar.

The new engine significantly improved the dynamic indicators of the machine: the maximum speed exceeded 200 km/h, and acceleration to 100 km/h decreased to eight and a half seconds. To tame such a “obstinate disposition” of the motor on the front wheels, remoded drum brakes into disk. Over time, I want to make the same replacement on the rear wheels. In the meantime, I just reasonably use the dynamic qualities of the car.
As a result of alterations, the car became, in general, another. Even her body from a purely sports type was transformed into a more calm – tourist one. But I tried to preserve the Shcherbinsky design style in it. And, it seems to me, it succeeded – the car remained recognizable.

From the editor
Talking about the car, the author does not use words expressing an excellent degree. However, the quality of the performance of its homemade nodes and details deserves them. The machine is made at the level at which famous foreign designer studies and tuning companies make single copies of cars for rich customers.
To call the car by a homemade man simply does not turn the tongue. It is better to say about her – handmade, performed by a talented craftsman.
In the article, the author noted that the car has a happy fate. It remains only to add to this: because she has a wonderful creator and owner. Popures of the well -known folk wisdom, we can say – the car is red as the owner!
Yu. Algebraistov


