IN THE DESERT — SAILING

IN THE DESERT — UNDER SAILWheeled Buer, beach sailing, sand yacht, metromobile… All these terms refer to the same Tina of vehicles using the movement force of the wind. Designs of such “petroholod” — a great many, from year to year are added up — three wheels and four, with Latin sail and with the Bermuda arms, hard planes, reminiscent of an aircraft wing, and even with a horizontally positioned fan-like impeller anemometer.

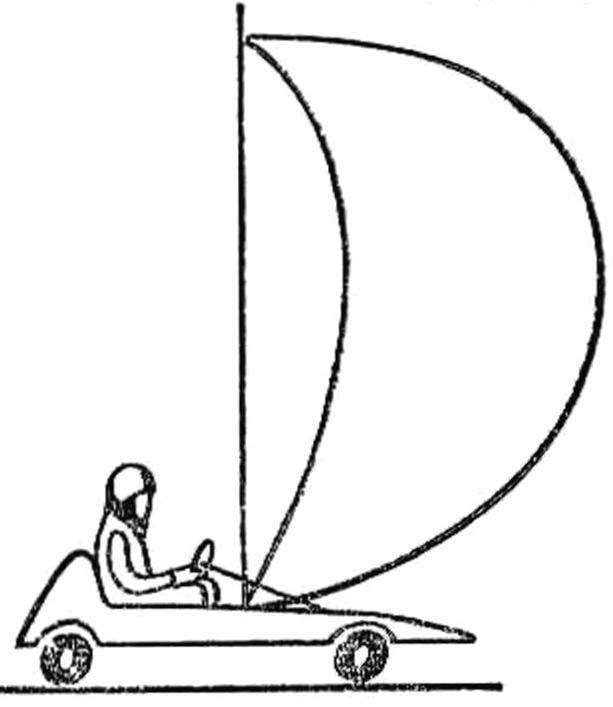
We offer to your attention a sand yacht is one of the most common schemes today — with arms Tina “devil cat” and a three-wheeled truck, the front wheel is steering. Despite its relatively small size, this kind of sailing cards can reach speeds up to 50 km/h! Do your friends a few of these “machines”, and you can make a very real race, of course, in areas where there is enough flat fields and blowing constant and strong winds. However, to ride on the sailboat can be on the school stadium, or even the lane.
 
The cart-based sailfish are two pine longitudinal section 40X60 mm each. The bars going through the cross-section 60X70 mm with the letter A. Additionally, the frame is supported in front of the plywood gusset plate S10 and the middle and rear parts of the two strips of the same plywood with a width of 150 km. All the elements of the frame are joined with epoxy glue and bolts M6.
For the rear axle you’ll need pine or spruce Board section 25X 150 mm and a length of 1900 mm. the choice of the material approach more closely. As the beam bridge also serves to cross a spring — Board must be straight grained, preferably without knots and bundles. With the side members of the frame beam is joined with 8-mm bolts or studs and epoxy glue.
 
Front swivel wheel (a sulker from the Danish bike) is secured in the Bicycle fork. She turns in the sleeve — the front of the same bike, cut from the old frame along with a section of horizontal pipe. The bushing is clamped between the spars, and its horizontal pipe provorachivaetsya to the plywood gusset frame 6 mm bolts.
 
Beach sailboat controlled by pedals connected startrename with a metal plate with a thickness of 5 mm, privernuty to the front of the fork.
 
Fig. 1. The constructive scheme of the land of the sailing ship
 
Fig. 1. The constructive scheme of the land of a sailboat:
 
1 — boom, 2 — mast, 3 — end guys fixing and the forestay, 4 — shrouds and forestay, 5 — screw lanyard, 6 — frame rails, 7 — fork of the front wheel, 8 — sail on 9 — Bafut boom, 10 — clamp fixing axis pedals, 11 — arm brake lever, 12 — brake lever, 13 — boss 14 — plywood cross member of the frame, 15 — seat 16 — headrest, 17 — seat valance, 18 — cross member made of plywood, 19 — rear axle beam, 20 — mounting bracket of the brake, 21 — axis brake lever, 22 — foot controls.

 
Rear wheel from a moped “Verhovina” or “Riga-16” — mounted on the brackets, curved steel strip section 4X60 mm with a beam rear axle brackets are attached with two 8mm bolts each. Fixing the brake drum is a steel pin, screwed into the beam. Axis wheels fixed in the bracket with two nuts and washers with subsequent locking of soft wire.
 
Pedals connected to the steering wheel, are located on the crossmember of the frame. The easiest way to make them out of a Bicycle wheel, bushing and clamp, which is fixed on the Bicycle handlebar.
 
Brake lever is cut from a block of wood 25X70 mm. cross-section On its upper part fits over the handle of a Bicycle wheel. Holes (under the axle and thimble rope), it is desirable to strengthen the metal sleeves off — cuts of pipes. Ropes budenovskoy shell are routed from the brake drums of the rear wheels up to two steel profiles “corner”, bolted to the chassis near the middle of the plywood cross member. Then through the equalizer cable tension to a brake lever.
 
The seat is assembled from plywood S10 in accordance with Fig. Joining of separate parts — dural nooks and M4 screws. In the upper part of the backrest install the head restraint foam sponge trimmed with artificial leather.
The mast is entirely dependent on your capabilities; it is best to use duralumin pipe with a diameter of about 40 mm for it, is fine on the jump pole. A good mast and get wood, especially if you collect it from several hover PA epoxy glue.
 
Mast escalivada the forestay and the guys. They will fit steel wire Ø1,5 mm or steel cable Ø2 mm. tension adjustment use of the rigging screw turnbuckle.
 
Square sail of about 4 m2. Sew it from the dense windproof fabric, such as a pillow tick, tent fabric or Bologna. Of the cloth are parallel to the lower leech of the sail, and sewed together with a seam “zigzag”. Back and bottom of foot are edged with ribbon carved from the same material. To the luff mast pocket is sewn the same as the sail of a windsurfer (sail boards).
 
The first ground test of a sailboat is best done with starved wind. First of all, check the reliability of brakes and steering operations. Then Orient the sailboat so that the wind direction was perpendicular to the selected rate (“galfvind”). Choose spread sheet until nor until the sail stops zaprashivat, then drive the boat until you feel that it moves without your help. On-the-go climb on the seat and choose a sheet — by this time the sail generally starts zaprashivat. Working sheets, all the time keep the sail on the verge of zapalskiene his front foot — in this case the pull will be maximum.
 
Fig. 2. Frame sand yacht. Fig. 3. Mount the forestay and the guys to the mast. Fig. 4. Geometry of the sail. Fig. 5. The attachment of the boom to the mast. Fig. 6. Clip and split ring. Fig. 7. Bracket the rear wheel. Fig. 8. Install the rear wheels. Fig. 9. Brake lever. Fig. 10. Seat. Fig. 11. Install the front fork. Fig, 12. The design of the pedals.
 
Fig. 2. Frame sand yacht. Fig. 3. Mount the forestay and the guys to the mast. Fig. 4. Geometry of the sail. Fig. 5. The attachment of the boom to the mast. Fig. 6. Clip and split ring. Fig. 7. Bracket the rear wheel. Fig. 8. Install the rear wheels. Fig. 9. Brake lever. Fig. 10. Seat. Fig. 11. Install the front fork. Fig, 12. The design of the pedals.
 
Fig. 2. Frame sand yacht.
Fig. 3. Mount the forestay and the guys to the mast.
Fig. 4. Geometry of the sail.
Fig. 5. The attachment of the boom to the mast.
Fig. 6. Clip and split ring.
Fig. 7. Bracket the rear wheel.
Fig. 8. Install the rear wheels.
Fig. 9. Brake lever.
Fig. 10. Seat.
Fig. 11. Install the front fork.
Fig. 12. The design of the pedals.
 
The most difficult and even dangerous turns. If you intend to do a tack turn, that is the bow to cross the wind line, start in advance to choose the sheet and at the same time square away. Crossing nose the position of “head to wind” (when the wind is blowing exactly “head”), vtupuyu choose a sail, and immediately after the passage of this provision estrovite it while evaluasi under the wind.
 
Be careful when working with brakes. Before braking, estrovite the sheet, allowing the sail to operate at the vane, otherwise you run the risk of capsize.
 
A. SUDETS

Recommend to read

  • AND THE CARGO ON THE TRAILERAND THE CARGO ON THE TRAILER
    When there is a need in the trailer for transportation of household goods, there is the problem of choosing which trailer to buy, good this choice was. That's the only difference in...
  • WICK-TIMERWICK-TIMER
    To limit flight free-flying models are often used machines with wicks. The thread connects the hooks of the fuselage and the stabilizer, locking them in the position required for the...