The edges of the plating, which should connect with each other, it is necessary to drill holes Ø 2-3 mm, they will be required in order to subsequently make the case using as a “thread” soft safety wire. Pitch between holes is 100 mm from the border edges they are located at a distance of 20 mm (Fig. 6).
Carefully fold the sheet along the lines of the cuts, and successively connect together the elements of the housing with a soft wire.
Cut from plywood with a thickness of 12-15 mm transom Board (Fig. 7) and the strips of fiberglass on epoxy glue will secure it in the housing. In the same way and set the bar stem. The resulting intermediate product of the hull must be strengthened. Cut strips of glass, of a width of about 100 mm, saturate them with epoxy glue and seal the internal joints. To ensure the rigidity and tightness of the hull is sufficient for 3-4 layers of fiberglass.
After curing epoxy glue protruding outside the twisted ends of the wire are cut and the joints are stuck together with strips of fiberglass.
Fig. 2. The design of the Dinghy:
1 — sail, 2 — geek 3 — blocks, 4 — end unit, 5 — pole 6 — end of the mast, 7 — steps, 8 — deck, 9 — stem, 10 — reinforcing frames, 11 bottom plate, 12 — centerboard, 13 — svartby well 14 — the bottom of the cockpit, 15 — edging of the cockpit, the 16 — transom Board, 17 — feather steering, 18 — deck, 19 — strengthening of the deck, the 20 — BIMS, 21 — textile strap, 22 — stopper.
Fig. 3. The pattern of the hull of the Dinghy.
Fig. 4. Pattern deck of the “Moth” and the location of her some constructive elements.
The next operation is the Assembly svetovogo well. It will require two sheets of plywood with a thickness of 5-6 mm and two wooden bars is their width, which determines the size of the well is 40 mm. the Elements of this node are held together by screws and epoxy glue. To the bottom of the casing, the well is attached by the same strips of fiberglass and epoxy. After curing of the resin in the bottom cut a slit under the centerboard.
Dinghy “Moth” has a so-called self-draining cockpit with a bottom located above the waterline, so the water freely pours out of him through the transom openings, scuppers. Thanks to this device the boat is easy to lift on an even keel, even if the cockpit completely filled with water.
Smoothing the bottom of the cockpit are cut from waterproof plywood with a thickness of 8-10 mm and secured with strips of fiberglass and epoxy.
Fig. 5. Joining plywood sheets for harvesting patterns of the body.
Fig. 6. The sequence of transformation patterns in the body.
Fig. 7. Transom Board the Dinghy.
Fig. 8. The connection of the housing parts with wire twist and tape fiberglass.
Fig. 9. Standing rigging of a sailing vessel: mast, boom, two pairs of cables and stays.
The deck of the Dinghy is easiest to cut from a sheet of hardboard or plywood, but you can glue, using methods that have been described. The inner side of the deck is enhanced by the longitudinal curved lines (see figure 2), their cross-section 10X20 mm. Hole of the cockpit is desirable to turn over the bent rail. Because the curved rail of a sufficiently large cross section is difficult, it is possible to use a simplified method. Cut some plywood strips (cut should go across the grain) and consistently stick them to the edge of the cockpit, securing small nails and temporary bracing. After curing, epoxy adhesive clean the trim with a plane, rasp and sandpaper.
After body Assembly, embed in the installation of the mast two reinforcing frames of waterproof plywood with a thickness of 5 mm. Fixing of frames with strips of fiberglass and epoxy glue. Try to keep the forepeak (the bow section) was sealed, ego will give additional Dinghy unsinkable.
Another watertight bulkhead is located directly in front drift boats well. It can be cut from chetyrehkilometrovoy plywood and fasten it in the body of a standard method – glass cloth strips.
For the manufacture of centerboard pick a few pine or spruce boards with a thickness of 30 mm, prituhuje them to each other and glue so that you get the billet dimensions mm. 30Х300Х1000 the Upper part of the centerboard strengthen the two cheeks made of plywood 4 mm thick, and the lower prostrogat so that the cross section resembled a biconvex symmetrical profile of the aircraft wing. The upper parts lighten — cut it in a triangular hole, as shown in figure 2. It remains to smooth the surface of the centerboard with epoxy putty and paste in one layer of fiberglass, puttied again, with sandpaper and paint with synthetic enamel.
The technology of manufacturing the steering of a pen identical to the one described above. The only difference is in the quality of the product is a sheet of plywood with a thickness of about 15 mm.
Special attention should be taken to work on the mast (Fig. 9). Try punctually to follow our recommendations. First of all, pick up the two boards with a length of about 6 m (preferably spruce). Thoroughly inspect them and make sure no knots, cracks, and cord. Do not worry if lumber of this length at your disposal will be blank can be glued up from several boards, connecting them “on condition” epoxy. Please note only that the “condition” must be at least 350 mm.
Prostrogat of the workpiece so that you get two bars section 35X70 mm each. The next operation is the cutting likasa. She runs a semicircular chisels or shpuntubelem — a small plane with a piece of metal sharpened on the shape of the future groove Groove sand paper, and then carefully grind. Note that its cross section remains constant along the entire length of the mast. Glue sticks epoxy resin, compressing the billet mast for the entire length of the clamps — they this will require at least two decades. In the process of curing the resin of the workpiece to be placed horizontally on the same props-the trestles or simply on wooden bars set on a level floor. Non-compliance can lead to the fact that the workpiece will be bent irreparably and will have to start over.
two dozen. In the process of curing the resin of the workpiece to be placed horizontally on the same props-the trestles or simply on wooden bars set on a level floor. Non-compliance can lead to the fact that the workpiece will be bent irreparably and will have to start over.
After curing of the adhesive, handle the mast plane: the diameter at the base should be 65-70 mm, and the top about 40 mm. Carefully uskoreniya detail is covered twice with hot (preferably natural) linseed oil and then two coats of oil varnish. Don’t forget the same operations to expose the inner surface likasa.
On the lower part of the mast pressed in a weight — cut thin-wall steel tubes and the upper top end mounted to it a pulley under the main halyard.
The mast is attached to the Dinghy with two pairs of cables and stays. All of them — from steel cable Ø 4 mm. the ends of the cables are sealed in the thimble or soft copper tube. For cables tension the forestay and use a screw turnbuckle. About their design, as well as many other sensible things sailboat you can find out looking in the ninth issue of “M-K” for 1979.
Geek is exactly the same as the mast, only blanks are selected it for a cross-section 20X50 mm and a length of 2400 mm.
The final operations in the manufacture of the body of the Dinghy “Moth” are lining the hull with one layer of glass, the alignment of the surfaces with epoxy putty, sanding and painting with synthetic enamels.
To sew a sail from a thin tent fabric, Bologna or pillow tick. Front and lower luff of the sail are reinforced with vegetable or nylon rope Ø 10-12 mm. In Shkotovo and halawy the corners of the sail sewed a reinforcing gusset plate of thicker than cloth sail material.
Sail the Dinghy has a through armor, which sewed through the same luterman a width of 50 mm each. Armor of variable thickness — the mast about 5 mm, and on the opposite side is 3 mm. Between the first and second battens shall be attached to the transparent window of the Mylar film with a thickness of 0.1 mm.
That’s all. Keep your Dinghy on the water, make sure of the water resistance of a shell, start the sea trials. Take the first exit in the gentle breeze. When you are sufficiently familiar with the technique of management by Dinghy, it will show you all its advantages — speed and handling — and the fresh wind.
(On materials of magazine “Praktik”, GDR)
Recommend to read AGAIN ABOUT BIOGAS The editors have received many letters on the publication of "Biogas: and warms, and cooks" (see "M-K" № 1, 1987), based on the materials of the Romanian journal "Technium". Of readers... “Little Bear” from Turin 1980. An unassuming little car, the Fiat Panda, takes to the roads of Europe. At the time, no one could have guessed that it would become a bestseller, remain in production until 2003, and... 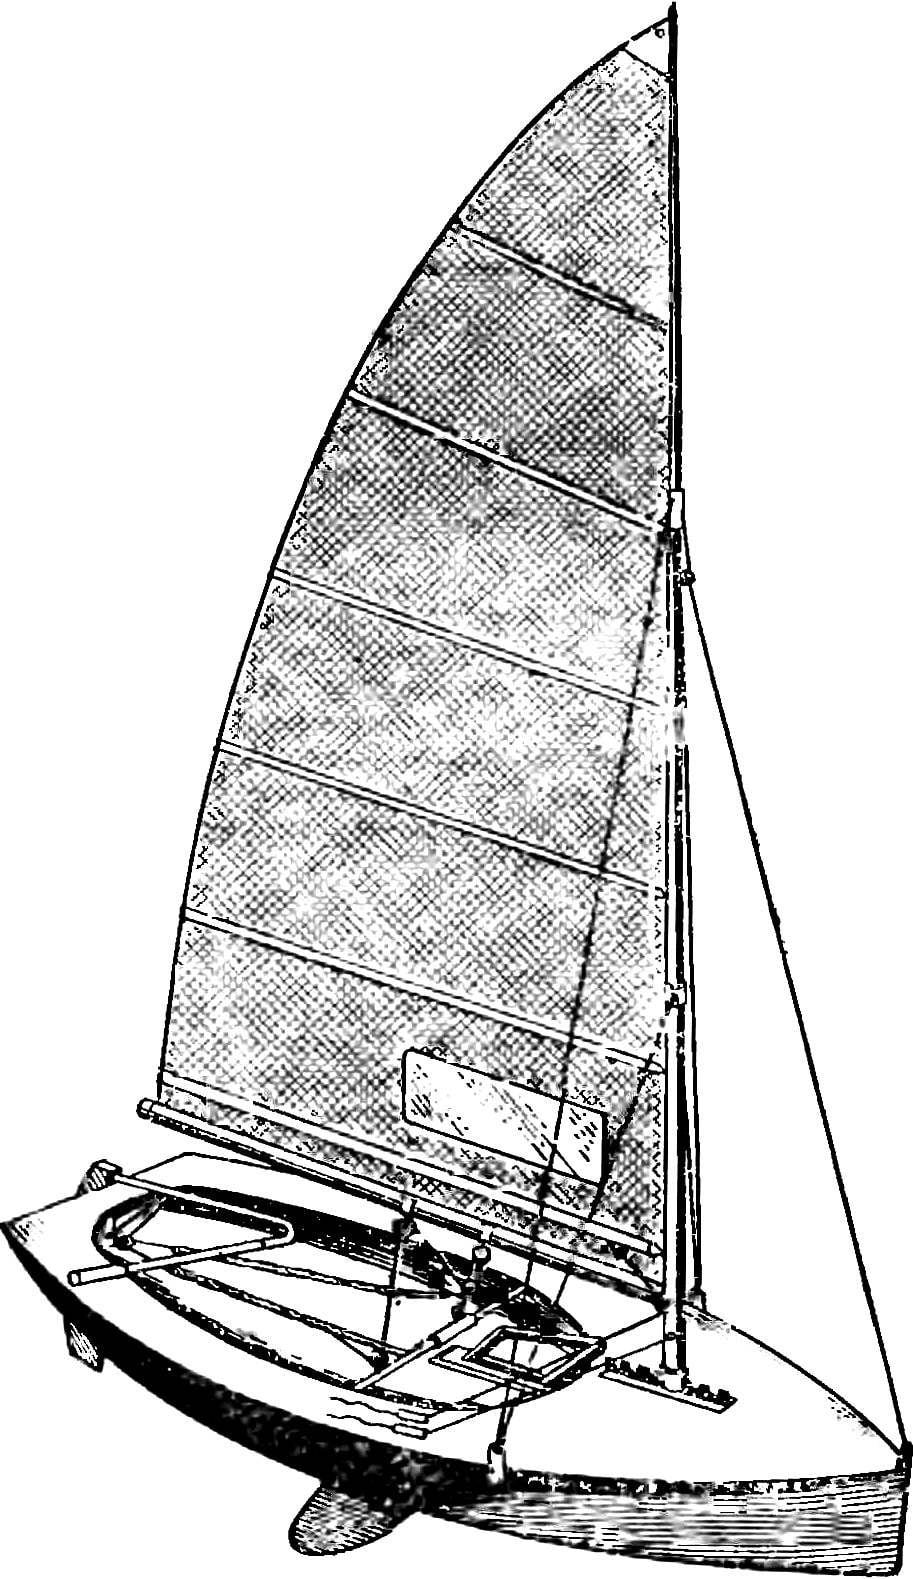
 Ultralight Dinghy international class “Moth” “the Moth” (Fig. 1, 2) simple in design, convenient in construction and possesses all the essential qualities of sports ships – fast, maneuverable and sensitive to control. All this allows to recommend it as the first sport of sailing to those who wants to achieve in sailing Olympic heights.
