 Sailing has always been considered a true male. And not by accident: this sailor has the necessary power and speed of reaction, physical endurance, ability to keep calm in even the most difficult circumstances.
However, sailing has two considerable disadvantages. The first is seasonality in our mid-latitudes means to do it can be no more than five months in a year. And second, the need fairly large areas.
Of course, there are ice sailing ice boats, and “sandy” the wheel of the yacht, but they are not universal. The classic Buer required snow free ice surface, which is formed on lakes and reservoirs only in the spring, when the snow has melted, and the ice still holds, and in early winter, when water is already frozen, and these snowfalls were not. Well, for wheeled glider need a relatively smooth steppe, desert clay-takyr or sandy coastline and great beaches. In the last decade, especially popular among Amateur designers are the so-called pneumatic-tired machines – motor vehicles on lightweight wheels with a camera-Pneumatics low pressure from a tractor or truck. Striking off such machines can equally well move on the waterlogged tundra and snow-covered steppes, hummocky ice, and loose sand, that moved the sailing to use the unique properties of wheel tyre low pressure while creating year-round sailing.
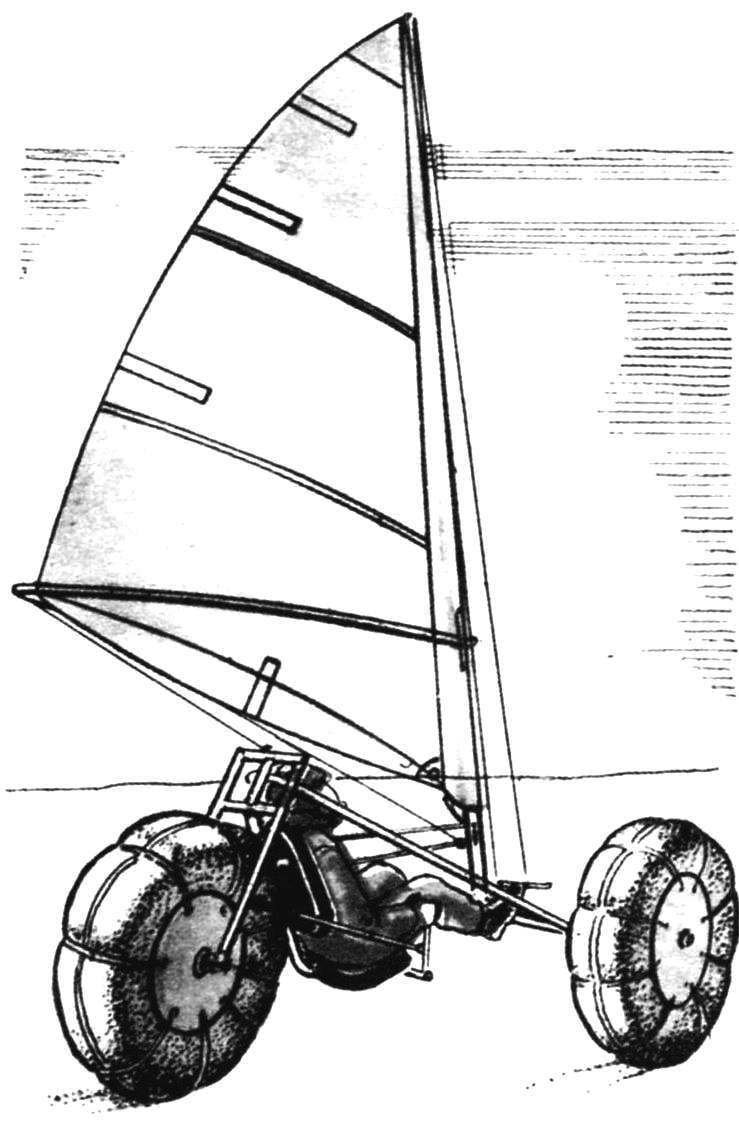
Today we introduce you to such a vehicle, which can be called windroller. Suspension of a sailboat, its frame, and a swivel fork designed for the type of motorcycle, and the sail is the same as that of the well-known windsurfer.
So, for work advised to Start with the most complex fabrication trolley. As can be seen from the drawings, it is three-wheeled, with the front axle has an unmanaged wheels and the rear is a swivel fork, reminiscent of a motorcycle.
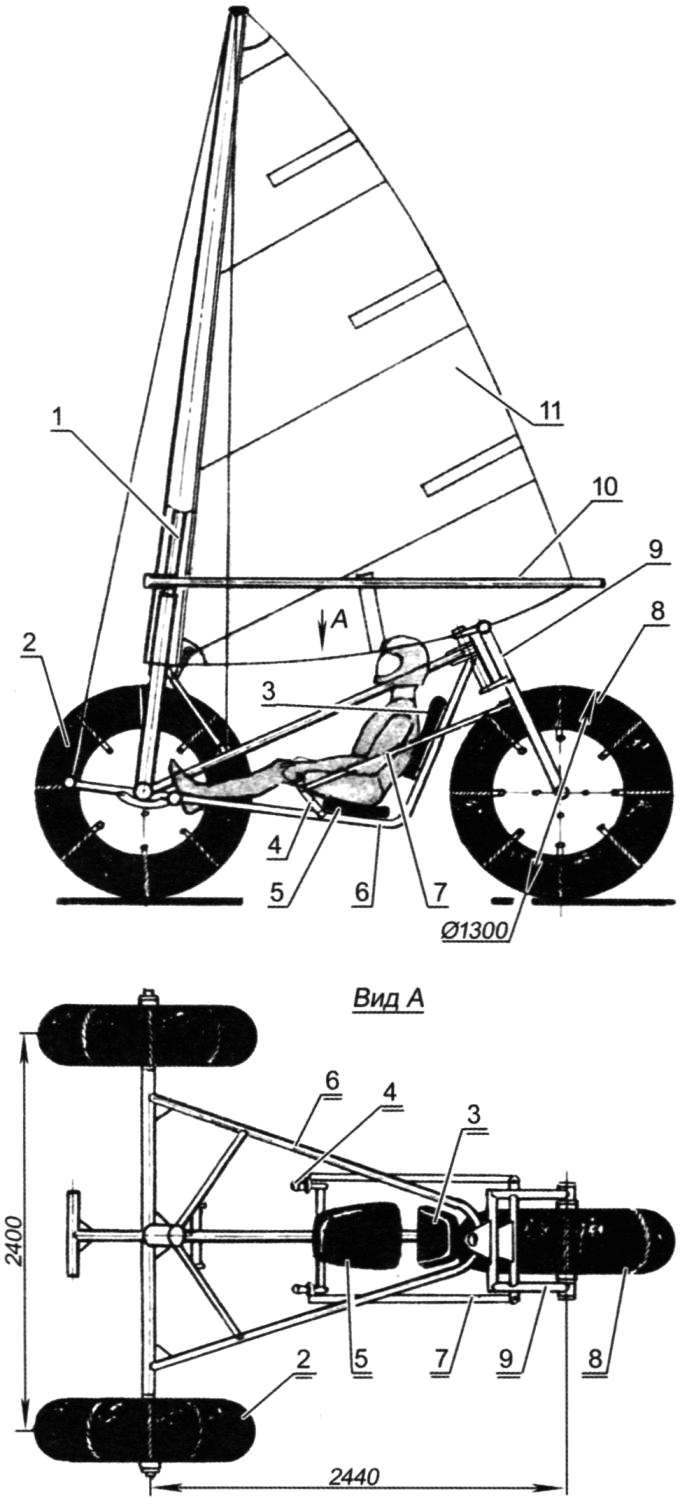
Layout all-season sailing yachts on the low-pressure tyres:
1 – mast; 2 – front; 3 – back; 4 – steering lever; 5 – seat; 6 – frame; 7 – tie-rod; 8 – rear driven wheel; 9 – fork of the rear wheel; 10 – hicok-wishbone; 11 – sail
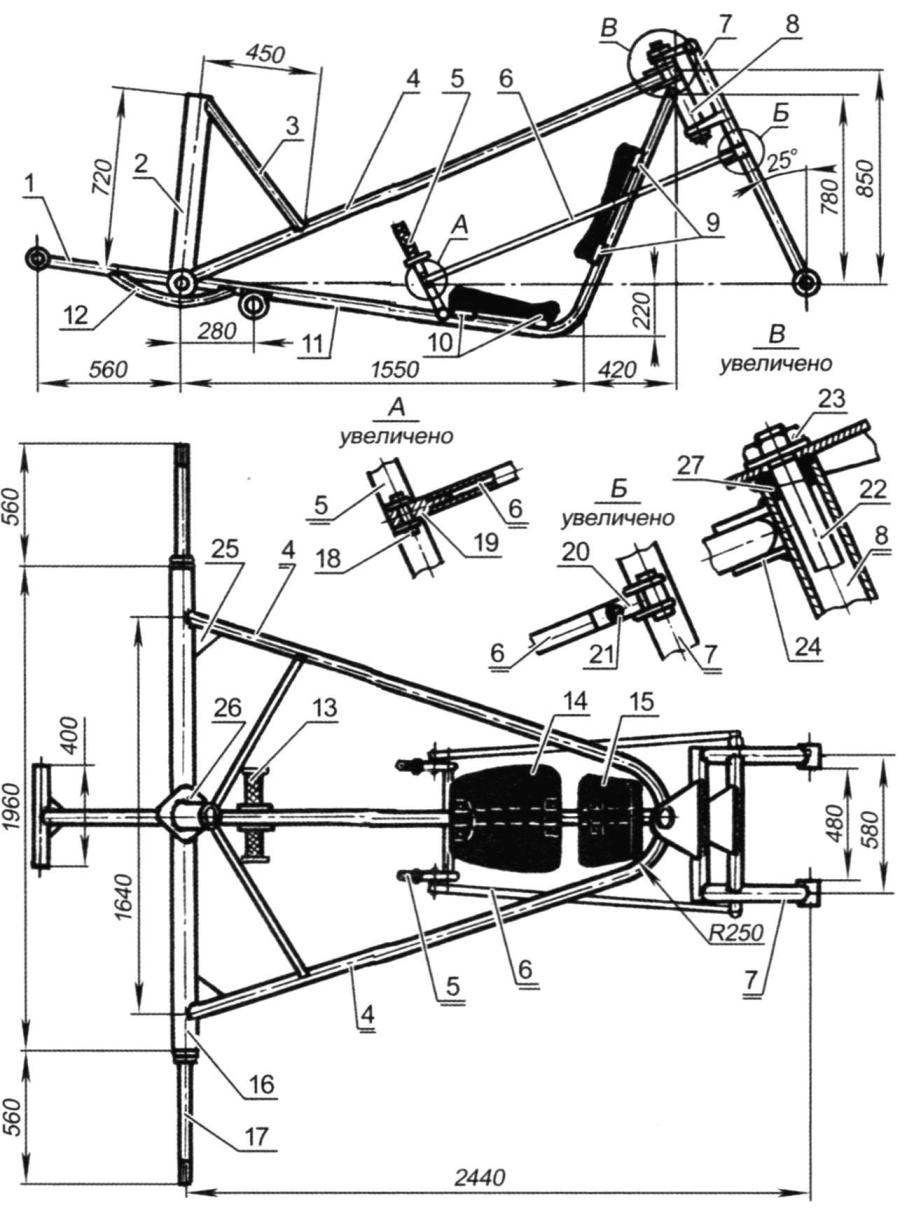
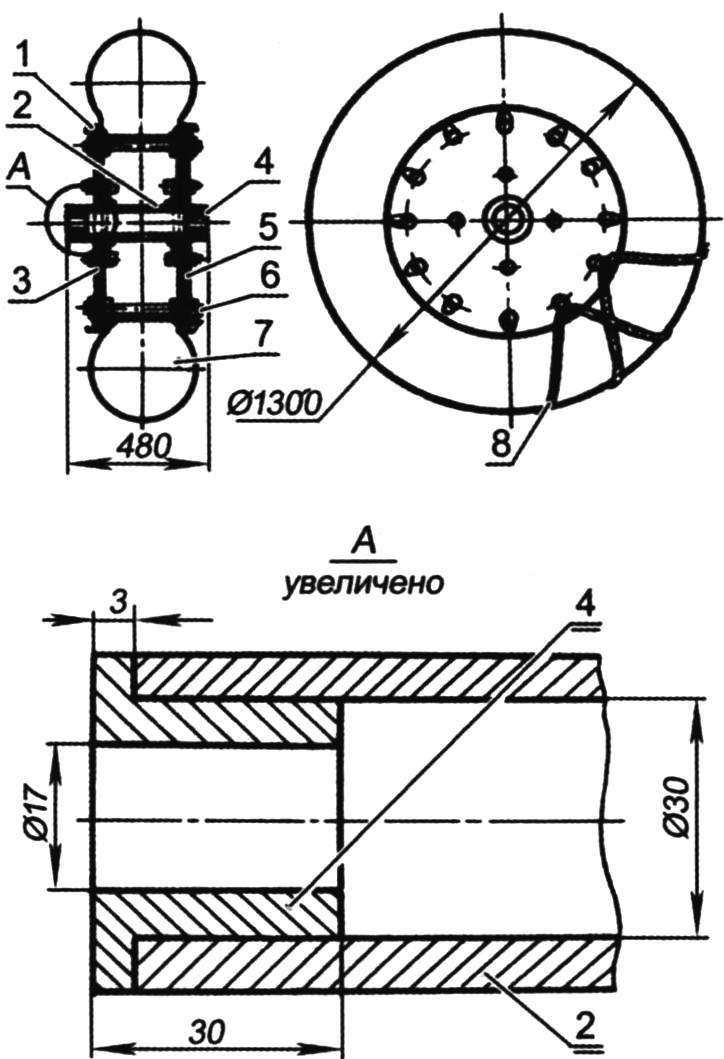
The track frame of a sailboat:
1 – bowsprit (pipe 030×2); 2 – masted glass (tube Ø60×2,5); 3 – brace (pipe Ø20×2,5); 4 – the upper zone of the frame (pipe 030×2); 5 – steering arm (pipe Ø22×2,5); 6 – tie rod (tube Ø16×2); 7 – fork rear wheel; 8 – steering column (tube Ø36×2,5); 9 – mounting brackets of the backrest (strip section 4×40); 10 – bracket for seat mounting (strip section 40×4); 11 – lower belt frame (tube Ø30×2,5); 12 – jumper (pipe Ø22×2,5); 13 – kickstand (steel Ø22×2,5 placed on her by the handles of a Bicycle wheel); 14 – seat (plywood, foam rubber and artificial leather); 15 – back (plywood, foam and PU leather); 16 – front beam (pipe Ø36×2,5); 17 – axis; 18 – a bolt of M6 with nut and washer; 19 – the tie rod; 20 – double hinged fork (steel s3); 21 – screw M6 with nut and washer; 22 – pin M12 hinge the steering column; 23 – nut M12 with washer; 24 – a reinforcing gusset plate (steel s2,5); 25 – Klondike (steel s3); 26 – Central gusset plate (steel s3); 27 – bushing (bronze, textolite or PTFE)
Trolley frame is welded from thin-walled metal tubes. Of course, better suited dural, however, in a pinch, you can use steel. That frame turned out to be symmetrical and without bias, it makes sense for it to build a kind of slipway. In the simplest case – smooth area of the floor on which are mounted, in accordance with the dimensions of the truck front axle and rear fork controlled along with the steering column. In this case the steering column must be located strictly in the plane of symmetry of the truck and perpendicular to the front axle (if you look at it from the front).
The next phase – the manufacture and adjustment of the Central beam of the frame.
This item has a curved shape, so you’ll have to use a tube Bender. It is desirable to heat the bending place of a gas burner or blowtorch, which will help to avoid dents and corrugations. The thus prepared tube is fitted to the front axle and the steering column and welded to the other several welding points. Note that docking the front axle and the Central tube is made using scarves – square of sheet steel of thickness 2.5 mm.
Now we have to prepare for the Assembly is curved in the form of the letter V tubular part forming a side member of the frame. To bend this tube is best with padding it sifted sand and warm places of the bend. Weld it to the front axle and the steering column should also be a few welding points. All seams are permanently welded only after careful validation of the docking elements of the frame.
Next on the Central tube of the frame in the dock with the front axle fixed mast glass – steel thin-walled pipe, the inner diameter of which somewhat more of the outer diameter of the mast. For fixing the mast Cup has two brace of the pipe sections with external diameter 18…20 mm.
As can be seen from the figure, the driver’s seat is mounted on is welded to the Central beam of the frame with special brackets. Two of them are intended for fastening of the seat, one backrest and one of the head restraint. On the front bracket of the seat (made of steel pipes with an outside diameter of about 30 mm) are fixed also the steering arms.
Now about the rear steering fork, the manufacture of which could also be started. As can be seen from the drawings, it is welded from steel pipes, two feathers and two crossbars. To the latter is welded on so-called bridges -a triangular steel plate: they plug connects to the steering column, which is a tube inserted the two bushings, machined from Teflon, textolite or bronze. Docking plugs and steering column using long bolts or threaded studs with washers, nuts and lock nuts.
As already mentioned, for windroller you can use the sail from a windsurfer. However, the sail is quite possible to sew on their own. Let’s start with patterns. The first step is to mark on a level floor, a few sheets of plywood or even on the asphalt pad main triangle, and then, putting the value in the “sickle” on the back and bottom scattering sails, to hold the smooth curves similar to those shown in the figure.
The next operation – the layout of the seams. The first line is the seam from the tack (front lower) corner of sail, perpendicular to the rear line of the main triangle. The layout of the rest of the joints made parallel to the first, with a step corresponding to the width of your existing fabric. By the way, sewing the sail of Dacron type “yacht”, Dacron or cotton canvas. However, it is possible to use for this fabric “Bologna” or even a pillow tick.
When cutting panels it is necessary to keep in mind that joining them is not in straight lines – in this case, the sail will become flat. To the sail originated the so-called “belly”, when marking the lines of the seams of adjacent panels, one of them should have a bulge in the 30…40 mm, and the other straight. Then when stitching the panels and get the bellied sail.
After sostragivaja panels, the sail is trimmed to the front and rear lower katarinam and sewn laderman designed for elastic elements of lat that supports the back and bottom of foot. Pocket width is selected in accordance with dimensions lat. The latter can be made of a plastic school ruler or polystyrene W-shaped profile for fixing glass in the cabinets or shelves. When attaching the sail lat-pockets of land in the upper rear part thereof with a length of 50…70 mm nepristoinyi leave. This is necessary for laying in the pockets of lat and their reliable fixation.
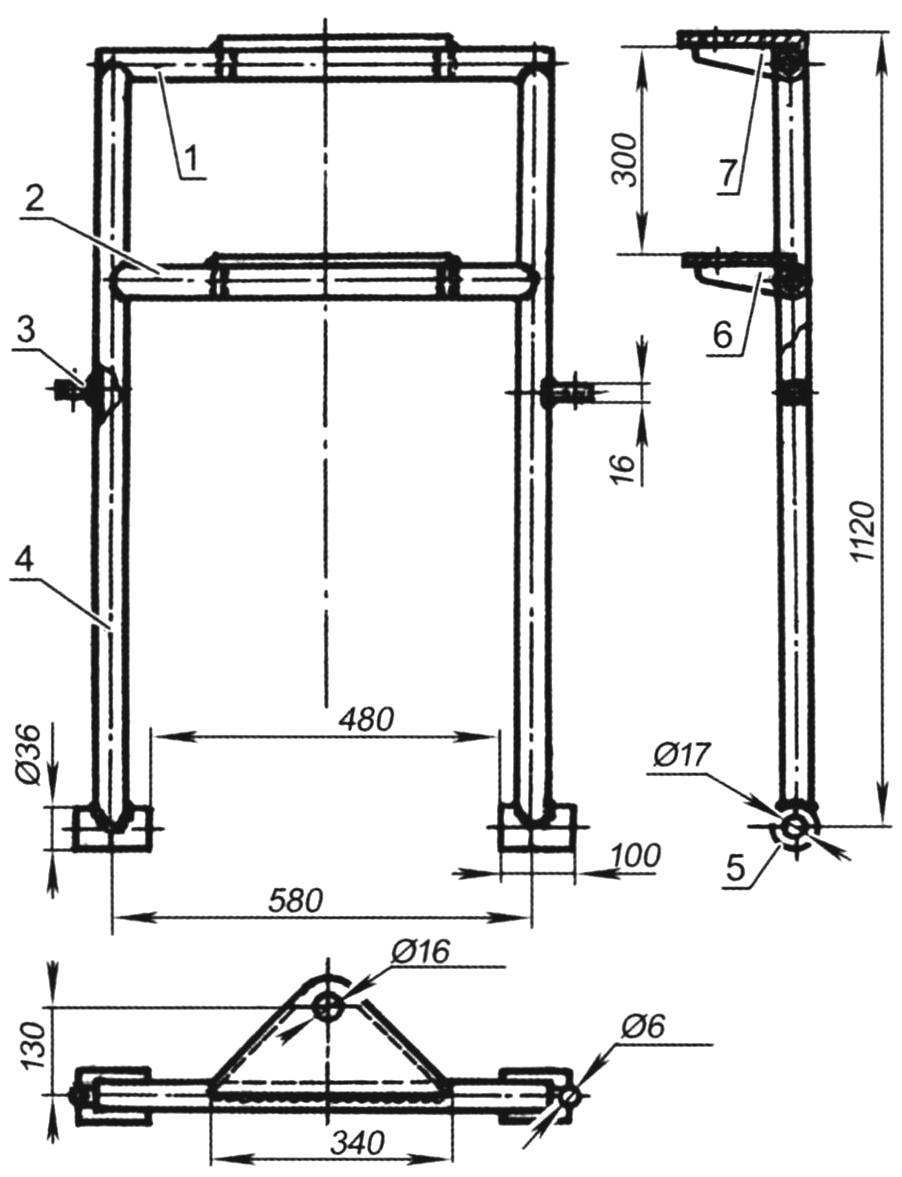
Managed fork rear wheel:
1 – upper cross member (tube Ø30×2,5); 2 – the bottom cross member (tube Ø30×2,5); 3 – Sukhar (steel 16×6 square); 4 – the pen (tube Ø30×2,5); 5 – bushing; 6 – lower bridge (steel s2,5); 7 upper bridge (steel s2,5)
Sail:
1,8 – grommet; 2 – masted pocket; 3 – sail (the drawing shows a variant with a panel width of 1100 mm); 4,5,6,9 – laderman; 7 – posterior part; 10 – washer grommet; 11 – grommet (a and b – the stage of installation of the grommet)
The land wheel of a sailboat:
1 – locking nylon rope; 2 , the Central sleeve (tube Ø36×3); 3 – flange (steel s2,5); 4 – bushing (bronze, textolite or PTFE); 5 – cheek (plywood s 10…12); 6 – stud with four M12 nuts and washers; 7 – pneumatic (camera from truck tire); 8 – nylon rope or strap
Incorporation of rear and bottom satorin is made using ribbon, synthetic or cotton. Last you just need to recapitulate – pre-soaked, dried and ironed; otherwise, after the first wetting the sails luff it turns into a kind of “thingies”. By the way, if the sail is sewed from cotton fabric, the cloth of this material must also be recapitulate – that is, to wet, to dry and ironed.
To fix the sail on the mast provided the so-called mast pocket doubled folded strip of fabric, tutu is to the luff of the sail.
Note that many of the seams on the sail is best done on a machine of type “zigzag” sutures of this type are elastic and do not pull the fabric. However, the seams that connect the individual panels together, sewn with a straight stitch -these stitches the sail to stretch out to anything.
And also about three absolutely necessary parts of a sail – reinforcing scarves in falavam (top), gulsoom (bottom) and the sheet (rear) corners of the sail. They are cut from thicker fabric (thick canvas or tarpaulin) and fixed to the sail with seam “zigzag”. In Shkotovo and gulsoom corners are fixed on the eyelet – brass bushing designed for schertow – braces of the sail. Instead of a grommet it is possible to fix some plastic (polyethylene) washers or rings, tightly almetov their thread and then cut the sail and gusset holes.
Mast windroller is a duralumin pipe with a diameter of about 40 mm with a wall thickness of 2 mm. However, it is possible to whittle the mast from quality pine bar out of the package or flat grained boards with a thickness of about 10 mm. Wooden mast should be tapered in the upper part its diameter is about 30 mm to 55 mm.
And the last piece of the mast -hicok-wishbone, resembling two bows put together. Make it the easiest way of duralumin tubes with a diameter of 22 mm; at the front fixed poluchaut of wood or PCB, which wishbon fit in with the mast and a rear – bolt with washer and wing nut.
Tires wheels windroller – camera truck. Depending on their geometrical parameters are selected and the sizes of wheel hubs. The basis of each amount of the sleeve – cuts steel pipes with welded thereto flanges and pressed in their bearings or bronze or PTFE.
Wheels are cut from plywood with a thickness of about 12 mm on the hub, they are fixed with M6 bolts and nuts, and with each other are connected through a LONG steel threaded rods, nuts and washers. Assembled thus the wheel has an acceptable rigidity and strength. If the size of the hub is chosen correctly, the camera-the tire on the wheel can not be fixed. However, smooth Pneumatics can not only roll, but also to “drift” – to slide sideways. That is why the tires needed some type of protectors. For this purpose quite suitable nylon rope, passed through located on the rims hooks or staples covering the camera.
The front wheels rotate on a short axle steel threaded studs mounted on the front beam of the frame using rubber bushings. This bushing is located between the two nuts and washers on the axle shaft, and then is embedded in the pipe, then the remainder of the outside nut is tightened; the rubber sleeve when it “swells” and firmly secures the axle shaft into the beam.
Rear wheel installed in the fork with a long threaded rods, two washers and a couple nuts with lock nuts. Turns windroller carried out using two levers, connected steering rods with controlled fork.
To equip or, as sailors say, to arm windroller pocket of the sail is stretched on a mast, and then her nylon skerton fixed hicok-wishbone; similar skerton, passed through the eyelet sheet angle the sail is pulled to the rear wishbone.
Thus prepared, the sail (with mast and wishbone) is inserted into the designated glass trolley and nylon skerton, passed through the tack grommet and struts, natugo stretched on the mast. The same SCART simultaneously captures the mast in a glass carriage.
Sail controls are carried out with the help of a nylon rope is the mainsheet. One end is fixed to the rear of wishbone, and the other sequentially passed through a block mounted on a shoulder strap (bracket) of the steering fork, through the block on the mast Cup, and finally falls into the hands of the steering (the driver).
A little about the technology driving windroller. Start moving it is best when quite fresh wind, whose direction – side or side-rear (sailors call these the direction of the wind relative to the course of the sailing ship “galfvind”). The first phase (acceleration) is performed on flat ground. Sailboat to start is oriented relative to the wind (sheet in this case must be fully restrain). The helmsman sits in the driver’s seat, and selects the sheet until, until zapalskiene sails. At the same time, the assistant starts to disperse windroller; if the sail again Zapolskaya, the driver picks up the sheet a little. Reaching a certain speed, the sailing ship continues to move by themselves, and the pull of the sail will allow you to move and on rough terrain, and even in shallow snow.
Be especially careful when cornering. As is well known to yachtsmen, they are of two types – turn tack, when sailing in the process of turning the bow crosses the wind, and jibe training, in which the wind crosses the line of feed of a sailing vessel. I must say that the first is significantly safer, although sometimes causes some hitch in the movement. More rapid rotation of the wind, although it is fraught with tipping of the sailboat through the nasal part with a sharp transfer of the sails from one side to the other.
Note, windroller brake has not. Finishing the movement, we should dramatically expand it against the wind and completely upset the sheet – it causes almost instantaneous stopping of the sailing ship.
We wish you success in the manufacture and development of windroller; hope that this land sailboat will help you in the shortest time to acquire the quality mentioned in the beginning.
I. EVSTRATOV
Recommend to read
 Compact folding table
Drop-leaf tables have been known for a long time and they are consistently in demand because they take up little space. But buying a table of the right size in a store is not always... ANTI-TANK “CARTS”
When developing a combat reconnaissance patrol vehicles (BRDM), the specialists of the design Bureau of the Gorky automobile plant in advance the possibility of creating on its basis a...
