
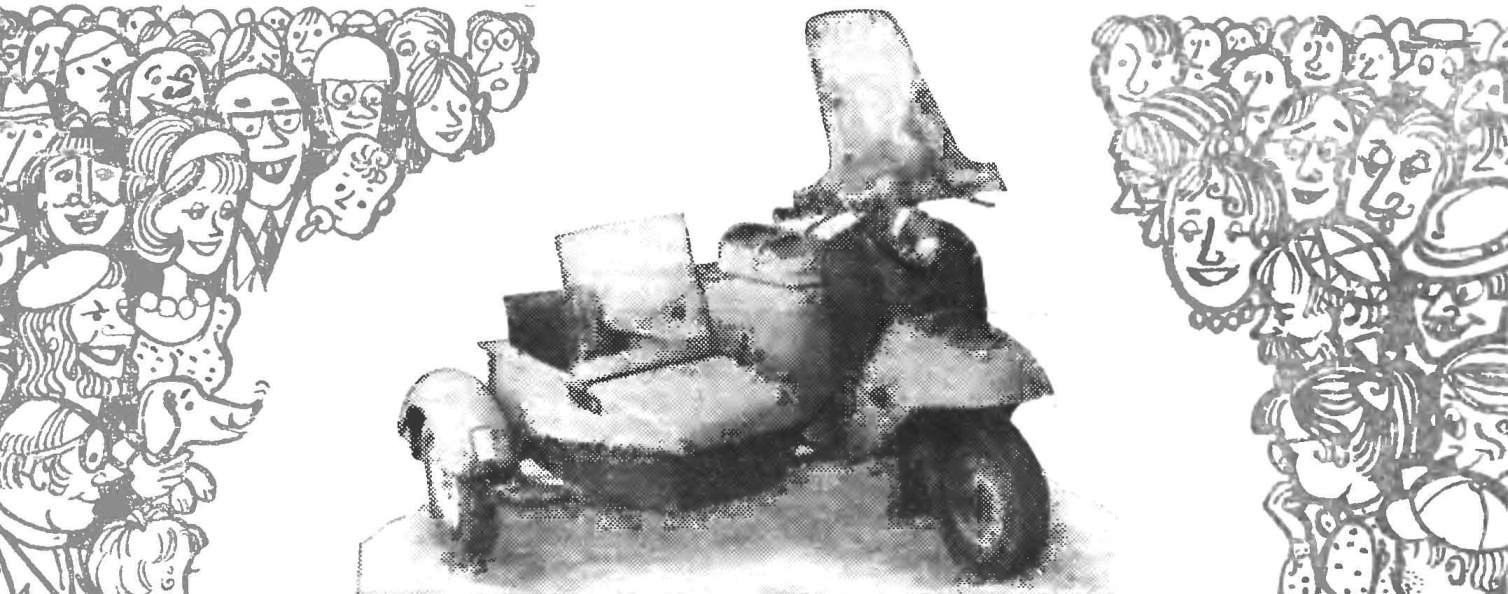
 What motorcycles and scooters are not built lovers side trailers! To “IAM” and “Sunrise”, to the old “Zundapp” and a brand new “Vyatskaya-Electron”. Don’t refuse to add a third wheel to his car and owners of scooters “Tula 200”. Moreover, the power of the engine of the modern “Tula Tourist” is quite allow. Unlike many such trailers design, proposed by Vladimir Kovalev from Bryansk, draws a bold design, to strict compliance of the contours of the shape of a scooter, reliability and modern technology for manufacturing of the body. So, the side of the trailer to the “Thule Tourist”.
The body of the trailer made of fiberglass (2 layers of stalloreggi epoxy resin).
It consists of two halves which are molded in one matrix made of plywood (hardboard) and slats. The joints are rounded rails and bumps patched with clay.
Depending on the purpose of the halves of the body (Fig. 1) when forming the matrix are set of removable elements, and the connections of the elements of the matrix are sealed with plasticine. When vyklevyvanija the lower half of the matrix (Fig. 2) installs the removable elements forming the seat base. When vyklevyvanija the top half of the removable element forming a window for the passenger boarding. Four aluminum plates from a children’s kitchen set are support elements for mounting the body on the trailer frame. Plates are glued to the lower half when it is forming and therefore are established after applying of the spacer layer. As a separation layer is applied parquet mastic.
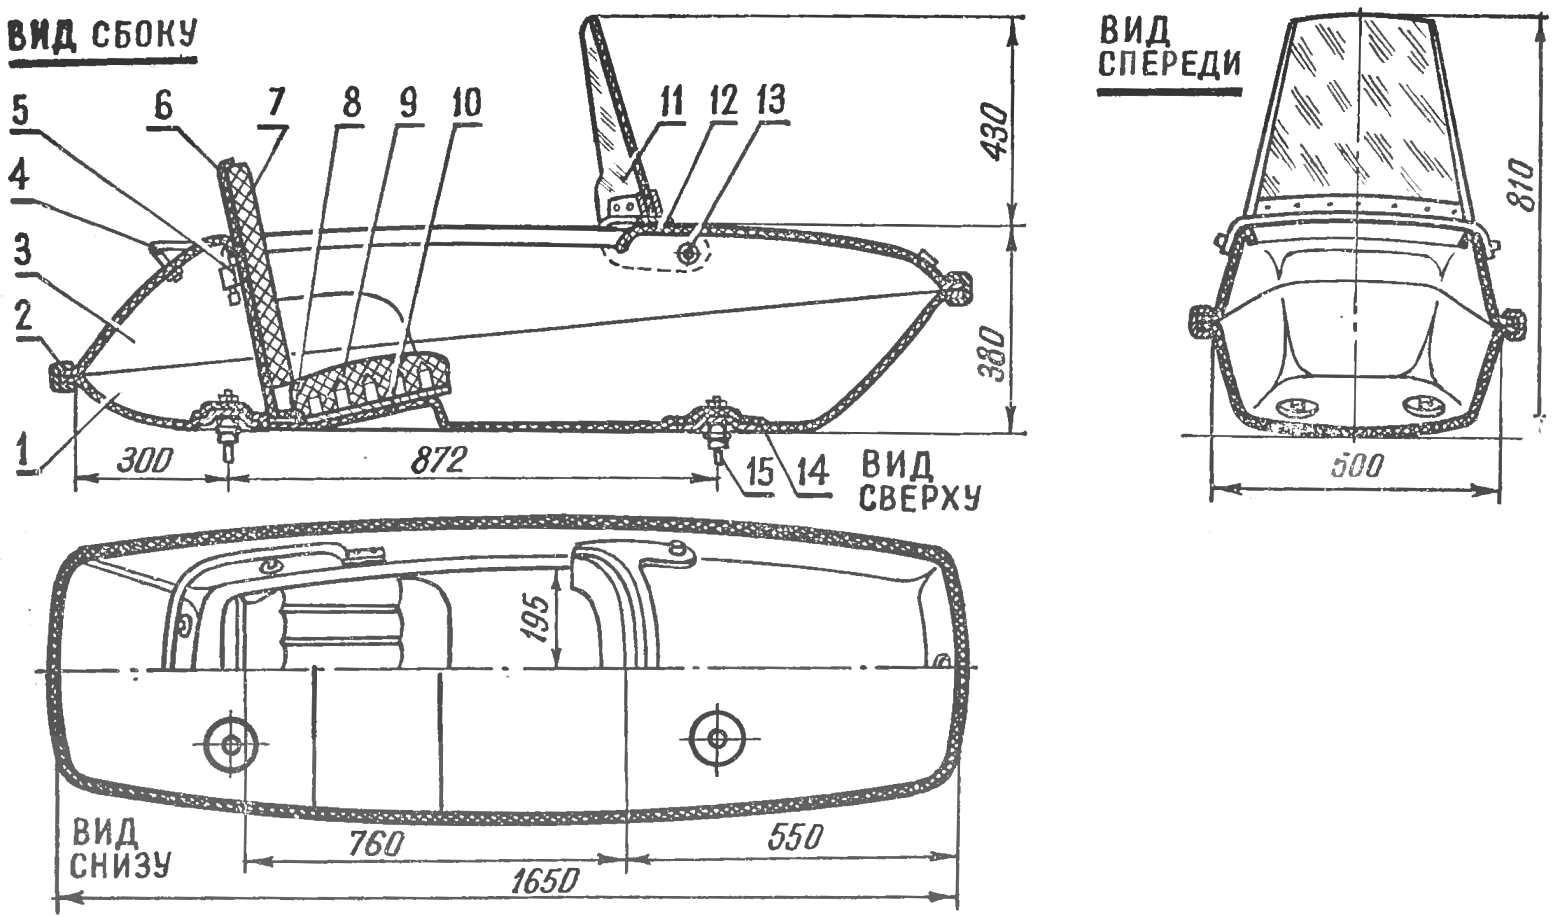
Fig. 1. Body:
1 — lower half, 2 — strip (rubber); 3 — upper half; 4 pulpit; 5 — latch; 6 — base of the backrest (GRP); 7 — cushion (foam); 8 — hinge; 9 — seat; 10 — seat; 11 — glass wind shield; 12 — base plate (aluminum); 13 — joint; 14 prop (a plate from the children’s kitchen set), 15 — attenuator (motor boat “Neptune”)
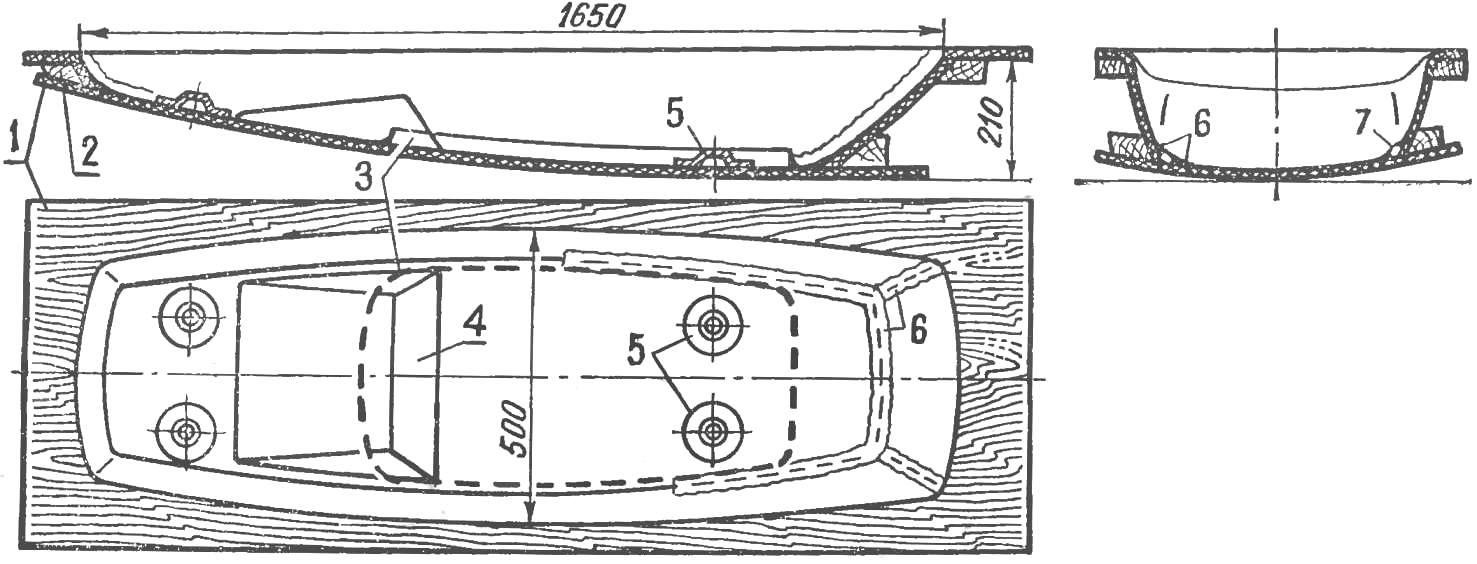
Fig. 2. Matrix:
1 — a Board (hardboard, plywood); 2 — bar; 3 — removable element for forming the landing window of the body; 4 — removable element for forming the protrusion under the seat; 5 — support plates (aluminum); 6 — clay; 7 — rack.
The process of veclachi is not difficult and has been repeatedly documented in various journals.
Where required the strengthening of individual sections (the base of the seat, the location of future fixtures, etc.), vyklevyvajutsja extra pieces and strips of stalloreggi.
After hardening of the resin half is extracted from the matrix and subjected to further processing: cut a window for the passenger boarding, cut the excess fiberglass around the perimeter.
The surfaces of the halves of the body work is pretty clean, but not eliminated the presence of bubbles, blisters, etc. These defects are sealed with putty, based on epoxy resin. The filler is desirable to use a small sawdust. This putty can be easily processed.
The body is painted in two colors, you will need to use tones close to the color of the scooter. It should be borne in mind that the quality of color depends largely on surface preparation, so it should be degreased, primed, spackled, sanded.
After painting the top and bottom halves connected to each other by rivets of brass tube Ø 3 mm and simple device (Fig. For), made of krugovova. Can be used for this chain, screws, aluminum rivets, glue, etc. between the upper and lower halves of the body banded with a rubber band cut from a Bicycle camera “Eaglet”. When pulling the strip firmly pressed to the Asses of half, and glue No. 88 keeps it from shifting.
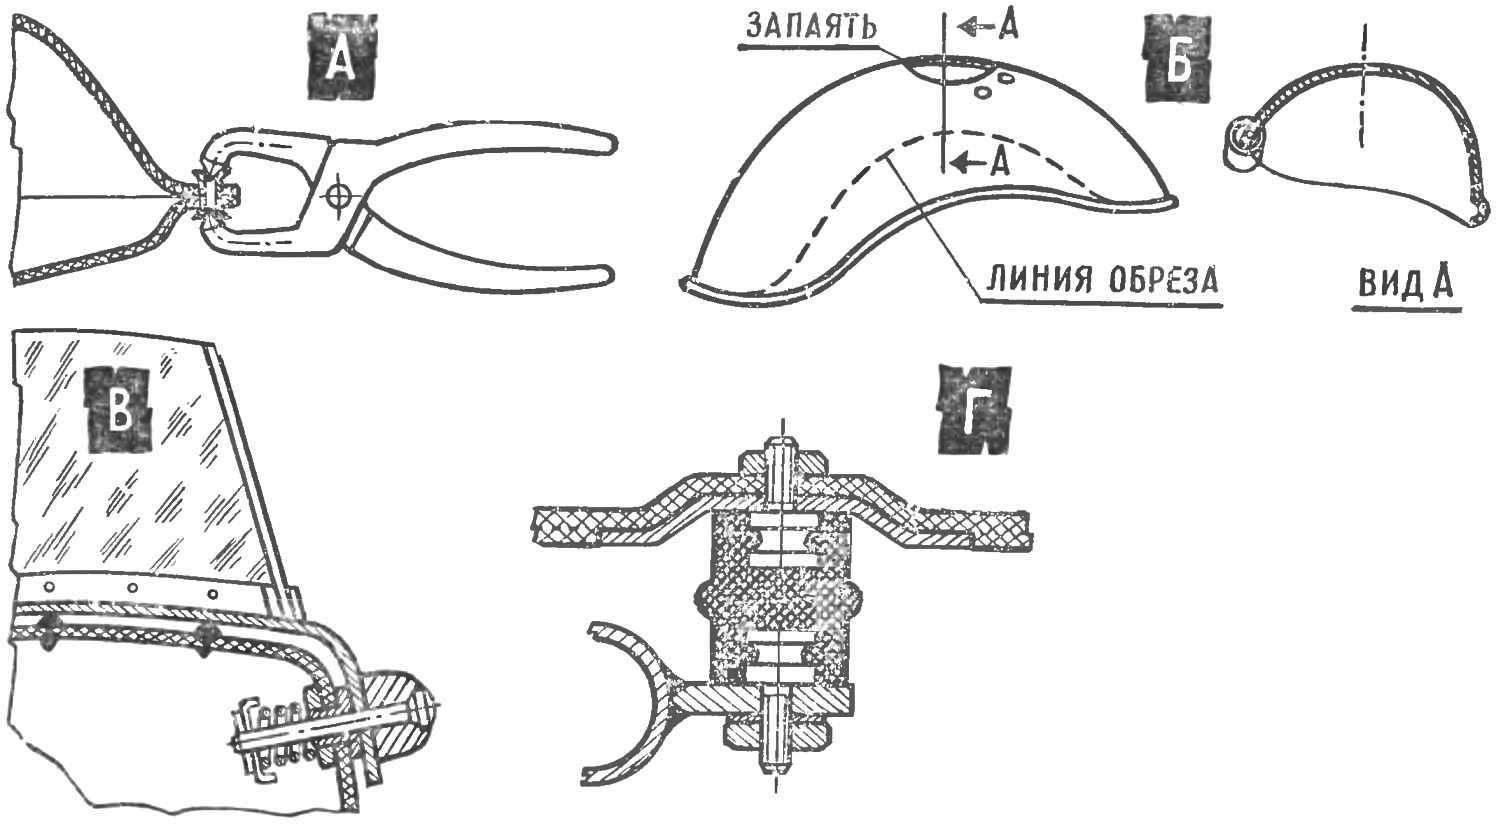
Fig. 3. Elements of bodywork:
And connection half; B—modification of the flap wheel; In a device of the hinge; G — fixing unit body.
In the back of a cushioned seat (Fig. 1) foam rubber glued to plywood base having a plurality of holes for air to escape and facilitate weight. The seat back is composed of a fiberglass base and glued it on foam cushion. It is upholstered in leatherette in colors harmonizing with the color of the scooter and trailer.
To the rear there is a small trunk, which closes the back of the seat is fixed in the lower part of the body on the hinges. Mounted on the back of the castle.
The trailer is installed with a mud flap from scooter “Vyatka”. To give it a beautiful shape, on the outer side is cut (Fig. 3b), and on the edge of the bleed is Igovka or napivaetsya cut along the tube. The old holes are running. On the flap set front and rear position lamps and stop signal.
For the manufacture of the lights applied from the lenses of automotive headlights.
Windproof flap (Fig. 1) made of organic glass thickness of 4 mm, mounted on a base welded from two parts cut from sheet aluminum.
To give the panel rigidity, the glass has two steep vertical curve. They are made on the template, heating the glass in the oil to a temperature of 120-130″ C.
Hinges (Fig. 3b) securing the flap to let him sit at the passenger.
The back of the body has a decorative edging of thin-walled steel tubes, which serve as armrests.
The body is bolted to the frame on rubber shock absorbers (Fig. ZG) from the motor boat “Neptune”.
Ass body laid a rubber Mat.
Weight of fully equipped body is 24 kg.
The frame side of the trailer (Fig. 5) is welded of seamless pipe Ø 32X3,0 mm, steel 20. On the right side it is welded suspension mounts, mud guard and foot pegs.
Mounting brackets trailer body are welded on the front and back parts of the frame, in addition, on the front part of the frame welded bracket lugs adjustable pull.
On the left side of the frame are the elements of the fastening side of the trailer bike.
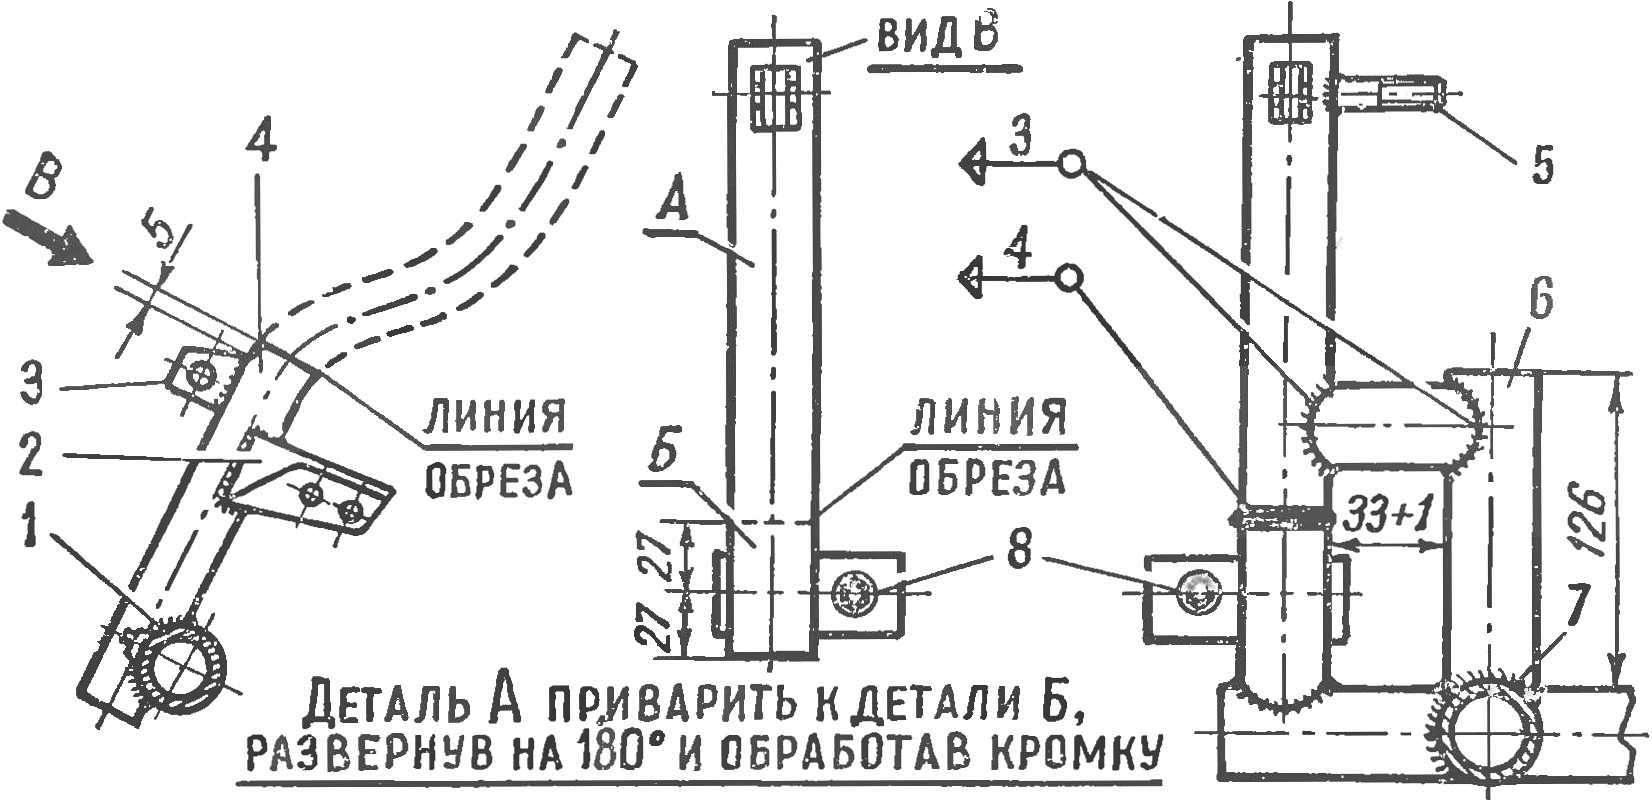
Fig. 4. Reconstruction of suspension “Vyatka” EP-150:
1 — bushing roller bearing; 2 — a spring strut bracket 3 — bracket hydraulic shock absorber; 4 — tube suspension; 5 — stud flap fastening M10X1,5; 6 — bracket; 7 — the frame of the trailer; 8 nipples
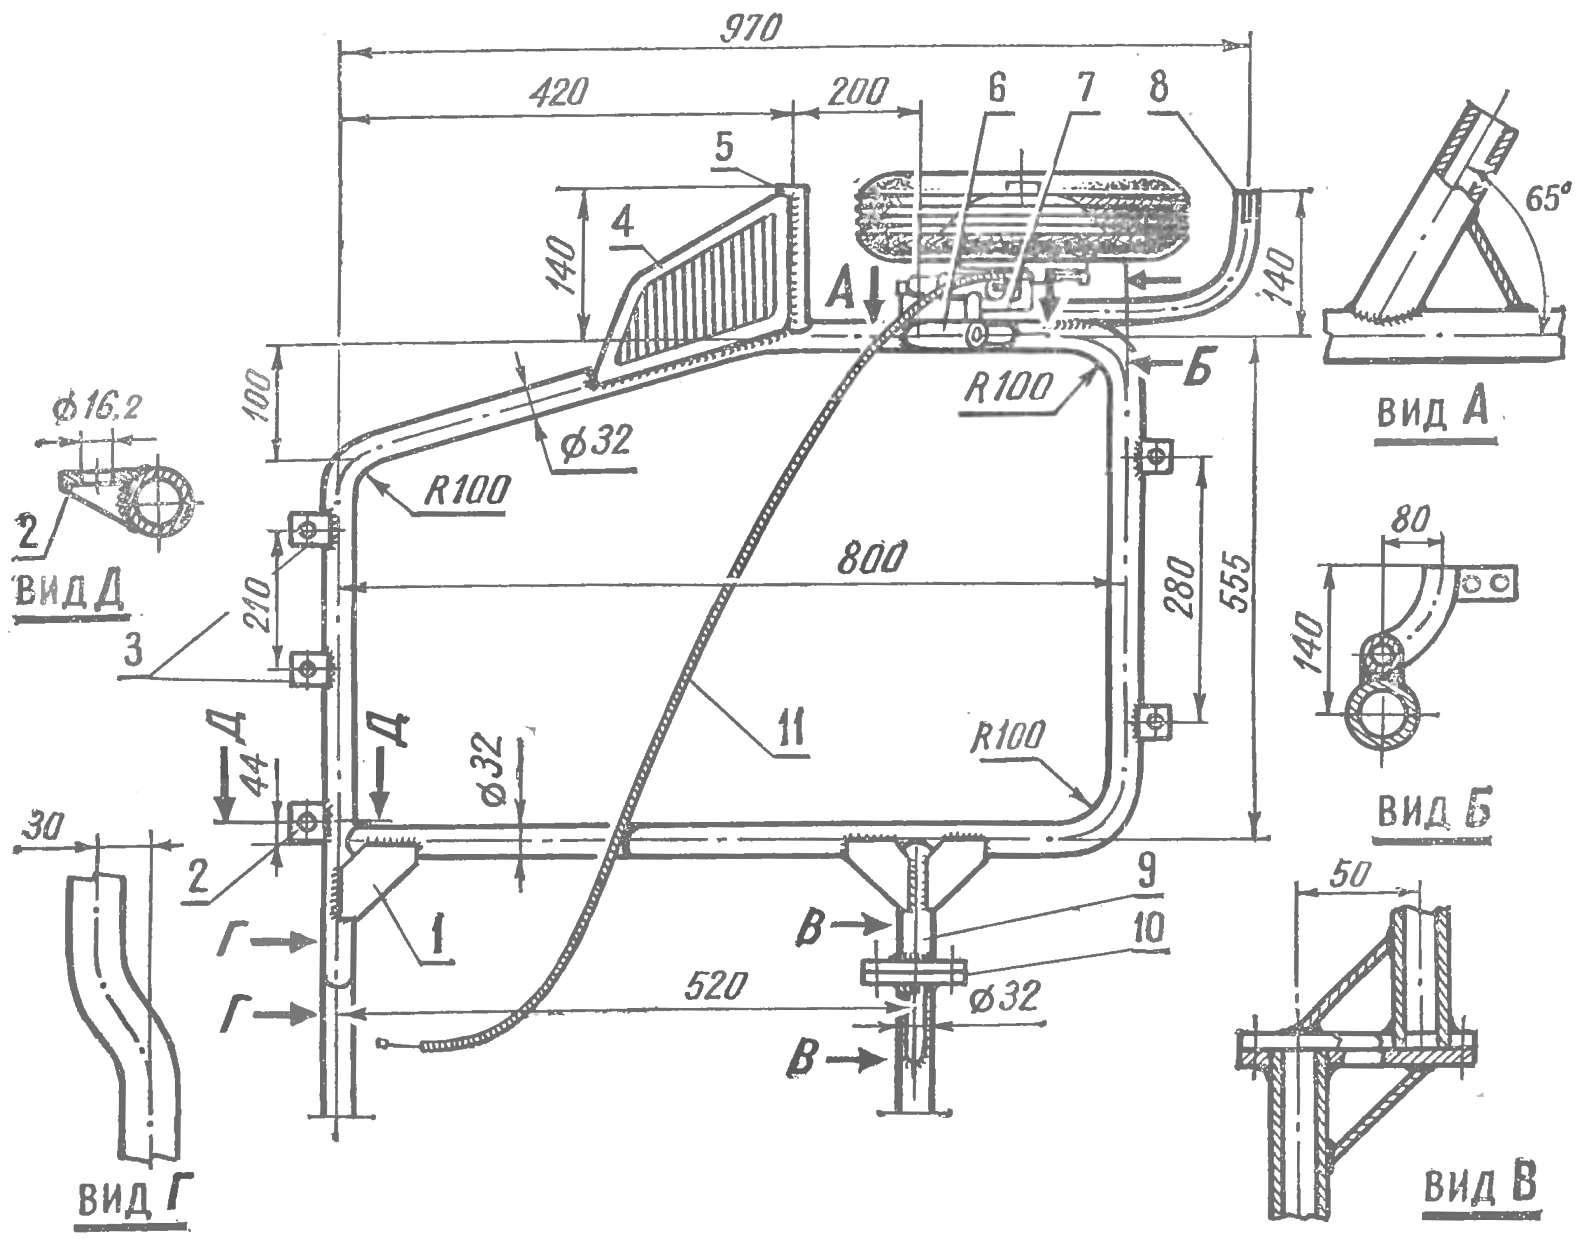
Fig. 5. The frame of the trailer:
1 — scarf (steel thickness. 1.5 mm); 2— eye the inclined rod; 3 — mounting brackets of the body; 4 — step; 5 — bracket footrest; 6 — bracket; 7 — the scarf hanger bracket; 8 — bracket wing; 9 — bracket n Klondike rear cropland; 10 — a flange; 11 — the brake cable.
According to the technical norms on the self build side of Remus trailer body should be 30-50 mm above the frame of the scooter, and attachment points must correspond to nodes connecting the motorcycles. To meet these requirements at the rear attachment point included the flanges, the front part of the frame has the matching curve and the attachment points are made according to the recommendations of “Behind the wheel” in 1971 No. 7.
Change design side of the emphasis of the scooter changed the way to connect the front node: finger collet attached to the frame of the motor scooter clamp Ø 60 mm, and thereto by welding.
Wheel suspension used on the VP-150. This allowed the use of axle, hub, swingarm, bushings, brackets and brake from the same scooter, and the crew got another wheel with brake.
Tube front suspension (Fig. 4) should be cut at 5 mm above the weld connecting the bracket of the hydraulic damper with the pipe. The lower part of the pipe cut off above the sleeve of needle bearings at a distance of 27 mm from the center, then turning it 180°, welded to the top.
Gear speedometer drive is removed together with the stem nut, and the hole is suppressed a rubber or threaded plug.
You should not miss such an important detail: after the alteration of the wheel suspension will get a rotation opposite to that which it had before, so the nut of the wheel axle having a left-hand thread should stall slightly rascarrel the end of the axis of the wheel.
To enhance inside the suspension springs, you can insert the rubber rod, rubber buffer suspension rear cargo scooter TG-200.
To connect the suspension to the frame of the trailer and its mounting bracket to the pipe to be welded DOA cut pipe Ø 32х3,0 mm according to figure 5, but for mounting a mud flap — pin M10X1,5.
The equipment side of the trailer brake wheel greatly improves the safety during operation of the scooter in an urban environment.
To connect the brake cable of the trailer to the foot brake of the scooter is the most convenient to use the ready parts (Fig. 6): mounting bracket and rod (from the lever of the brake of the motorcycle “Voskhod”), the adjustment fitting from the brake of the scooter; only the finger will have to be replaced by longer ones.
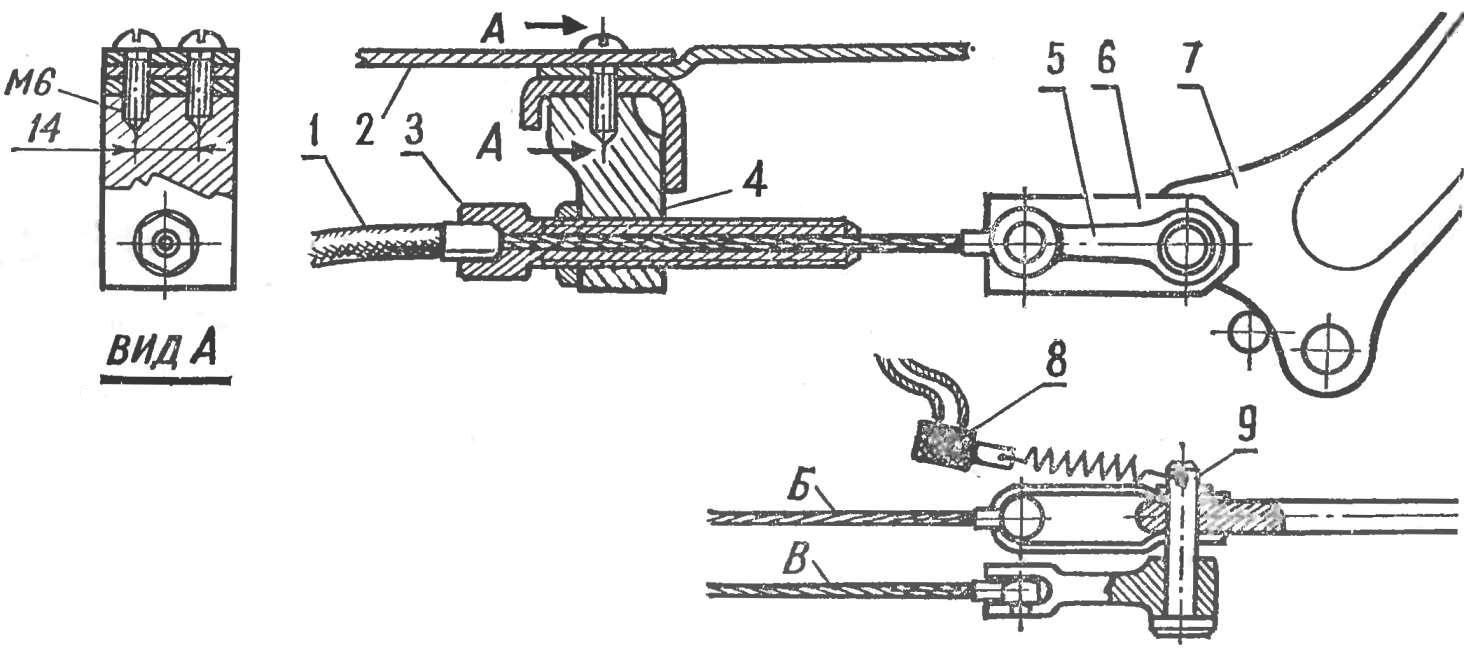
Fig. 6. Wiring diagram for brakes:
1 — sheath of the cable brake; 2 — polik scooter; 3 — fitting the adjustment; 4 — bracket fitting; 5 — thrust (brake lever of the motorcycle “Voskhod”); 6&; 7 — a brake pedal; 8 — the switch of a signal “stop”; 9 — pull your finger (extended); B — rear wheel; The wire rope wheel of the trailer.
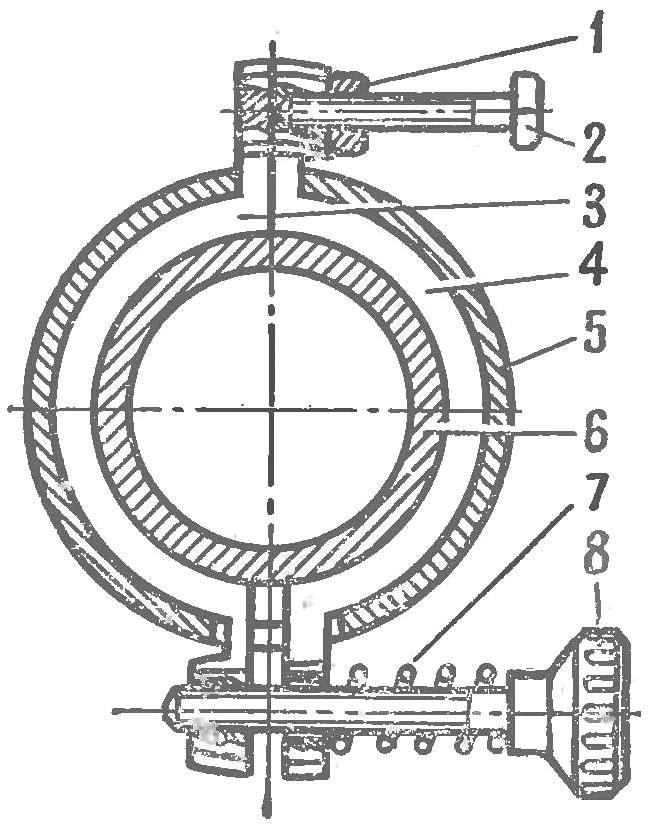
Fig. 7. The steering damper:
1 — M6 nut; 2 — a bolt М6Х20; 3, 4 — crackers (bronze); 5 — head pipe; 6 — pipe steering wheel; 7 — spring; 8 — the screw of adjustment М6Х40.
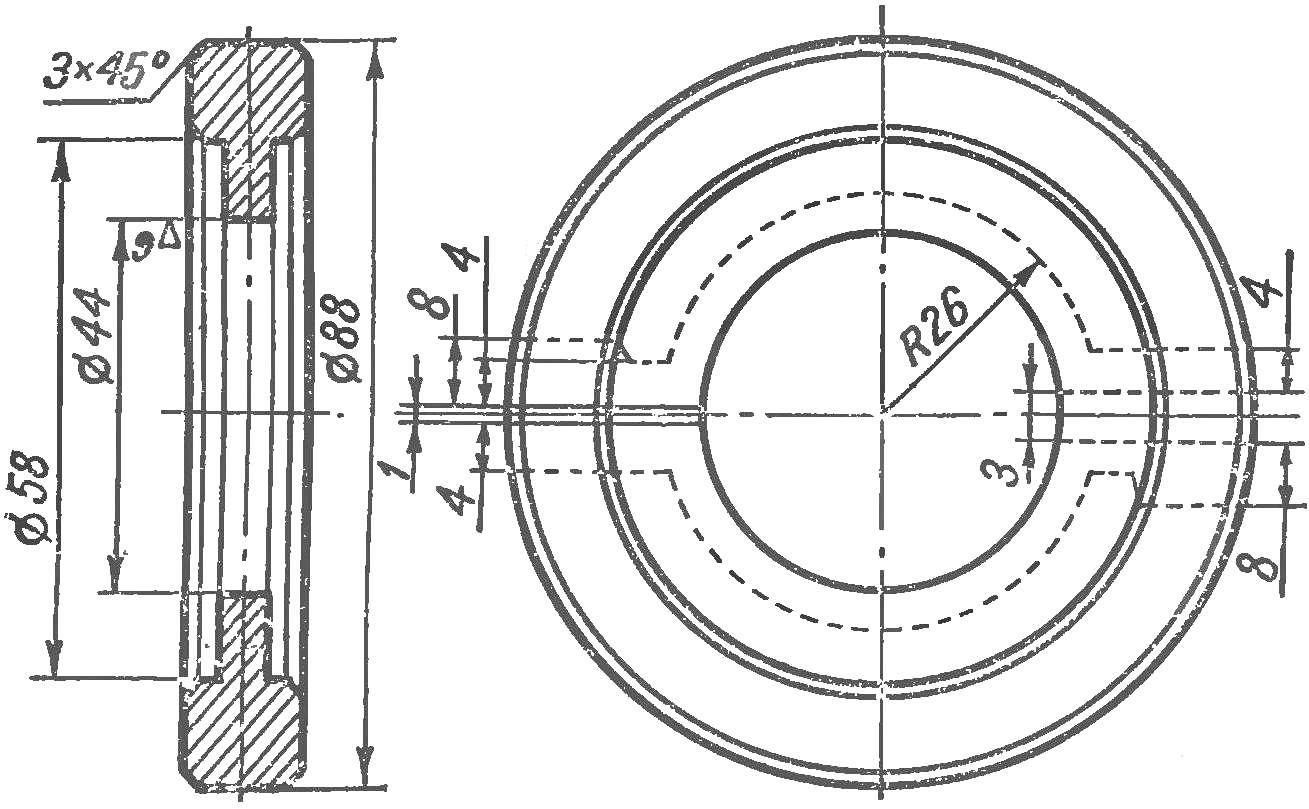
Fig. 8. The workpiece for the manufacture of crackers damper
The stop bracket is secured with two M6 screws, one of which serves also for fixing the fastening of the flooring. For the second screw near the first drilled hole Ø 6.2 mm.
To facilitate the management of scooter the wheel is provided with a damper. Its design (Fig. 7) allows you to adjust the amount of force when steering and eliminates wobbling — fault, which many fans refuse from the operation of a homemade side trailers.
The main parts of the damper are bronze crackers installed in place of the felt seal in the bottom of the tube of the steering column.
Fluctuations helm extinguished by the forces of friction between the bronze breadcrumbs and the base of the steering tube when screwing in the tightening screw.
To eliminate backlash between the shoulders of the crackers and cut-outs in the head tube last open screw and lock-nut. When installing the collets in their place of the working surface you need to cover the grease tsiatim-201.
V. KOVALEV, Bryansk
Recommend to read
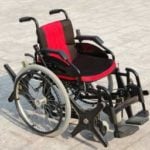 INVENT A STROLLER!
I think that it interests not only me, but many who because of injury, illness. or accident has lost the ability to move independently. Great care of us, the disabled, shows the state. A...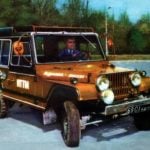 “JEEP” – SIMPLY AND RELIABLY
Residents of the Armenian capital like cars and know a lot about them. This convinced us to visit Yerevan streets with design engineer ERISA by Stanislav Hopenosis on his makeshift...
