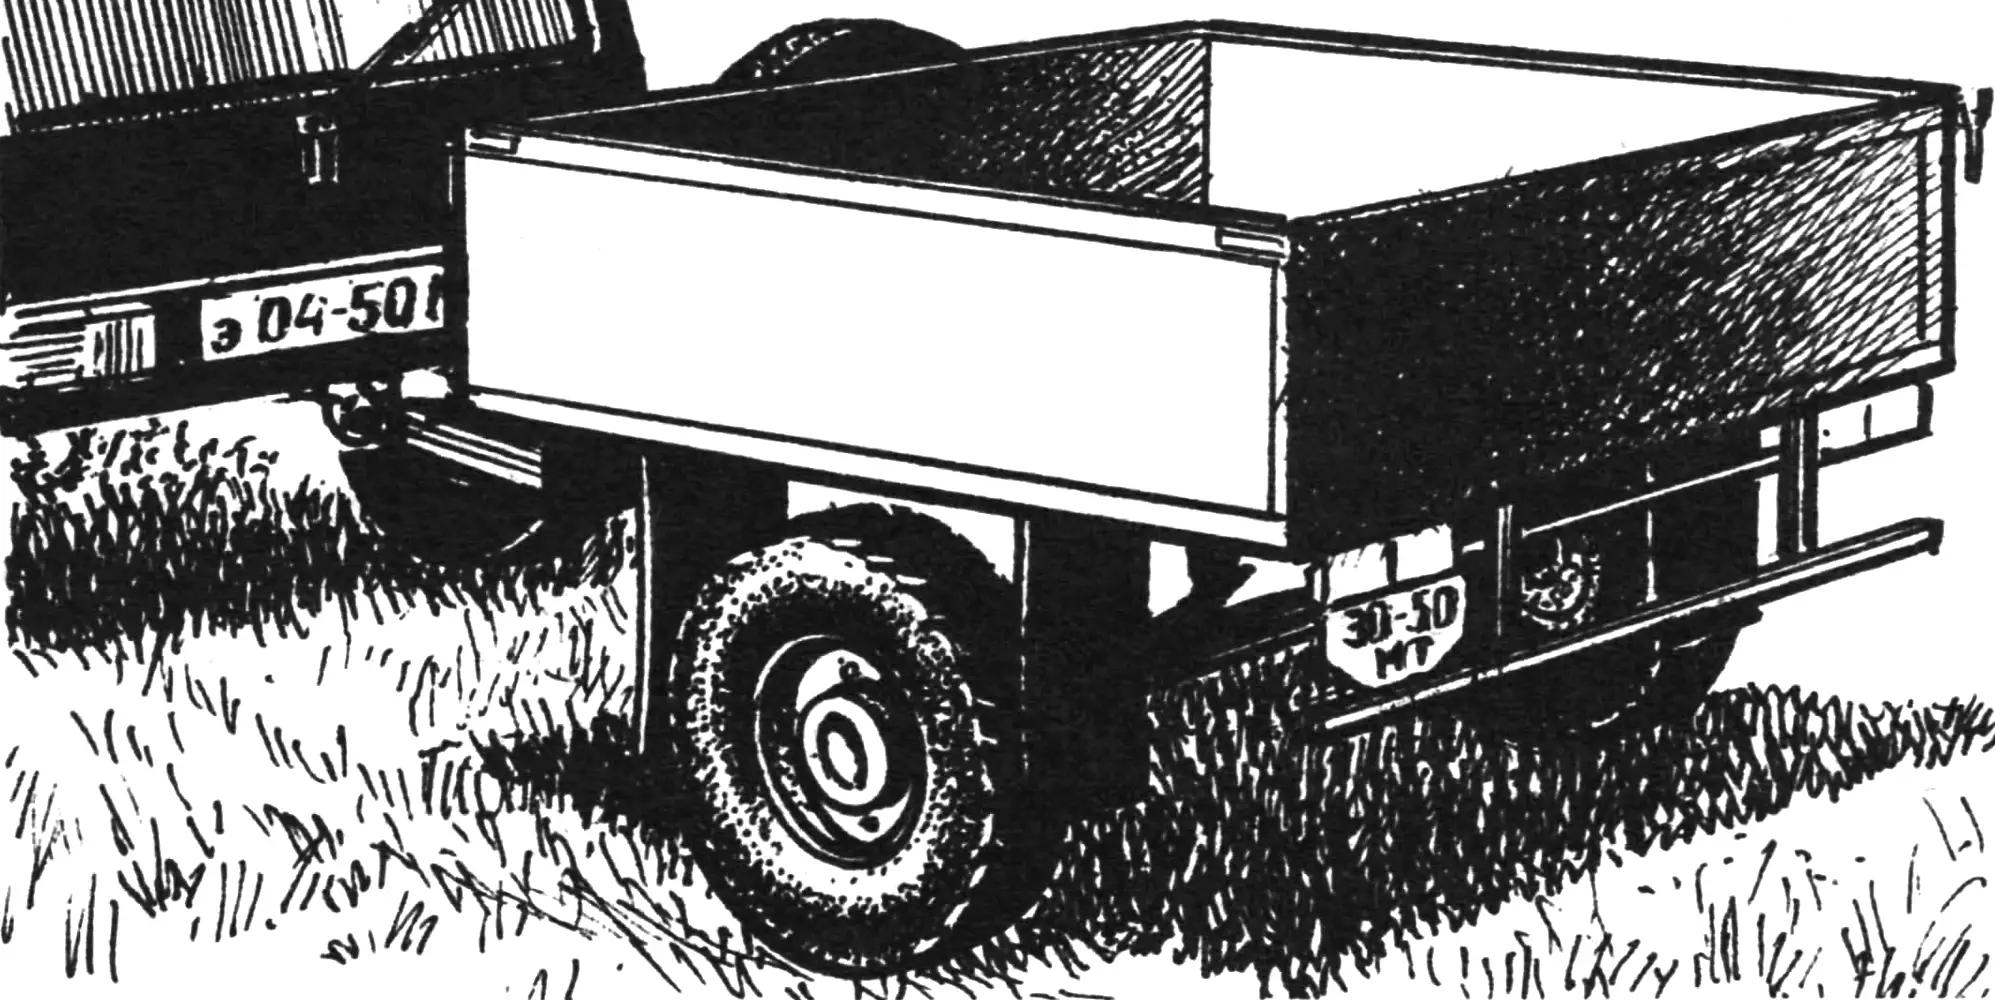
The favorite car in the countryside is, without doubt, the full-wheel-drive, high-clearance VAZ 2121 “Niva”. Unfortunately, our industry does not produce trailers specifically for this model that have a high load capacity and can be operated off-road. And that’s a pity! Rural residents have an enormous need for them: they have to haul building materials and fertilizers, and deliver produce from their gardens to the market. In short, a trailer for the “Niva” is simply essential! That is why I designed and built one myself.
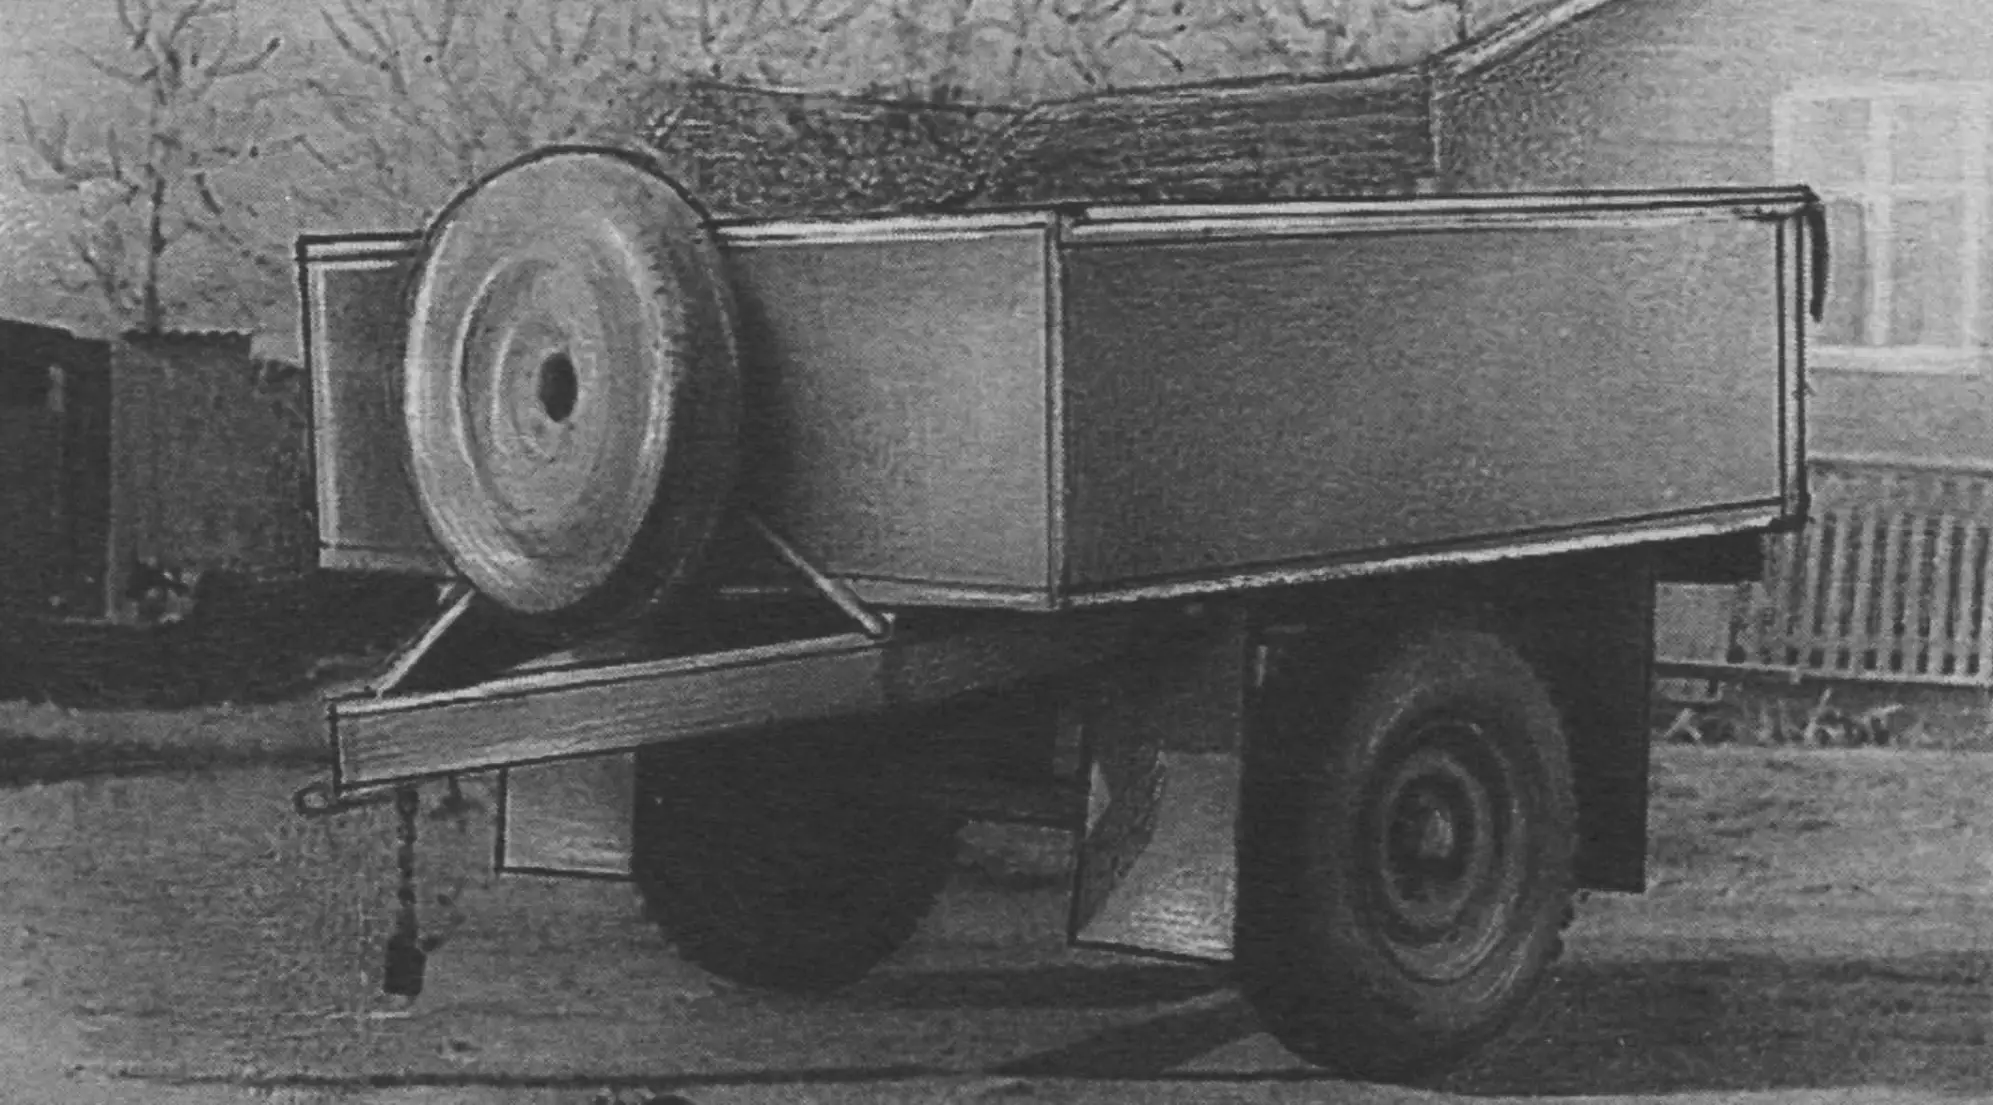
The trailer’s own weight is 250 kg. According to traffic police requirements, the total weight of a trailer not equipped with brakes, with cargo, must not exceed half the curb weight of the towing vehicle, i.e., no more than 750 kg. Thus, the load capacity permitted by the authorities is 500 kg, while the actual capacity is twice as much: up to 1000 kg. In addition, the folding rear tailgate and smooth cargo floor make loading and unloading convenient. The trailer is currently registered and in successful use. Rural craftsmen have repeatedly asked me for drawings, so I decided to write to the “Modelist-Konstruktor” magazine. I hope many of its readers will gladly take up building the trailer.
The running gear is based on the rear axle with leaf springs and hubs from a scrapped mobile compressor PR-10. The track width was adjusted to match the towing vehicle. For this, the thick-walled axle tube with an outer diameter of 80 mm was cut and shortened on a lathe with a chamfer for welding. The axle was subsequently welded by electric arc welding. The number of spring leaves was reduced by two on each side. The wheel discs and tires are from a UAZ vehicle — size 8.40×15″. The spring shackles are welded to the frame made of channel steel and rectangular steel tubes 25×50 mm. To supply grease, the spring mounting bolts have an internal channel and a round head with a trimmed hex. Bolt rotation is prevented by plates 15×25 mm made of 2 mm steel welded to the shackles.
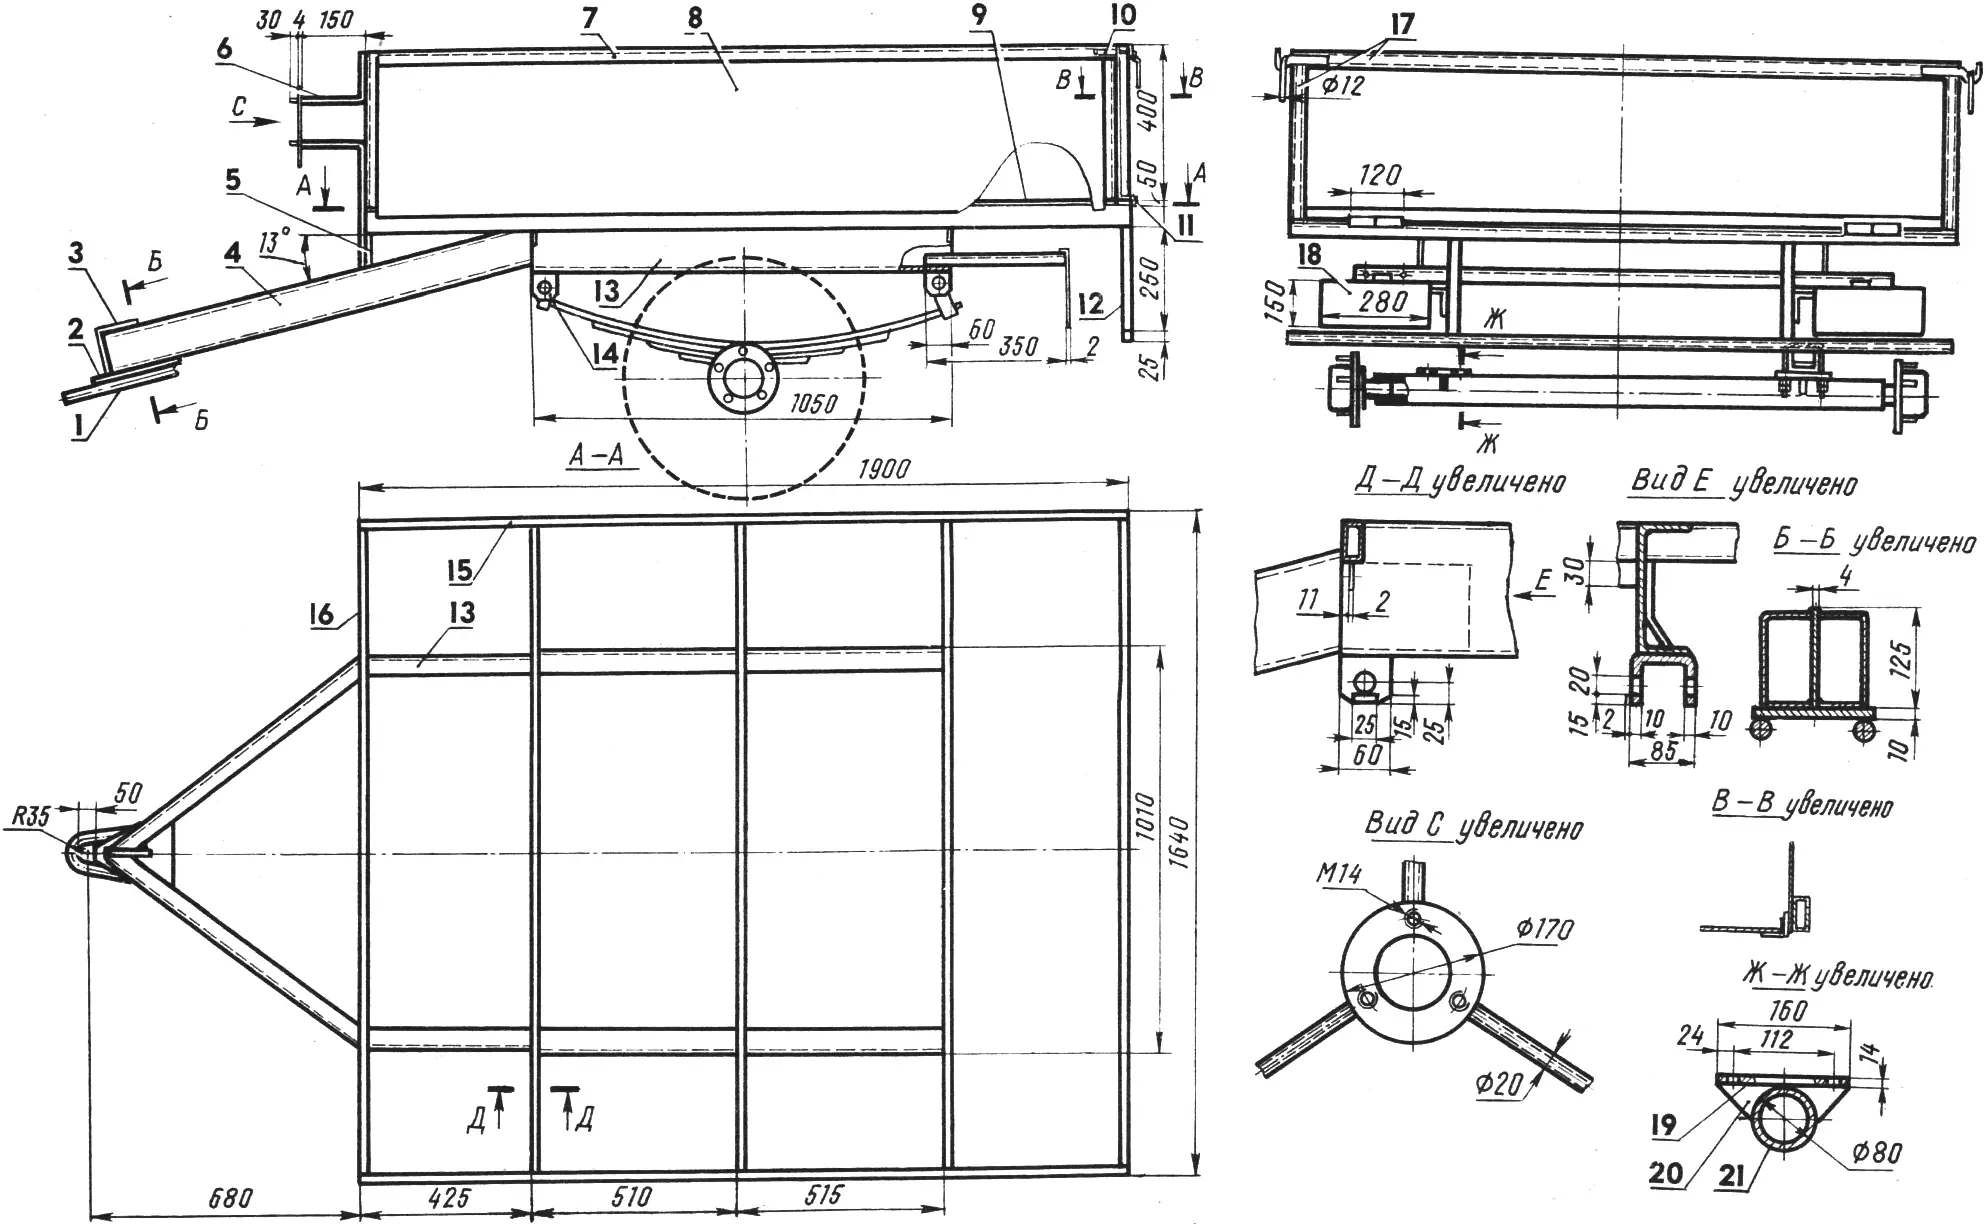
1 — clamp (steel, rod Ø 20), 2 — reinforcing plate (steel, 10 mm thick), 3 — reinforcing partition (steel, 4x100x125), 4 — drawbar (steel, channel No. 12), 5 — reinforcing plate (steel, 5x50x90), 6 — spare wheel bracket post (steel, tube 20), 7 — body edging (steel, angle 32×32), 8 — body sheathing (steel, 1.2 mm thick), 9 — floor pan (steel, 2 mm thick), 10 — lock, 11 — hinge, 12 — bumper (steel, tube 25×15), 13 — side member (steel, channel No. 16), 14 — shackle (steel), 15 — longitudinal tie (steel, tube 25×25), 16 — transverse tie (steel, tube 25×25), 17 — rear tailgate edging (steel, tube 25×50), 18 — mudguard plate (steel, 2x150x280), 19 — support plate (steel, 14x140x160), 20 — brace (steel), 21 — axle (from PR-10 compressor).
The trailer drawbar is made of bent equal-leg channel steel. The cargo floor is a 2 mm steel sheet. The body posts and the upper framing of the side and front boards are welded from steel angles 32×3. The board panels are 1.2 mm steel sheets. The rear tailgate hinges, 16 mm in diameter, are turned from steel round stock. Turn signals, clearance lights, and stop lights are from a KamAZ truck. A plate for mounting the license plate is provided on the left side of the trailer (in the direction of travel), along with its lighting. Protection for the signal lamps is provided by a welded structure made of 25×25 mm tube. Mudguards are cut from conveyor belt material; 30×270 mm plates of 2 mm steel are welded to the frame for mounting them. The guards are attached to the plates with bolts.
The spare wheel is located at the front of the trailer and secured on the bracket with three M14 nuts.
All trailer parts are painted with gray automotive enamel ML-152.
Order of trailer frame fabrication.
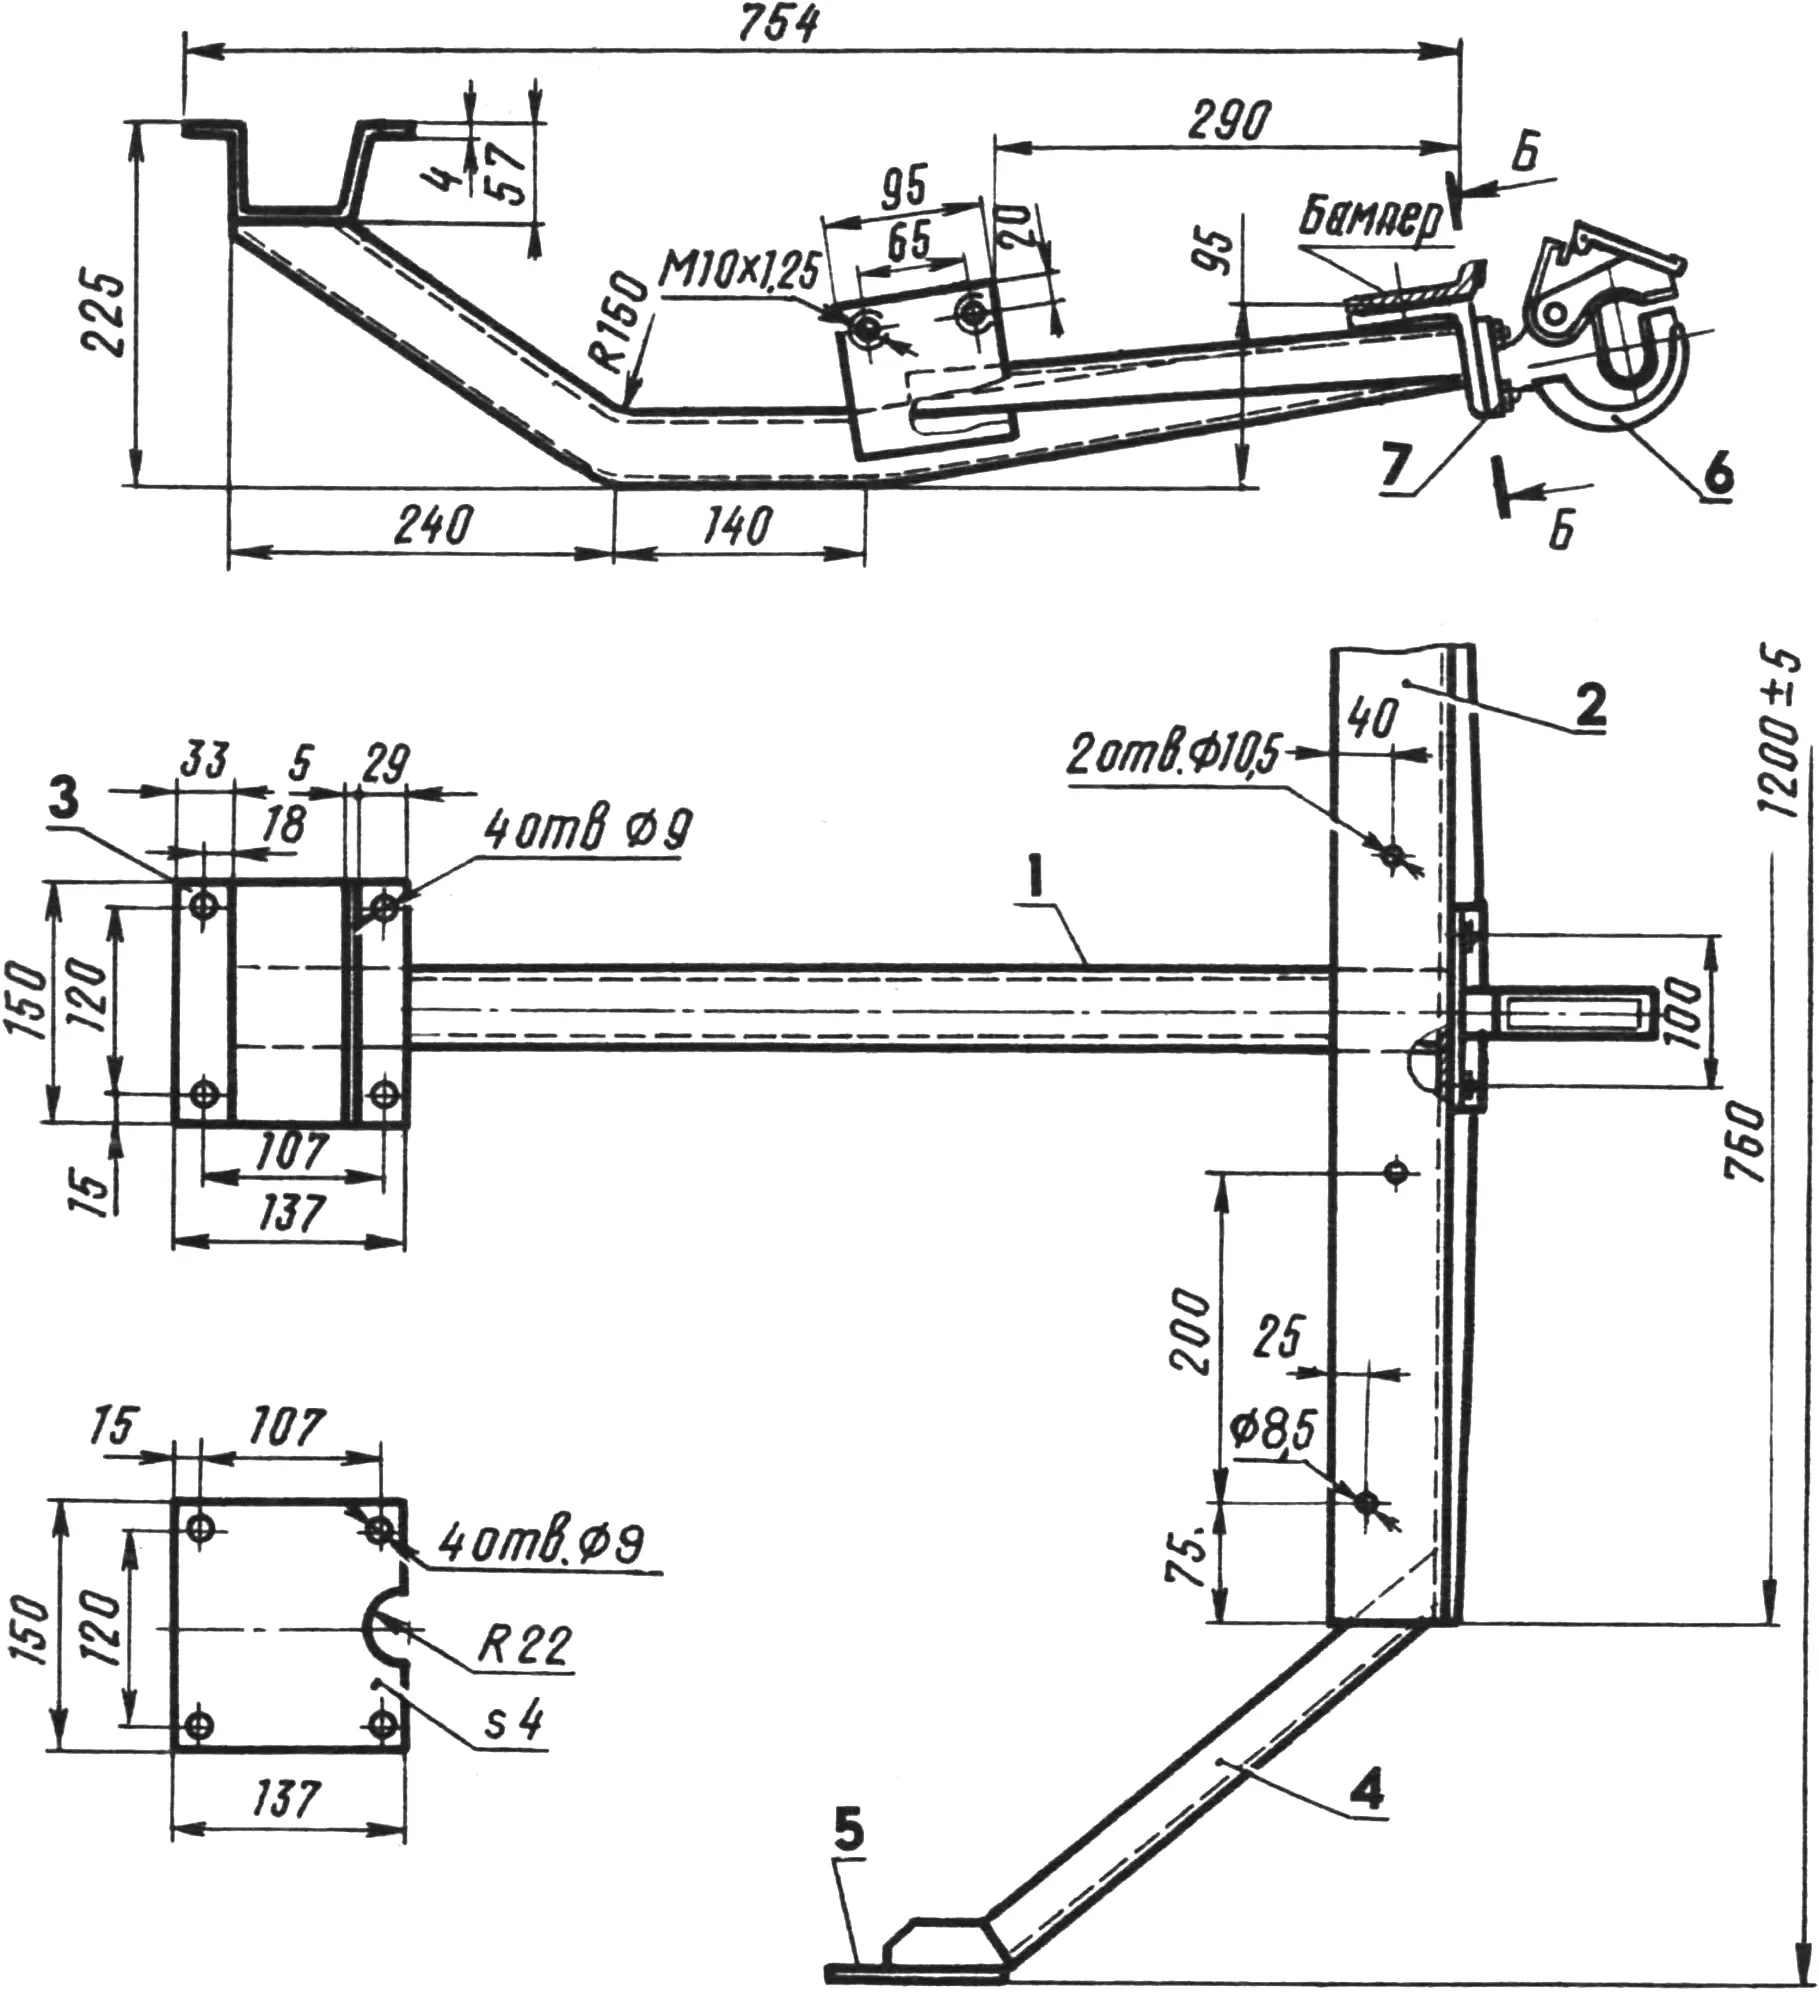
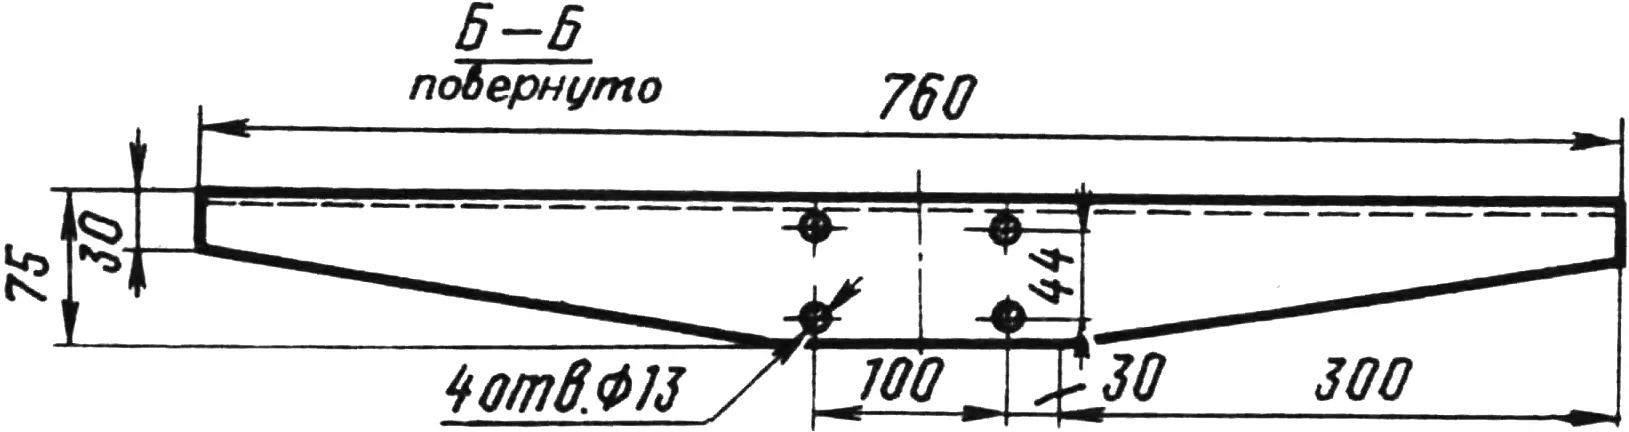
1 — longitudinal beam (steel, tube 45×3.5), 2 — rear bracket (steel, angle 75×8), 3 — clamp (steel, 4 mm thick), 4 — brace (steel, angle 32×3), 5 — mounting plate (steel, 6 mm thick), 6 — tow hook (from UAZ automobile), 7 — bolt M12x40 (4 pcs.).
Three cross members — tubes of 25×50 mm section — are first welded to the base made of two channels. Then the shackles for mounting the leaf springs.
The axle with hubs must be prepared in advance. Attach the leaf springs with the axle to the frame base. At the rear spring mount, a part is provided to compensate for their elongation during motion.
Next, the trailer drawbar and the towing device for the automobile must be fabricated.
The most acceptable method of assembling the frame with the drawbar is as follows: hook the trailer drawbar onto the automobile’s tow hook, then place the frame base with leaf springs and axle on wheels in a horizontal position; insert the drawbar into the frame base and weld by electric arc welding according to the drawing.
Assembly and welding of the remaining body parts, I think, present no difficulties, so I will proceed to describe the towing device.
It consists of a rigid bracket beam, clamp, cover plate, braces, plates, and tow hook. The tow hook is taken from a UAZ automobile.
The structure is secured to the automobile body at four points. The front end is drawn through the cover plate with four M8x30 bolts to the luggage compartment floor and grips the floor cross member. The rear is fixed to the bumper with two M8x25 bolts and two M10x25 bolts.
The beam is bent from a tube 45 mm in diameter with a 3.5 mm wall thickness. The clamp and cover plate are made of 4 mm sheet steel. The rear bracket is made of equal-leg angle steel 75×8. Holes 13 mm in diameter are drilled in it for mounting the tow hook. The lower edges of the bracket are trimmed on a milling machine. The braces are made of equal-leg angle steel 32×3. The plates are cut from 6 mm steel. According to the drawing, holes 8.6 mm in diameter should be laid out and drilled in them, and M10x1.25 threads cut.
Now installation can begin. Holes in the luggage compartment floor are carefully laid out and drilled along the clamp, keeping in mind that the towing device must be positioned strictly on the automobile’s centerline. The clamp and cover plate are drawn together with M8x30 bolts. After drilling holes in the rear bumper in place, the bracket is secured with M10 bolts. Replace the automobile’s tow eyes with plates.
Welding work is best done with the automobile on a lift or over a pit. Tack-weld the beam to the clamp and bracket by electric arc welding, and the braces to the bracket and plates.
To avoid damaging automobile parts with welding, the entire structure should be dismantled and fully welded on a welding table. All that remains is to clean the seams, paint, and install the towing device on the automobile. The tow hook is attached last with four bolts.
The lighting signals must be connected to the automobile’s onboard electrical system.
As a safety device, a steel cable 8…10 mm in diameter or a chain must be installed.
“M-K” 9’94, A. LINCHENKO, civil engineer
Recommend to read
 “ETERNAL” CUFF
The weak point of any piston pump — automobile, motorcycle or Bicycle, as is well known, piston, or rather, leather cuff, and the main fault is a loose fit it to the cylinder walls. The... RULED BY “SHUTTLE”
DPJ-quality processing of wood of iron planers, chisels and other tools necessary not only to sharpen, but to rule. This is achieved by lapping on the touchstone — the operation usually...
