Of the readers who didn’t lose metal parts or tools? Sometimes it happens at the most inopportune time and threatens to permanently stop work. Lost somewhere in the grass screwdriver that fell behind the Cabinet chisel or a failure in a pier of pliers is able to ruffle anyone. In such cases a simple device – a magnetic probe with light and sound alarm. Using this simple device, you can easily find the loss in hard to reach places and the fact findings you will be notified outbreak warning led and buzzer. The principle of operation of the probe is quite simple – on a long rod fixed two magnet “sticking” to the metal object which closes the circuit and lights the warning led. Thus, you can know when the probe with discovery, you can extract the “light”.
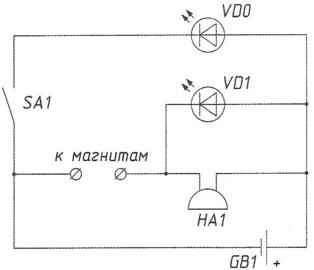
The probe device shown in Fig.1. On the long rod of rectangular cross section short screws (screws) are attached two steel cheeks with terminals. Each of the cheeks with clamps and bolts are attached magnets. The approximate dimensions of the parts shown in the figure. From the terminals there are two wires to the electronic unit, which is located closer to the opposite magnets to the end of the rod.

 Of the readers who didn’t lose metal parts or tools? Sometimes it happens at the most inopportune time and threatens to permanently stop work. Lost somewhere in the grass screwdriver that fell behind the Cabinet chisel or a failure in a pier of pliers is able to ruffle anyone. In such cases a simple device – a magnetic probe with light and sound alarm. Using this simple device, you can easily find the loss in hard to reach places and the fact findings you will be notified outbreak warning led and buzzer. The principle of operation of the probe is quite simple – on a long rod fixed two magnet “sticking” to the metal object which closes the circuit and lights the warning led. Thus, you can know when the probe with discovery, you can extract the “light”.