 Scale model 1:18.
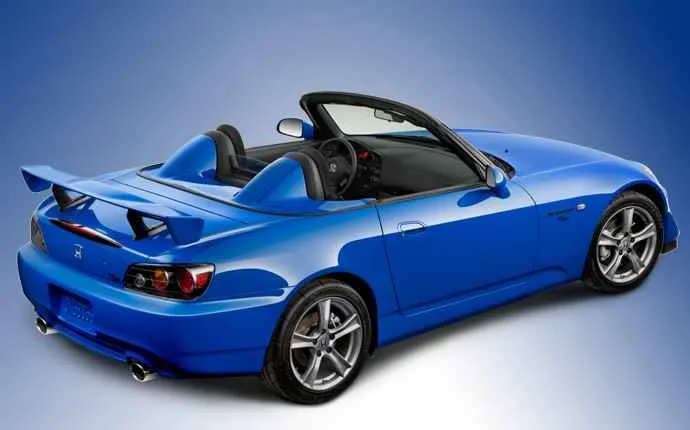
Honda S2000 — the car rear-wheel drive front-engined and rear wheel drive Roadster with equal weight distribution on front and rear axle, manufactured by Honda. Produced from April 1999 and dedicated to the 50th anniversary of the company as a successor series of roadsters S500, S600 and S800. In 2003, the Roadster from Honda has undergone restyling. Equipped with an engine of 2.0 liter capacity 237 HP and a 6-speed manual transmission.
In 2008 released a modification S2000 CR (Club Racer), focused on the track. Has a reduced weight, chassis tuning, a removable aluminum roof, air conditioner and audio system in the list of options, spare wheel replaced by a puncture repair kit tire. August 7, 2009 production S2000 was discontinued, in honor of that, Honda decided to release a special modification of the car — Ultimate Edition.
THE ORDER OF ASSEMBLY OF THE MODEL.
1.*Assemble the unit from parts marked with the symbol “A”: Al; A21; A2P; АЗ1; AZR; A5 (see Fig.1).
2. Collect the frame unit 1 of the items J1; J21; J2p; J31; J3p; J4; J5; J6; J7; J8 (see Fig.2).
3. Glue on the frame unit 1 in detail Al (see Fig.3).
4.*A41 and А4р glued to A1 (see Fig.3).
5. Collect blocks of the items marked with “In”:
5.1*W51+В5р+B6+B11 (see Fig.4).
5.2 B8.1+B8.2+B8.3+B8.4 – glue on B6 (see Fig.4).
5.3B7.1+B7.2+B7.3 – glue on B6 (see Fig.4)
5.4 B9.1+B9.2+B9.3+B9.4 – glue on B8.1 (see Fig.4).
5.5В10.1+B10.2+B10.3 – glue on B6 (see Fig.4).
5.6 putting it together B13+B14+B15+B16 (see Fig.5).
5.7 putting it together Q23+Q20, Q23+Q21 and Q23+Q22. and glued to the B12 and B16 (see Fig.5 and Fig.6).
5.8 q17.1+B17.2+B17.3+q17.7 glued to В1З and B14 (see Fig.5 and Fig.6).
5.9 B17.4; q17.5; B17.6; B17.8 sticking to the B17.3 and B17.7 (see Fig.7)
5.10 putting it together B26.1+B26.2+B26.3+X11+Х1р (see Fig.6)
5.11 putting it together B19.1+B19.2+ B19.3 and glued to the B18.1+B18.2 (see Fig.8).
5.12 Collect B28+B28.1; B28+B28.2; 27+27.1 (see Fig.9).
5.13 putting it together B1+OT. Gather together all the details, as shown in Fig.10 and Fig.11.
6. *Collect frame unit 2: J9+J10+J11 (see Fig.12).
7. *Collect the back of the body model: ?1+?4. ?2.1+?2.2, ?3.1 R+?3.2 R ?3.11+?3.21 glue to the inside ?1. Gather together ?5+?5,1+?6. ?7R and ?71. Glued to ?6 and ?4. ?8P ?81 is glued to ?7R and ?71 respectively (see Fig.13).
8. *Collect the front part of the body of the model. ?2211+?22.21+?22.31 ?221р+?22.2 R+?22.3 R; glue to the inside ?22. ?21 is glued to ?7R and ?71. Gather together ?13+?12+?15+?16+ ?181+?18P+?19+?20. Collect ?14.1+?14.2 and sticking to the inside ?13 ?12. Collect ?17.1+?17.2 and sticking to the inside ?181, ?18P, 716 and ?19. Glue ?91 and ?9P K ?71 and ?7R, respectively. ?10p+?Glued to the 11R ?12, ?9P and ?15; ?101+?111 glued to ?12, ?91 and ?15 (see Fig.14).
9.Gather together Fll(p)+F21(p)+F31(p)+F41(p)+F51(p)+F61(p) (see Fig.16). Glue these blocks to the inside ?4+?5,1+?71+?7R, as shown in Fig.23.
10. The frame unit 2 is glued to the body of the model, as shown in Fig. 15.
11. Gather together В251(R)+B25.1+B25.21(p)+В2531(R) and glue to the inside В241(R). Glue B21(R) and В41(R) to В241(R) and ?71(R), respectively (see Fig.17).
12. Glue together all the previous blocks of the model (see Fig.22 and Fig.23).
13. We gather together the E11(R)+E21(R)+Е31(R)+E41(p)+Е51(R)+Е61(R)+E71(R)+ E81(R) (see Fig.18). Glue these blocks to the inside of the front end of the model, as shown in Fig.22.
14. Gather together ?23.1+?23.2+?23.3+?23.4+?23.5+?23.6+J12+J13 (see Fig.19). Glued to ?6 (see Fig.22 and Fig.23).
15. We gather together the H11(p)+H21(R) (see Fig.20). Glued to ?71(R), respectively (see Fig.22 and Fig.23).
16.Sobiraemosti Gl+G2+G31+G3p+G4+G5 (see Fig.20). Glued to ?5 (see Fig.22 and Fig.23).
17. Glue ?4.1 ?4.2 K ?3.11 ?3.1 R in the appropriate places (see Fig.23).
18. Gather together 11+12+19.13+I4+I5+I6+I7+I8 glued to I1 (see Fig.24).
19.111 glued to 111.1 and 111.2. Gather together I14+I10+I12+I15+I16 (see Fig.25 and Fig. 26).
20. Axis wheels fixed in A1. On the ends of the axles of the wheel set (blocks with the symbol “I”).
21. Gather together Dl+D2+D31+D3p+D4+D5 (see Fig.27).
22. The block with symbol “D” is glued to the top of the body of the model (the block with the symbol “?”) (see Fig.29 and Fig.30). 23.Glue item x2 (see Fig.28)
Note. When assembling the points marked with ” *” need to use the gluing data along with the details of the model.
The materials to build a model of HONDA S2000 (download)
Recommend to read
 Pneumatic vehicle “Losharik”
Once upon a time, there was a popular TV show "You Can Do It" where craftsmen talked about the designs they had created. Perhaps it was there that information about air-cushion vehicles... MAGNETIC BRACELET
Magnet from old speakers, glued with epoxy glue to the strap from the watch, will allow you to free your hands when performing such work as repair of footwear, mending roof or door...
