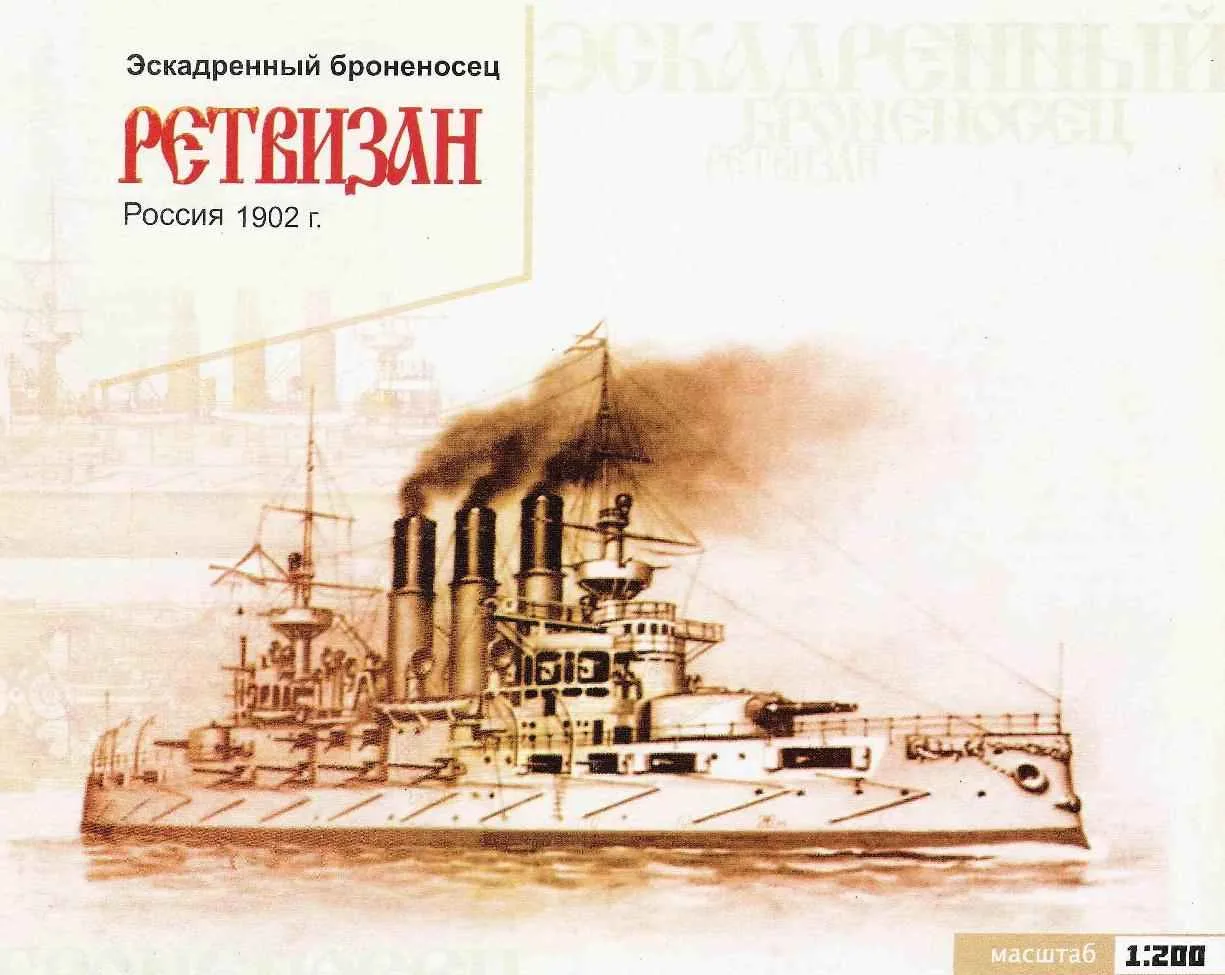

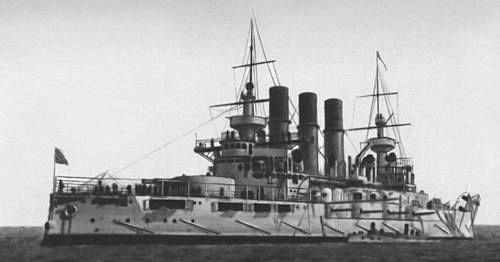
SQUADRON BATTLESHIP RETVIZAN. Scale model 1:200.
“Retvizan” (in translation from the Swedish “war CRY”) a Swedish ship of the line captured in battle on 26 June 1790. Preserved in the Russian Navy, its name is traditionally passed to the sailing steam ship line, and then to the squadron battleship.
The history of this vehicle began with the appearance of Charles Kramp head of the American shipbuilding company, “William crump and Sons” in the corridors of the Main Admiralty in March 1898. Having heard about the Shipbuilding program of 1898, “For needs of Far East”, he immediately offered the services of his company to build a number of ships.
The hopes of the American crashed on the “extremely severe”, in his opinion, the conditions of the order ships. He was able to negotiate the construction of only two ships: the cruiser “Varyag” and the battleship “Retvizan”.
At the request of the Admiralty, the prototype of “Retvizan” was to serve as a battleship “Peresvet” with the replacement 10 – inch artillery by 12-inch,
To control the progress of works was created a special “monitoring Committee” headed by the Chairman, captain 1st rank M. A. Danilevsky. Actively engaged in the process of building, members of the Commission revealed the utter bankruptcy of the MTK in the operational number of issues. Paperwork on agreement, subsequent re-examination, approval, and then another change drawings, threatened to cause disruptions in the building.
But the Americans also made mistakes. The error in the calculation of the displacement of 272 t had to fix already on the slipway, increasing the length of the ship by 2.44 m. a Particularly hot debate was the order of the tower ustanovleno caliber.
June 27, 1901, on the battleship.for the first time, threw a pair of twelve boilers of the bow group, on another day with feed. In early October, began official tests. For three days (from 8 to 11 October) “Retvizan” was tested on the measured mile, made a 12-hour run at full speed 24 hours was economic 10-node swing to determine cruising range. The speed of the ship was only 17,99 bonds (if contract speed of 18 kt).
Finally, after the final finishing of the ship, 10 Mar 1902, raising the flag and pennant, Retvizan started the campaign. April 30, he left the American shore and 10-node swing went to Russia. 1
31 Oct 1902 Retvizan in slavetrade, consisting of the battleship “Victory”, the cruisers “Pallada”, “Diana” and “Hercules” moved to Port Arthur.
 Convinced of the inevitability of war, Admiral E. I. Alekseev, the king’s Viceroy in the far East, gave 18 January 1904 the order on the beginning of the campaign was associated with various instructions from St. Petersburg and he did not know what to do. Not to part with the idea of “preemptive strike”, Alekseev continued to keep the ships in the outer roads…
January 26, testing the lights and charging the mine the artillery, the ships of the Russian squadron prepared to spend one more night at anchor, which, according to the calculations of many, was to be the last day it was expected the exit to the sea. Approaches to the RAID was guarding the searchlights of the battleship Retvizan, which was ranked in the third line, and the cruiser “Pallada” in the fourth. The first torpedo from the destroyer”, Siracusa”
“Retvizan” was struck in the left side. Five people who were under the Department of underwater mine apparatus, was killed instantly; the sixth was picked up by the flow of water and thrown on the decks. Cartridge cellar flooding starboard, was able to reduce the roll to 5 degrees. In place of “Retvizan” during the attack on the Japanese destroyers were also damaged the cruiser Pallada and the battleships “Tsesarevich”,
However, the situation on the “Retvisan” became critical because of the failed nasal pump: continued ingress of water, the ship slowly settled to the vosemnadtsatimetrovoy the depth of the RAID. Uklapa anchor rope, three bow compartments flooded Retvizan moved to the entrance to the inner roadstead and firmly aground in the passage. The stern of the battleship launched, and he blocked half of the narrow passage. When in the morning to Port Arthur approached the main forces Of “Retvizan” opened fire, having released only two 152-mm projectile.
Surrounded by a double row of anti-mine nets, covers the coastal artillery, the duty torpedo boats and mine boats, the battleship was a kind of Outpost of the fortress. In the night from 9 to 10 February, five Japanese ships-ships, accompanied by destroyers, rushed to the aisle with a purpose to lock up the fleet in Port Arthur. However met by fire “Retvizan”, active-duty destroyers and shore batteries fire-ships, despite the desperate heroism of the crews and are unable to perform the task and sank before reaching the pass.
To remove Retvizan boats managed only 24 February, on the day of arrival in Port Arthur, Makarov, the new commander of the fleet. The repairs dragged on for 4 months. Its appearance in the squadron when trying to break through to Vladivostok on 10 June, was for the Japanese a surprise. July 27 at battleship got 7 shells from the batteries, installed by the Japanese on the outskirts of Port Arthur. The deck of the battleship was broken in two places. However, on 28 July, the battleship took part in the battle, known in history as “the Battle in the Yellow sea”. For 45 minutes the first phase of the battle the ship was hit 12 enemy shells.
The episode with the attempt to RAM “Mikasa” probably appeared already after the battle, and the movement of the ship was caused by the attempt to break through to Vladivostok on their own, after their order, “the crown Prince”. And only hot shrapnel that landed in the stomach Sosnowica, decided the fate of the ship. From the pain of losing samarbeten, he ordered to turn to the squadron, decided to lead the departure of the fleet to Port Arthur.
Linking his fate with that of the fortress, Retvizan shared the fate of the 1st Pacific squadron. Capturing 22 Nov mountain High, the Japanese began shooting, standing in the harbour ships. In 16 hours 5 minutes 23 November, after a number hits 11 – inch shells, Retvizan with roll on the left side fell to the ground, leaving above water all add-ons and most of the upper deck.
After the surrender of Port Arthur, the Japanese began to lift sunken ships. 22 Sep 1905″ raising “Retvizan” and renamed it “Hisen”, the Japanese have it towed in to Sasebo, where it was repaired. From 1908 to 1921 the ship was listed as a battleship. With Japan’s entry into the First world war, “Hizen” were part of the Japanese fleet in the Pacific and Indian oceans. In July 1924, the old battleship sunk as a result of the testing of new torpedoes.
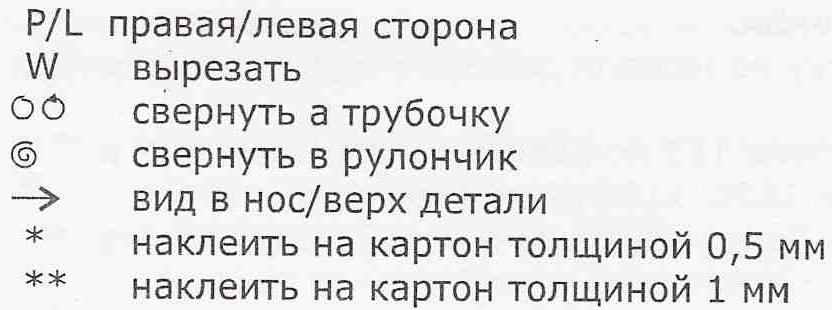
Legend
Assembly model
Model making is not too complicated, but requires attention and care, especially during Assembly of the housing (due to the large number of complex dungeons and challenging forms of housing).
For greater realism, it is desirable to luted and paint the body and parts (for masking joints) to do the glazing of the film cutting and lights, lifelines and rigging that will lend a rich look. Some items we offer to make the templates. At the end of the Assembly model, it is desirable to paint.
Let’s start the build:
The cut parts with the designations A1-z, V1-V3, W1-W15 and and F2 (right and left halves). Be glued on cardboard thickness indicated with asterisks. It is advisable to glue the “Budeprion” and not PVA, to avoid deformation of the cardboard after drying.
Collect the frame body of the above details. Then repeat the same operation with parts marked with the letter E: they are pasted on cardboard, and then in the locations specified on parts E
Parts 1 and 2 are the wheel. Be careful with part 2: the transverse black dash seat folds gently push the sharp end of the scissors to freely bend. Collect the wheel and put it aside until better times.
Detail 3 bow torpedo tubes rolled into a tube and insert into place in the bow of the hull.
Next, collect the deck, parts 4 and 5 again glued on cardboard and attached to a skeleton: refers to the scope of the case. Now NOTE: the deck isn’T GLUE, and roll over and take the items with the number 7 or 7 a-b-C, which indicate the ladders inside the shell. Then soberly assess their strength: who is less diligent makes ladders from parts 7, and for more patient alternative 7a-b-C. Cut out the openings, indicated by the letter W: there will be ladders. The slope of the ramps shown in the diagram. Now the deck can be glued to the frame.
 Take details of frame, indicated by the letters C and repeat all the operations described above. Do the same with a detail under number 6 there’s also a ladder, and it is better to notice it right away, because then it will be inconvenient to paste it in place (its position seen in parts 4 and 5).
Next, collect the body, not forgetting before that to whittle down the nose on details A1 for the specified pattern.
The underwater part of the hull needs to be collected from items 21 to properly position the hole in the tail section. Next, glue on parts 8, and then everything in between. Don’t forget the hole glued parts 21 pclitical 23.
Next, go to the topside, which are starting to gather three 152-mm guns (items 29, 30). Turn detail З0b into a tube, then into the white box pasted item 30C and also turn it turns out the gun barrel. Next, collect the carriage of the parts 30 and 29 and insert the guns into place.
Next, glue parts 25 and 26. Collect casemates 27-27A, 31A-31d. Begin to assemble the Board with the parts 33-34; on the back side 34 to attach the casemate 32-32A-32b. Next step: items 35, 36, before gluing the item 37, need stilnoy side of the part to glue the parts 39 and casemate 38-38A-38b.
Sticky parts of the shields, casemates under the rooms on the ground and hatches.
Next we glue the bilge keels 57 and dadude (parts 58 to 63). For sticking the keels focus on dash in 13 and 16 the details of the bottom; the place for gluing Davudov marked with circles on the parts 20. Continue to cover the case: we now turn to the upper parts 64 and 65, the complexity is not to turn upside-down: ensure that figures are readable.
Continue to work: turn the item 70 into a tube and affixed on the place marked on the deck. Details 71-76 bend, sizing and pasted into place.
Part 28 we finish the Assembly of the boards and dungeons 28a, 28b.
Cranes 77-80 it is desirable to paste in its place after the installation of decks. 81 winch attached to the crane using a wire diameter of 0.1 mm.
Next, difficult step: item 82 after gluing on cardboard carefully cut out and pasted on the parts 70. Here you need to make sure that the bridge does not SAG and the edges are fully converged with the edges of the part 6.
Glue the continuation of part 70, item 83.
Do bronirovka of the parts 86, 86a and 86b, Wycliffe cylinder. The parts 88 and 88a Wycliffe in an arc. Black dashes details 88 slide the tip of the scissors to make it easier to bend. The roof of broniowski (parts 87, 87a): after Assembly of the pasted item 87 to the part 86b; upper parts 87 should be at the same height as the top of the part 83.
Now insert item 85 open side facing aft. The next step of the bonding pairs of items 91-91A, 92-92A and paste on details 83. Thus, we were prepared to stick the bow and stern parts of the superstructure. So, sticking parts 93 and 94, having cut all the holes marked with the symbol W (94 bow detail, 93 stern). Bend and glue on the 94th detail, focusing on one side at the border on the parts 94, and the other on the projecting border of bronirovka. Glue parts 93,95,96.
Bonded item 101 and 101A, item 100 is the pilothouse; do first frame of the parts 100A, 100b, 100C. Further, basically, the frame part 100 and glue to the part 91, 101 top sticking.
Then finish the tops: 108 108A bonded with, basically, the contour of the detail 108с. A collapsible tube parts 106 and 107, sticking pad at the end of the tubing and glue this design to the deck in these locations so that the junction details 108с looked inside the ship. Collect items 109, 110 (109 bow detail, 110 closer to the stern). Glue 111 and 111A, and glue like hanging to detail 109,110. Deleiver details 108,112 and Mars is almost ready. The rest is done by templates.
 Now you need to do small details, since their installation does not interfere chimneys. So, the details 97,98,102,103,104,105 bend and glue in place.
The last big detail of the chimney. A collapsible tube item 113 on the circumference of the parts 113 and 113b to give the correct shape. On a white field sticking detail 113с. 113d glue and fasten on the white band above the detail 113с. Assembly end item 113е. Next, see the patterns and finish parts 114, 114a, 114b.
It was the turn of the main fire. From 115,115 a, 115b glue cylinder. Assemble the frame for the tower from parts 116b, 116d Pbsi and glue between parts 116A. In the part 116 of the cut out places marked with W and glue the cylinder. 116f glue in place of the joint. Items 117 and 117b roll into a tube and glue end item 117a. Stick to the roof of the tower in the fly 117C, glue before the parts 117b. Trunks GK (item 118) roll into a tube and glue to the workpiece 116d. The tower is made not rotatable.
And now, starting with the nose, glue all parts in turn. Sticking detail 89. Bonded anchor from parts 120, 120A 120b. Glue the anchor in place, as specified in the scheme instructions.
Details 119b glue each, item 119, bend and mount the part 119b on the tip 119. Glue to the deck detail. 119a, on top of her stick 119 (a white rectangle on the 119a).
Further work with the parts 121, 123,124. Then item 122 roll into a tube, then glue on the deck behind 89 details. Glue parts 84 on the ladders (part 7).
Go to details 126. 126 rolled into cones and glue two parts together narrow ends. Parts 126A and 126b cut out and glue each, glue on the deck; 126b to attach the gathered detail 126. Glue each piece 126с and 126d and glue on top of 126.
Details 127a rolled into a roll and glued to 127, on the other hand stick the item 127b. Also glue parts 128 and mounted them on the deck. Item 129 cut out and glue to the deck. Parts 130A glue the pairs between themselves, stick to the deck detail 130, to the end of her stick glued parts 130A ends to the middle.
Parts 131 and 131a among themselves and sticking to the stern. Further to these places sizing detail 131b and 131d glue on the outer edge.
Details 133,133 and roll into tubes and glue to the part 95.
134P/L glue the bow and stern of the hull. Items 134a-b-with glue according to the instructions instead of flat ladders (as in the case of item 7).
Parts 135 and 135A glue between them. Details 135b fold along the marks and glue the ends. Then glue the wide side to the workpiece 103 on the narrow end of the top stick the item 135A.
Details 136,137,138,139,140,141,142,144 roll into tubes and glue to the deck in these locations.
Of glue the cone 143a, 143 roll into a roll, top stick glued item 143a.
Item 145A roll into a cone and glue the wide end to 145b. The gun barrel is produced according to the template with one end of the barrel is glued 145d detail and non-detail 145с. In the part 145 after gluing, cut inside the box and insert the barrel of the gun. Then to the assembled construction detail 145е glue and glue the cone on top; then glue the guns to the decks.
Item 146 bend and stick to the workpiece 92 between the ladders. Details 146a fold and glue to the workpiece 146 at the acute angle down. Parts 146b and 146s glue between them. On top of the details of the 146a paste parts 146 b.
Gather spotlights : item 147 a collapsible tube size 147а and 147b, glue them on the ends, the workpiece side 147а sticking detail 147с. 147h bonded to the part 147 in the designated place. Bonded parts 147d and 147е, then glue on top of 147е 147d. Detail 147g bend and fix it the upper part of the searchlight from the bottom.
Item 148 bend and glue to the stern.
Item 149 (helm): 149A, glue the cone and glue on item 149, then make the wheel pattern.
Compass (part 148): details 148 roll the cone around the part 148d and stick to 148а. 148с turn around 148d; 148b wrap on top of the part 148 and the top glue the gathered detail of 148d and 148с.
Machine guns (part 150): turn the item 150 into the tube, and 150A in the cone, glued 150A 150. Detail 150s roll into a tube and glue to the end of the part 150b, and then glue the part 150b to the top of the cone 150A.
Details 151 P/L and glue each stick to the sides according to the scheme (as an alternative you can use 151a).
152,153,154,155,156 and 157 of the boat.
Item 158 is better to stick on thick cardboard with a thickness of 0.5 mm. Cut out the area marked W. Further detail 158d roll around the bottom 158с, leaving the front wall open; to part 158 glue the parts 159 and 159a and the free edge of the glue from the bottom in item 158, then glue the side of the boat 158а and back side 158g, glue the keel and rudder, the details 158Ь and 158с. Next, glue the deadwood to make the design, the screws 158f. 159 for detail apply details: 159d, 159e, 159f, and the item 159a item 159Ь. Complete chimney: base 159g glue in the tube and glued around the black mug. Detail 159h a collapsible tube mounted on and swamped the cabin of the boat. Completes Assembly of the mounting wheel.
Second boat: item 160 cut out, glue onto cardboard and repeat the same procedure used for assembling the first, only now changed the part numbers; for the viscera take part 160f and 160е. The insert part 162, and then glued inside the collected 160f. Sides 160A, 160b and the keel with rudder (160C and 160d), Davudi do the diagram and screws 158f. The details 161 of glue and glue to the deck; d. 161a insert the specified location; 159d mount 161. Details turn 163, glue the top parts 163с and 163d, glue it to the deck of the boat. Next, finish assembling boats: 161 pasted parts 161b, and 161с 159f; 162 glue parts 162a, 162b. Finally imovietube (161d).
Complete the construction of the ship (items 164, 165, 166, 167). Also mounted railing and details specified in the templates (optional).
Tactical and technical elements: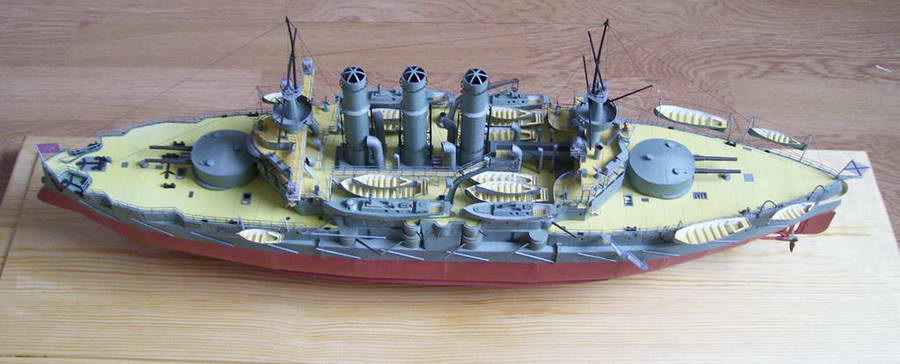
Displacement, t: 12 746
Length, m: 117,9
Width, m: 22
Draught, m: 7,6
Body height: 13,1
The materials to build a model SQUADRON BATTLESHIP RETVIZAN (download)
Recommend to read
 ACOUSTIC PROBE
The magazine "Amaterske Radio" (Czechoslovakia) proposed scheme is a simple audio probe to detect logic levels; low (logic 0) and high (logical 1). The device consists of a bitonal... FROST ON THE WINDOW SILL
thriftily whether the spent energy for heating homes, to spend it on... then lowering the temperature for storing food in the fridge? Especially when the window — frost. A hang out of...
