 Read the article “mounting Brackets for stereo speakers” (“M-K” № 3, 1982) and decided to make them. To begin with, that repeated the design described in the article, However, welding and a large number of threaded connections complicate it, and sliding the grips on the sides of the columns increased the size I. in my opinion, worsened the appearance.
To get rid of “these shortcomings, I made then PD>the version of the bracket. The base of the console and left it unchanged, just put them together not by welding, but with three screws. The main role in changing the spatial position of the column in two planes began to play a fork, the end of which is inserted into the vertical hole of the console. On top of “the worn end of the adjusting stud and screw the nut-lamb.
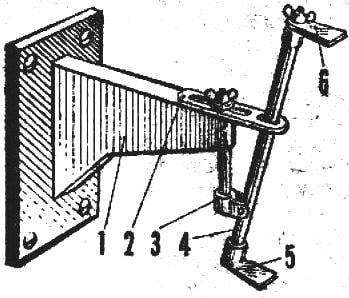
The device bracket:
1 — the base of the bracket with the console. 2 — sulfur”, 3 — fork, 4 — rod, 5 — the fixed foot, 6 — movable foot.
The plug is hinged rod with two legs, weighed down a little bit to each other for a more secure grip of the column. The lower leg is stationary, the upper screw moves a nut which is embedded in the rod’s end face.
Loosening the clamp nuts-lamb and sliding earring — plate with two slotted holes, you can change the tilt column. Twist from side to side is due to the swivel fork with the console. Thus, the column is fixed in two planes, not five screws, as in the published version, but only one nut-lamb.
E. KUZNETSOV, Volgograd


