THE RETURN MOLDINGS

RETURN STUCCOThe “retro” style enjoys great popularity today, a factory or home-made “antique” furniture is increasingly found in our apartments.
However, “Empire” or “modern” are poorly attuned to modern doors, walls and ceilings.
 
Give and take “retro-face” will help offer practical advice on how to make stucco plaster moldings, borders and rosettes.
 
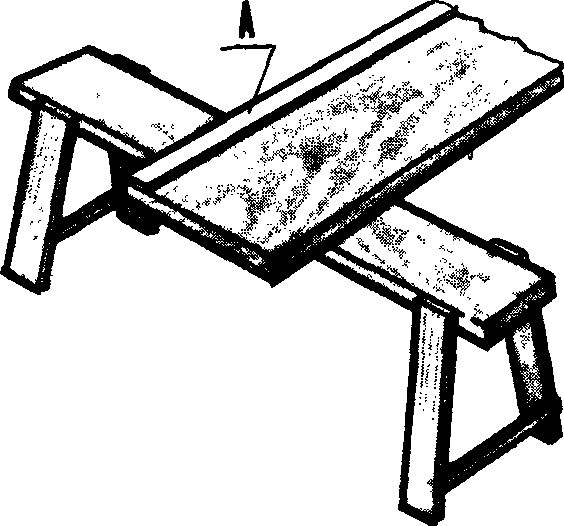
For the manufacture of plaster models even and smooth Board or table, the cycle, a spatula, a trowel, a bucket of soft plastic (easier to clean), templates and, of course, plaster. Working table’s length should be at least 1.5 m but not exceeding 2 m, as in this case, it will require special dexterity and agility. On the one side it is nailed plank thickness of 2 cm, as shown in figure 1. From the smoothness and straightness of the strap and the table largely depends on the quality of the resulting model.
 
Fig. 1. Desk.
Fig. 1. Desk. The letter a represents a guide strip.
 
To make a template, you must first draw on a sheet of 0.5 mm thickness profile of the future product. Then, the profile should be cut and place a file (figure 2 shows one of possible variants of the profile). Make wooden fixture shown in figure 3. To the part that has the slot you need to beat tin a profile and connect the parts in accordance with figure 4. The table is lubricated with a small amount of mastic for parquet flooring or avtol. Now you can start the breeding of gypsum. Plastic bucket is filled one third with water. Plaster spilling out handfuls or sieve (mesh) to sift through. It needs to sink evenly and does not accumulate on the surface. Plaster is added until, until you stop sinking. Then with quick movements of the trowel in one direction only, the resulting slurry is mixed, and needs to try so she began to turn, as in a centrifuge. The mixture was stirred for minutes, and as soon as it begins to thicken (to the consistency of yogurt), with a trowel applied along the oiled surface of the table. The thickness of the gypsum layer should correspond to the height of the pattern; the distance to the guide bar about 2 cm (Fig. 5). The template must be pressed firmly against the guide bar and the work surface (Fig. 6). Continuing to press the template, slide it in the direction shown until the end of the applied material. The assembled cast is removed with a spatula, and the template is now moved back.
Fig. 2. Profiling plate (tin).
 
Fig. 3. The details of the pattern.
Fig. 3. The details of the template.
 
Fig. 4. The template Assembly.
 
Fig. 5. Application of plaster on the work surface of the table.
Fig. 5. The application of plaster onto the table surface.
 
Fig. 6. The manufacture of the cornice.
 
Element of the cornice.
 
Now you need (clean template and a bucket) knead half the previous amount of gypsum. It is applied to a semi-model. Again hold the template in two directions. The operation is repeated until then, until the product is smooth, without shells and irregularities.
 
The finished item with two sides trimmed with a trowel and a hacksaw is divided into parts (if the work was going on a long table). The side that will be up against the wall, cross scratched with a spatula — now a model can be set.
 
Before talking about the installation, you need to make a significant refinement of the gypsum model can be used as a cornice or border. In the first case it is installed on the ceiling and covers the metal profile, in which moves the curtain. And the second is mounted on the place where wall and ceiling.
 
Let’s start with the cornice. Place on the ceiling to which it is attached, it is necessary to putty and check the evenness of the surface level. Then, using twine bounces straight line, which will be held on the front face of the cornice. Between her and the window distance is 30…35 cm From the inner side of the line hollows out a groove half the thickness of plaster (for example, a width of 3 cm and a depth of 1 cm). In two opposite walls of bore recesses are somewhat greater than the dimensions of the ledge, — they will include both of its ends. Groove and recesses abundantly moistened. Gypsum mortar is kneaded in the same way as for the manufacture of the cornice; as soon as it starts to harden — a trowel is applied on the scratched surface of the ledge layer 2…3 cm with Two hands, the ledge is pressed against the ceiling, and its front face must match with the line. A part must hold as long as the plaster does not “grab”. One end of the element enters the recess in the wall, and it is advisable to move them so that the plaster has firmed up. Then in the same way is established the next item, the gap between them filled with gypsum and executed. Operations are repeated to the opposite wall.
 
The curbs are made in the same way, only it is necessary to scrape both the back surface of the workpiece, and chamfer on its rear face (see Fig. 7). The line marked on the wall for the top edge of the curb, and the curb needs when applying to the same. On both sides of the part can be applied a layer of plaster, but more liquid composition.
 
Fig. 7. Applying a layer of plaster to the curb.
 
The making of a border.
Manufacturer of curb.
 
The socket is made the same way as the eaves. Figure 8 shows a sample profile template which you can use to do both elements at the same time. Part of the template for the line elements are attached to wooden parts (Fig. 9). It is a symmetrical cut, with more than the profile size. Bottom it hammered a nail, who plays the role of the center of the circle.
Fig. 8. Profiling plate for the manufacture of the sockets.
Fig. 8. Profiling plate for the manufacture of sockets.
 
Fig. 9. Template for the manufacture of the socket Assembly (B - centering nail).
Fig. 9. Template for the manufacture of the socket Assembly (B – centering nail).
 
Figure 10 shows how to make a circle. On a flat and smooth surface breaks through the hole, which includes the nail template. Followed by all the operations described above.
 
Fig. 10. Manufacturer outlet.
Fig. 10. The manufacturer outlet.
 
For mounting the wall to the ceiling is also gypsum is mixed: the same amount of water poured slightly more than the first portion. On the pre-smoothed, the ceiling is applied to the shape of the sockets; they are hollowed out by as in the installation of cornices, after which the product sequentially, item by item, already mounted in the usual manner. The edges are cut at a right angle to be seen where they connect. The final design is to apply a small amount of gypsum, which, once it begins to thicken, fills the void in places of Assembly and smoothed the roughness.
 
According to the magazine “Guide yourself”, Bulgaria

Recommend to read

  • WHEEL SECRETWHEEL SECRET
    For those doing long trips on a Bicycle puncture of the camera wheel is a waste of time and effort. And if there is no spare wheel, very bad: stuck now with the patch and glue... For...
  • MINUTE RUNMINUTE RUN
    Only four minutes, the athletes rakatomalala to prepare for the start. How much do you need to keep up with the time flying at the competition as if one moment: to install the model on...